

Steve Sells
-
Posts
9,156 -
Joined
-
Last visited
Content Type
Profiles
Forums
Articles
Gallery
Downloads
Events
Posts posted by Steve Sells
-
-
IForgeIron Blueprints
Copyright 2002 - 2011 IFORGEIRON, All rights reserved
BP0639 Two 90 degree bends
by Grant Sarver
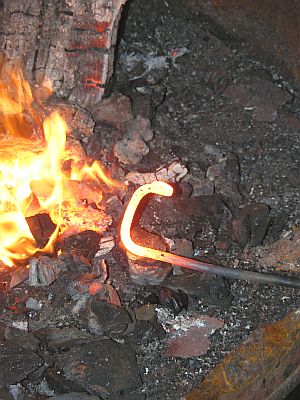
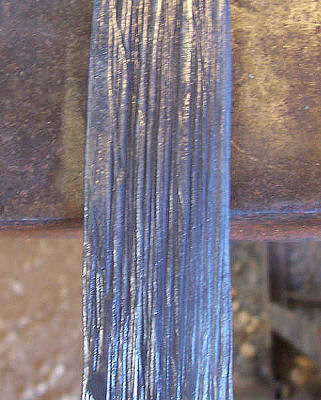
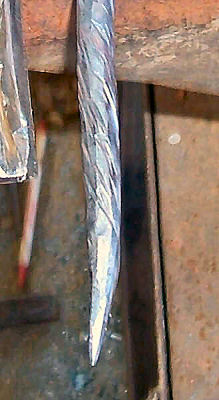
Ya ever run into the need to make two 90 degree bends right next to each other? Like the first picture. There's just no way you're gonna get that second bend into the bender. Well, long time ago I had to figure that one out. After much head scratching I came up with this. Pretty easy once you know the trick. Actually there are many times where I find it easier to bend in one plane and then twist it into another plane. Got me out of trouble on more than one occasion.


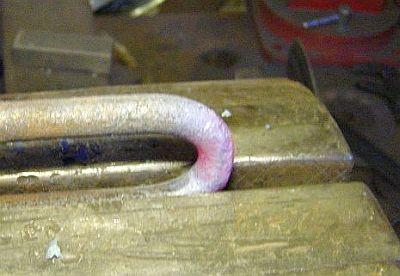

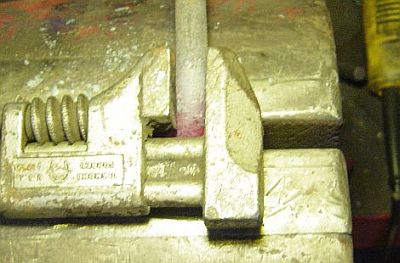
I've done this on work up to two inch diameter. Sometimes I see folks struggling to make a bend close to the end of a bar too. Often it saves time and comes out better if you leave a long "tail" on it and cut it off after. Getting a bend right at the end is darn near impossible and if you get it close you end up beating the end up pretty bad. -
IForgeIron Blueprints
Copyright 2002 - 2011 IFORGEIRON, All rights reserved
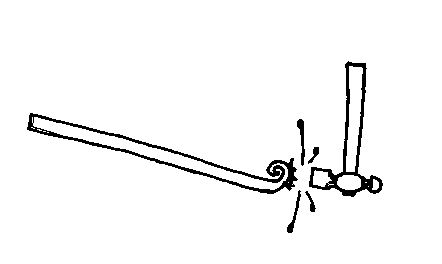
BP0657 Bending tool
by Petere76


I got this idea from a set of plans I saw for a hot bending jig (re: blacksmiths journal). I turned a steel bushing at .62 OD bored for .375 ID at 2.0 LOA. This bushing allows the use of the set of NH bending dies supplied with their Chinese bench top bender. The dies are stout enough and they work well while mounted to the .5 IN drilled and tapped plate. The rig will vise mount or can be inserted in the Hardy. In use, I did note that the .375 IN fabricated sliding bracket could be heavier in dimension.
-
IForgeIron Blueprints
Copyright 2002 - 2011 IFORGEIRON, All rights reserved
BP0699 Building a fire in the snow
by Glenn ConnerWhitesmith needed a subject for his photography class. He said the outside lighting was better for photography. Either your your a dedicated blacksmith, or a dedicated parent, to venture out in 2-3 inches of snow, 28*F, spitting snow, build a fire in the forge. Then you must make the project only one step at a time, and take exacting directions on where everything should be placed just so to make the best photograph.
The following explains how I started with a cold forge, built a fire, and then heated the stock to make the project.

The 24 inch diameter chimney on the Supercharged 55 Forge is great for draft and removing smoke, but also sucks snow down the chimney when there is no fire in the forge.

To get the forge started, just scrape the snow from the twyere, crumple up some newspaper, and light the ball of newspaper. Here 3 double sheets were used as that is what was in the section of paper.

Add a little air and then a double hand full of coal.

As the coal catches fire, add a second couple handfull of coal.

As it catches fire, add a little more air.

Before long you get a bed of coals and the snow starts to melt.

As this was 1/4 inch round stock so I did not need a large fire.

Just enough to heat the stock.

After a while the coke and clinker retains a huge amount of heat.
Thin stock and a welding heat fire make for quick reheats.
-
IForgeIron Blueprints
Copyright 2002 - 2011 IFORGEIRON, All rights reserved
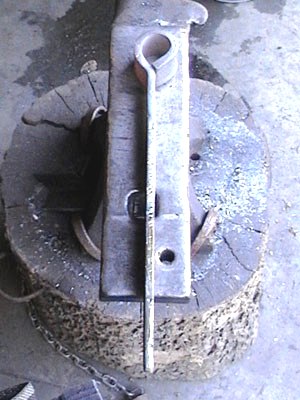
BP0664 One Man Hold Down
by Jeff Phillips
This is another tool I have had floating around my head for a while. Glad to get it out...

This is a hold down designed for the one man shop. I tried to grow three hands but came up with this instead.
The shaft is round stock that fits the hardie hole somewhat snug. The reason for round stock for the shaft is so you can turn it as needed.


I took a piece of heavy flat bar and cut it edgeways at a 45 degree angle, then inverted the end to form a V Groove. The other side I left flat for holding flat bar down. I drilled a 1/2 hole in the center of the bar, and plug welded it to the shaft. The varieties on this one are endless. I welded a length of 3/8 solid square lenthwise for stiffness, and added a handle.
I drilled the shaft on the bottom, and inserted and welded an eyebolt.
The spring tension had to be tested multiple times to get the bottom eyebolt in the anvil stump right. -
IForgeIron Blueprints
Copyright 2002 - 2011 IFORGEIRON, All rights reserved
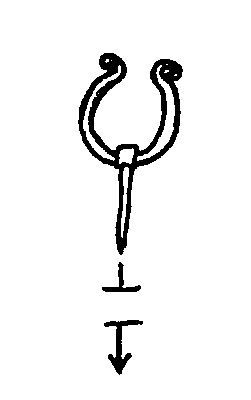
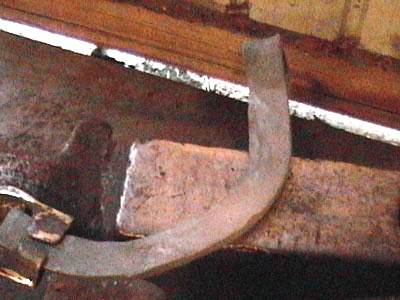
BP0698 Holdfast
by Alwin
Here is the holdfast I use. It is a design I worked on for awhile and it works fantastically. I make it out of rebar because the texture seems to help. It is allowed to cool in the air after it's made. Don't harden it because it could break under tension. I use holdfasts like this for 1.5-2 years before they wear out without adjusting them.


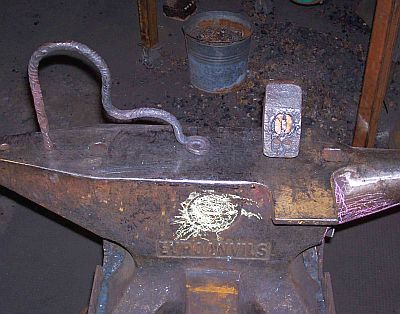
Rebar is not the most consistent stuff so predictably hardening and tempering them is a challenge. The size adds to the difficulty- the one in the picture is made of 30 inches of 1/2 inch rebar. The texture is the reason to use it. I use mine for doing detailed chisel work with the anvil backing, as well as punching and slitting holes
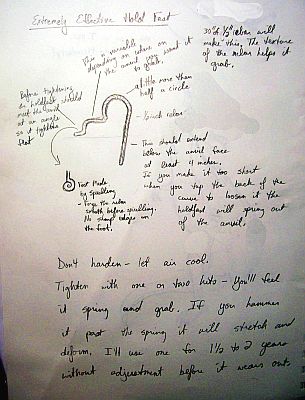
The advantage of the extra bends is it springs from the first bend which is best if it is a little over half a circle. The distance from there to where it drops into the foot is just based on where on the anvil you want it to grab. The foot is made by forging all the texture out of the end of the rebar and then spiraling. If you tap the top of the large curve the hold fast springs out to lock your work down. Hitting the side of the holdfast right above where it enters the pritchel hole loosens it- it can really jump if it is under a lot of tension. It is important to not hit the holdfast past the point it can spring. Usually one or two light hits will lock it down very well.
By making that loop larger and a little more than half a circle you increase how much it can spring and isolate where it springs from. After you've made the loop part you have to put a few other bends in to get it where you need it on the anvil. -
IForgeIron Blueprints
Copyright 2002 - 2011 IFORGEIRON, All rights reserved
BP0400 Patina Formulas for Brass, Bronze and Copper
By The Science Company
Used with permission.
Thank You Steve Grebe for permission to use this materialis a chemical supply, and can supply you with the chemicals listed below.
The Science Company has collected these recipes from a variety of sources through the years. The formulas have not been personally tested so there is no guarantee that they will work. We suggest they be employed on a "trial and error" basis first so their effectiveness can be judged by the user.
INDEX
Select coloring effect and learn how to create it with the formula. The Science Company is a chemical supply, and can supply you with the chemicals listed below.
1. Light to Dark Brown
2. Brown to Black
3. Blackish Brown
4. Florentine Brown
5. Antique Green
6. Basic Green
7. Blue Green
8. Cold Process Green
9. Light Green
10. Green
11. Purple to Light Green
12. Green-Blue (Flemish)
13. Transparent Blue
14. Blue
15. Straw Yellow
16. Golden Yellow
17. Deep Rust Red
18. Purple
19. Antique White
20. Red - semi-matt (For Copper & Copper Plate)
21. Dull Pink (For Copper & Copper Plate)
22. Red - Purple Satin (For Cast Bronze)
23. Orange Brown (For Cast Bronze)
24. Black - semi-gloss (For Cast Bronze)
25. Blue Green (For Cast Bronze)
26. Golden Yellow (For Cast Bronze)
27. Blue Green - semi-matt (For Cast Bronze)
28. Brown - Greenish Yellow (For Cast Bronze)
29. Reddish Brown (For Cast Brass)
30. Black (For Cast Brass)
31. Variegated Gold-Brown (For Cast Brass)
32. Red (For Cast Brass)
1. Light to Dark Brown
Ingredients
* Ferric Nitrate... 1/2 tsp
* Distilled Water... 1 pint
Process
Heat metal and apply liquid. (Red to reddish brown has also been reported using this recipe.)
2. Brown to Black
Ingredients
* Sulfurated Potash grape sized lump (crushed).
* Distilled Water... 1 pint
Process
Hot or cold process. Use fresh solution each time.
3. Blackish Brown
Ingredients
* Ferric Nitrate... 2 oz
* Distilled Water... 1 pint
* Sulfurated Potash... 1/4 oz
Process
Hot process. Mix in the order given.
4. Florentine Brown
Ingredients
* Ferric Chloride... 1 tsp
* Ferric Nitrate... 1/2 tsp
* Distilled Water... 1 pint
Process
This old Italian formula produces a rich brown patina.
Apply evenly with a brush, sponge, or sprayer and let it dry. When a light brown rust color appears rinse well with cool water.
Dry with newspaper - it is very important to use newspaper. You may want to use a slightly damp paper.
Burnish the surface with steel wool or wire brushes. Leave over night
Repeat the process for darker result.
When finished, wax over the patina to darken and set the color.
5. Antique Green
Ingredients
* Ammonium Chloride... 1/3 oz
* Cupric Sulfate... 3 oz
* Distilled Water... 1 quart
Process
Hot process. Solution hot (180 to 190°F), metal hot (200°F), cold wash water applied after metal has cooled to around 100°F. Wash solution over metal surface, let dry, then wash piece in cool water. Repeat until color develops.
6. Basic Green
Ingredients
* Cupric Nitrate... 1 tsp
* Distilled Water... 1 pint
Process
Hot process, semi-transparent patina. Heat metal and apply a fresh mixture for each coloring.
7. Blue Green
Ingredients
* Sodium Thiosulfate... 1/4 oz
* Ferric Nitrate... 2 oz
* Distilled Water... 1 quart
Process
Hot process. Solution hot (180 to 190°F), metal hot (200°F), cold wash water applied after metal has cooled to around 100°F. Wash solution over metal surface, let dry, then wash piece in cool water. Repeat until color develops. For Yellow Green, dip in dilute nitric acid, then wash and dry.
8. Cold Process Green
Ingredients
* Cupric Nitrate... 40 gm
* Ammonium Chloride... 40 gm
* Calcium Chloride... 40 gm
* Distilled Water to make 1 liter
Process
A cold process, opaque patina. Frog green results after several applications, 1/2 hour intervals. Color is not satisfactory alone. Combines well with most brown and black cold process patinas.
9. Light Green
Ingredients
* Ammonium Chloride... 16 units
* Sodium Chloride... 16 units
* Cupric Sulfate (optional)... 16 units
* Ammonium Hydroxide... 16 units
Process
A cold process, opaque patina which should be applied at 12 hour intervals for several days. For deeper green add 16 units of cupric sulfate.
10. Green
Ingredients
* Sodium Thiosulfate... 8 oz.
* Lead Acetate... 1-3 oz.
* Distilled Water... 1 gal.
Process
A cold process that is said to work well on brass.
11. Green - Blue (Flemish)
Ingredients
* Sodium Thiosulfate... 8 oz.
* Lead Acetate... 1-3 oz.
* Distilled Water... 1 gal.
Process
Temperature at 170 to 190°F, a hot process especially for brass.
12. Purple to Light Green
Ingredients
* Sodium Chloride... 5 parts
* Ammonium Hydroxide... 4 parts
Process
Parts by weight. Early stages of this recipe produce purple. Additional applications and chemical action turn the metal light green.
13. Transparent Blue
Ingredients
* Sodium Thiosulfate... 60 gm
* Nitric Acid Concentrated... 4 gm
* Distilled Water... 1 quart
Process
A transparent, dip process patina. A preservative such as paste wax or polyurethane is necessary. May produce a grey blue when tap water is used.
14. Blue
Ingredients
* Sulfurated Potash... 15 gm
* Ammonium Chloride... 200 gm
* Distilled Water 1 quart
Process
Brush onto surface.
15. Straw Yellow
Ingredients
* Ferric Nitrate... 1/2 tsp
* Distilled Water... 1/2 pint
Process
Heat metal and apply hot liquid.
16. Golden Yellow
Ingredients
* Sodium Thiosulfate... 1/4 oz
* Ferric Nitrate... 2 oz
* Distilled Water 1 quart
Process
Heat solution to a boil. Dip.
17. Deep Rust Red
Ingredients
* Cupric Nitrate... 48 grains
* Ammonium Chloride... 48 grains
* Calcium Chloride... 20 grains
* Cupric Sulfate... 10 grains
* Oxalic Acid... 10 grains
* Distilled Water... 4 oz
* Nitric Acid 10%
Process
Brush to surface for color. Then dip into diluted (1 acid:8 water) Nitric acid for 1/2 hour, remove, wash and dry.
18. Purple
Ingredients
* Sodium Chloride... 5 parts
* Ammonium Hydroxide... 4 parts
* Ammonium Chloride... 5 parts
* Glacial Acetic Acid... 4 parts
* Distilled Water... 32 parts
Process
Parts by weight. Brush to surface.
19. Antique White
Ingredients
* Bismuth Nitrate... 2 tsp.
* Distilled Water... 8 oz.
Process
Heat metal and apply liquid. Variations of this formula add a pinch of Sulfurated Potash, Ferric Nitrate, or Cupric Nitrate for a slight coloring effect.
Formulas Suggested for Specific Metals.
20. Red - semi-matt (for Copper & Copper Plate)
Ingredients
* (A) Cupric Sulfate... 25 gm
* Distilled Water... 1L
* (B) Ammonium Chloride... 0.5 gm
Process
Boil immersion (A) 15 min.
Boil immersion (A)+(B) 10 min.
Immerse in boiling cupric sulfate solution about 15 min. or until color well developed.
Remove to hot water while ammonium chloride is added to the cupric sulfate solution. Then immerse about 10 min. Remove and wash in hot water. Dry and finish.
Important note: In general, chemically induced finishes are unsuitable for use on articles to be used with food.
21. Dull Pink (for Copper & Copper Plate)
Ingredients
* Cupric Nitrate... 1 tsp
* Nitric Acid 10% ... 100 ml
* Distilled Water... 1L
Process
Hot immersion - 5 min.
Immerse in hot solution (140-158°F, 60-70°C) which etches surface. Remove after 5 min., wash in warm water and air dry. Wax finish.
22. Red-Purple Satin (for Cast Bronze)
Ingredients
* Cupric Sulfate... 25 gm
* Distilled Water... 1L
Process
Boiling immersion (10 to 30 min.)
Immerse in boiling solution. A reddish orange color begins after 2-3 min. and deepens with continued immersion. When a reddish-purple color is attained from 10 to 30 min. remove and wash well in hot water. Dry and wax finish if choose.
23. Orange-Brown (for Cast Bronze)
Ingredients
* Cupric Acetate... 25 gm
* Cupric Sulfate... 19 gm
* Distilled Water... 1L
Process
Heat immersion (15 min)
Immerse in hot solution (176°F, 80°C). Color develops gradually and remove after 15 min. Wash and dry wax finish if choose.
24. Black - semi-gloss (for Cast Bronze)
Ingredients
* Sodium Thiosulfate... 50 gm
* Ferric Nitrate... 12.5 gm
* Distilled Water... 1L
Process
Hot immersion (20 min.)
Immerse in hot solution (140-158°F, 60-70°C). In one minute the surface is colored blue-purple. This recedes to a brown color, then changing to gray. After 20 min., remove, washing in hot water and dry in air. Handle as little as possible.
25. Blue Green (for Cast Bronze)
Ingredients
* Cupric Sulfate... 20 gm
* Cupric Acetate... 20 gm
* Ammonium Chloride... 10 gm
* Acetic Acid (6% soln.)... to form a paste.
Process
Applied paste - several days.
Using a mortar and pestle, grind ingredients to a creamy paste with the acetic acid. Apply paste to object with a soft brush giving a thick coating. Dry for one day. Wash dry residue away under cold water using a soft brush. Apply a thin layer of paste with a soft cloth and dry again for one day. Wash off residue again. Apply thin layer and dry until good variegated patina is achieved. When treatment completed, dry thoroughly. May be waxed.
26. Golden Yellow (for Cast Bronze)
Ingredients
* Cupric Sulfate... 50 gm
* Ferrous Sulfate... 5 gm
* Zinc Sulfate... 5 gm
* Potassium Permanganate... 2.5 gm
* Distilled Water... 1L
Process
Boiling immersion (15 min.)
Immerse object in boiling solution. A dark brown layer forms on surface after 1-2 min. Remove object and bristle-brush under hot water. Re-immerse and repeat process after 2 min. if necessary. Immerse again to approximately 15 min. remove and wash thoroughly in hot water using a bristle brush if necessary. Dry and wax finish of choice.
27. Blue Green - semi-matt (for Cast Bronze)
Ingredients
* Cupric Acetate... 20 gm
* Ammonium Chloride... 35 gm
* Distilled Water... 1 L
Process
Applied liquid.
With mortar and pestle, grind ingredients with a little water. Then add to remaining water. Dab and wipe on sparingly with soft cloth, to leave an evenly moist surface. Allow to dry in air. Repeat procedure once a day for several days as color develops. Dry for several days during which time the patina develops further. When there is no more surface change, wax to finish.
28. Brown - Greenish Yellow (for Cast Bronze)
Ingredients
* Cupric Nitrate... 80 gm
* Nitric Acid 10% ... 100 ml
* Distilled Water... 1 L
Process
Immerse in hot solution (140-158°F, 60-70°C) to cause etching of the surface and gradual darkening. After 5 minutes remove and wash in warm water. Allow to air dry. When dry, wax finish.
29. Reddish Brown (for Cast Brass)
Ingredients
* Cupric Sulfate... 125 gm
* Sodium Acetate... 12.5 gm
* Distilled Water... 1 L
Process
Boiling immersion (10-15 min)
The color will develop after 10 - 15 min. Remove and wash in hot water. Dry thoroughly, wax finish.
30. Black (for Cast Brass)
Ingredients
* Sodium Thiosulfate... 6.25 gm
* Ferric Nitrate... 50 gm
* Distilled Water... 1 L
Process
Heat immersion - 1 minute.
When article is immersed in hot solution (120-140°F, 50-60°C) a succession of colors is produced. It changes to a purplish color after about 45 seconds. The color darkens quickly and the article is removed after about 1 minute. Wash thoroughly in hot water and air dry, wax finish.
31. Variegated Gold-Brown (for Cast Brass)
Ingredients
* Potassium Permanganate... 10 gm
* Distilled Water... 1 L
Process
Hot immersion (3-5 min.)
Immerse in hot solution (194°F, 90°C). A golden luster develops within one minute and becomes more intense. When luster color is fully developed in 3 - 5 minutes, remove and wash in hot water, which is also a cooling process. Finally, wash article in cold water. Dry carefully first by blotting excess moisture with absorbent tissue paper and then air dry. Wax finish when dry.
32. Red (For Cast Brass)
Ingredients
* Cupric Nitrate... 8 oz
* Oxalic Acid... 8 oz
* Distilled Water... 1 gal
Process
Heat metal and apply hot liquid
Used with permission.
By The Science Company
Thank You Steve Grebe for permission to use this material
-
IForgeIron Blueprints
Copyright 2002 - 2011 IFORGEIRON, All rights reserved
BP0401 Coat Hook
by Brian Cornish, photos by Tyler "Millimeter" Cornish
Straighten the spike.
Marking the spike to determine where to start the leaf.

Drawing out the shaft of the spike.
Rounding up the stem of the leaf.

Draw a point on the leaf end.
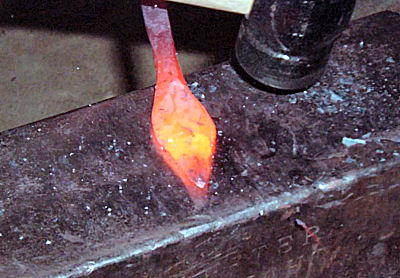
Using a rounding hammer shape and spread the leaf.

Cut veins into leaf with a chisel. Hold down is a chain attached to the anvil stand with a stirrup on the end that I hold with my foot.

Make the initial bend using a bending jig.

Clean up the bend on the anvil.
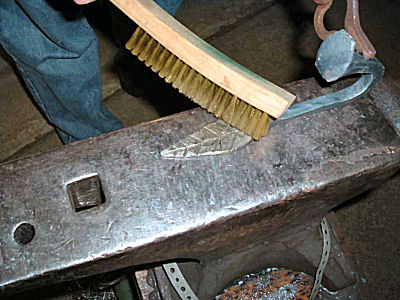
Brush the leaf while at a black heat with a soft brass brush. Drill a hole to hang the hook.

Rub entire piece with beeswax, wipe off excess with a soft cloth.

The official photographer holding the finished product.
-
IForgeIron Blueprints
Copyright 2002 - 2011 IFORGEIRON, All rights reserved
BP0402 Texturing Dies
by JJ2K AKA John Jobe

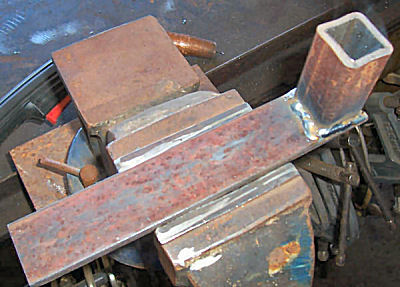
I started with 2 pieces of 1” sq tubing cut 2” long for stems. And 2 pieces of ¼” X 1-1/2” Flat Bar.

This first die is my vine die and wood texturing die. I welded some stringer welds down one side of the bar. They don’t have to be perfect or straight. But they do need to be as straight as is reasonable. Any weld height will work, but try to keep it below 1/8" in height.

Run another pass of stringer bead on top of the first pass.

Rough grind the die bringing the tops of the stringer beads to a point the entire length of the die.

Check the die for low spots and spot weld to build that up. Then finish up by grinding with a sanding disc.
Weld on the stem. This will now fit my anvil, my 25lb JYH, my 50lb LG and my treadle hammer.

The next die is what I call my pebble texture die. It is nothing more than welded dots along the length of the bar on one side.

Using a sanding disc and a scotch brite disc, I cleaned up the die, and welded on the stem.
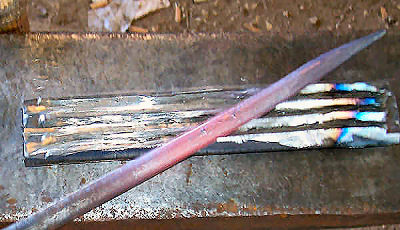
Let see the dies in action. Using a piece 3/8” round bar tapered on one end, I hold it at a 45 degree angle and rotate the piece as I strike it. We’ll look at the results in a minute.

Using a piece 1/8” X 1” flat bar, I hold it length wise on the die to achieve a wood grained type of texture.

Using another piece of 1/8” X 1” flat bar I hammer this on the die to achieve a pebble texture. The nice thing about this die is that you do not have to hold it at any particular angle or place on the die to get the desired result.

The dies and the finished products.
The wood grained texture on the flat bar.

The Pebble texture on the Flat Bar.
The vine textured round bar -
IForgeIron Blueprints
Copyright 2002 - 2011 IFORGEIRON, All rights reserved
BP0403 Super Square
by Irnsrgn

There are occasions when you need a very large square for cutting plate or just lining something up. This is how you make a large take down square.
Material list.
1. 3' 3" piece of 1/4 by 1.5" flat bar, with center punch marks exactly 3' on center in the center of the bar. Drill and tap the center punch marks 5/16" thread.
2. 4' 3" piece of 1/4 by 1.5" flat bar, with center punch marks exactly 4' on center in the center of the bar. Drill a 5/16" hole in one end and drill and tap a 5/16" hole in the other end.
3. 5' 2" of 1/4 by 1" flat bar, with center punch marks exactly 5' on center in the center of the bar. Drill these marks 5/16".
4. Cut off 3 - 5/16" bolts so they don't stick out the bottom side and bolt together as shown below, you now have an accurate 3' by 4' square to use.You can an extra foot or two to the 3' and 4' bars to stick out and have an even bigger square.
If you want to you can make the 3' bar out of angle iron and you will have an edge to drop down over the side of a sheet of plate to help hold it square.
-
IForgeIron Blueprints
Copyright 2002 - 2011 IFORGEIRON, All rights reserved
BP0405 Celtic or Medieval Cloak Pins
by Mr. Smith of Oz
This BP is for “Celtic” or “Medieval” cloak pins. They are a good seller at renaissance or medieval events. I’ve made one approximately 25mm across to stick on my bag.
The important thing to remember is that they are pretty much a safety pin – keep the pin as fine as possible.

First work out how much metal you need. I use 8mm rod. Work out how wide a cloak pin you want, then work out the circumference, and deduct about 25%. Then add about 5mm for the scrolls.
Point, and then scroll each end.

Form the rod into a circle. Remember to leave the gap at the bottom.

Form a pin from square or round bar. Bear in mind that the pin has to pass through a garment without causing much damage. If you have to, grind the pin down to make it thin and sharp.
For the purposes of illustration, I’ve drawn it much thicker than it needs to be. Form a hinge on the other end.

Whilst the hinge is still hot, close it around the ring.


To use, hold the ring “upside down” with the pin pointing downward. Push the pin through the cloth, so that the point comes back out.

Flip the top part down, and then rotate the ring under the pin.
There you go!
-
IForgeIron Blueprints
Copyright 2002 - 2011 IFORGEIRON, All rights reserved
BP0406 "S" Bending Jig
by Richard Thibeau
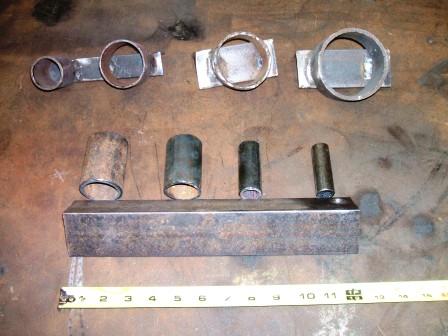
When you have a need to make many bends or "S" hooks with the same radius of curve, this is a quick and easy jig to make up for consistent production work.
Any size pipe can be used to establish the size of the curve. A piece of angle iron is needed to weld the pipe pieces onto so the jig can be clamped into a vise.
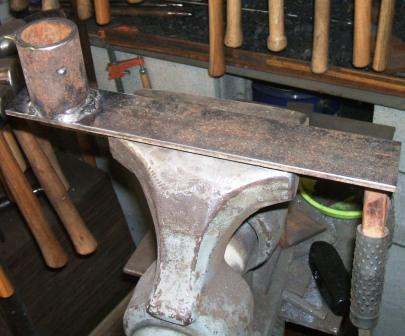
The angle iron clamped in the vise, the first pipe piece is welded on.

The jig can be longer or shorter.

A pair of scrolling pliers holds the stock to the pipe piece and the stock is pulled around the pipe to make the desired bend. Reverse the stock and an identical bend can be made in the opposite end.

The new jig completed, an "S" hook made, and other sizes in the background. Don't forget to drill a hole in the upright side of the angle iron so it can be hung up.
-
IForgeIron Blueprints
Copyright 2002 - 2011 IFORGEIRON, All rights reserved
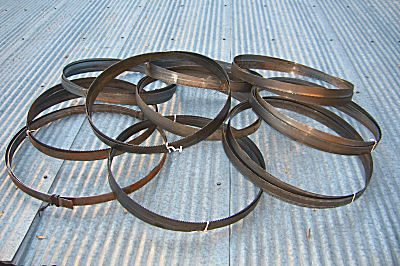
BP0407 Metal Shear
by Glenn ConnerI started off cutting several pieces of saw blade and banding by hand using a pair of tin snips.
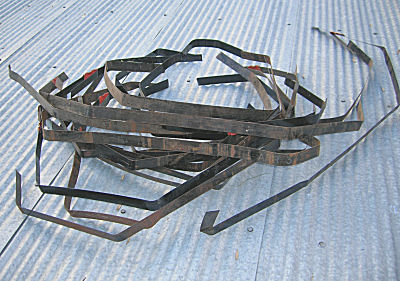
It did not take but several pieces and I felt that although I had not paid my dues in full, at least made a down payment had been made. There had to be an easier way !!

So I got a piece of my favorite steel (leaf spring) and measured the depth of the saw blade.
I welded on a handle.
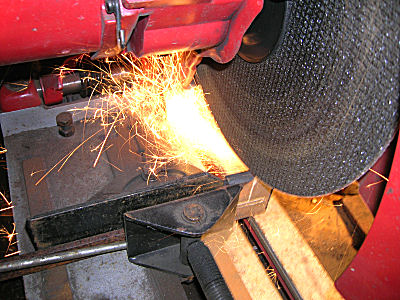
And cut a grove in the steel using a hot saw. A hack saw would have done just fine, but I was more interested in production than traditional work.

And a fine looking cut it was !

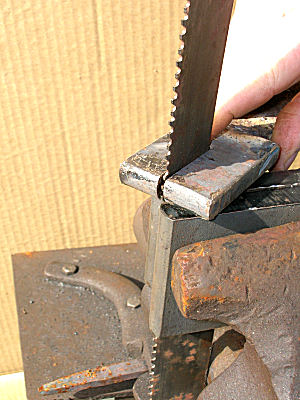
Next weld on a handle. Using a couple more pieces of spring steel as support, I clamped the saw blade into the vise.

Now just slide the blade into the grove.
And twist

And twist a bit more.

And the blade shears.

Which tool would you rather use ? One hurts after several cuts, where the other is just a matter of pulling a lever.

Once you get the saw blade and the banding cut, you just have to stack them in alternating layers to see what the "billet to be" will look like.

Really you should turn it over, as the other side gives you a better view.
Now I have an excuse to build that gas forge.
-
IForgeIron Blueprints
Copyright 2002 - 2011 IFORGEIRON, All rights reserved
BP0408 Triangle Bell
by Glenn ConnerTake a piece of 1/2" round bar and mark it at 10", 20" and cut it at 30". Round the edges a bit to remove any burrs.
Bend the bar so it has a small inside radius at the 10" and 20" marks.

Leave about 1/4" gap where the ends meet.

I use a 3/8 round bar for the clapper. Form a pig tail and a loop at the horn of the anvil. This allows you to hang the clapper on the bell.
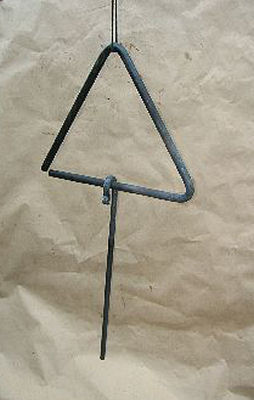
Hang the triangle bell from a piece of raw hide lace.
But what if you have more than one triangle bell to make? This is where a blacksmith looks at his anvil and then figures out how to make a jig to make life easier. This does not have to be a year long project, just a way to speed things up.
Remember to round both ends of the triangle and one end of the clapper before you start.

So one rod in the prichel hole and another in the hardie hole and drive them both tight into the wooden stump. For those that don't have a wooden stump, see the method above <grin>

Heat up the 1/2" rod and placing the 10" mark at the proper location, bend it using the new anvil tool.

Remember to leave a little gap between the ends.

The clapper is just as fast this way as with a jig.
Hang it all on a piece of rawhide lace and your done.
-
IForgeIron Blueprints
Copyright 2002 - 2011 IFORGEIRON, All rights reserved
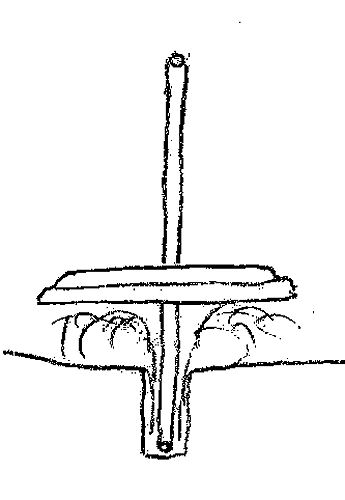
BP0409 Anvil Hold Down
by Glenn Conner

Bend a piece of flat bar to loosely fit the width of the face of your anvil and maybe 3" or so down the sides.

Ben a piece of round bar the width of the face of the anvil or just a bit less. The legs are about 2" long.

Weld the round bar to the flat bar as shown.

Locate a piece of flat bar that will fit diagonally into the hardie hole. Weld it at 45* as shown.

Locate a piece of scrap. This happens to be 14" long with a triangle shape and a lip to the LEFT side. The holes were already there, otherwise drill a hole toward the end as shown.
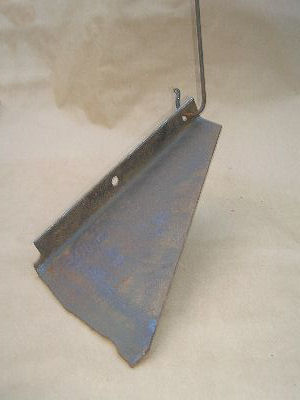
Use an 2 "S" hooks the proper length. Insert one through the triangle plate.

Drop the welded assemble into the hardie hole and attach the 2nd "S" hook in the hole. You can substitute chain for the 2 "S" hooks.

The round bar at the top is to catch with the hammer or tongs to raise the hold down to place the metal under the hold down. The harder you step on the pedal the harder the anvil hold down presses onto the metal that you placed on the anvil. With only a little effort you can hold the metal secure enough to do most things.
I am right footed so the lip being on the left supports my foot from slipping off the pedal. -
IForgeIron Blueprints
Copyright 2002 - 2011 IFORGEIRON, All rights reserved
BP0410 Making Money by Blacksmithing or Forging Checks
by Glenn Conner
I started with some 3/16" square bar or key stock. Make a check mark.

Find some flat bar that it will fit on comfortably. This is 1/4"x1-1/2" flatbar.

Position the check mark on the flatbar to your liking.
Cover with a healthy piece of metal, this happens to be 3/8" leaf spring but anything with some good thickness will do.
Get the flatbat up to a orange heat, put the check mark on the flatbar, put the healthy piece of metal on top and whack it one time real good. No, being gentle will not get the job done, WHACK IT !! How hard? I have used a 4# hammer but a 10 or 12 does better <grin>

Just be careful who you present these thing to. They will take the check with no problems, but passing a forged check can get you into trouble.
-
IForgeIron Blueprints
Copyright 2002 - 2011 IFORGEIRON, All rights reserved
BP0411 Bowls
by Mr. Smith of OzThese are some bowls I make from time to time. They go great as gifts, and remind me of pots I use to make in primary school. I could only find one I made from rebar - ignore the rust - I finished with spray, rather than beeswax.
One day my local salvage yard had 1/4" round bar in 4 foot lengths, dirt cheap, and I used a lot of it up making these bowls. You can use pretty much any round bar, and I have used rebar before.

Taper one end of the rod. Draw it out to a round point.

Curl the end, then form a scroll. Keep hammering as the scroll needs to form a solid circle.

Keep on scrolling. Eventually the scroll will be big enough that you can grip it in a vise. Use the vise to hold the scroll whilst you keep wrapping the free end. It will start looking like a lollypop.
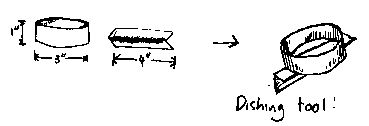
All being well, you will have a big fat disk. How are we going to make it a bowl? With out dishing tool of course. Cut a piece of 3" diameter pipe. Weld it to a piece of angle iron onto the bottom

Use the dishing tool to form the bowl. Heat the whole bowl up to an even orange/yellow. Then either gently hammer hammer it into the dishing tool, or press it in with a piece of off cut.
You can forge weld a new rod on the free end to make a bigger bowl.
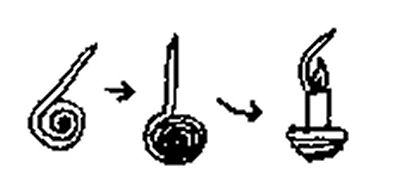
Leave a bit of the free end sticking out, so you can make a candle holder.


-
IForgeIron Blueprints
Copyright 2002 - 2011 IFORGEIRON, All rights reserved
BP0412 Straight Holes
by Irnsrgn

Even if you don't have a bridgeport or other vertical mill, spacing and drilling multiple holes in line and straight thru a round tube is easy with this simple jig.
1. Find a piece of angle iron at least 3/16 thick whose inner web measurement is a little less than the OD of the tube and of a length necessary to have one end flush with tube and enough length to drill all the holes.
2. Lay out the center line of the tube from the inside web of one side of the angle iron, then layout the distance between holes and center punch.
3. Drill the holes the proper size in the web of the angle iron.
4. Line up the end of the tube with the end of the angle iron (fool proof lineup, no measuring needed) and clamp the tube to the angle iron web you didn't drill holes in with a pair of vise grips.
5. Clamp in drill press vise and drill holes thru both sides if needed. The web of the angle iron will push against the vise jaw and thus line the tube up with the drill bit and all the holes will be in line in the center and straight thru no matter how many times you move the work piece in the vise, the holes will be lined up on the opposite side too.
Results, One layout, lots of accurately drilled holes. -
IForgeIron Blueprints
Copyright 2002 - 2011 IFORGEIRON, All rights reserved
BP0413 Anvil Accessories - Roll Bar
by Gerald Franklin

This is my take on a “roll bar” mentioned in Lorelei Sims’ book, Backyard Blacksmithing. This one is made from a stick of 1 ½” round stock about 4” long with a hardy shank welded on.
The roll bar in position and ready to use. It is used similar to the anvil step to fuller material against. The rounded edge provides a smoother edge for hot stock to ride against and is not as likely to mark up the stock as the edge of a square step can do.
-
IForgeIron Blueprints
Copyright 2002 - 2011 IFORGEIRON, All rights reserved
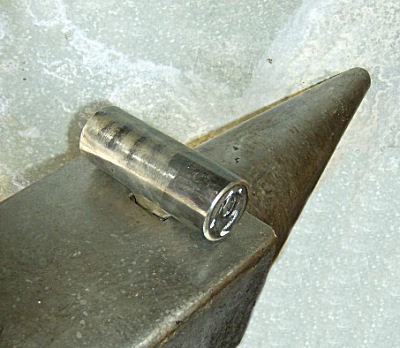
BP0414 Heating Small Parts
by Scott ThomasHere is a handy item for heating up a quantity of small parts in a coal or charcoal forge. It is basically what is called a “Muffle box”. The early types were made out of ceramic and used in early gas forges for high carbon tool work by indirect heating of the work.

Mine is made of 3/8” steel plate mig welding together.

Burry it in the coals, pile more around and on top, heat it up (not too fast as you might burn through it by rushing.) and there you go.
It is a good idea to throw in the parts you want to heat from the start so they heat up as the “Muffle box” is heating


The swage tools I used for the rivet heads. (And the rivet heading plate)

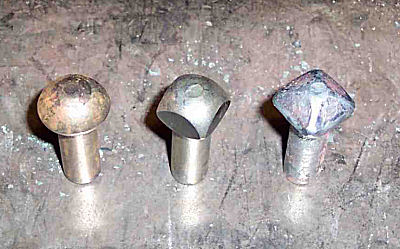
Here I was re-forging round head rivets into pyramid head rivets. Square them cold, heat, and re-swage the top.

The finished rivets installed in the door.
-
IForgeIron Blueprints
Copyright 2002 - 2011 IFORGEIRON, All rights reserved
BP0415 Reproducing a Viking Adze
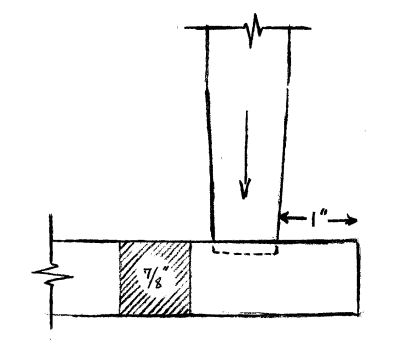
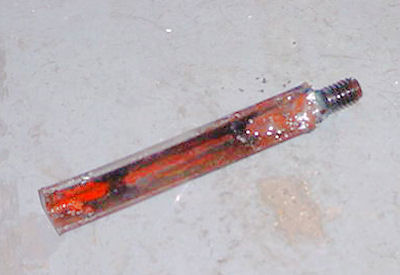
by Bob OuelletteTarget time: • 4 hours Tools: • Anvil • Vise • Regular cross peen forging hammer • Light riveting hammer • Light sledge hammer (for use with a striker) • Tongs for holding 7/8” or 1” square bar (best if box jaw), and flat jaw tongs for 1/4”, 3/8”, and 1/2” • Eye punch: 1/8” x 7/8” or 1/8” x 1” - the punch should be high carbon steel and tapering to become about 1/2” thick and the same width as the punch (See Figure 1) • Drift: 1 1/4” x 1/2” (See Figure 2) • Files: Flat coarse, Half round coarse, 1/2” round coarse, and a flat fine file • Hot cut hardie • 1/2” Round bar to use across vise jaws • Hack saw or other cold cutting instrument Supplies need: • Flux Materials: • 7/8” square or 1” square wrought iron or mild steel at least 5 inches long (but longer is helpful) • 3/8” x 1” x 1 1/4” high carbon steel
Pictures will appear after each section to help keep everything readable.


Step 1: Punching the Eye • Begin with a section of mild steel or wrought iron stock. If you have a piece that you can hold with out tongs it will make the beginning steps easier.
Figure 2
• Heat the end of the bar up to a bright yellow; if you’re using wrought iron, the surface of the metal should appear very wet.
• Holding the punch with the 1/2” flat-jawed tongs set it about 1” from the end of the bar and as near to the centerline of the bar as you can get it. Have your striker use a light blow then check the placement of the punch mark. Now is the time to adjust it if you need to.
• Once you are satisfied with the placement of the mark, drive the punch into the stock. Be careful not to let the tip of the tool get too hot and deform. It is easiest not to work below a low orange heat. Drive the punch into the stock until you feel the resistance of the anvil. When you feel that, remove the punch and turn the bar over onto the other side. It should be fairly easy to find where the hole is on the other side as it is in the center of the bulge. It should not take more than a few light blows to remove the biscuit (the small chunk of material that is punched out). (See Figure 4)
It is important not to hammer on the eye until later in the process.
*Note: Punching the eye may take several heats, do not expect to get it all done at once.

Step 2: Welding the High-carbon Bit • Using the hot cut hardie make a cut about half way through the stock (if using wrought iron) about 3 1/2 inches from the hole for the eye. Forge this end so that it is approximately an inch wide and 1/2” thick (See Figure 5). Set this piece aside, but if you are able to keep it hot (as in a gas forge) it will save a few minutes when you go to weld.
• Take the piece of high-carbon steel and forge a sharp taper on one end. The 3/8” flat tongs should be used for this.
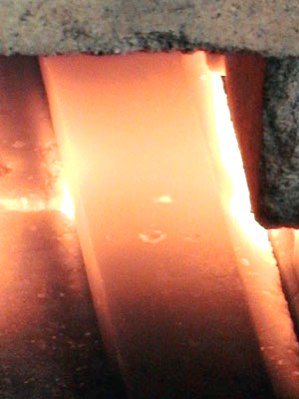
• Once the steel has been prepared, cover it with flux and then flux thinner end of the wrought iron or mild steel body. Place the steel bit on top of the iron bar, with the ends lined up (See Figure 6). Place in the fire and bring up to welding heat.
• Once the two pieces are at welding temperature, bring them out and tap lightly to get the pieces to stick securely (they may already be sticking as you bring them out of the fire. Hammer the two pieces together and begin spreading them.
*Note: it is ok if the edges of the weld are not perfect at this point in the process, as they will become easier to weld as the material is spread.


• Using the peen of the hammer spread the blade until it’s about 2 1/4” wide at the edge. Use the opportunity to seal any cold shuts as you draw it down. The blade should be about 4” – 4 1/2” long. (See Figure 7)
Step 3: Forming the Blade
• Make sure to keep the sides of the blade strait and get a nice taper from just before the eye to about 3/16” at the edge

• Heat the eye to a near welding heat. Drive the punch into the slot that was made earlier, but be careful not to drive too hard. Hammer the sides of the eye in order to make the hole bigger. (See Figure 8)
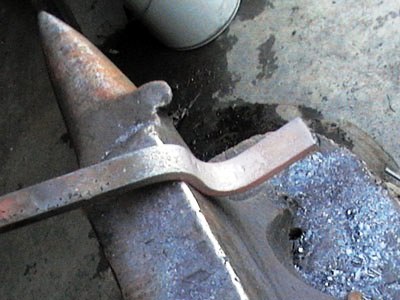
Step 4: Forming the Eye
• Once you are able to drive the punch all the way through, use the 1/4” flat jaw tongs to grip the blade, heating the pole. Set the far side of the eye on the far edge of the anvil, creating a shoulder 1/4” – 5/16” from the edge of the eye. Thin the area at the corner of the shoulder to about 1/2” thick. (See Figure 9)
• Getting the pole as hot as you can, thread the 1/2” bar through the eye and set it across the jaws of a vise. Use the riveting hammer to upset the pole (See Figure 10). The pole will want to turn down towards the eye, so it is important to keep it strait. One thing you might do is use the peen to spread the material as well as push it back onto itself. Make sure not to let the pole get any wider than the eye. This is the step where it will happen so make sure to prevent it as soon as it starts to make things easier on your self.
*Note: it is not important to get the exact shape of the pole during the forging process.
• Once the pole has been shaped, it is safe to do the final drifting of the eye. The adze should be held by the blade during this step. Tap the drift into place so that it fits snugly. If the hardie hole is big enough, place the eye over it and tapping the drift in. If you do not have a hardie hole of the proper size, a plate with a round hole that is large enough for the drift to fit through can be used over the jaws of the vise. DO NOT drive the drift all the way in! This is important, as it will cause the wrought iron to tear and ruin your hard work. Once the drift is snug, lay the eye flat on the anvil and hammer the walls thinner (Refer to Figure 8). This makes the diameter of the eye larger and makes the walls thinner and closer to the final size.
• Set the forward end of the eye over the thickest part of the anvil’s horn. This acts like a large fuller and helps to make a smooth transition from the eye to the blade (See Figure 11). For this step, you may choose to hold the adze by the pole. In which case you will want to use the large box-jaw tongs.
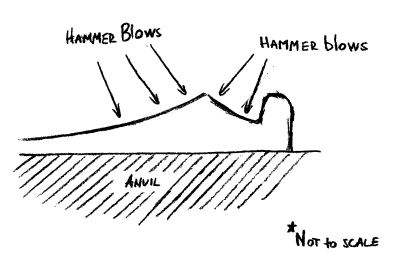
• Once the eye has been drifted to the proper size, use the riveting hammer to shape the lugs. Bring the hammer in at an angle to hit on either end of the eye, leaving the center ridge untouched (See Figure 12). By doing this you should be able to create the points that extend down. Use the drift as an intermediate anvil to keep the lugs from getting thicker than the rest of the eye.
Figure 8

Figure 9

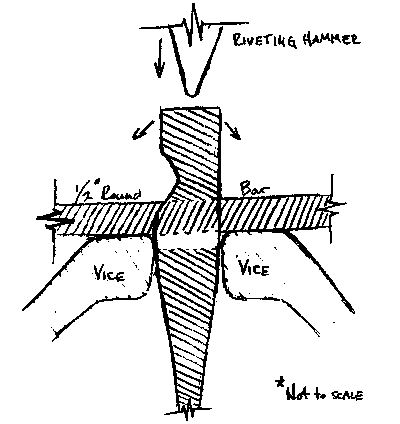
Figure 10

Figure 11
Step 5: Final forging • Holding the adze by the pole, set the transition point from the eye to the blade over the horn of the anvil and tap it into a gentle sweeping curve. Keep about 2 1/2” - 3” from the end of the blade strait.
• Finally, heat the blade to the critical temperature of the steel and let it air cool. This normalization step will make it easier to file.
Step 6: Filing • File the edges of the blade and the sides of the eye with the flat file, making them flat with an even transition. Keep an even pattern of file marks on each surface. For this step, it is simple to clamp the blade in the vise on edge.
• Once both sides of the eye have been done, cut off any extra, uneven material at the edge off. File the edge to get a slightly curved cutting area.
• Clamping the eye and some material on either end of the end of the eye in the vice (to keep from distorting the eye) draw file the flat surfaces of the blade and the top of the eye and pole. It may be necessary to use the half round file to get the under side of the blade.
• Use the half round file to shape the profile of the lugs and the pole, using the narrow edge to get into the sharp angle where the pole meets the rest of the body.
• Use the round file to clean up the inside of the eye. Run the fine file along the sharp edges to remove any burrs that might cut you.
• The final step before heat treat is to file the bevels on the edge. File about a 20º angle on both sides of the flat of the blade.
Step 7: Heat treatment and finishing • Heat the edge to about 1/2” in towards the eye to the critical temperature of the steel and quench in the quenching medium that is best for that steel. If you are using wrought iron, it is ok to quench the entire adze body without fear of making it too brittle to use.
• Temper to a brown or dark straw color. You can do this in an oven or with a torch.
• Finally, wire brush the entire surface of the adze and apply a wax or oil finish.

Here's a picture of the final product.
-
IForgeIron Blueprints
Copyright 2002 - 2011 IFORGEIRON, All rights reserved
BP0416 Simplified Hatchet
by Tyler MurchThese can be made from any size stock. For this one I used 8" of 1/4" x 1-1/4". This is made from one piece of tool steel. I like to use 5160.

Bend each end over about 5/8", each in the same direction. Here is one end. This will eventually make your poll (butt).
You will bend the piece in the middle so that the ends that you bent over are on the inside. Here it is with some flux on it. Ready to be brought to welding heat.

Forge weld the poll section, and the bit section. Don't forget to leave an un-welded section for the eye.

Begin forging the blade to the shape you enjoy. Use the cross peen to make the bit wider.

Drift the eye. Do this at a high heat. Drift from each side with a tapered drift (about 1/8" or 3/16" of taper per inch of length) to give an hourglass shape to the inside of the eye. This keeps the handle on tightly.

After all hot shaping is done, file the edge, clean up the profile if you need to, and heat treat. When heat treating, remember that fine grain is important for a cutting tool. Here's the forged head.
Sharpen it, put a handle in it, and see how it works. Don't forget to soak the hafted head in linseed oil for endurance and fit. Have fun!
-
IForgeIron Blueprints
Copyright 2002 - 2011 IFORGEIRON, All rights reserved
BP0417 Stud Removal
by Irnsrgn

The problem - broken off stud in a big ford V-8 engine this is where its located front wheel removed, shock removed, steering column disconnected and inner wheel well removed, prior to calling me. also negative post of battery disconnected.
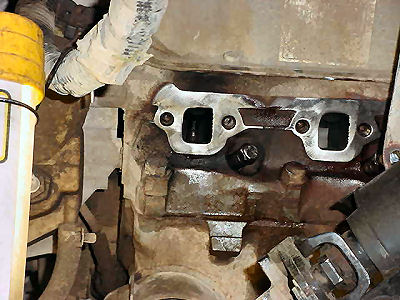
A close up of the broken stud (bolt)

A short piece of 1/8 by 1/2 angle iron welded to the stud, strike arc on angle then move up to stud with welding rod, 3/32 7018. cool angle with air pressure add Marvel Mystery Oil for penetrate and using crescent wrench carefully break loose and screw out.
The basic principle is, welding on the stud gets it hot and it wants to expand, as it can't expand in the hole it expands lengthways and when it cools off it shrinks just a tad loosening it a little thereby making it a little easier to remove.
The culprit of all this mumbo jumbo.

To find out how steady a hand you have try a 6-32 machine screw sometime. -
IForgeIron Blueprints
Copyright 2002 - 2011 IFORGEIRON, All rights reserved
BP0418 Froe
by J.W.Bennett (JWBIRONWORKS)
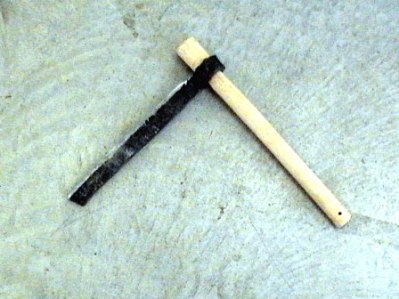
A while back I had a fella ask me to make a froe for him. He carved wooden bowls and needed one to split the wood stock to size. He had been unable to find one to suit his needs. I ran into him about a month ago at a show and he was very happy with the Froe. He even brought a piece of red oak the next day to show me how well it split. So anyway I am not an expert by any means but here is how I make a Froe.

We'll start with a piece of 3/8" x 2 1/2" cut from an old bush hog sittin' out in the weeds out back since I don't have any 3/8" x 1 1/2" on hand.

Now we cut away the excess and clean it up and now it's 3/8" x 1 1/2" x 20" more or less.


Come 6" from one end and make 3 punch marks to mark 6".
Doesn't that show up nice when the piece is at heat?
Place the punch marks on the far edge of the anvil and hit it a good wack several times. It should bend down and the force should also start your eye bend for you.


Keep a good heat going and work the eye around the horn.

This is what you should have at this point.


Now I weld the eye with the mig. If your up to speed on your forge welding you can do the scarf before you start the bend and forge weld if you wish. I run several beads to help blend everything.


Run a bead on the inside then heat, hammer, grind, heat, hammer to blend it all back in

This is what you have now at this point.


At this point you want to pick your best edge and then with that edge facing the anvil slip the eye over the horn at a good heat and taper the eye the same way you do a candle cup or a bell. Rotating the eye around as you work.


You don't need alot of taper the handle taper will keep the froe from coming off. Same as a mattox handle


Now this is were you gotta pay attention. You have to bend the blade with the wide taper side facing into the bend. That way your cutting edge is facing the right direction. You make this bend on edge not on the side. If you don't make this bend your blade will curl upward as you taper the cutting edge. With the blade bent as you taper the cutting edge, it will straighten back out and form a nice angled point on the end of the blade. I bent this one a little too far and had to do some straightening in the vise at the end rather than work the blade too thin.


You only have to taper the bottom half of the blade. Both sides are tapered like a wedge.Taper to a 1/8 " edge. The blade will have a tendency to twist so straighten every thing as you go.


Everything is straight both directions

The froe ready for the edge to be ground. I knock the high spots down with a 4 1/2" grinder and the put a slight edge on it with a belt grinder. It doesn't have to be hardened or sharp. It is actually just a wedge with a handle.
Looking at the froe from the end. You can see the tapered wedge of the blade.

The finished Froe ready for a handle
-
IForgeIron Blueprints
Copyright 2002 - 2011 IFORGEIRON, All rights reserved
BP0419 Blower
by Irnsrgn
This time we get to go diving in just plain ole Trash. Remember that Soft Drink you got on the way home and tossed the cup and lid.
Well salvage that Lid and Straw. Washing them up real good. Never know what was in the trash can. Stick the Straw thru the cup like you did to drink it. Now you ready to use another high $ tool.
That loose crud down in the hole has got to come out. The air hose is clear across shop, so the blower is another way.
Pick up that new high $ tool and stick it in the hole, push that lid down a ways, and exert some nice low pressure air into the hole, put your lips on the straw, and blow to clean it out. That lid is a nice safety device. Just don't blow so hard you make the hole bigger.
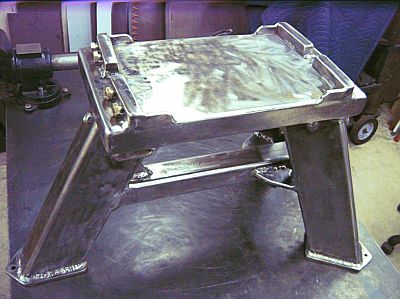
BP0638 Anvil Stand
in BP 600 Series
Posted
IForgeIron Blueprints


Copyright 2002 - 2011 IFORGEIRON, All rights reserved
BP0638 Anvil Stand
by Avadon of the Onyx Abyss
FINALLY, RIGHT!!
Here is a little info about the Stand I made for Nimba's Gladiator.
Death Industries Anvil stand:
Weight: 265lb (With anvil ~715lb)
Thickness of bed: 2"
Width: 10.75"
Length: 20"
Legs: 5" x 3" x .025" rectangular tubing
Legs: 25dgs from vertical, 30dgs apart in front.
Anvil stops: 1" Sq Rod with qty 4, 1/2X20NF Grade 8 Bolts.
3 Grade 5, 1/2x20NF bolts for filling hollow legs and cross members
with sand for deadening ring.
Parting Bolt: 1/2x20NF Grade 8 bolt underneath breaks anvil from calk/adhesive bond.
Welds: Stand is pre-heated and multi-pass welds are used on every joint. Steel gussets brace cross-members.
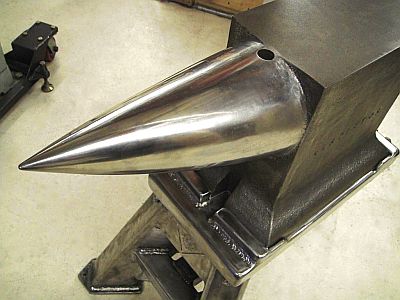
Gladiator Anvil Specifications:
Tip to Tip Length:
39 inches / 99 cm.
Height:
13 inches / 33 cm.
Face Width:
7 inches / 17.8 cm.
Base Width:
10 inches / 25.4 cm.
Base Length:
15 inches / 38.1 cm.
Hardie Hole:
1 inch / 2.54 cm.
Pritchel Hole:
7/8 inch / 2.2 cm.
Weight:
450 lbs. / 204 kgs.
Here are a few other pics of the cross members and bracing. The roses engraved on the 3 fasteners and the jacking implement I made.
I have a need to be able to move my anvil so I created some wood bracing with some metal rails that keep the anvil and stand balanced side to side. Once I get it lifted up I can place the two steel jacks I welded up underneath it. Then I can move my pallet jack fully underneath the feet. Once I got up there it's safe to move. If I make more for sale or for myself I will probably include some other jacking ports. The anvil locks into the stand so incredibly strong that for all intensive purposes it becomes one piece. It is deceptively heavy, trying to lift the anvil from the heel seems like a doable proposition because it's placed near your hands but no matter how much force you exert it does not budge a bit. Of course that disc that just slipped in your back will move lol.
You can see that initially I just jack it up using the lumber with the metal rails. Once in place I throw the jacks under. Then I take the pallet jack down and place it under the rear feet and throw the bar under the front foot. Then its good to travel. That is a micro pallete jack rated at 1000lb, so I take care with this 700lb item. Even though it's no where near as big as the 700lb band saw behind it, it is deceivingly heavy and if it tips dangerously or miscarried when it is moved, it could go over.
those little pallet jacks are almost a must, even for a small shop. They make jacking and moving things so helpful. Best 250$ I spent at grizzly tool.
I should have probably gotten the legs a little closer to vertical. Like 20dgs vs 25dgs. But I held them up at 20dgs and for some reason that seemed kinda scary to me. Like it might be easy to easy for it to tip over. They probably could be at 20dgs or even 15 without any problem, especially if you've anchored it down.