

Steve Sells
-
Posts
9,156 -
Joined
-
Last visited
Content Type
Profiles
Forums
Articles
Gallery
Downloads
Events
Posts posted by Steve Sells
-
-
IForgeIron Blueprints
Copyright 2002 - 2011 IFORGEIRON, All rights reserved
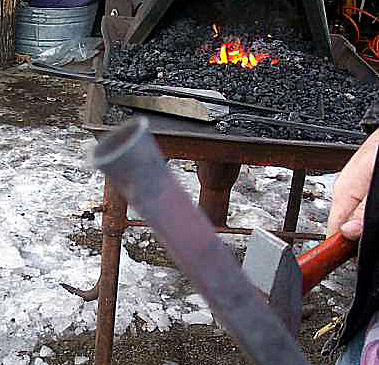
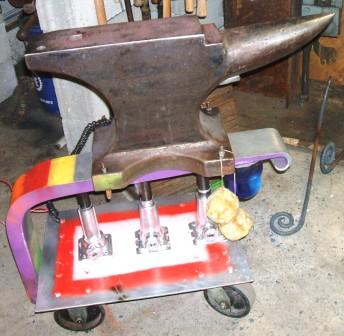
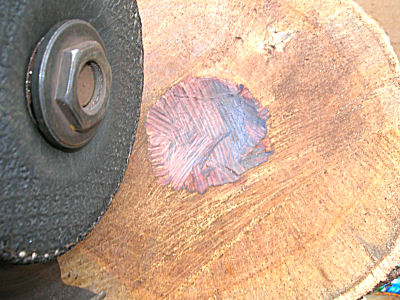
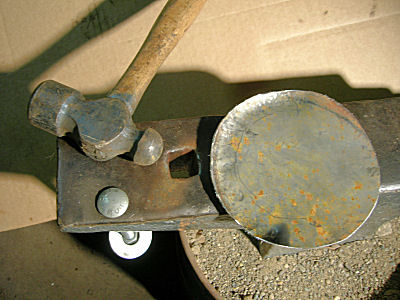
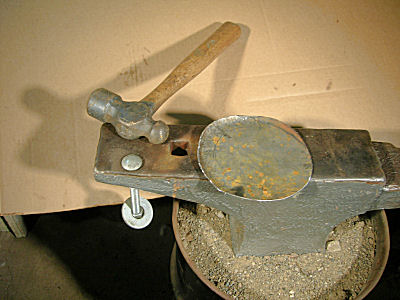
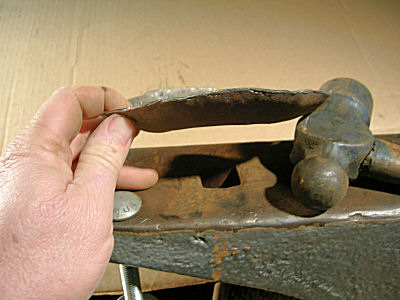
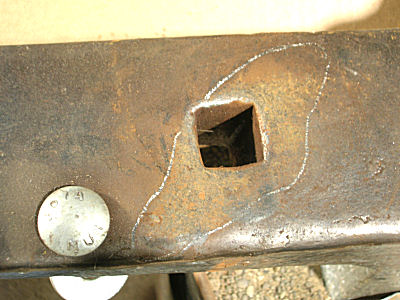
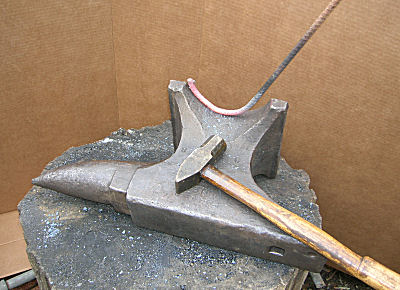
BP0421 Punching Thin Stuff Cold
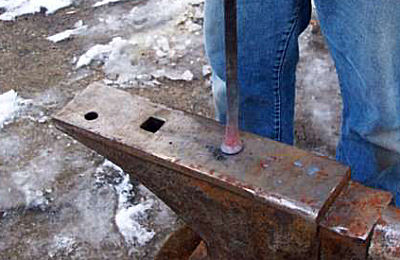
by IrnsrgnThis is a tutorial on how I cold punch holes in thin cold iron.
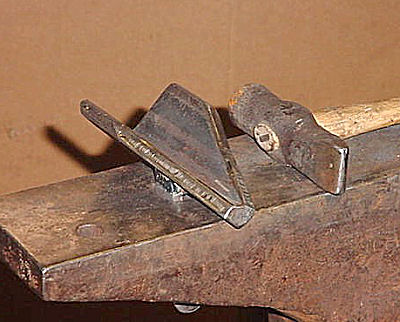
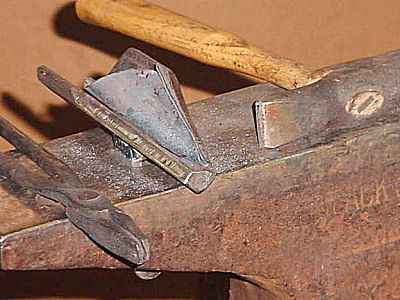
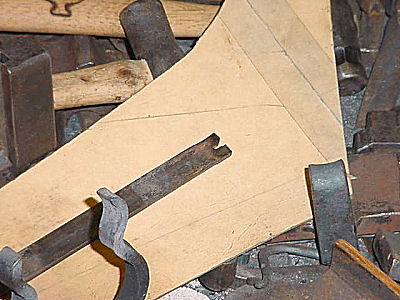
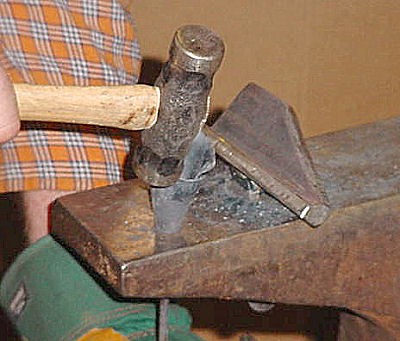
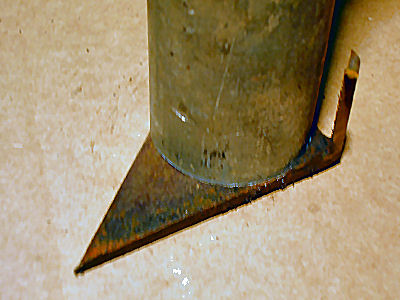
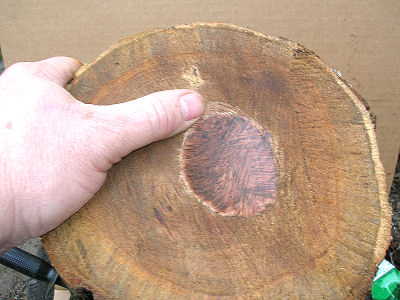
socket and block - this is a socket with hardy shank that contains a oak block I use for special purposes. One end has a small spoon shape burnt into it. The end used for this tutorial is just flat end grain.
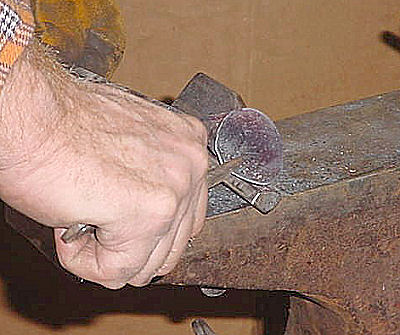
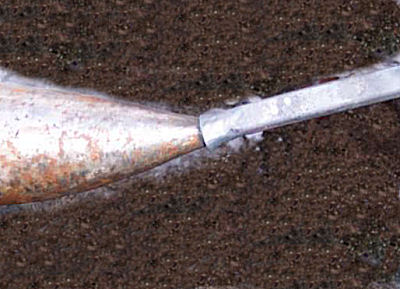
making dimple - shown here is making a dimple in the thin stock, a center punch is used here, but a countersink punch makes a better dimple, the wood block lets the dimple bulge out on the bottom side.
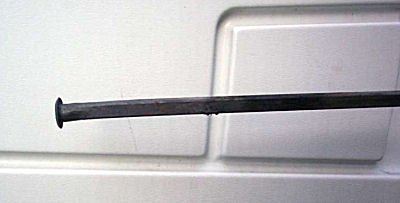
dimple - this picture shows the dimple raised on the bottom side of the piece.
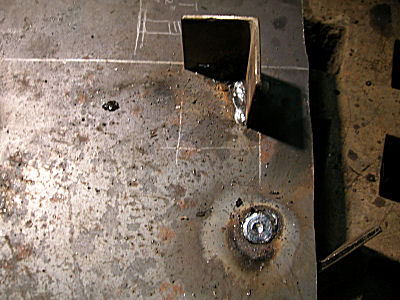
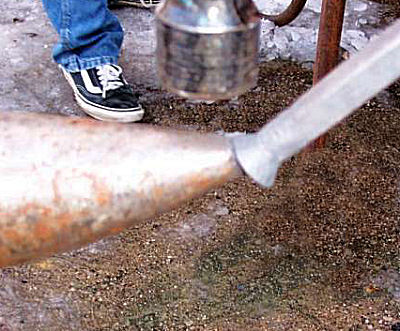
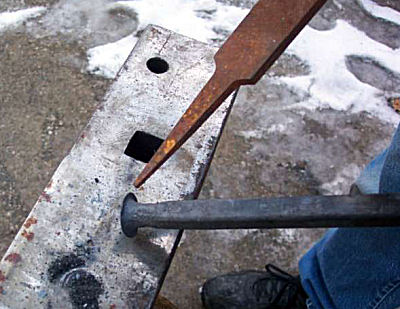
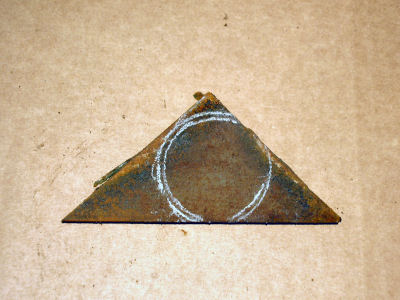
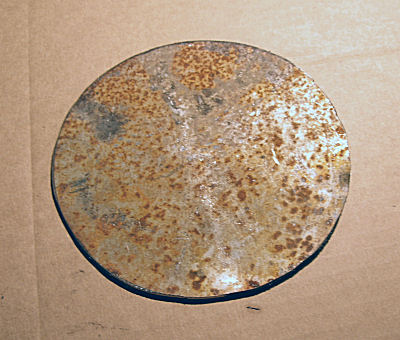
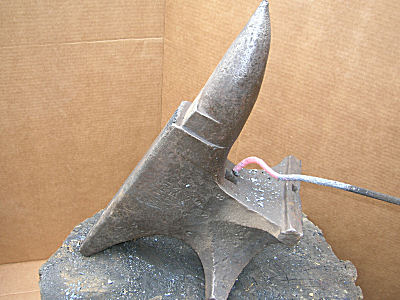
bolster plate - this is a handled bolster plate with holes 3/4, 5/8, 1/2, 3/8, 5/16, 1/4 and 3/16 drilled in it.
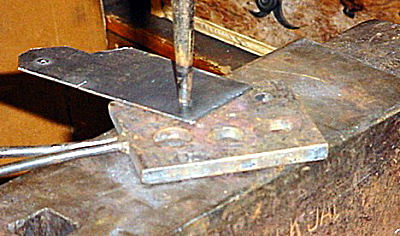
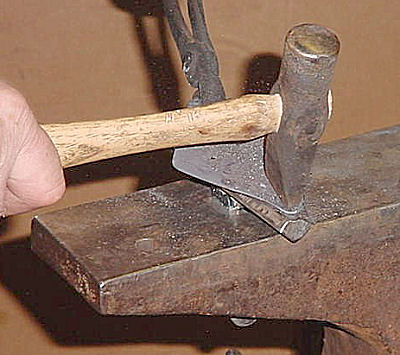
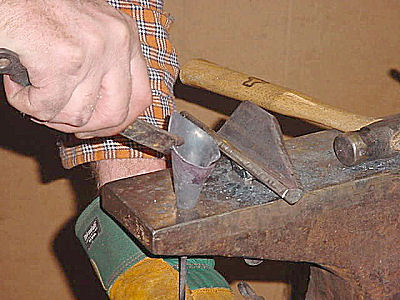
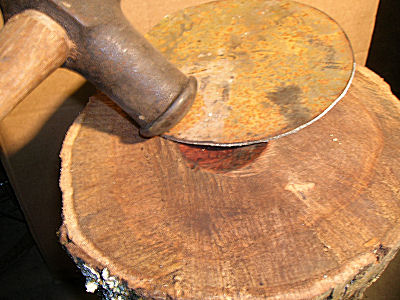
punching - the way this works is the dimple on the bottom centers itself in the appropriate hole in the bolster plate, and the punch with a slightly smaller square end than the hole in the plate centers itself in the depression left by making the dimple. This is actually a shearing action just like using a punch press. Strike the punch just enough to shear the hole in the plate. Too Hard and the tapered punch will wedge itself into the bolster plate. This can be done on thicker material when hot also.
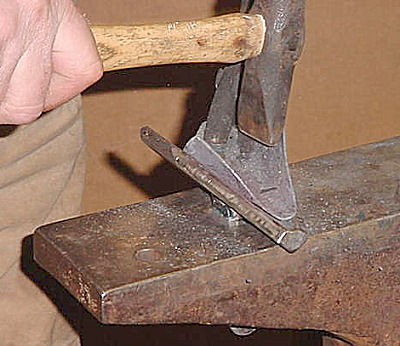
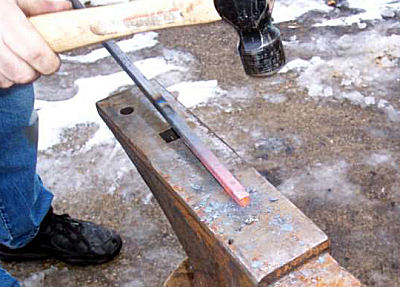
Turn the piece over and lightly punch to remove the slight flash and any excess bulging and then lightly chamfer with a countersink punch and you have a nice burr free hole.
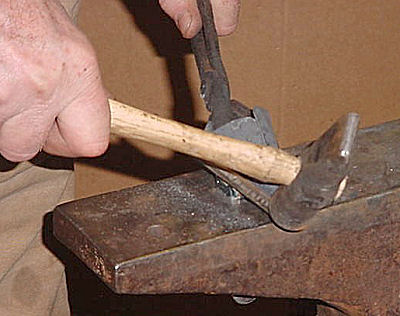
I also cold punch slots this way by making a dimple at each end of the slot then using them to line up the slot over one of the slotting bolsters seen in the punching BP and tilting the slotting punch make a starting cut on both ends then finishing the middle sectio -
IForgeIron Blueprints
Copyright 2002 - 2011 IFORGEIRON, All rights reserved
BP0422 Mounting a Vise
by Glenn Conner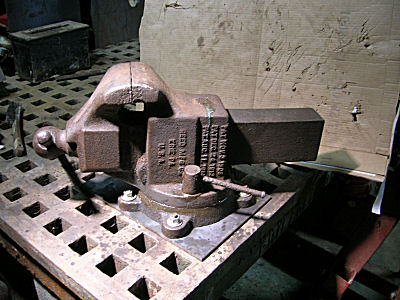
When I found this vise it was a encrusted in rust and nothing moved. After a bunch of penetrating oil, tapping with a hammer, and lots of patience, the jaws finally loosened up but the base refused to separate. I wire brushed the surface, coated it with oil, and put it into service. Finally I had a 8 inch heavy machinist vise !!
When I moved the acorn platen into the shop, the work table had to go. The vise needed to be mounted on the acorn in such a way that it would not interfere with the acorn being used.
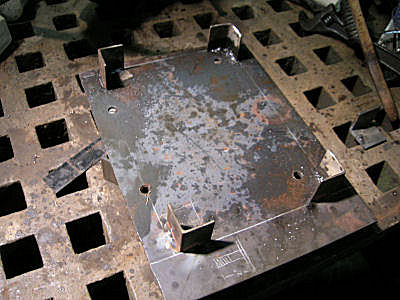
To use the vise on the acorn I cut a piece of 1/4 inch plate and welded 4 pieces of angle iron to the plate to match the holes in the acorn. Then I drilled holes for the vise mounting bolts.
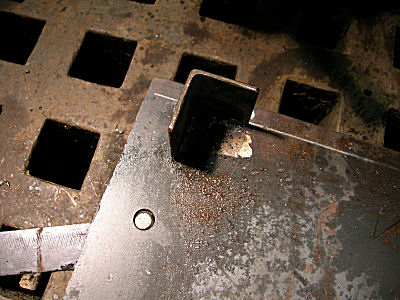
The mounting bolt was positioned about 3/4 through the hole.
And welded into place.

All 4 mounting bolts are now welded into place.
Grind the weld flush so the plate rests flat against the acorn.
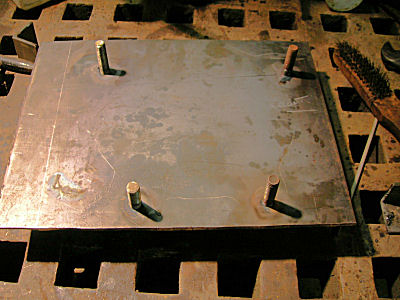
Ready for the vise.
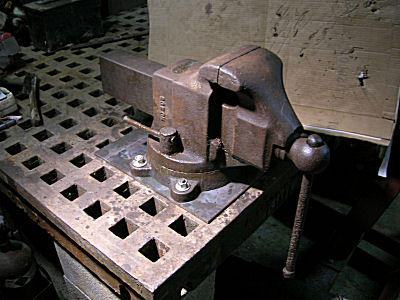
The vise is placed onto the acorn platen.
Loosen the locking nuts and rotate the vise on the mounted plate.
You will notice the plate has been moved one row back and one row closer to the edge. The vise can now be picked up and moved to ANY location on the acorn platen.
If you don't need the vise, just pick it up and put it on the floor.
During the review, it was strongly suggested that some method be used to secure the plate to the acorn. This can be done easily by drilling a hole in the plate and bolting it through a hole in the acorn. Another option is to weld a chain to the plate and then run it down the acorn hole. Use a wedge secure it at the bottom.
Coalforge said he uses a bench holdfast similar to the wood working holdfast, but made from a truck axle.
-
IForgeIron Blueprints
Copyright 2002 - 2011 IFORGEIRON, All rights reserved
BP0423 Mounting a portable generator
by Irnsrgn
A fellow on another forum about ideas for mounting a welder generator in the back of a small used school bus he was going to use as a service vehicle. He wanted it so that it was easily moved to the side so that long pieces or other bulky stuff could be moved thru the back door. This is the suggestion Irnsrgn made based on a similar project he had in the past .
I am assuming you want to mount the welder long ways front to back to obtain the maximum room in the center and also have the controls access able thru the back door.
1. Make an Angle Iron sub frame for your welder and mount wheels made of 1/2" plate circles cut out.
2. Determine the distance from the wall to the other edge of the welder and cut 2 pieces of angle iron to be bolted to the floor for rails. Make sure to round the sharp upright end of the web to prevent injury if you fall on it.
3. Make 2 center locking brackets as shown with at least a 3/4 inch round shaft on the bottom extending to both sides as shown. Drill the ends of the shaft to accept a spring cotter safety pin. fasten to the sub frame by bolting or welding.
4. Weld pieces of short pipe that have a bit larger inside diameter than the pins at the inner and outer limits of travel as shown.
Install safety pins on both ends of the welder in the shaft sticking thru locking stops while in the center position. To move to the outer position, remove the safety pins roll to the side and reinstall safety pins.
This system gives you ease of moving, built in stops, good forward momentum safety prevention and roll over protection. and only 2 small parts needed to change positions.
NOW HAVE YOU CONSIDERED THE BUILD UP OF CARBON MONOXIDE GAS INSIDE THE VEHICLE.
I would recommend a pipe thru the roof with a rain cap flipper on the outside and a piece of flex pipe with adequate length to compensate for movement.
-
IForgeIron Blueprints
Copyright 2002 - 2011 IFORGEIRON, All rights reserved
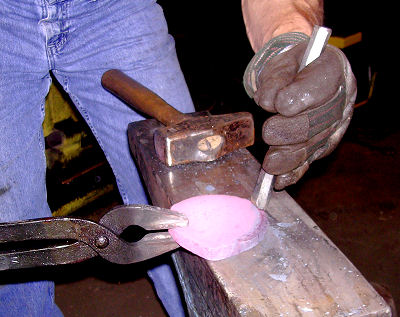
BP0424 Rail cap Snub End Scroll
by Jeremy Knippel
This is the end of a railing I did with a custom rail cap I forged grooves on the edges. The rail cap is 1/2" x 1-1/2" steel . The problem is - how to save the edges and make it taper and have a snub scroll on the end.
This is the tool I made so I could blend in the outside edge groove after forming the snub. I formed this tool while red hot by driving it down onto the edge of the railcap.
First I start by cutting out the middle to form a "V" from the inside edges of the grooves to a point about 8" from the end.
Heat up the "V" in the forge and start forming around the horn of the anvil and periodically set flat on the anvil and pound both sides so as to keep the bottom of the rail cap flat.
This is the end as the forming is done. Also by splitting the middle and bending in this manner it helps to minimize the deforming of the edges, on both inside and outside grooves. As you can see in the picture the ends move independently and if it was all one piece there would be a considerable amount of stretching and compression that would cause unwanted deforming on the edges.
Cut out a 3" circle from a scrap of 1/2" plate - you can leave a little of the circle uncut as that won't be needed.
Heat up the circle and start to put the groove around the edge.
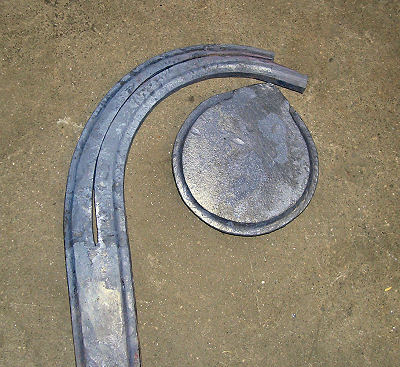
This is the finished rail cap end and the circle with the groove around the edge.
Cut and trim so the pieces match to form a nice curve on the outside edge.
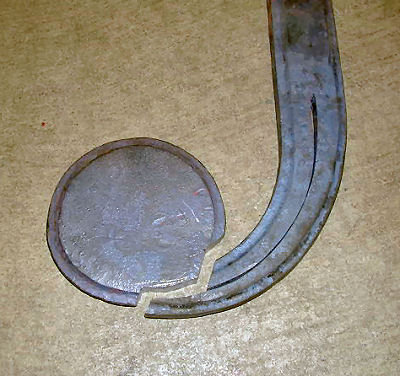
Grind down the welds flush and put back in the forge to heat up. After a full heat - using the edge groove tool, touch up the outer edge were the weld joins the 2 pieces. On the inside use a round ball punch to finish and blend in the groove.
Grind out weld area to a small "V" and weld together.
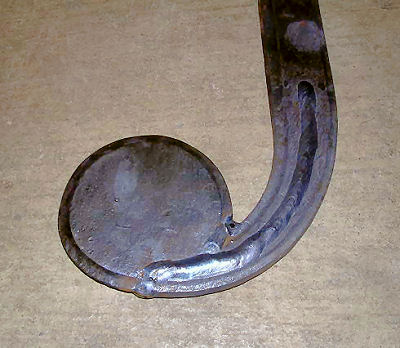
This is the finished end. This could be done on a full length piece or like I did, on a small section that is attached to a wood post for a return.
-
IForgeIron Blueprints
Copyright 2002 - 2011 IFORGEIRON, All rights reserved
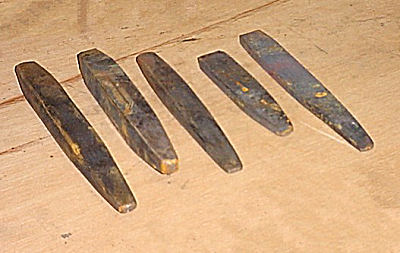
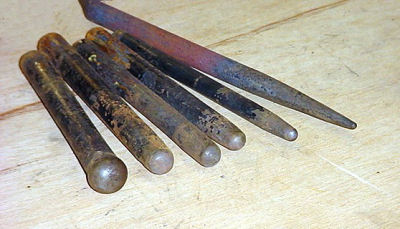
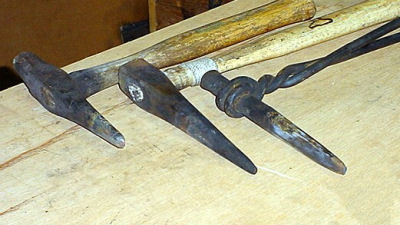
BP0425 Punches
by Irnsrgn
This BP is just some pictures and explanations of some of my most used punches and stuff.
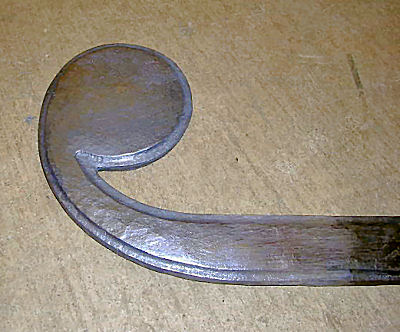
punches - My most used tapered Hot Punches, l to r - 3/16, 1/4, 3/8, an extra 3/8.
counter sinks - used to chamfer the edges of punched holes a little and for countersinking screw holes.
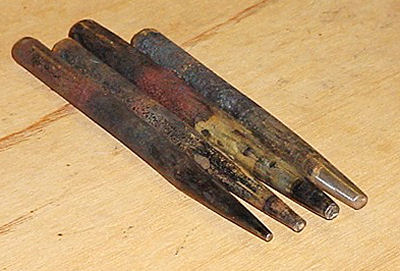
small slitters- different configurations for slitting different things.
chisels - different configurations of thin chisels, 3rd from left is beveled on one side only for use when cutting ears for critters, far right is for lining or grooving.
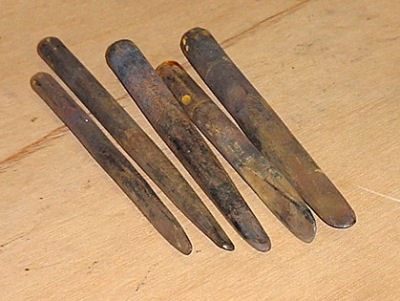
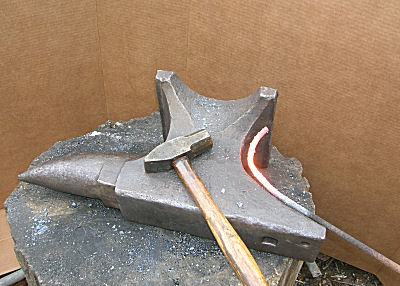
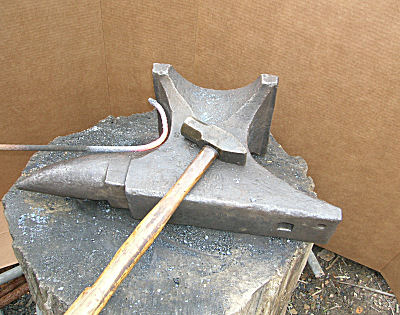
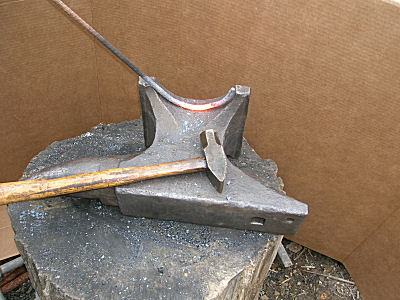
slotters - square ended thin punches for punching slots in hot material.
slotting bolsters - used as back ups to leave clean edges when slotting, also used when slitting some things to let slitter stick thru bottom and not make contact with anvil face, clamped sticking up in a vice can be used for initial bend on flat stock when making tight 90's.
drifts - used to size punched holes. normally not overly long with a long taper on one end and short taper on the other end so any swelling from use will not impair the drift from going all the way thru the hole. I have seen them as short as 3 inches in old shops, pairs are shown one square one round. 3/4 thru 1/4 shown.
rect drifts - odd rectangular drifts for special applications, 2nd from left is a special drift for a plate that I use to square the shoulder on the hardies I make for my anvil.
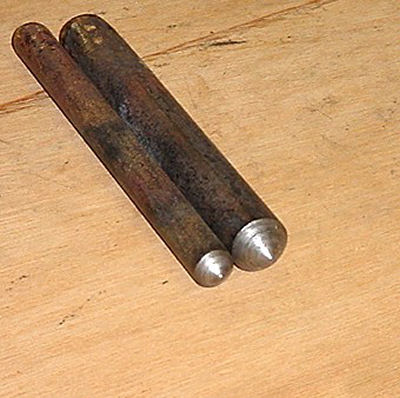
ball end punches - for making ball shaped depressions and for making rivet sets. 3/4 thru 3/16.
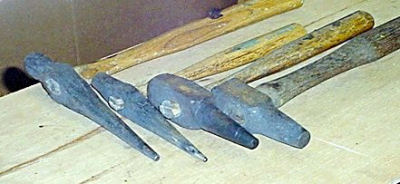
handled punches - used when punching holes in large Hot work.
eye punches - used to make eyes in Hammer Heads, l to r - combination slitter eye punch, the first one I use when making an eye also for making small eyes for small handles, eye punch for finishing eyes for blacksmith style handles and sledge hammer handles, rodded eye punch for the machinist handles I use in most of my hammers. -
IForgeIron Blueprints
Copyright 2002 - 2011 IFORGEIRON, All rights reserved
BP0426 Torch Holder
by J.W.Bennett(JWBIRONWORKS)
I use the torch alot for bending small stock, leaves and petals. I needed a handy place to set it down while using both hands to work the metal. I also thought that since I use three different vises in the shop it needed to be easy to move from 1 to another.
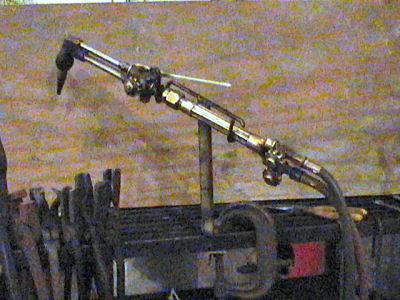
This is made from 1/4' Round stock welded to a piece of 3/4x1/4 flat stock. The flat stock is bent in an L shape so that it can be C Clamped into position on Tables, Benches,stock stands......
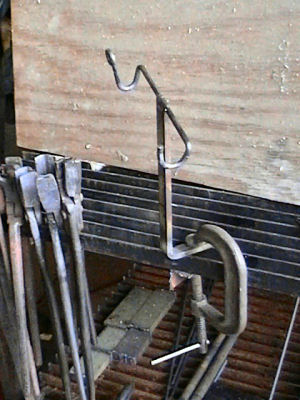
Full View
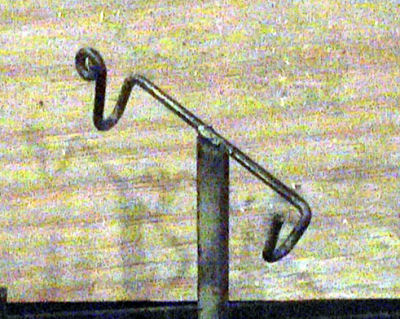
Close Up
Since it is also handy to not have to keep shutting the torch off and relighting it, the top of the holder has a small scroll on it that hooks over the top of the mixing valve on the torch to keep the torch from flipping over backwards and burning my delicate self.
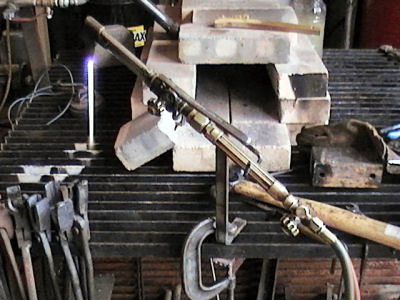
Just make sure you know what is in the flame path when the torch is in the cradle. -
IForgeIron Blueprints
Copyright 2002 - 2011 IFORGEIRON, All rights reserved
BP0427 Hammer Rack
by JWBIRONWORKS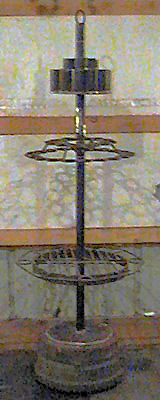
This is my new Hammer Rack. Basically I followed BP0166 and then added a few things to fit the needs of my shop. The base is a semi-tractor brake drum with a piece of 1/4" plate welded to it. The center pole is 1' sch 40 black pipe. The pivots and spacers are 1 1/2" sch 40 black pipe.
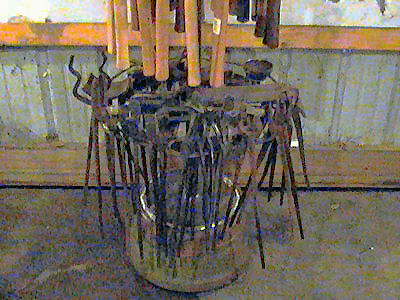
The bottom rack will hold hardies, Tongs and hammers.
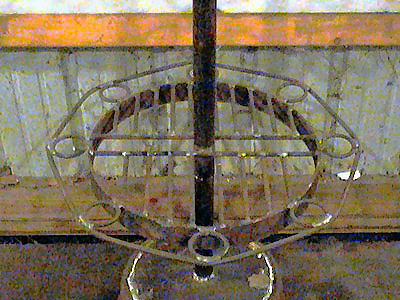
The middle rack is made of 5/16" round stock and has room for 32 hammers/hafted tools. It will also has room toexpand one more ring if need be.
The top rack is made of 6" and 4" pieces of 2" sch 40 black pipe welded to the 1 1/2" black pipe pivot. This rack is designed for holding Punches, drifts, chisels, Monkey tools and files.
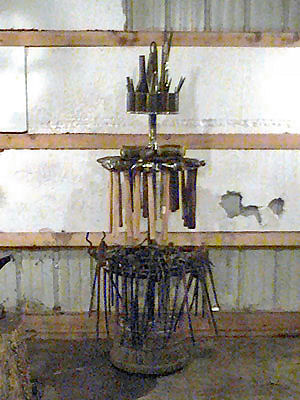
The rack is approximately 6' tall and when loaded you can lean it to one side and roll it easily if you want to move it.

It's probably over kill but I built it to use for demos this year. I'm trying to make as much of my shop portable as possible. As the last picture shows it will breakdown easily if need be.
It did free up alot of space in the forge area of shop also.
-
IForgeIron Blueprints
Copyright 2002 - 2011 IFORGEIRON, All rights reserved
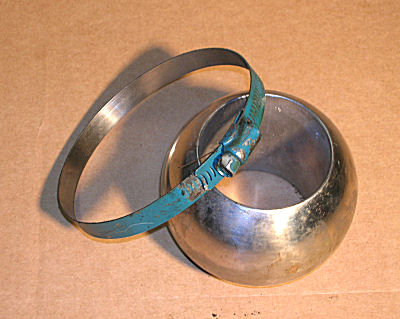
BP0429 Cutting or Sizing Circles
by Glenn Conner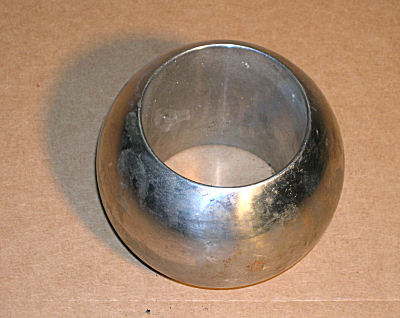
You have a strange shape and want to fit it into a hole in a piece of plate steel. There is no easy way to measure the diameter as this is some 3 plus inches in diameter.
Grab that radiator clamp, the big one.
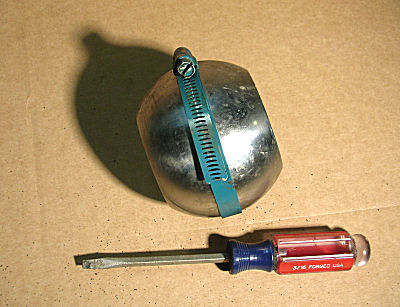
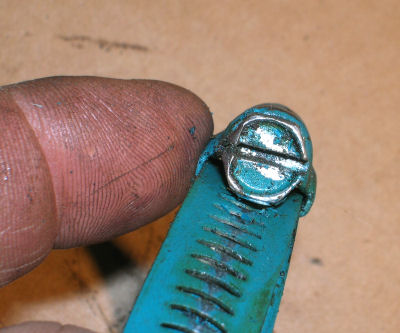
Put the clamp on the object and tighten it snug.
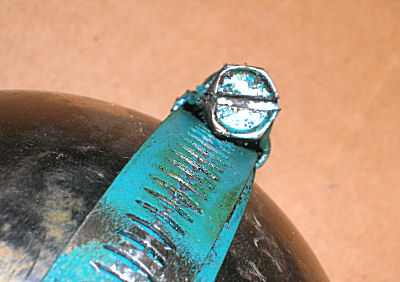
Take note the position of the groove for the screw driver and convert it to time on a clock. This example is 9 o'clock.
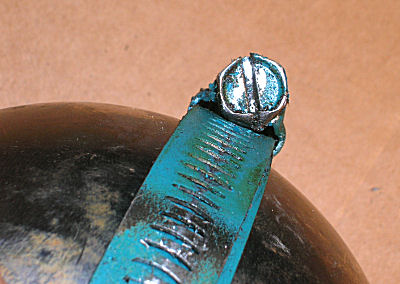
Now loosen the screw say 90 degrees or what ever is needed to remove the clamp.
Return the slot to the original position.
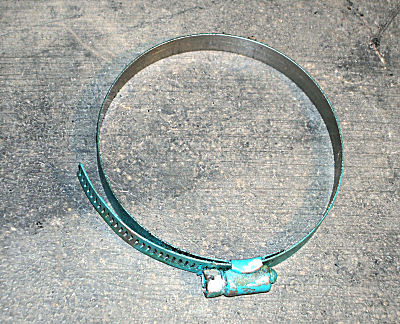
Lay the clamp on the plate.
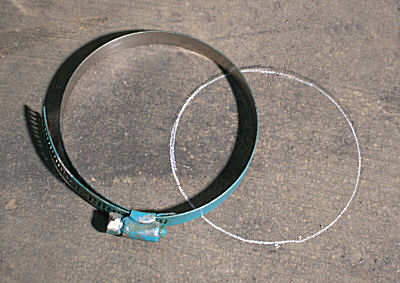
Draw your circle and cut the hole.
You have a choice of marking the inside or the outside of the clamp depending on whether you want the circle, and therefore the cut, tight or loose.
-
IForgeIron Blueprints
Copyright 2002 - 2011 IFORGEIRON, All rights reserved
BP0430 Measuring Tool
by Irnsrgn
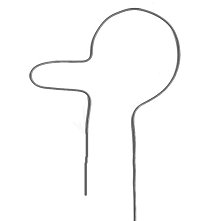
Made from of baling wire, it will give you a length measurement for for the stock need to make a spring fuller.
I use a piece of wire in the apron or press brake to get the bends right first.
-
IForgeIron Blueprints
Copyright 2002 - 2011 IFORGEIRON, All rights reserved
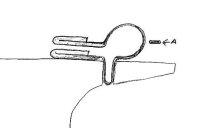
BP0431 Pin Type Spanner Wrenches
by Irnsrgn
A lot of Hydaulic Cylinder End caps and assorted other things have 2 or more holes for using a spanner wrench. Its always a problem measuring and then making a custom wrench to do the job.
And then there is the problem of the holes being mutilated by others who have used punches or whatever to remove and replace the caps because they did not have the proper tool on hand. I often have to clean these holes up or in some cases redrill new ones as needed.
Back when I was younger and not past my Prime, I came up with this little toy that resides under the truck seat in the long underseat collection tray.
One Adjustable Spanner that fits all toy.
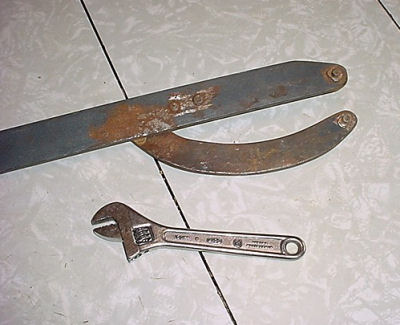
The working side in the almost closed narrowest configuration with a 6 inch crescent for size.
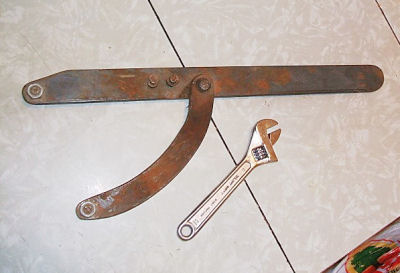
The back side in a partially open configuration with nuts that hold the interchangeable or replaceable pins to the ends.
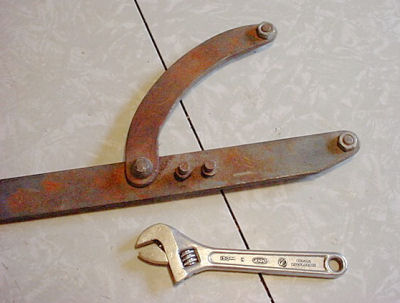
This gives a better view of the other sized pins which are stored in threaded holes in the handle. I have 2 sizes of pins 1/4 and 5/16 and the tool is familiar with a cheater pipe on its handle.
-
IForgeIron Blueprints
Copyright 2002 - 2011 IFORGEIRON, All rights reserved
BP0432 Cone Making Tool
By Jr. Strasil
I went to the Bam Hammer in in Claycomo and saw a jig similar to one I made many years ago. The demonstrator was using it to fold a large silicon bronze leaf. It was formed a little different than mine was, it had more angle. I looked for my old one and finally realized I had used it on a repair job. So I made a new one from a piece I had available that was not as big. I described this jig to ten hammers awhile back so he could make cones easier.
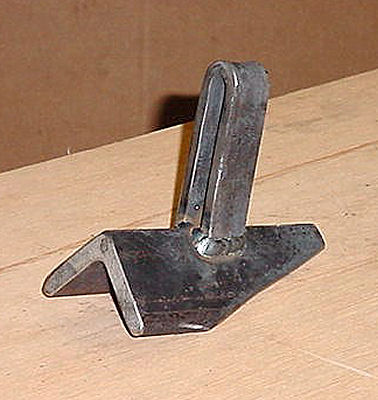
This is a piece of 3/8 by 2.5 inch angle iron with a long taper cut on one end and a simple folded flat iron hardy shank welded on. The angle cuts are rounded with a hand grinder to eliminate sharp edges that would transfer to the finished product.
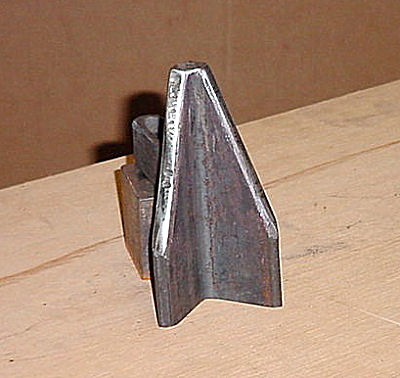
Another view of it.
Jig set in the hardy hole ready for use. And a 1 1/4 pound cross pein made from sucker rod as the instrument of choice for torturing the metal.

I decided to make a calla lilly to show it is used and I learned a few new things while doing it. ie, Don't fiddle with the camera while the piece of sheet metal is in the forge heating, makes lots of sparks and the end seems to disappear. The very edges of the lilly are hard to get curved the old way I did it so I precurved them as shown over the rounded outer edge of the jig as shown.
I start curving from the opposite side, then work the near side and then the middle usually at a dull red heat so as not to make dents but still is easy to work.
Working the center, the V of the angle iron on the back gives you space to grip the work with the tongs.
Working the narrow end shut, the tapered end lets you work this part with support on both sides.
This pic shows the accessibility it gives you.
Flaring the top edges of a calla lilly is always difficult, so I cut this groove in one of my spacer jigs to make this easier. (notice the one rounded edge.)
After welding a stem on the small end and working the weld down I tried it this way and it was still hard to do so.
I got the bright idea to try it this way and viola it worked so easy I almost had a conniption fit. I just heated the top of the lilly. Who says you can't teach an old dog new tricks. LOL A little at a time makes an even roll.
A little TLC with a 1 pound rounding hammer and its finished. Yes that is a 1 pound hammer not a 3 pounder. LOL
This jig will make making cones a lot easier and if I had had the angle iron I would have made it out of 4 inch stuff. -
IForgeIron Blueprints
Copyright 2002 - 2011 IFORGEIRON, All rights reserved
BP0434 The Demonstration
by Richard HansonForeword: At some point in your blacksmith career you will be involved in conducting a live demonstration. If you are one of the fortunate few that are skilled enough to be asked to demonstrate at an actual blacksmith event, I envy you. For the rest of you, your demonstration will probably be conducted in association with a re-enactment or other historical event where people don't have a clue as to what you are all about.
Entertain these people. Although you are probably not getting paid for your time, these people did pay an entrance fee.
Your job is to educate these people about the craft of blacksmithing.
At the end of a long day, refrain from throttling the next person that tells you his grandpa was a blacksmith, or asks you if you shoe horses. Perhaps sell some stuff to at least recoup the cost of the coal you burned. Keep the more adventurous from getting close enough to injure themselves.
Insurance: Don't leave home without it. Don't rely on the place where you demonstrate to have insurance. If you don’t have your own umbrella policy, get one. Remember section 38 of Murphy's Laws. "No good deed goes unpunished." You are there providing a free service but if someone gets hurt as a result of your demonstration you could end up paying for the rest of your life.
Equipment: Remember it is better to have it and not need it than to need it and not have it. Prepare your equipment in advance. Make sure it is in good order. Your equipment may be more or less "period correct" depending on the type of affair you are working at. For example a composite frame hacksaw would be totally out of place at a Civil War Era demonstration. Pay attention to details if they are important to the demonstration. Basic equipment you will need is:
Eye Protection - "Period Correct" be damned, I don't do anything without my safety glasses. Take an extra pair of glasses if you wear them and a pair of generic safety glasses to wear over them in case you break your prescription safety glasses.
First Aid Supplies - Band-Aids, burn cream, some tape and gauze at a minimum. Also some sun block.
Business Cards - If you have them bring them. If not, something with your name, address and phone number on it that you can display prominently. You might make a buck at this yet.
Clothing - Your costume may need to be "period correct" however, stay away from synthetic fabrics anyway. They tend to burn rapidly. Cotton and wool are the best fabrics. Hat and shoes should be appropriate for the era portrayed.
Apron and Gloves - A leather apron is a necessity. Whether it is a full apron or one that ties around your waist is up to you. Gloves are up to your discretion. Some people prefer to work barehanded.
Forge - usually coal, hand cranked blower if acceptable, otherwise bellows
Anvil - I take 2 because I have 2. Don't forget the mounts.
Hammer - Take at least 2 or 3, I take a bunch because you can do quite a lecture on the various types and functions of hammers. It has been said that many a demo has been ruined because of a broken hammer handle. My way of thinking is if you only take one hammer to a demo, you probably weren't the sharpest knife in the drawer to begin with.
Tongs - I take a bunch, once again you can do a lecture of the function of various types of tongs. Also if you only take one pair, see the above statement about hammers.
Punches - take at least 2, and if you need a size you don't have, a quick demo within a demo is making a punch and using it.
Chisels, files and hot cuts - take a couple of each.
Steel - you have to have something to pound on. I take a sampling of various sizes and shapes. Some flat bar, some square and round stock. You will be governed by what you plan to make. I also take some high carbon steel like pieces of spring.
Vise - I take a post vise mounted to a big wooden block. You can get by with a machinist vise, but you will need something to hold and clamp metal.
Swage block - if you have one, it is nice to take it. Part of your demo should be to show and explain the types of tools used by a blacksmith.
Coal or Charcoal - Don't forget something to burn. A metal coal bucket and coal shovel are nice accessories. Make sure you have an adequate supply to last the whole day.
Slack Tub - some sort of water container. It should be made out of wood or metal. A steel 5-gallon bucket is ok but remember to remove labels and paint over markings on it. Plastic is usually a no no.
A rack for tongs and other tools as well as some way of organizing your hammers is a nice touch.
Any non-traditional items such as plastic buckets for additional coal can be hidden out of the way under a piece of canvas.
Matches - lots of them. You would be surprised how hard it is to find something to start a fire if you forget to bring your own. If you are a traditionalist, flint and steel, or two sticks to rub together. A little charcoal lighter fluid is a handy addition as long as nobody is looking. You might also want some pieces of cardboard and some newspaper and possibly some wood kindling.
Chair or Stool - It is nice to have something to set on and take a break from time to time. Include a few chunks of 2 X 4 to throw in the fire to keep it going while you take your breaks so you don't have to keep pumping the bellows or cranking the blower while you are trying to eat.
Some canvas or tarps to cover your stuff if it rains, or if the demo is more than one day and you are going to leave your stuff over night.
Water - Both for the slack tub and for drinking.
Food - If lunch is not provided, make sure you have your own.
Fire tending tools - a clinker hook and some fire tending tools are a necessity unless you are adept at managing your fine with tongs.
A hand cranked grindstone a small one, is a nice accessory, but not absolutely necessary.
A small sprinkler can or can to water the coal in your fire
Setup: The three most important things in real estate are Location, Location and Location. The same is true when setting up for a demonstration. Get involved in the selection of the site for your demo. Be vocal about your wants and needs. Remember you will be working with hot iron and fire you don't want to be located in tall dead grass. Fire is always a primary consideration, your proximity to flammable structures like tents etc. should be such that there is no danger of setting your neighbors on fire. Keep in mind that the sound of your anvil may be music to your ears, but it will be annoying as hell to the frontier poet who is doing a recital 50 feet away. Also keep in mind that the smoke from your fire can offend your neighbors.
After you have taken into consideration the comfort of those around you, it is time to consider your comfort as well. Shade is nice, the afternoon sun can be brutal try to find a location that affords shade from about noon on. Beneath a stand of trees is nice, they don't have to be Chestnut Trees.
The site selected should have ample room for all of your equipment and afford a comfortable safety buffer zone between you and the public. Pay attention to wind direction, you don't want to work in the smoke all day and you don't want the spectators to stand in the smoke either. Remember that as soon as the fire is built, the wind will change. You may not be able to reposition the forge, so have enough room so that you can reposition everything else to get you and the spectators out of the smoke.
There should be some sort of physical barrier to keep spectators at a safe distance. Tables where you display your wares can work to this advantage. Sawhorses with boards on top will also work. Simple stakes in the ground with a rope between them will also do. The idea is to keep spectators at a safe distance yet afford them the best opportunity to observe what is going on. I generally try to set up with my forge beside my anvil and to the weak hand side. That way the spectators can see everything that is happening without me blocking the view as would be the case if the forge were located behind the anvil. It also allows you to continually face the crowd and keep an eye on them for safety sake. By keeping the forge on the weak hand side, it allows you to operate the bellows or blower as well as handle the material with your off hand while you tend the fire and rest your hammer hand.
Have everything set up and in place well before the grounds open. Light your fire beforehand and be ready to pound iron when they open the gate. Remember that the only time in your life you will ever have difficulty lighting a fire is when there are 30 people standing there waiting for something to happen.
The Demonstration: Practice your demonstration beforehand. It is ok to be incredibly stupid as long as you are the only one who knows. If you get up in front of a crowd and announce you are going to make whatever, then botch the job, or it don't turn out because you didn't include something you need, everyone will know. If you have never done a forge weld, now is not the time to do your first one.
Take a short time and explain the tools that you use and what you are going to do. You can at this time give a short talk on the various types of tongs and hammers that are used and their function.
Keep your demonstration short. Most people have the attention span of a gnat. They are used to instant gratification. They want it now. If Martha Stewart can make a 7 course meal in a 30 minute TV show with time out for 15 minutes of commercials, you should be able to make a 6 foot gothic gate in about 30 seconds. With that in mind, make something that takes about 5 minutes. Leaf key rings are quick and easy for example. The rule is, if you want the key ring, you have to stay for the demo.
If you take requests, be ready for anything. I once asked a small boy what I could make for him and he said "a feather". I asked how big, expecting to make one about leaf size, He indicted a size with his hands that was about 10 inches long. If this happens, you are on the hook and you damn well better be able to make a 10-inch feather in short order.
That's the Theory, Here is the Reality: For the sake of brevity in this dialog the spectator will be referred to as "Guest" and the blacksmith as "BS".
Guest: As he walks up and sees the fire in your forge. "What ya cookin?"
BS: "Steel."
Guest: "Ya mean ya all ain't a cook?"
BS: "No, I am a Blacksmith."
Guest: "My Granddaddy was a Blacksmith."
BS: "So was mine."
Guest: "Do ya shoe horses then?"
BS: "No those are farriers."
Guest: "Like the ones in San Francisco?"
BS: Resisting urge to commit mayhem with a 2 lb. cross pein, "No the ones in San Francisco are from a different guild."
Guest: "What's that black stuff?"
BS: "Coal."
Guest: "What do you burn in your fire?"
BS: "Coal."
Guest: "Why are you cranking that handle?"
BS: "To blow air into the fire to make it burn hotter."
Guest: "How hot does it get?"
BS: "I am not sure, around 3000 degrees I guess?"
Guest: "It don't really get that hot!"
BS: Takes piece of 1/4 inch round rod places it in the fire, cranks hell out of the blower, then pulls out the burning sparkling piece of white hot steel "Steel melts at around 2600 degrees, this is not only melting, it's burning, what do you think now?"
Guest: Well I'll be, who would have thought?"
BS: Mumbling to self "Anyone with half a brain."
Guest: "What's that big hunk of iron?"
BS. "That's an anvil?"
Guest: "An annnvillllle what do ya do with an annnvilllle?"
BS: "I pound hot iron on it."
Guest: "Why do you do that?"
BS: " To get the iron into the shape I want it."
Guest: "What ya gonna make?"
BS: Holding up the piece he is hammering "What does it look like to you?"
Guest: "It kinda looks like a leaf."
BS: "You are exactly right, it is a leaf."
Guest: "What you making a leaf for."
BS: Secretly wishing lightning would strike this guy. "It's going to be a key ring for you if you stay for the whole demonstration."
Guest: "Well gee, OK."
BS: Finishes the key ring, gives it to the Guest.
Guest: "Come on Bobby I think I see some horses and Cavalry over there" Walks away without saying thanks.
BS: Makes pledges to himself that he will get a full Frontal Lobotomy before he ever does another one of these things.
After a short period of time, another bunch arrives:
Guest 2 "What ya doing here?"
BS: "I am a blacksmith."
Guest 2: "Really, my granddaddy was a blacksmith, he used to make the best knives out of old files, do you make knives out of old files?"
BS: "No I make Files out of our of old knives."
Guest 2: "He he, you shore are funny."
BS: Contemplates forging a sharp point on a 4 foot piece of 1/2 inch square bar, setting it firmly in the ground, standing on anvil and doing a Swan Dive onto the sharp point to put himself out of misery "I find a little humor helps to pass the time."
Guest 2: "What do you make."
BS: "Everything you see on the table was made by me."
Guest 2: "Do you make horseshoes."
BS: "No those people are called farriers."
Guest 2: "But I'll bet you could make a horseshoe if you really wanted to."
BS: "I don't know why I would want to, I don't like horses."
Guest 2: "How can you be a blacksmith and not like horses?"
BS: Suddenly wishing he had a horse to drag this guy behind, "You're right, I really like horses, I was just kidding you, to shoe horses, takes special training, and I haven't had that training, so I don't mess with them."
Guest 2: "See I knew if you wanted to make a horseshoe you could."
BS: Smiling wryly because he is thinking how much he would like to nail a hot horseshoe right in the center of this guy's forehead, "Yup, nice thing about being a blacksmith is you can make anything you want out of iron or steel."
Guest 2: "Can you make me a horseshoe."
BS: "I probably could, but it takes a special type of steel and I don't have any of that type with me now. If I made it out of mild steel, it wouldn't come out right."
Guest 2: "If I come back tomorrow will you have some of that special steel."
BS: "Nope have to order it in special from San Antonio, and takes 2 weeks to get it here."
Guest 2: "What can you make me."
BS: "How about a leaf key ring?"
Guest 2: "OK but I really wanted a horseshoe."
BS: Completes key ring and hands it to guy.
Guest 2: Walking away mumbling to his family, "he can't be much of a blacksmith, I'll bet he can't make a horseshoe even if he had the right kind of steel."
Another short interval passes, way too short if you ask the smith, and another group arrives:
Guest 3: "Where did you get these knives?"
BS: "I made them."
Guest 3: Thumbing the blade of a 192 layer random pattern Damascus Knife "Are they sharp?"
BS: "The Band-Aids are in the box on the end of the table, you need help putting one on?"
Guest 3: "Boy they really are sharp."
BS: "I wouldn't have much use for a dull one."
Guest 3: "How do you make the fancy figures in the blade?"
BS: Gives a brief description of the process of making pattern welded steel.
Guest 3: "How long does it take to make a knife like that?"
BS: "Several days."
Guest 3: "I'll give ya $50 for that knife."
BS: "Lay 3 $100 bills along side that $50 and you got yourself a knife."
Guest 3: Walking away mumbling "There ain't no knife in the world worth $350 and besides that, it didn't balance good and it didn't have no rivets in the handle. My daddy always told me the best knives have 3 rivets in the handle."
BS: Smiles to himself, contemplating how nice it would be to forge some earrings for that guy and hot fit them.
At the end of the day when you make the last of what seems like a million leaf key rings and other trinkets you notice a young boy who has been watching you all afternoon with rapt fascination. You put a little extra effort into that last leaf, and when it is done, you hand it to the boy. His eyes get as big as saucers and he goes running off to find his parents to show them the great treasure you have just bestowed upon him and you know that you are coming back tomorrow with a smile on your face, even if they charge you to get in to the place.
Iforgeiron: Sometimes the story doesn't just end with the last sentence, and the period after the final word. Below are two comments from two different blacksmiths
Funny thing happened last week. I was called to the front of the store to help out as a cashier for a bit. I looked up at the next customer in line, it was a lady with her son, the same kid that I spoke of at the end of the story.
He said, "Do you remember me"
I said, "I sure do. Your name is Tyler isn't it?" He beamed like it was Christmas all over again.
Funny how things happen sometimes. I hadn't ever expected to see him again, then I put that piece at the end of the story, and a couple days later, there he was. Richard Hanson
The kid that stayed all day for the demo -- I had steel for one Chris Fredrick / Conner cross left at the end of a day. This boy had been working all day with his folks at their rope making demo near by, but he really wanted to watch the smith. I made up that last steel cross for him and put it on a boot lace necklace. He was thrilled! Jim C.
-
BP0435 Fire Blow Pipe
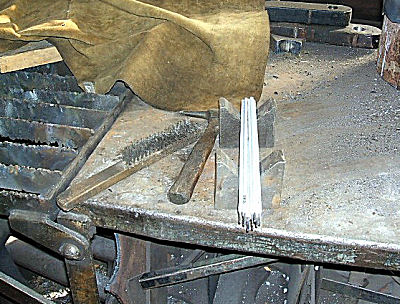
by Chanterman aka Mark SzymanskiNo more stooping and singeing your eyebrows! This is a cheap, easy to make, and incredibly useful tool for the campfire. With it, you can move logs or restart a lagging fire without blowing out your lungs. If you wish a decorative twist, I suggest placing a 3/8ths rod inside to be sure you don’t crush the inner walls too tightly.
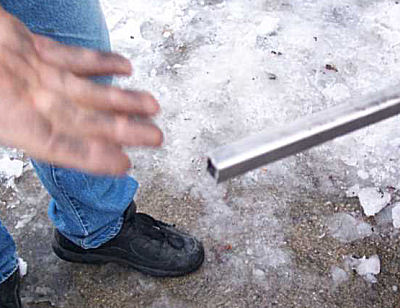
½ inch square tubing about 3 feet long.
Take a good orange heat on one end and open the flare by placing the heated end on the tip of the horn and hammering the other end. Only do this while you have color in the tubing.
The opened end on the horn.
This is the end of the tubing opened up after wedging it open and the first go around the horn of the anvil.
Open the end on the anvil horn. Notice the guiding hand is lifting the tubing to increase the angle on the flare. Occasionally you may wish to drop the guiding hand down to do a straight hit on the other end of the tubing to open the “trumpet” end more.
Open up and round the flare on the tip of the horn of the anvil. Continue lifting the guiding hand to open up the flare. Work while you have color or it will crack.
Open the flared “trumpet” end by pressing down/hammering from the top.
Continue to roll the flared end by hammering down on the opposite end of the tubing until it curls to the degree you wish.
Flared end nearly done. By heating the edge, roll the edge on the anvil to finish curving the edge backward.
The finished flared end. Notice how any sharp edge is rolled back around underneath to prevent cuts. If you have the flare off center, simply reheat and adjust your angle. Be careful if you quench, since there is the real possibility you may get cracking on the “trumpet” end.
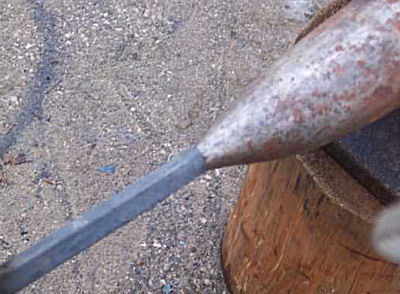
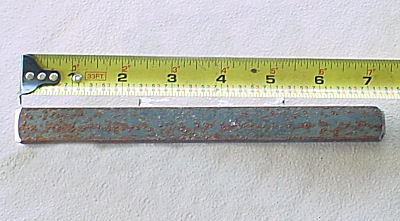
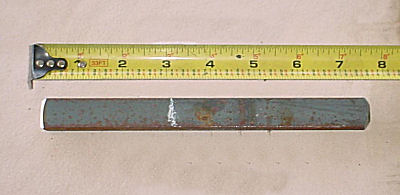
Starting the taper. You can either taper it square or taper it to a rounded tip, either way will work just as well. Round or square taper down until you have it taper from about 3 inches from the end.
Finishing the taper. The end hole should be about ¼ inch square, or about half the area you started with.
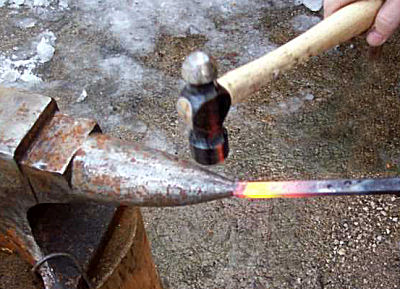
Starting to make the bend over the horn. I hit the end of the taper gently to start the curve.
Showing the taper and the bend over the horn. Be careful not to hit too forcefully, the tubing can collapse.
Showing the bend of the narrowed end.
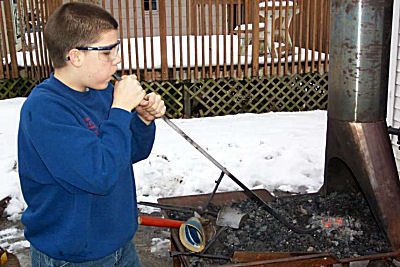
My Son Jacob demonstrating the use of the blowpipe. (We use it on the campfire not the forge)
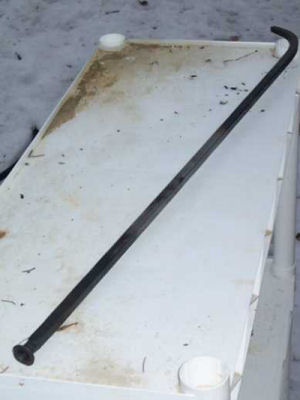
The finished blowpipe. -
IForgeIron Blueprints
Copyright 2002 - 2011 IFORGEIRON, All rights reserved
BP0436 Pot Holder
by Bill Epps
7 1/2" of 1/4 by 3/4 flat bar.
Make a mark 3" back from one end.
Bend 90 degrees at the mark.
Bend it back over itself and square up the end.
Using the hardy hole I straighten it back out to where it is flat and have about 1/2 boss sticking up.
I roll the long end over, leaving about 1/2" between the end of the bar and the top of the boss.

I drill mounting holes (for about a #8 screw)
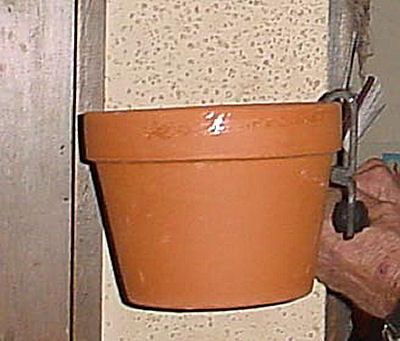
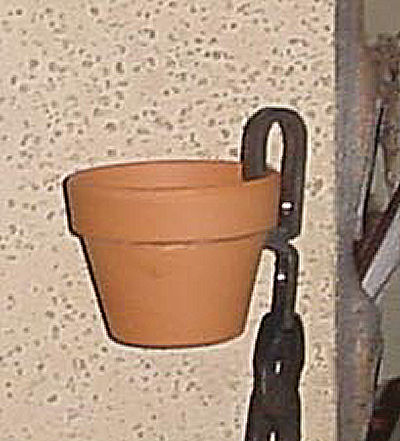
Then I have a bracket that will hold between a 8" and about a 4" standard flower pot.
This is a little bracket that is quick to make and sells real good. At the shows I sell them for about $3.00. They sell real good in the spring time.
Just another idea for something to make and sell. -
IForgeIron Blueprints
Copyright 2002 - 2011 IFORGEIRON, All rights reserved
BP0437 Vises in the Shop
by irnsrgn
People (Smiths) do a lot of arguing about correct Anvil Height, but no one seems to talk about proper Vise Height. So this is intended to bring the subject up for discussion.
Generally speaking a Blacksmiths Vise should be Mounted so you can work completely around it from all sides. But this is not always practical because of space restraints.
Normal Vise Height for most uses is when you are standing with your upper arm straight down beside you and your fore arm bent at a 90 degree angle, your Elbow should Rest or be just a little Above the top of the Jaws. This is the proper height for Filing, but is awkward for Hammering.
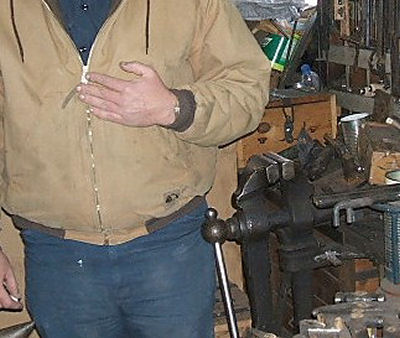
For a Vise used at or near an Anvil for Light Pounding it should be at approximately Navel (Belly Button) height.
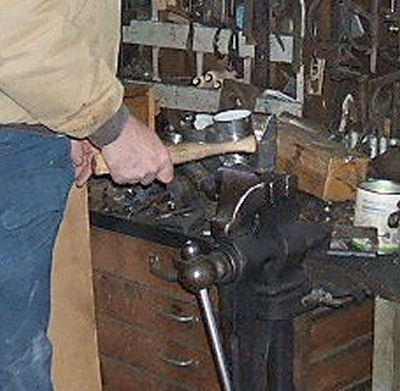
A Big Heavy Vise for holding things for Serious Pounding should be approximately the Same height as your Anvil, But the Bottom Hinge of the Outer Jaw should not be below floor level.
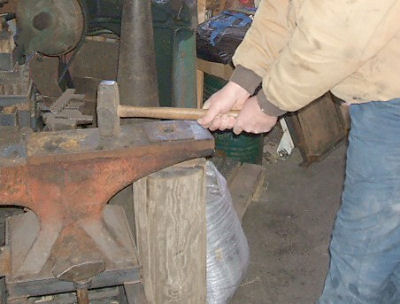
Large Heavy Anvil set Low are usually used when Strikers are employed to do the Heavy Pounding. The Reason for this low height is so that they may Deliver a Better Blow when they are hitting Fair and Square. This general Rule applies to Large Vises also.

For the Convenience of the Striker and for working Large things on an Anvil and to Improve the blow, a couple of easily made riser platforms are a nice Convenience. They even work well for Working at a Vise or Anvil.
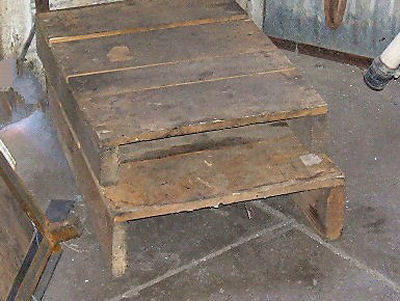
These are the two risers I keep handy near my Forging area. The top one is 2 by 4's with packing crate boards nailed across them, the bottom one is 2 by 6's with packing crate boards nailed on top.
-
IForgeIron Blueprints
Copyright 2002 - 2011 IFORGEIRON, All rights reserved
BP0438 Slack Tub
by Gerald Franklin
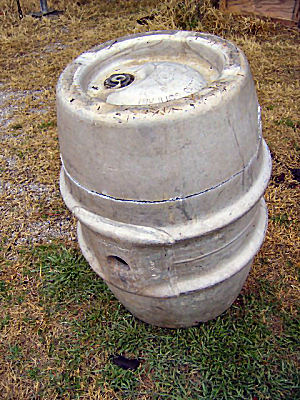
This rust proof slack tub is made from a large aluminum “beverage container”. The cut is marked down about 5 1/2 inches from the top leaving a couple of tabs for lifting holes.
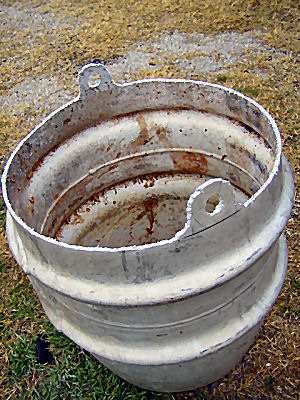
I used a plasma cutter to cut the keg but I suppose that a saber saw would work, too. This keg had been in my friend’s junk pile for a long time, so I didn’t worry about fumes. If you are working with a newer one, you may want to purge the thing before cutting.
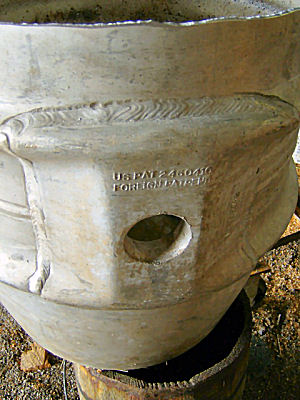
Once the cut is made and cleaned up a bit, something has to be done to stop up the bunghole. I suppose that a “Master Craftsman” would have TIG welded an aluminum plate over the hole, BUT…
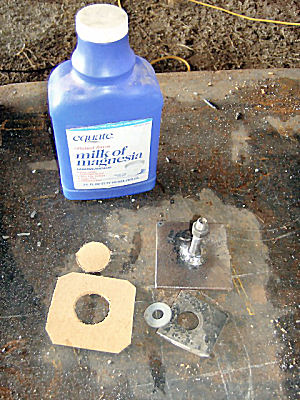
My solution was to weld a bolt onto a piece of 3/16 strap. The gasket material seats between the flat strap and the front of the keg with the bolt passing through the bung. The smaller squareish piece goes inside the keg as a washer for the outside piece to tighten against. Oh yeah, coat the threads of the bolt with Milk of Magnesia before welding and the welding berries won’t stick to the threads and mess them up (thanks to Jim C. in an earlier BP for this tip).
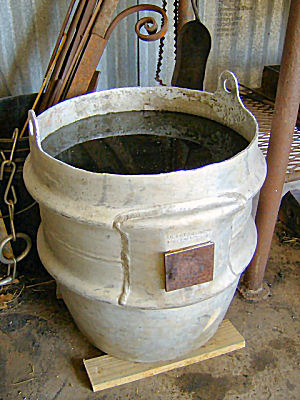
Snug the bung assembly up tight enough to seal the gasket material and fill the tub. This one holds about 11 gallons. If your shop has a concrete floor, place the keg on a wood float to keep it off the concrete. Aluminum reacts with concrete over time and could eventually begin leaking. -
IForgeIron Blueprints
Copyright 2002 - 2011 IFORGEIRON, All rights reserved
BP0439 Rod Holder
by Glenn Conner
This is one way to keep the welding rods from getting scattered on the table, and the flux from being chipped from the rod.
Find a piece of scrap to cover the end of a piece of pipe.
Mark the OD of the pipe. Then step in just a bit so the weld can be applied between the edge of the plate and the edge of the pipe.
Weld it to the end of the pipe.
A pipe coupling goes on the other end.
The length of the pipe should fit the rod. This pipe was a 9 inch piece of scrap.
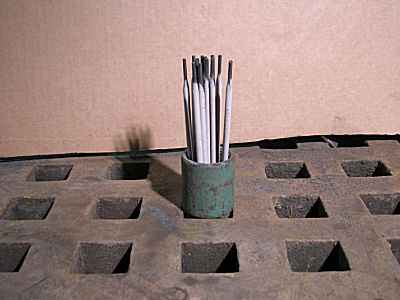
That way you just drop the pipe into the hole and the rods are protected but still easily accessable.
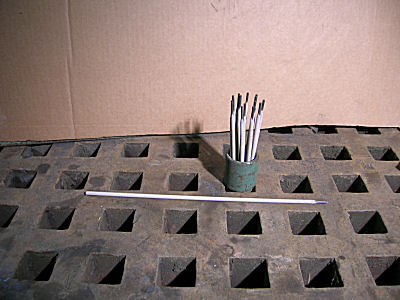
The new rod holder can be placed where ever it is needed.
-
IForgeIron Blueprints
Copyright 2002 - 2011 IFORGEIRON, All rights reserved
BP0440 Anvil Stand, Adjustable, Portable, Mobile
by Richard Thibeau, Dancing Frog Forge
I started with a fork lift tine as the basic element to build on for this stand. First, the sharp end was scrolled under, then the main leg of the tine was bend 90º to make the top parallel with the floor and level to mount the anvil on.
A platform was made from sheet steel with caster wheels bolted on so the assembly would be moveable.
The bottom of the tine slides under the platform and with jacks is lifted up to make contact with the bottom of the platform.
Initially a scissors jack was used, but three screw jacks were found to be better for strength and stability.
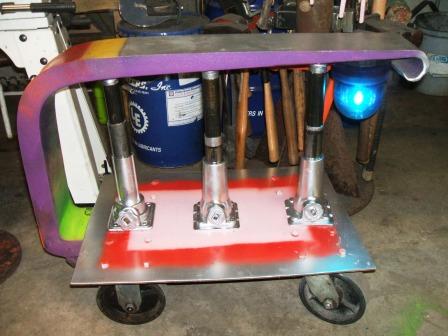
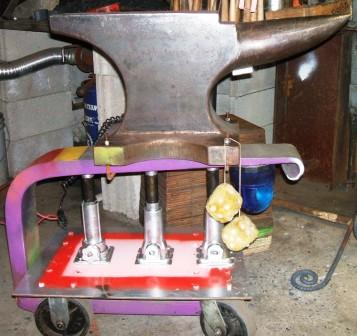
Three jacks between the fork lift tine and wheeled platform hold the anvil up and allow for 4 inches of adjustment. Four more screw jacks under the platform allow another 6 inches of adjustment.
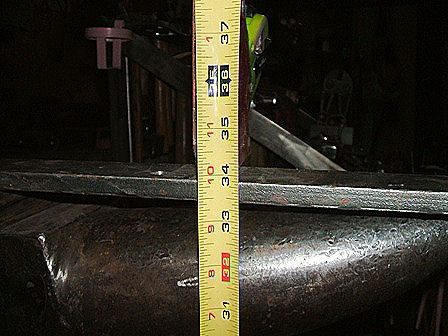
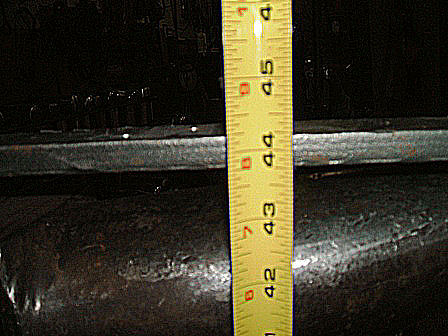
Minimum height with the 300 lb anvil is 34”, maximum is 44”. These measurements would change depending on the size anvil used.
The final configuration, complete with fuzzy dice and revolving blue light. The anvil is strapped to the forklift tine, which is in turn clamped to the wheeled platform by the screw jacks, and the total weight is over 500 pounds. In use, it has been very stable and solid. The wheels allow the assembly to be easily moved, but do not detract from the stability or solidness of the anvil in use. Finally, the finishing touch is to paint the whole rig in the shop colors. This one won’t be lost in the background.
-
IForgeIron Blueprints
Copyright 2002 - 2011 IFORGEIRON, All rights reserved
BP0441 Welding Rod Holder
by Irnsrgn aka Jr. Strasil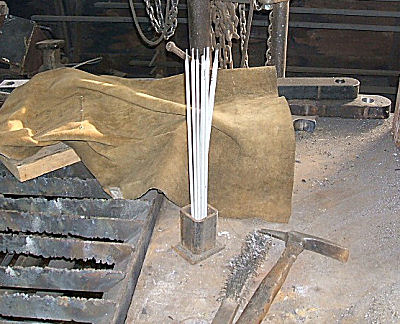
A welding rod holder can be as simple as a piece of square tube with a bottom welded onto it.
or, two pieces of plate cut in a "V".
A longer section of square tube will hold the rods in place by its own weight and they won't roll around loose.
For a permanent storage area out of the way to protect the rods when not in use, A cabinet with a door properly labelled is necessary.
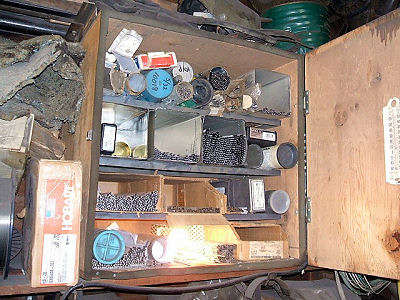
Viola!! All the different rods by size and type neatly stored and readily accessible as needed.
-
IForgeIron Blueprints
Copyright 2002 - 2011 IFORGEIRON, All rights reserved
BP0442 Metal Cooler
by Glenn Conner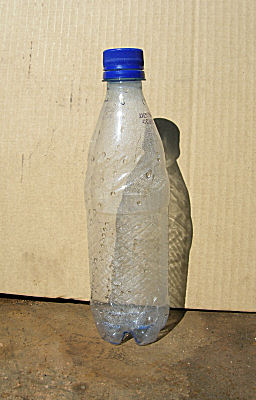
You can use a water bottle with a recloseable sports cap, or just drill a hole in the cap.
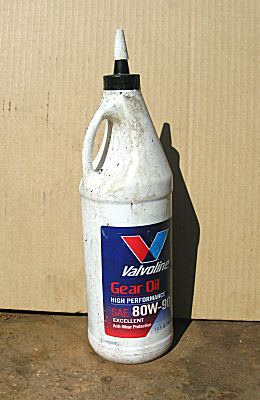
But a gear lube bottle already comes with a funnel cap.
Just fill the bottle with water. The funnel cap will direct a small stream of water on to the hot metal to create localized cooling.
This will isolate the heat to where you want it, as when you are making a twist.
Now you can control where the twist starts and stops.
-
IForgeIron Blueprints
Copyright 2002 - 2011 IFORGEIRON, All rights reserved
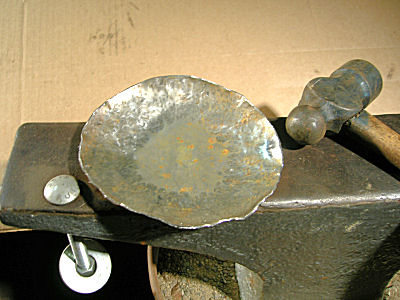
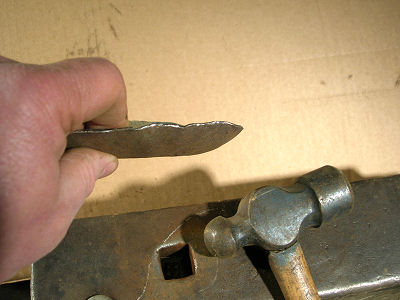
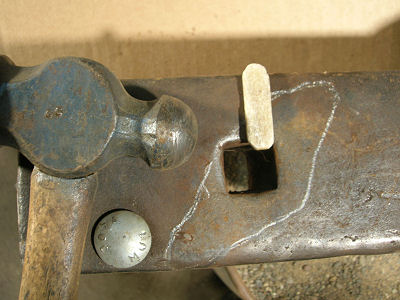
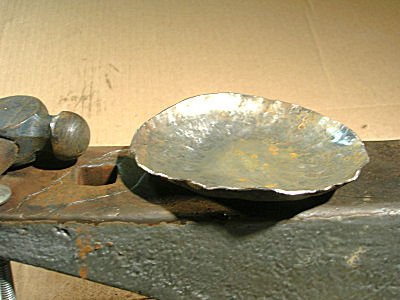
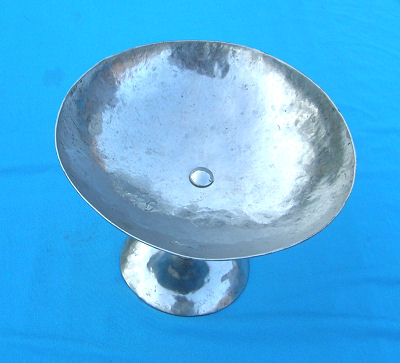
BP0444 Cold Forming Armor or a Bowl
by Glenn ConnerThis same procedure is used to form armor, but for this Blueprint we will use a bowl as the subject.

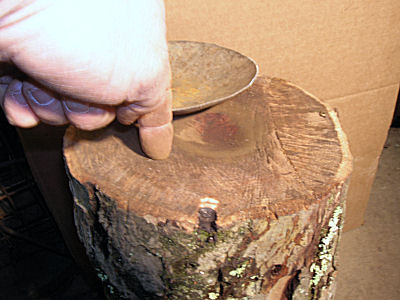
Start by making a "wooden" swage. This is a 8" diameter piece of firewood.
Make a shallow depression.
A 4-1/2" grinder was used only because it was handy.
The depression is little larger than an egg and maybe 3/8" deep.
The metal for this blueprint is a disk cut from the lid of a 55 gallon drum.
Place the metal over the depression. Starting at the outside edge work all the way around and gradually work your way to the center, working all the way around each time. Work with blows just hard enough to stretch the metal gradually and avoiding kinking or making big dings.
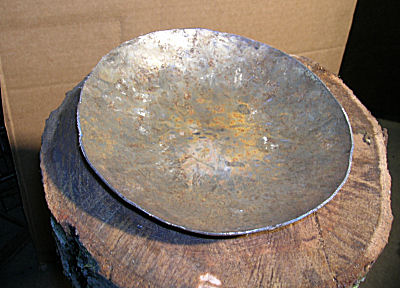
After a couple of passes, the metal starts taking the shape of a bowl.

You can see the sides of the bowl. The bottom is still flat.
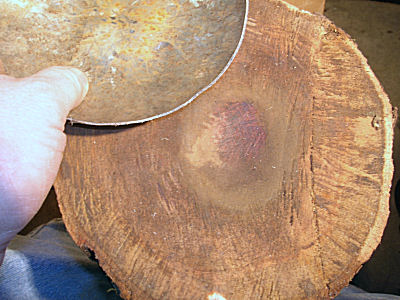
The scuffing shows how the depression works and where the metal is in contact with the wood.
After a couple of passes the edge raises up about a finger joint and a half.
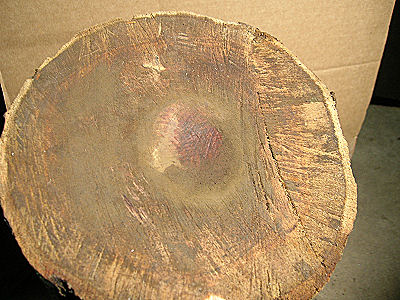
A close up of the depression shows that the metal never touched the bottom of the depression, Only the edges were used as a support and the hole was used as an unsupported area for forming the metal.
The side of the bowl after only a few passes.
The bottom of the bowl is still flat.

The side is still over a finger joint tall.
The bowl is no where near finished. This was only a few passes with the hammer to show how a slight depression in wood could be used to form a bowl. This is not the only way to accomplish the task, just one way.
-
IForgeIron Blueprints
Copyright 2002 - 2011 IFORGEIRON, All rights reserved
BP0445 Cold Forming Armor or a Bowl 2
by Glenn ConnerWhat you make is your choice, the purpose of this Blueprint is to show you one way it can be done.
All you need is a hammer and an anvil to make a bowl. The round blank has shows the results of the first pass.
The anvil buried in sand, and the carriage bolt and washer dampen the ring of the anvil.
After a couple of circles you can see the bowl taking shape.
The impact marks show the part of the anvil being used. The metal is supported by the edges of the hardie hole, and the hammer sinks or pushes the metal into the hardie hole a little bit with each hammer blow. The wear pattern tells the story.
Work from the outside toward the inside and in a circular pattern. Try to get close to the finished product as you work your way across the metal.
A couple more passes and the bowl is a little deeper and the sides are more refined. Notice the bottom is still flat.
The wear pattern on the anvil is still the same.
It is a good start, just needs a little more work.
Getting things to this stage took almost as long as cutting out the circle of stock. From here you keep working the metal to bring it to the shape you desire. It will have a nice "hammered" look. To get a smooth texture, you planish the metal, file the metal, sand the metal, buff and polish the metal.
Planish is to give a smooth finish to (metal) by striking lightly with a smoothly faced hammer or die. This is usually a term used by auto-body workers, and armorers.

-
IForgeIron Blueprints
Copyright 2002 - 2011 IFORGEIRON, All rights reserved
BP0446 Using Your Anvil
by Glenn Conner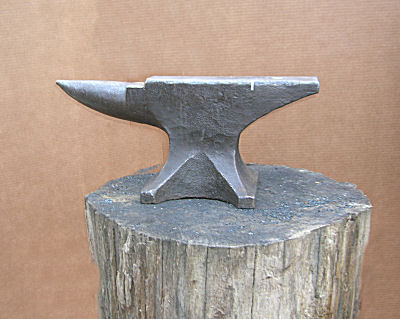
Many times when someone says anvil, you only see it one way. It sits on a stump, or anvil stand, and it looks much like all the other anvils you have seen. It is a nice looking anvil !
No one said you could not put it face down and use the base as work surface.
Or use the handling hole as a hardie hole.
Those things can be surprisingly deep.
But then you have the curves of the anvil that can be used to make curves of one size.
The other side of the anvil had a different shape and produced a sifferent size curve.
The foot has yet another shape and produces yet another size curve.
And don't forget to try things in both directions. There may be a difference.
A small anvil can be turned in many different ways and many of the surfaces can be used. You paid for the whole anvil, why not use the whole anvil.
-
IForgeIron Blueprints
Copyright 2002 - 2011 IFORGEIRON, All rights reserved
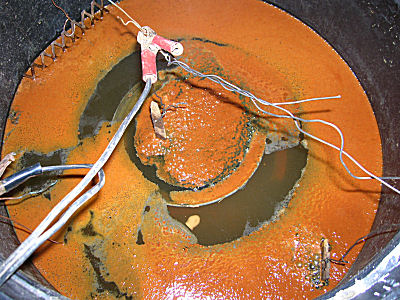
BP0448 Derusting Metal
by Glenn Conner
Never tell your wife your cleaning out your smithy. For years, I have used a couple of old metal cream cans with some boards across the top as a shelf in the shop. Once the cream can containers surfaced, they were declared an endangered species and MUST be cleaned up. (Read that as "wife speak" for cleaned, painted, and moved to a location of her choice.)
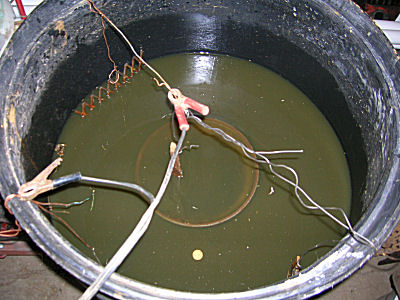
Use a plastic container.
Make sure that the battery charger and electrical cords can not come in contact with water.
1 tablespoon of Arm & Hammer Super WASHING soda (sodium carbonate) per gallon of water is a good mix for this process. Baking soda (sodium bicarbonate) can be used, but it takes a lot more sodium bicarbonate than sodium carbonate.
The hook up is rather simple, use a battery charger and connect the NEGATIVE to the material you want de-rusted, and connect the POSITIVE to where you want the rust to go. In the photo the negative connection is down the side of the container to the cream can, and the positive is to 3 pieces of scrap metal, one on each side and one in the middle of the cream can. If the object has multiple parts that may not be electricly connected, multiple connections should be used for best electrolytic performence. You may need to wire brush or otherwise remove the rust to bare metal to get the best electrical connection.
DO NOT use stainless for the electrodes as they make some very nasty Hexavent Chromium that is poisonous, is absorbed through your skin, and is a haz-mat material.. Any rusty piece of iron will work just fine.
The positive metal must NOT touch the metal being de-rusted. Only 2 to 4 amps is needed. If you exceed 4 amps, remove some of the positive metal from the water. Give the process some time.
I don't get worried about the rust that forms on the surface as the item dries, I just let it form, and then treat with Phosphoric acid solution. After it drys, you have a nice chemicly bonded layer of Iron Phosphate, (FeO3) witch acts as an impervious coating to future rusting, and is an excellent enamel primer.
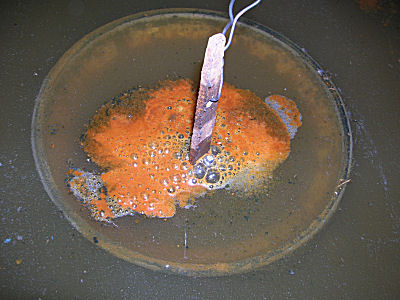
The process will produce bubbles and breaks some nasty rust and crude loose. In this case a piece of positive scrap metal was hung in the center of the cream can to remove the rust on the inside of the container also. Pull the positive scrap metal out of the water a couple times a day and clean the rust from the metal.
Did I mention it can get nasty? From everything I have read, the process is self limiting, and will not hurt the original base metal.
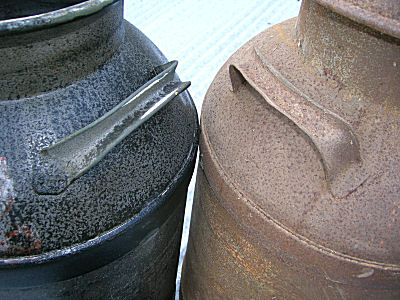
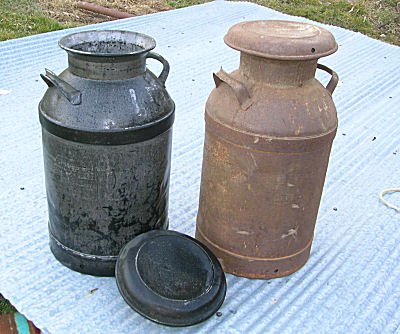
After 2-1/2 days, the cream can was removed and a pressure washer was used to clean it up. As the metal is now clean and wet, it can flash rust. Have your paint brush (or spray can of paint) handy and apply a protective coating as soon as possible.
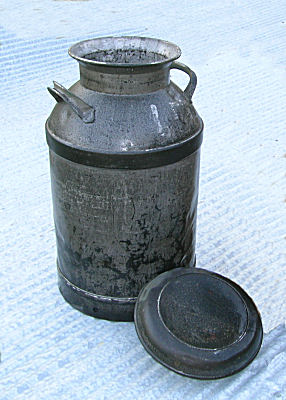
Now where is that can of paint.
Sometimes when you ask people to look for scrap steel you get some interesting things. The fellow said the last floods had washed the dirt away from some gears in the creek. He pulled them out of the mud with his truck and ask if I wanted them.
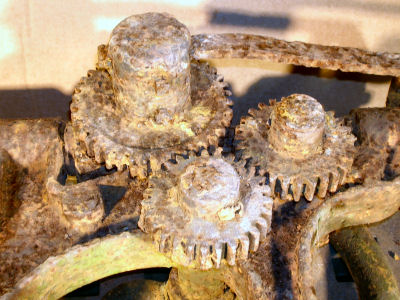
The gears were encased in mud. A full pressure washing was needed to even get down to the rust.
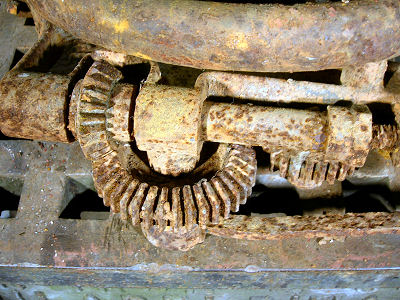
And there was some rust.
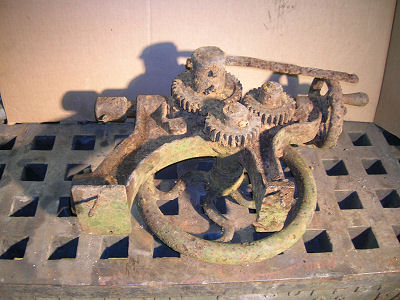
After the mud was removed, it was time to clean it up a bit more.
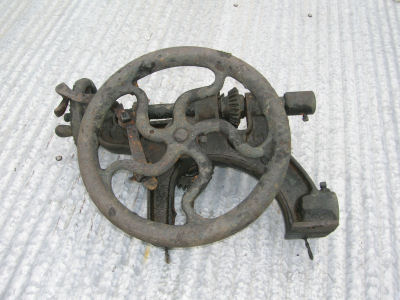
The whole unit was derusting using the technique in this blueprint.

The gears did clean up nicely.

Derusting does not fix broken parts or make things new again. It does remove rust from metal. Now for a little TLC (Tender Loving Care) to salvage the parts for use on other drills.
BP0420 Forging a Knife from an Old File
in BP 400 Series
Posted
IForgeIron Blueprints
Copyright 2002 - 2011 IFORGEIRON, All rights reserved
BP0420 Forging a Knife from an Old File
by Don Abbott
We’ve had several questions lately on forging knives from old files, so I thought I would give a step-by-step procedure for a simple method that I use from time to time. Understand that these are simple instructions for a very simple blade. There are as many different ways of forging a blade as there are smiths who forge them. Everybody will have different ideas about how to get from file to finished knife, but this way works for me.
I did a live run-through by these instructions this past Saturday just to be sure I was not leaving anything out. I completed all of the forging steps in well under an hour using only a charcoal forge, hammer, anvil, and my wolf-jaw tongs. You will also need a cutter of some sort. I use a hot-cut hardy, but a handled hot-cut, or even a chop saw, will work fine.
There has been much said about which files to use, and general consensus is that you can’t beat the old “Black Diamond” brand. But like everything else, these are getting harder to find. Any file made of high carbon steel is going to work. Really old files are usually going to be good, but they say that many of the newer, cheaper brands of files, and especially rasps, can be casehardened mild steel. These are no good for blades. If the material is in question, you need to do a little research on spark testing. Perhaps you could even test a sample piece and see if it will harden when quenched. Also note that this same forging procedure would work with any rectangular piece of carbon steel.
NOTE: You will hear reference to what we call “critical temperature” and/or “non-magnetic”. To find this temperature, you will gradually heat the steel, continually checking it with a long-handled magnet of some sort. There will be a point where the steel will no longer attract the magnet. This is your critical temperature. Make a mental note of the color of the steel. In my shop, this will be a good uniform orange color. Do it enough and you won’t be nearly so dependant on the magnet.
NOTE: You will hear me refer several times to “a good forging heat” or “a good heat”. You must be aware that the higher your steel’s carbon content is, the tighter your forging temperature range will be. You might be accustomed to pushing your mild steel forgings to a bright yellow heat and then working them down below cherry red. You’re gonna have to tighten up for a thin, high-carbon piece like a file. Don’t heat your file much past critical, and go back in the fire as you lose heat down around cherry red. Work it too hot and you’ll get damaging grain growth. Work it too cold and you’ll get stress cracks. It ain’t hard to do, just keep a close eye on it.
NOTE: One more thing up front: You will hear bladesmiths speak of “normalizing” their steel. We will accomplish this by a three-step procedure as we forge our file blades. To normalize, gradually heat your blade to non-magnetic (critical) and leave it in the fire at that temperature for about a minute (sometimes refered to as “soaking”). Take it out of the fire and let it gradually air cool to black. Repeat this process two more times. Now your blade is normalized. The purpose of this is to relieve the stress that all of our forging operations will introduce to the steel. It allows the steel to relax and become accustomed to its new shape. Feel free to normalize at any point you think your blade might benefit.
NOTE: Before I forget… get yourself a good, stiff steel wire brush and keep it handy. Your steel will form scale and it will pit your blade and cause problems down the road. You cannot wire brush too much. Get in the habit of hitting it a quick lick with the brush every time you come out of the fire. A scale-free blade is a happy blade.
So that’s what we’ll start with… and an old file:
Before forging, you can anneal the file and grind past the teeth for a clean start, but this is just a blacksmith’s quickie, so we’ll leave the teeth and deal with them later.
The first forging I do is to draw out the tang. This is going to be a “stick tang”, or “hidden tang” knife, by the way, so I need a little more tang than the file has to offer in its natural state (the intended size of your finished knife handle will dictate the length of the tang. I’d rather go long and cut it off than end up short).
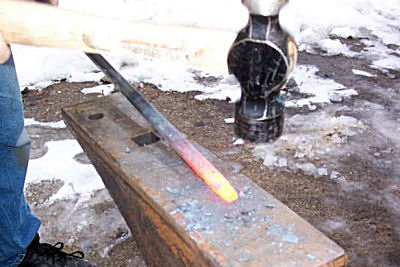
Into the forge, and take a good heat at the tang end:
Working over the edges of your anvil, simply draw that tang to your desired length:
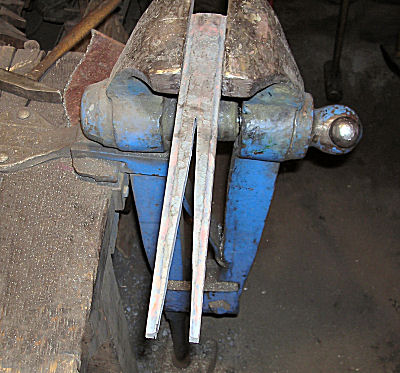
Now, unless you want to end up with a miniature sword, you’ll want to cut the blade end off a bit before you commence forging it.
Take a good heat on the blade end, and cut it on the diagonal. I usually line the blade of my hot-cut up with the teeth of the file, but it really is not critical. Cut as shown by the dashed line:
Your file should now look something like this:
Note that, in spite of the way the blade is shaped at present, the top will be the spine of the blade; the bottom will be the edge .
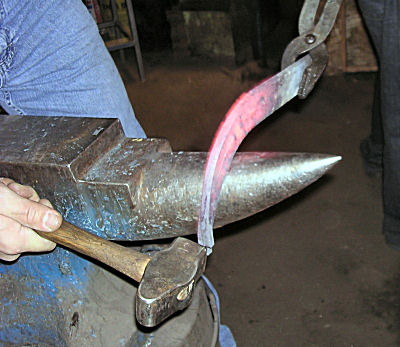
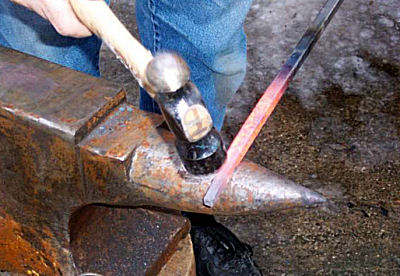
Take a good heat on the end of the blade to start forming your point:
You want to begin forging the profile of the point end, causing the bottom edge to turn up (vary the angle of your blade on the face of the anvil to achieve the point shape you desire).
The dark arrows represent the approximate direction of your forging blows:
A WORD ON BLADE TAPER:
As you proceed in forging the profile (side view) of your blade, you will want to pay continual attention to the taper (top view) as well. When forging the blade profile, the thickness will naturally tend to bulge. You must continually correct this, ultimately aiming toward a good distal taper; kinda like a really slim diamond, or a really skinny fish. Something like this:
Here you should have established the final profile of your blade:
At this point, you are ready to start hammering the bevel into your blade.
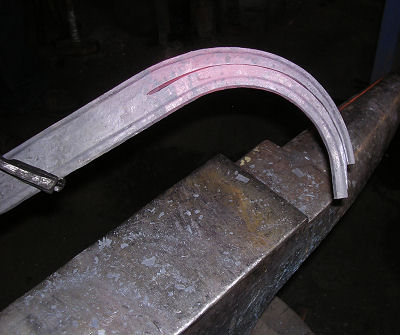
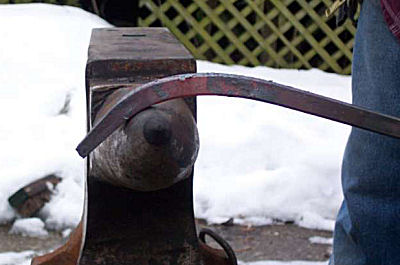
If you think about it, as you start to thin the steel on the edge of your heated blade, the material on the edge is naturally going to spread in all directions. This will leave your blade bending backward like a banana. You can try and see what happens if you want to, but I have learned to put a counter-bend in the blade first. Some folks correct it as they go, but after a time or two, this problem becomes predictable enough to fix up front.
Take a good, long heat:
Then simply introduce a slight arch, making the edge become concave. You can bridge the blade between two pieces of pipe or some other specialty device; I simply bridge the spine of my blade over the step of the anvil and work it in there.
You should have something that looks similar to this:
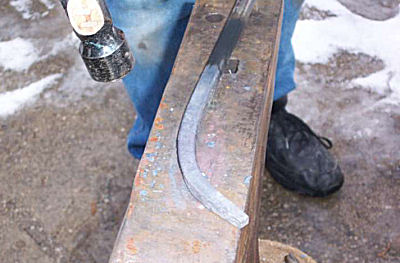
NOTE: every one of these procedures will potentially affect the natural flatness and straightness of your blade. ALWAYS restore your flatness and straightness before proceeding to the next step! A twist, warp, or bend will only get worse if not corrected.
Here we begin hammering the bevels into the blade. I tend to begin my forging passes at the tip and work back, but I suppose back-to-front will work as well. The key is to maintain a consistent pattern. Make as many passes as you need to establish the bevel you want.
Don’t hesitate to take more heat at any point in the process. If you lose forging heat in the middle of a pass, stop hammering and go back into the forge; just remember where you left off, then resume.
A lot of this stuff will not make much sense until you get your hands on it. This is really one of those things that you’re going to have to try. That’s why we’re using an old file instead of expensive steel!
As you forge your bevels, you must pay close attention to the angle of your blade to the face of the anvil. Remember, the anvil will “answer back” every blow of the hammer, so if you lay it too flat on one side, you’ll undo what you just did on the other.
You should be forging bevels at an angle similar to this:
As you forge the bevels into the blade, remember that we are going to do a good bit of stock removal to achieve our final shape. HERE is where we’ll get rid of most of those unsightly file teeth. So as you forge, DON’T WORRY ABOUT GETTING IT REAL THIN! Especially for beginners, you are going to get rid of a lot of surface imperfections; teeth, hammer marks, scale, etc., so forge it thick; we’ll grind it thin.
Think of your blades cross-section like this:
So here is where we end up: tang drawn, profile forged, and bevels hammered in. Notice that the profile is a little “fatter” than your original profile before the bevels were forged. That’s good. We’ll clean it all up in the stock removal stage. MAKE SURE that everything is good and straight! At this point, you can put the hammer down. We are finished with the forging, but we will be going back to the fire, so keep it hot.
The blade should resemble this:
Normalize here, if you want to. Might help; can’t hurt.
In order to do any filing, grinding, or drilling we might want to do, this steel needs to be as soft as possible. This process is called annealing. In our case, it’s not rocket science, but indeed, it can be. Since we are blacksmiths and not rocket scientist, we are going to keep it simple.
You will need a big, non-flammable can, bucket or box, preferably with a lid, full of some sort of insulating material. A lot of folks use powdered lime or vermiculite. I use one of those big 3 or 4 gallon popcorn cans full of sifted wood ash. What we are looking for is something to slow the cooling process way down.
The process is simple. Gently heat the blade to non-magnetic (critical temp), and bury in the ashes (or vermiculite, etc.). Put the lid on. Leave it until the next day. Don’t peek; just leave it.
After this slow cool-down, your steel should be soft enough to work with a file, a grinder, sand paper, drill bit, stones, etc., etc. The whole grinding and shaping process is a study within itself; one that I still need a lot of work on. Files are a good way to start. This gives you a lot of control and you can sort of make your decisions as you go. A good belt grinder will be quick, but you better know what you’re doing.
NOTE: Leave your edge roughly the thickness of a dime. Don’t take it to a sharp edge right now. If it’s too thin, you will increase your chances of cracking or warping during the final heat treating. We’ll worry about the edge in the final finishing stages. Just be sure it is good and smooth.
After filing and grinding everything, you can start cleaning up the scratches with descending grits of sand paper. Start around 100 or 150 grit and work down to 400. Use each new grit until you remove all the scratches from the previous grit. This is probably the most boring and least enjoyable process of all, but the results you get depend on your patience and the time you put in. Again, volumes have been written on blade finishing, but this is the 101 method.
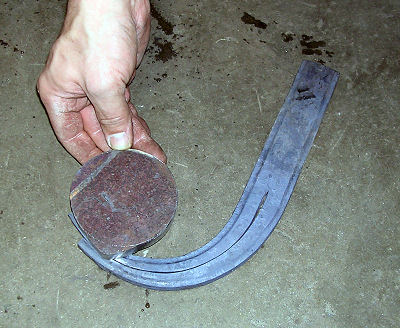
Here’s what the almost finished blade might look like:
At this time, we are ready to finish up with the heat-treating.
Go ahead and normalize your blade, and then remove any scale or crud you might pick up in the process. A clean blade is important from here on out. We want it fully prepared for what is about to take place.
Now it’s time to harden the blade. You will need your forge, your tongs, and your blade (of course). Also some type of quenching medium and something to put it in.
I use an old brass flower planter that is about 6 inches square and 2 feet long. I’ve seen some folks use old valve covers from truck engines. Just be sure it’s not flammable, and doesn’t leak.
As for quenching mediums, I use vegetable oil. Any type of cooking oil is okay. I have seen several guys use automatic transmission fluid. It seems to work well, but it stinks. The cooking oils smell like, well, like your cooking. Just stay away from used motor oil and transmission fluid. If you can smell it, that means you’re breathing it.
I normally fill my tank with oil and then pre-heat it to roughly (very roughly) 150 Fahrenheit. I usually accomplish this by heating up a railroad spike and submerging it in the tank (I just leave it in there).
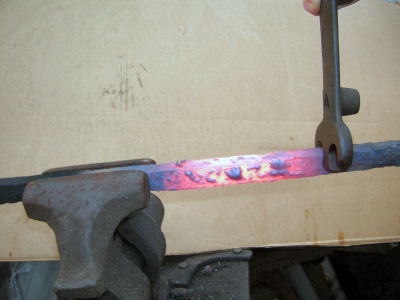
Then, you will take your cleaned and normalized blade and ease it back into the fire. Let it heat slow and gradual, and be very sure the heat is dispersed evenly, even if this means moving the blade back and forth a bit. This time, check it very carefully with the magnet. You can certainly take your time getting up to critical, but you definitely don’t want to exceed it. (Take your time, and don’t rush. At any time you feel like you need to scrub the mission, just re-normalize and start over.)
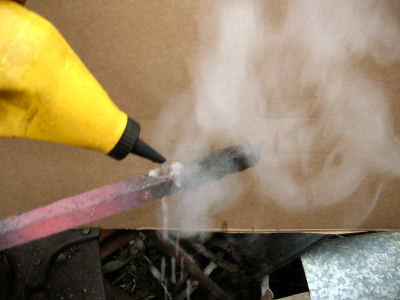
As soon as you reach non-magnetic (critical), you need to go into the quench. Different steels have different rates at which they must be quenched, but we’re not going to get fancy. Just be quick. Come out of the fire and into the quench edge first, just like you are cutting through the surface. Submerge the entire blade in the oil, holding it straight. You can move it front to back or up and down a bit, but do not wave it side to side… it could warp. Leave it there until it is completely cool. I know there are also many ways of quenching a blade, but this is the most basic; just quench the whole blade.
NOTE: Depending on the type of oil you use, you might get a little flash or surface flame when you quench. As in all things flammable, be prepared for the worst. Do this only in a protected area with a fire extinguisher handy. Gloves, glasses, etc… you know the drill. Safety first.
After your blade is cool enough to handle, it should be fully hardened. It will be blackened from the burnt oil, so you need to take the time to clean it back to bright. To test the blade for hardness, take a good file and try to cut the edge of your blade. The file should simply “skate” like a piece of glass. If the file cuts the steel of your blade, it is not as hard as it should be. But if you did it right, it will be fully hardened.
If the blade is fully hardened, it is too hard to be of any use as a knife. The steel is extremely brittle and too hard to sharpen. You will need to introduce enough heat back into the blade to pull back some of this hardness. This is what we mean by tempering. I normally use a very simple 3 step process here… well, actually 2 simple steps, and one that can be a bit challenging.
First, put your blade in a 400 degree oven for an hour. You can use a full size kitchen oven or a small toaster oven. Heat is heat; either will work. After an hour, let it cool.
Second, do it again; 400 for an hour. Let it cool. Now, take it back to a bright 400grit finish. It is important that you have a clean, bright finish for the third tempering step.
Third, you will need an exposed source of heat. I use the eye on the kitchen stove. Some folks use a block of iron or copper heated in the forge, some use a propane torch, some use a special set of heavy jawed tempering tongs, and some have the nerve and know-how to do it over the forge. I have found the front stove eye on the high setting is the easiest and most manageable heat source to use for these smaller blades.
You definitely need that bright finish on your blade, because you are going to be watching the oxidation colors “run” through the steel. I highly recommend that you polish a couple pieces of scrap steel (even mild steel will work) and practice with this before you go live. Make sure that your work area has enough light to see what’s going on.
I generally turn the stove eye to “high”. I grip the tang with tongs or pliers and lay the spine of the blade directly on the eye. The blade needs to remain edge up. Immediately begin to move the blade back and forth with the entire spine making passing contact with the heat source (kinda like you’re playing a slow tune on a fiddle). Soon, depending on the size and shape of your blade, you will see the first hints of a straw color appear closest to the heat source. Now you really need to pay attention. The colors are going to run in a manner similar to a sunrise. Straw will be followed by bronze, bronze will be followed by a range of purple-ish colors, and then comes the blue. Ideally, you want to let the heat flow from spine to edge, stopping the process as soon as the bronze band reaches the edge. If the blade is wide enough, you can end up with a full spectrum across your blade, similar to this:
If this procedure goes as planned, you will have managed to reduce the hardness of the blade in a way the spine will be somewhat flexible, and the edge will remain hard enough to hold a good edge. If you find the edge is still too hard, polish it up and re-temper, this time letting the colors run a bit farther that the last time.
That will about do it. All that’s left is to do the final polish and mount the handle. We have taken it to 400grit at this point; how fine you want to go is up to you. Same with the handle… bone, antler, horn, wood; what ever you have in mind.
Here’s a couple of my “early works” made according to these instructions:
Again, our experienced bladesmiths will automatically see all sorts of things that can be done differently (and probably better), but this is simple, and it works for me.