Frozenforge
-
Posts
648 -
Joined
-
Last visited
Content Type
Profiles
Forums
Articles
Gallery
Downloads
Events
Everything posted by Frozenforge
-
Find some large pieces of cardboard, single layer like a cereal box and start bending, cutting till you get the final size and shape you need. You can actually make a miniature version out of paper to get the concept down. Then go full scale with the cardboard then get the appropriate guage sheetmetal that you can hand form and use the cardboard as a pattern.
-
Please help me with anvil identity
Frozenforge replied to Metalmark's topic in Anvils, Swage Blocks, and Mandrels
Thats a beauty! The block on the base is called an upsetting block. -
It can be from 1860 to 1910. According to AIA Peter Wright only made 1 design change around 1885 and it only affected anvils over 150lbs.
-
I used torch cleaning files to clean and size the mig tip. I learned the hard way about trying to drill the tips on my wire feed trying to resize on when I had to replace one on a Sunday in the middle of a project! I will look in the thread but if its not there, when and where is the January meeting? I have been trying to make it to one for a while now but its like a jinx, something always seems to come up at the last minute!
-
You can get a date range but we need a good picture of the logo that is part of and above the weight markings. You need to make a little bottle opener, steak flipper or something cause you got a REALLY GOOD DEAL!
-
On a NA burner what would be considered more important when constructing? Maintaining smooth airflow so it can induce as much air as possible or not really worrying about that so any turbulance created helps mix the air and propane more in the tube as well as the outlet lip/flare. I am wondering if I should lower the propane velocity with a larger mig tip so the heat stays in the forge a bit longer? The burners I have made so far have been the Ron Reil improved designs and I did what ever I could to improve airflow, blended out the seam in the pipe, blended where the tube joins the reducer and generally cleaned any burrs ect. Carefully adjusted the aiming of the mig tip (.035) to shoot straight down the middle. When running the burner it will run lean without a choke and when tuned with the choke for a neutral flame the choke is probably 80% closed. It runs stable from 1-2 psi up to 30-35 psi. By the time I get to 6-7psi its really starting to roar and by 30 the outlets of the forge look like rocket exhausts.
-
McMaster Carr has cad drawings linked to their hex cap screws. The drawing shows the hex wrench size. Do you know what the thread pitch it is?
-
Just search anvil stand in the forum and you should be able to find some pictures of a stand built up from lumber. Some screws and glue and you can make your stand. If you have a hard time finding a good picture here jut google images.
-
You could really use a stump or something more solid under that anvil. The board the anvil is mounted on IS flexing and absorbing alot of your hammer blow. The noise from the spikes bouncing around would mask the anvil ring!
-
It looks like the openings on the ends are a modification from the original design in the first picture. The burners are designed for a certain amount of back pressure and the change has altered the back pressure. You can get some soft firebrick and reduce size of the openings till it runs properly.
-
heat treat questions
Frozenforge replied to bonehead-student's topic in Heat Treating, general discussion
If you go to the McMaster Carr catalogue and search for tool steels there is a link to a basic heat treating guide for the different tool steels they sell. I think it has good information but maybe one of our members with more experience with steel hardening could take a look at it for any discrepancies. -
Identify this anvil markings
Frozenforge replied to b4utoo's topic in Anvils, Swage Blocks, and Mandrels
It gained about 25lbs so the plate added was pretty hefty. If you look thru the hardie hole can you see evidence of welding in there? If there is then whoever added the plate may have notch welded the plate thus eliminating the dead area between plate and anvil. Was the seller willing to negotiate or was he even aware it had been modified? -
Take a look at a product called POR 15. It actually works best on lightly rusted or porous surfaces. It reacts with humidity in the air and actually penetrates and seals the surface. I buy the pint size put what I need in a cup and the rest I transfer to a mason jar to seal it. 1 drop of sweat or wate in a pint can and the next day it will be solid. Learned that the hard way. Make sure the sealing areas on the jar are clean with no paint on them or it will be sealed for good!
-
Anvil with no Hardie or pritchel?
Frozenforge replied to 78sharpshooter's topic in Anvils, Swage Blocks, and Mandrels
That looks like an old Peter Wright that has had a much thicker piece attached to the top or was a custom order. The close ups are too blurry to see any details. -
Help with first anvil
Frozenforge replied to Heliotropicmoth's topic in Anvils, Swage Blocks, and Mandrels
TPAAAT is basically talking to people any where you go no matter if you think there is no chance they might know. You never know who might have an anvil sitting in the basement, in the garden, corner of the garage. You have already started to learn about anvils and how they have been manufactured. The better educated you are the easier it is to recognize a bad anvil from a top quality one. When I first decided to give forging a try I thought an anvil was an anvil but upon starting to research realized how wrong this was. I obtained a copy of Richard Postmans Anvils in America (AIA) and what I paid for the book saved me from wasting money on a made in china ASO that were being sold at a local pawn shop that also sold cheap tools. Even up here in Alaska there are anvils, no where near the number that are down in the Ohio area. The trick up here is finding one for sale and at a reasonable price. As an example I was talking to the guy that does our aircraft seat upholstery for where I work and asked him if he knew anyone that might have an anvil. To my surprise he said "I have one, if its still there, from 20 or so years ago when my daughters had a horse! I thought I could save some money by shoeing the horse myself but quickly realized it looked way easier than it is." It was a 80lb HayBudden, some chips in the edges but no delaminations or cracks (which I knew to look for from research and knowing how the anvil was made). I had my book with me so I was able to tell him how old it was and what to look for to determine if it had been damaged in the past showed him the ball bearing rebound test. We both learned something that day. He said an old friend of the family gave it to him when they got the horse so he didnt have any emotional attachment or money invested which is also why is was just sitting outside the shed overgrown by a shrub. I have found several others that are just sitting not being used and not for sale. The 2 largest are a 392 lb Sodefors just sitting outside and a 395 lb Kohlswa in a machine shop up on a display rack cause it "Looks Cool". My friend owns a lawncare business and he has shown me a couple in clients gardens that belonged to either a late husband or father/grand father. I could see the emotional attachment so didnt even ask if they were for sale. I told them what information I could determine by examining it if they didnt know already and they always really appreciate learning something more a bout their heirloom. Be respectful, polite and leave your name and number and you might be surprised how quickly something shows up. Be ready with cash in hand! -
It appears to be a star anvil, pictures of all sides and particularly the bottom would help to confirm the identity. There should be a hole in the bottom up into the main body.
-
Flame looks too rich (too much fuel) it also looks like your propane pressure is pretty low so it may not be inducing enough air. When you say it goes out when you open the choke does the flame actually blow out off the end of the nozzle or does it go back up the pipe then go out?
-
It appears to be in good condition but that would be a pretty high in price even up here in AK. Check with any local machine shops to see if they have any left over pieces of large steel, forklift repair shops for an old tine. Leave the seller your number and a fair price you are willing to pay, maybe after some time he will call you. Often the most powerful bargaining tool is to walk away and have patience.
-
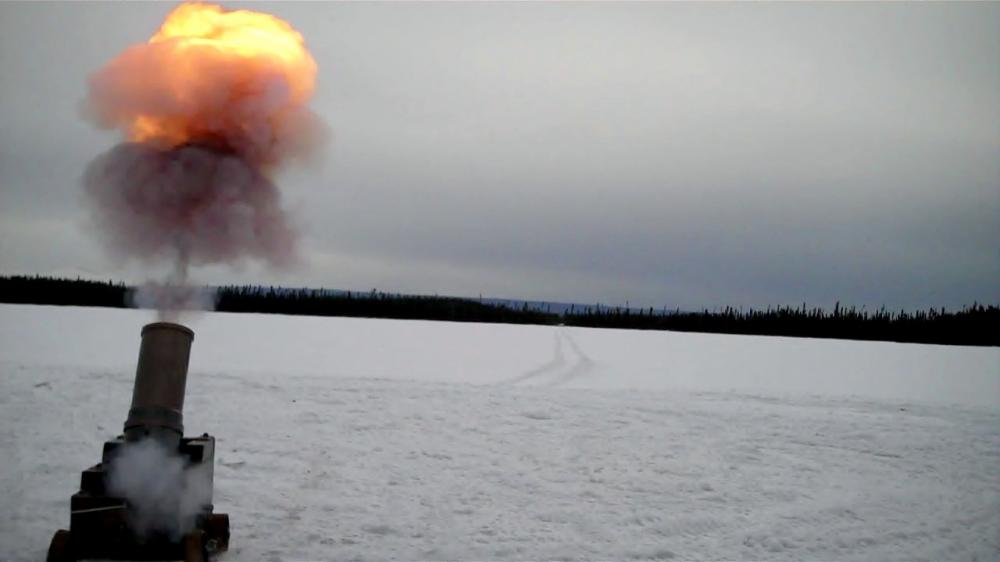
Thats 4oz of black powder. The powder chamber will hold 4 1/2 oz.
-
Built this 2 years ago. 60 degree firing angle, 16lb bowling ball. Treeline is 1/4 mile away. Found ball 1/4 mile past treeline. Total 1/2 mile! Difference in building it now from when I was younger, 2 months of research and design. Ability to safely fire remotely by long cord. Don't even want to know the stupid stuff from early years!
-
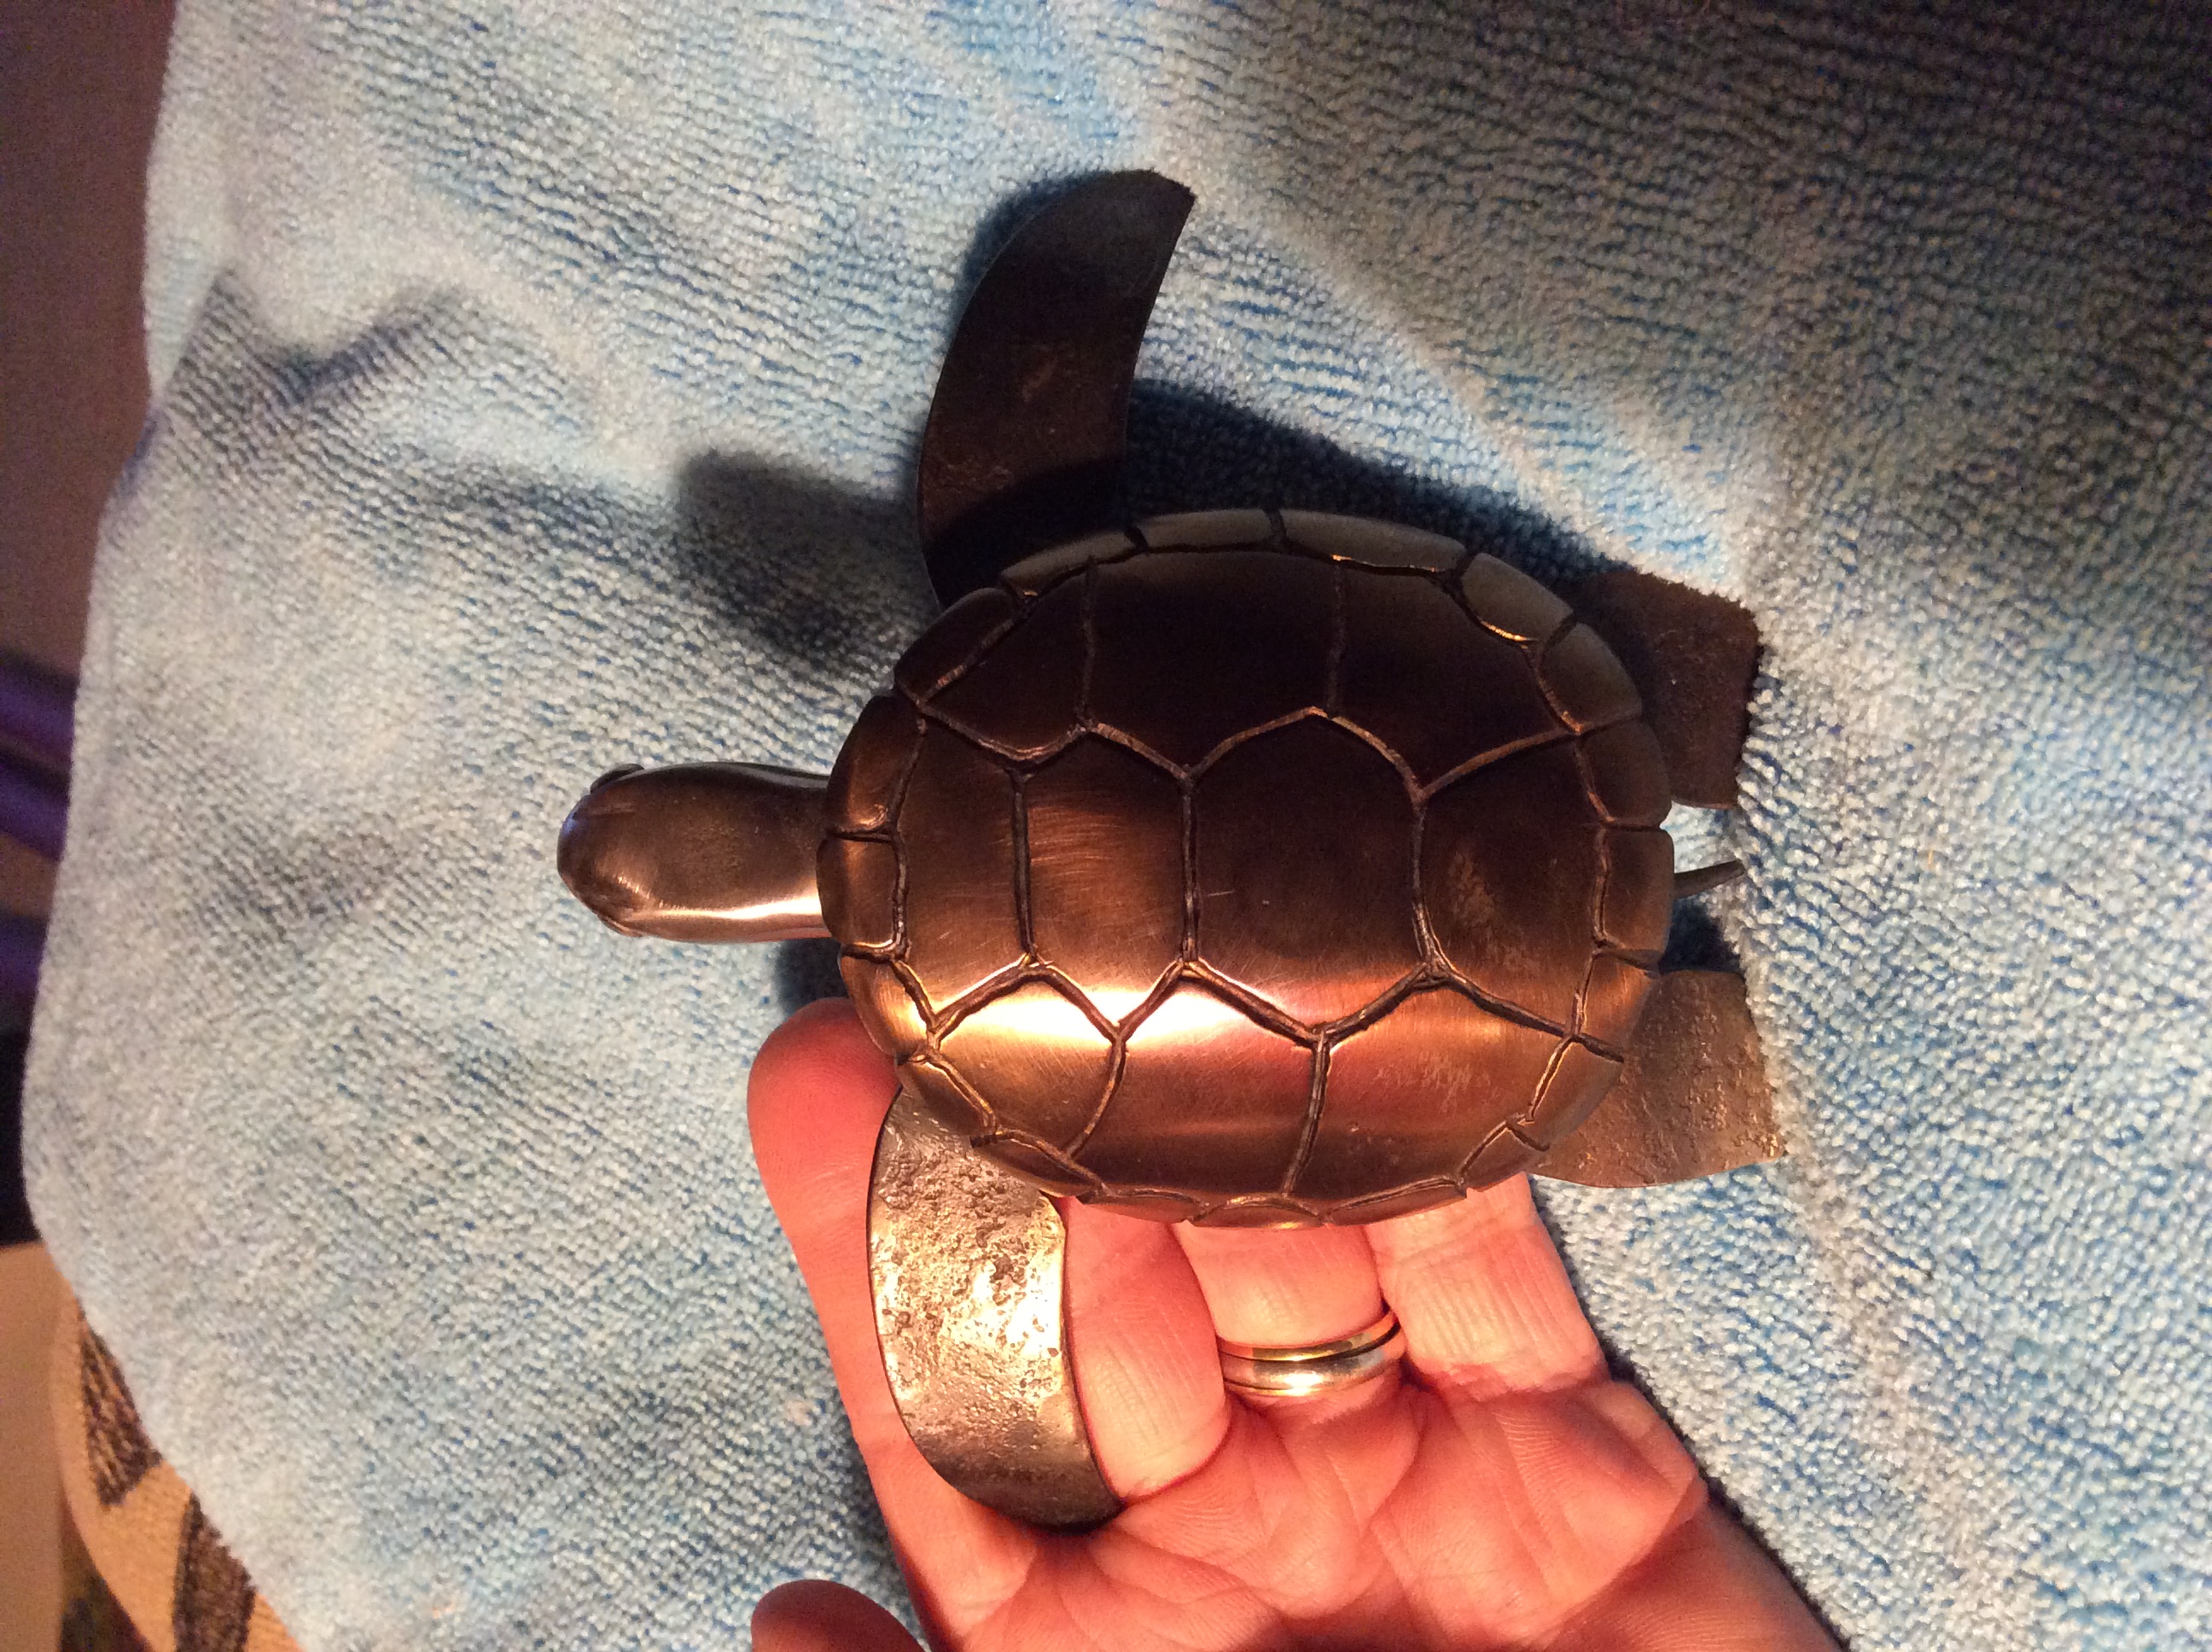
Show me your Bottle Openers!
Frozenforge replied to Arbalist's topic in Blacksmithing, General Discussion
Nicely done, I can appreciate the time and effort! I found getting the chisel tuned just right really helps.
-
Can someone date my Trenton?
Frozenforge replied to DC_CycleWorks's topic in Anvils, Swage Blocks, and Mandrels
If the s/n is A4937 1899, A49437 would be 1904. Not sure what you mean by "difficult to live with". The upside down stampings on anvils is not uncommon, they were all done byhand back then, nobody's perfect! -
Show me your Bottle Openers!
Frozenforge replied to Arbalist's topic in Blacksmithing, General Discussion
Black Frog, Love the Bruins opener! Looks like the B was done by hand with chisel but was the shield part hand engraved? -
Only Frosty could transform a swage block thread into hunting with an A10! I wonder how much a 30mm depleated Uranium round costs?
-
The ad for that burner that the link takes you to says it won't run outside the forge. That design IMO looks like it needs to run at higher regulated pressure. It then requires the forge to choke down the exhaust to keep the flame from blowing out. Do you have a pressure guage to monitor lp pressure going to the burner? That will help, bottle pressure typically drops off some after you have it running for a little while and that regulator appears to be a single stage so inlet pressure will effect outlet pressure.