

Ridgewayforge
-
Posts
859 -
Joined
-
Last visited
Content Type
Profiles
Forums
Articles
Gallery
Downloads
Events
Everything posted by Ridgewayforge
-
Thomas: How do you heat treat your spring steel nail headers? Glenn: I will try the method you mention; I cannot get to the link you posted, but would be very interested in the bp. Stephen, Thanks for the link! I am going to study your notes, thanks for sharing with me! I want to begin each forging session by making some nails, I found it fun. So, I want a durable header. What is a good thickness for the domed part of the header?
-
Glenn, you mention an hourglass shape: what are the proportions? Is it a true hourglass, or is one side offset? Because how much would the shank upset if it is a true hourglass figure?
-
Gotcha on the domed head, that will be on the next one. Is spring steel that much better than low carbon for this application? What kind of cross section of the hole is best for nail making?
-
A couple of days ago, I made a nail header. It works fairly well, but I wanted to open it up for criticism and helpful advice for my next one. I made it out of a railroad spike without the head, and punched a square hole mostly through. Then I drilled a 1/4" hole in the underside. It worked well without sticking. Thank you for looking! Ridgewayforge
-
Coke appears as grayish, pourous rock, not shiny and hard like coal. From left to right: Clinker, Coke, Coal
-
Oh VaughnT, stop making it sound so tempting! Now I want to build another forge!!!
-
There is no reason why you couldn't build, say, a 2X2 table, put 2-3 inches of dirt or stone on top (contained, almost like a side-blast) and then have the tuyere sticking up, flush with the dirt. That should do it. That would be something lightweight and portable. Put some handles on it, and some detachable legs and it'd be very portable for you!
-
Nice work! You've been busy! Now you just need to finish those before you get them all mixed up! I started working on a nailheader, got most of the way done (its annealing now), started on a second one, and made a hook for a young man who came to watch, seems he's really interested. It was the fastest I've ever made a hook, given that I was being watched the whole time!
-
Well, what are you going to make the firepot out of? The wood should be kept at least 6 inches away from the firepot, for smaller fires such as you're going to be using. What are you invisioning for the forge? ~Patrick
-
Mark, you're right about the coal falling through. A preliminary movement of the firebricks deepened my firepot, and gave me a much better work surface. I salvaged some 1/8" springs from a couch that I dumped, and am going to try to use that to support the firebricks. I may end up using some other stock as well, and we'll see how it works! Thanks for your input, and the roof over my forge is going to come one day!!!
-
Brian, I do have some picket fenceposts, but when I decided to go that route, I ate up a hacksaw blade trying to get through. I guess they are hardened steel, or some kind of rebar-like material. Although, it just occurred to me (I don't know why it didn't before...) that I could heat up the bars and hot cut them to the size. Now I feel foolish! petere76, thanks for some history on that! I feel like wood is an under appreciated resource that we blacksmiths can use in a pinch! Obviously someone thought the same!
-
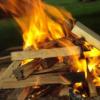
Today I want to share with you all the forge that I constructed from scrap lumber, steel fence-posts and wire mesh, all found around my house. The screws were mostly extras that my dad had laying around, and everything was done with minimal tools. I want to show what CAN be done, and that you don't have to go fancy to make beautiful artwork. First of all, after I first bought my Champion 400 blower and Whirlwind Firepot, I knew I needed a place to put them, so that I could forge efficiently. This was my original set up. I did work like this for about 6 or 7 months, which was a real drag. The fuel always fell out of the heap, as you can see from the bricks surrounding the pot. So, with a little help from my dad, we scrounged some scrap wood and built this table: As you can see, the forge is wood, with a plywood top and adobe/mud topped with firebricks. This was amazing, forging on top of this puppy. Unfortunately, the first forging only lasted a few minutes... We have smoke! Ignition! Fire! So, this forge caught fire. The plyboard was only an inch away from a hot firepot, and so it reached critical temperatures.... Back to the drawing board! I knew that I was not going back to this rubble pile of a forge. It was just plain inconvenient! So, I measured, and began to cut the fence posts! The fence posts spanned the wood, now devoid of the plywood. Note the T shape of the fence posts: I had to cut a notch to accommodate the posts in each piece of wood. A test fitting of my firepot! This is the general idea of my wooden forge. There is between 8 and 12 inches from the wood to the firepot in any direction. The next step, accomplished many months later, when the snow was long gone: I covered the whole thing with wire mesh, and doused it with dissolved borax in water. Its a fireproofing thing. The back needed to be cut out, and so I did that and added reinforcements so it didn't cave in. I used old flex tubing for the air pipe. It works great! This is the underside. I added cut open steel food cans as deflectors to reflect the heat back from the wood. This added layer of insurance is great, it works like a charm. It is tied with wire to the mesh up top. The forge, finished for now, and with a bright fire licking coal smoke off those smooth black rocks. The fire bricks are movable and temporary. I am not quite done modifying the forge; I would like a steel top rather than the wire mesh, but that will come whenever I can find a filing cabinet or a washing machine shell... Here's the whole smithy, under the sprawling elm tree or whatever the poet wrote. I'd rather have a roof. After the fire was all raked away. The mesh holds the coal well enough! A view of the ash dump, held there by wire. Slightly primitive, but its what I've got. A view of the underside after I raked away the coals. The blower, the thing that makes it hotttttt!!! This is how I have my blower mounted: I have the feet cut off and the tube goes straight int the stump, which has holes drilled to accommodate the piping. There was enough airflow to keep the coals glowing hot for a little while. Amazing! Thus, I completed my forge, in all of its glory! Its not DONE, but its getting there. I just wanted to share this with everyone, contstructive criticism is appreciated, and I wanted to encourage those who don't have welding experience that they can build a workable forge! ~Ridgewayforge
-
storage of coal
Ridgewayforge replied to the hangman's topic in Solid Fuels: Coal, Coke, Charcoal, Wood, etc
Doesn't the coal mixed with water create a form of weak sulfuric acid, and that's why the metal rusts faster? -
Suggestions for education
Ridgewayforge replied to reitenger's topic in Blacksmithing, General Discussion
Please do keep a blog of sorts, and share it with us. You're going to be doing an impressive thing! -
Need ideas for products for a craft fair
Ridgewayforge replied to EarthJuice's topic in The Business Side of Blacksmithing
Hooks, skewers, bottle openers, steak turners, flower brackets, door pulls, rasptle snakes, forks, knives, spoons, crosses, nails, S hooks, cooking spits, pot racks, candle holders, snuffers, etc -
How to get back into the swing of things
Ridgewayforge replied to Ridgewayforge's topic in Blacksmithing, General Discussion
Yeah, Frosty, that is the best advice for me. I'm a perfectionist, and I really want my work to be as good as it was before. But, I can't wait for perfection to catch up to me; I have to keep moving forwards! After all, its just heat and beat, right? Hammer marks are the new preferred finish, right? -
How to get back into the swing of things
Ridgewayforge replied to Ridgewayforge's topic in Blacksmithing, General Discussion
That's true, there is no master smith breathing down my neck. I was able to slow down, and make something basic, a hood. I reigned myself in; I really wanted to start all the projects I had drempt of, but kept myself on task. This is what I came up with! (the one on top is the one which I forged yesterday, the other one is the previous day's work.) Thanks for all the input and support! -
Ohhh! Now I get it. So that's why anvils have horns as opposed to antlers, right?
-
That depends: Does steel wool come from Steel Sheep, or Steel Alpacas?
-
Pictures would be a great asset!
-
help me spend my money
Ridgewayforge replied to Pug}{maN's topic in Anvils, Swage Blocks, and Mandrels
I have seen 500 pounders pass by the Pittsburgh area for less than a grand. Keep your eyes open, and be willing to make a day trip (or even an overnighter) to pick up a big one. If you've got the cash, save it until you can buy as big as you'll ever need. Sure new anvils are grand, but a 500 pounder will make a new anvil seem like chump change. -
One can MAKE an anvil? I always assumed that you went down to the granite quarry, picked out the best one......
-
Hello all! Today was my first time at the forge since March, I believe. I was fairly good before that, and was able to forge nice tapers and semetrical pieces. Now, however, I am slow at performing the basic tasks. Is this normal, and how do I get back into the swing of things? Today has really eaten away some confidence I had in my abilities. Thanks! RidgewayForge
-
Once an anchor, now a chisel!
Ridgewayforge replied to VaughnT's topic in Chisels, Gouges, Scissors, etc
Very nice! What is the best angle to place the bevel at for different applications? -
I will second VaughnT, Brian's video is what I based my first pair of tongs off of, and they turned out okay. I changed a couple of minor things, which I believe is why they didn't turn out great. His work should be memorized several times, maybe done cold in clay before heading to the forge.