August 28, 20214 yr So, I haven’t posted in a while, things are going ok, getting a few jobs here and there. I need some help. I am making a pair of roof brackets, 34”x 30”, of 2 1/2” x 3/16 flat bar. The client wants a dimpled or ‘Peened’ texturing to multiple surfaces of the project. The flats are pretty easy/straight forward. I am having difficulty with peening/dimpling/texturing the scrolled ends. I have tried texturing before scrolling but, this pulls most of the texture out. I have tried texturing after scrolling but can’t get the entire surface textured and this process throws the scrolls out of proportion and distorts them to a point of near ruined. I can’t seem to find a good solution to this issue, anyone have any clever ideas? Thank you all in advance, ya’ll are more clever and have waaaaay more experience than I. Cheers! John
August 29, 20214 yr Author I had been attempting with a wooden mallet, will need to get a rawhide or leather one, thank you Rojo Pedro
August 29, 20214 yr Would it be possible to make a jig to fit just on the inside of the scroll to reinforce it while peening? Maybe that could help with the deforming?
August 29, 20214 yr Do it flat. To get the texture to show on the scrolled part, you need to texture the other side of the scroll. Its a transition thing. the texture you see on the flat disappears inside the scroll. The scroll surface you see is actually the reverse side of your material. For future reference, 1/4" material looks good. 3?16" looks, in this case a bit thin and wispy.
August 29, 20214 yr Author Twisted Willow, thank you for the response! Funny enough, I had made a small jig for the post vise to throw the scroll on and hammer away! Alas, though the attempt was valiant, it resulted in poor appearance and an exorbitant amount of effort to produce very little and poor texture. anvil, I had to read that twice, lol. I must still be tired post nights or I haven’t ingested the required amount of Java to induce productive thinking. Surely, texturing the inverse means it will show when the scroll is…uh…scrolled? (Not sure on that one). Thank you for the input regarding starting stock, I was worried, with the width being 2 1/2”, that it would get awfully heavy for the home the pair are headed to. The overall project uses something like 23 feet of flat in total. I’ve been really excited to do this project and have been having a blast and learning so, so much with it. You all rock and thank you so, so much for the input.
August 30, 20214 yr What Anvil is saying is the visible part of the scrolls is the back side of the component and is facing or against the wall and isn't visible UNTIL the scroll exposes the back side of the stock. Mark one side of a piece of paper and roll it to see what we're talking about It makes sense. Honest. Texture it first THEN turn the scrolls. You do NOT need to hammer it to turn a scroll. Scrolling wrenches will do it with little damage to the texture. I'd make a ball end chisel bit for my air chisel and have all the stock peined in half an hour or so. I can however pass long stock through my propane forge and elevate my anvil so they're on the same level. That way I can pass a full 20' stick through the fire and pein it as I pull it through. If they call for un-textured portions I'd mark them and leave them with the mill finish. I'd make the scrolling wrench with the tine that inserts into the scroll small diameter and the outside or forming tine larger and round so as to leave the least marks. Frosty The Lucky.
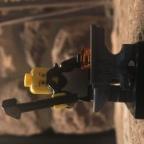
September 2, 20214 yr Author Hey Frosty, Thank you for the input, sad to say, I have Zero experience with scrolling wrenches, Scrolling tongs and hand scrolling on the other hand, I know well-ish. Scrolling is one of those things I’ll practice till I’m dead. (I know I can make jigs and things but, being able to hand scroll consistently to a moderate to high level of consistency is important to me). Considering the stock is entirely too wide to use the tongs I have on hand, I suppose I’ll be considering making that wrench to do the job and learning REAL quick. I did mark and leave the untextured portions with the mill finish for welding. I have a 5 burner gas forge that, theoretically, I could heat up a massive section but lo, I do not posses much power or air equipment, for the moment I’m abusing my body, 90% of it’s by hand and hammer. Attached is a picture of the peened surfaces thus far. Tomorrow is more measuring, marking, and hot punching the mounting holes. Any suggestions for sanding that textured surface for priming and paint?
September 2, 20214 yr If you're going with priming and paint, sanding is a waste of time. A knotted wire brush in an angle grinder (with all appropriate PPE and safety precautions!!!) is probably your best bet.
September 2, 20214 yr More Power! Folks I know offering a peened surface do it with a paddle with multiple ball bearing balls welded to it and a power hammer.
September 2, 20214 yr Author JHCC, thanks for the input! I will wire brush it up! ThomasPowers, More Power!! YESSS!! The multiple ball bearings idea was just recently mentioned to me. There is always the next one to try it out for always there must remain The Discipline of Steel!!!
September 2, 20214 yr 1 hour ago, ThomasPowers said: a paddle with multiple ball bearing balls If you use such a thing, it's a good idea to change the angle between hits. That makes it less obvious that you have a repeating pattern, and therefore it's more pleasing to the eye.
September 4, 20214 yr Don't swing so hard! You're just texturing the surface. I started to describe a scrolling wrench but pasting an image is just sooooo much more appealing to my lazy soul. They are easy to make if you have a welder, REALLY easy just weld two pins to a bar for the handle. You can drill a series of holes in the bar and drop pins through them say lag bolts with the threads cut off to avoid marring the stock. If you have scrolling tongs you can bend the bits 90* to give you more leverage to bend. Don't spread the pins much farther than the thickness of the stock you're scrolling. Frosty The Lucky.
September 6, 20214 yr Some more info on scrolling tools. You make them I'm sets. There's the wrench that goes in your hand, and there is the matching piece that goes in your vise. They are not a one size fits all kind of tool. The opening should be just a bit larger than the material you are scrolling. This makes it easier to control small sections of your piece. I always taper the ends of my forks like in Frosty's first pic. This makes it far easier to get into tight places to tweak scrolls you have already made to get those peaky little flat spots and to have more control matching multiple scrolls. For what it's worth, I rarely, approaching never, use scrolling tools to do my finials(the scroll ends). I always do them freehand. If I'm doing a bunch of matched scrolls, I then use my forks, as needed, to better match the freehand turned finials ends.
September 6, 20214 yr Arghh, I forgot the fork in the vise. <sigh> With a little practice turning finials on the anvil is faster than picking up the scrolling tongs. A couple few seconds, tops. Frosty The Lucky.
Join the conversation
You can post now and register later. If you have an account, sign in now to post with your account.