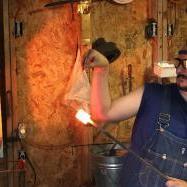
August 31, 20187 yr Putting together an induction forge build, documenting it for others. Haven't added the radiator fan and hooked up power yet but will be doing that Sunday. 15KW Induction Forge, ebay - U.S. Solid - company is us based but looks to be just a retailer. Made in China but if anything happens you can go through a US company for parts/repair w/e. Input 240v single phase. Will measure amperage under load prolly this weekend but it should be around 32-35 amps max. 60 amp breaker on the line. All internals are heavily water cooled, note the bridged water cooled mosfet pic. Good stuff. Over the counter 200 psi braided pressure hose from Lowes for the 3/8" ID rear connections on the 2 input / 3 output ports. 14x14" radiator from ebay. 1" ID braided pressure hose for radiator ports from Lowes. 3 step brass fittings to neck down 1" ID to 3/8" ID from ACE hardware. 3 way brass fittings from ACE hardware. Metal cart from ebay. 1/3HP motor and 250 psi pump kit (look for soda fountain carbonation parts) ebay. This is much cheaper as a kit than individual parts. 6 gauge wire ebay - solder the leads after clamping the clips down. 7 gallon heavy duty bucket ebay. 50ft 1/4" copper tubing ebay for custom coils. 25ft 1/4" fiberglass mesh hose for custom coils. Will put up operational pic/video this Sunday or Monday whenever I get it up and running. The two loose hoses from the pump will go directly into the bucket. Don't mind the critter its just a curious ferret.
September 1, 20187 yr Oooh the green things look like they were pretty till you stuck the hoses on them. That said I'm way out of my depth so I'll just watch and hope I can afford one before I stop smithing except in my memories for the youngsters. Frosty The Lucky.
September 1, 20187 yr Why did you put the radiator on front where you will be standing when it is in use? Won't you need a fan for the radiator?
September 2, 20187 yr Author will the coolant be water or something else? -distilled water is required, 7 gallons. never use radiator fluid or well water. Why did you put the radiator on front where you will be standing when it is in use? Won't you need a fan for the radiator? -because that was the best place to put it. -yes a fan is required, it's behind it. directional flow is pull. makes cleaning dust off the front of the radiator cake and provides airflow for the motor. processing trial run video, will add it to the OP. doesn't look like i can edit the OP. 800+ full power will melt pretty quick, 550ish will evenly heat to welding temp in about 40sec. the stock coil is used below, have the parts but havent put any more coils together yet. will be making a horizontal 1", 2" 3" 4" and pancake coil once i calculate out the size/turns ratio so i dont overload the unit. Video removed due to content and link at the end.
September 3, 20187 yr Ameritherm made the 30kw unit we had at work. Great company to work with and very knowledgeable staff. I would think pancake coils would work much better for forging. You can also insulate the coils so you won't short them if you accidentally touch them.
September 3, 20187 yr DRoberts, I'm impressed! Never saw one melt the end of a bar off before. What was the material size? More info. please? I have been of the opinion for a while that induction forges would be a way to get blacksmithing demos in to "pubic" places that were concerned about fire in any form. Al
September 3, 20187 yr On 9/3/2018 at 8:41 AM, PVF Al said: I have been of the opinion for a while that induction forges would be a way to get blacksmithing demos in to "pubic" places that were concerned about fire in any form. Al Hilarious typo notwithstanding, it's a fair point. The barrier to its use, however, is that the power input requirements aren't universally available. Also, it is my understanding that the power factor for these things isn't real great, so extensive use at home might cause the power utility company to start looking at you a bit more closely. Customers with bad PF consumption sometimes get hit with surcharges (I've seen a few guys who weld a lot at home get hit with it).
September 3, 20187 yr very impressive. if you make coils with larger apertures to handle larger work will it's ability be reduced?
September 3, 20187 yr Depends. You want "coupling" between the coil and the part. The closer the fit between the part (1/16" is good) and coil the better the coupling. The magnetic fields only project so far from the coil, so if you are mismatched you have to run the power up to project the fields out farther. Frequency also makes a difference. Small parts higher frequency, big parts lower frequency. Some small parts run gigahertz frequency wise.
September 4, 20187 yr On 9/2/2018 at 3:11 PM, DRoberts said: Why did you put the radiator on front where you will be standing when it is in use? Won't you need a fan for the radiator? -because that was the best place to put it. -yes a fan is required, it's behind it. directional flow is pull. makes cleaning dust off the front of the radiator cake and provides airflow for the motor I've only used an induction forge once for a couple of minutes, so hope you will bear with another basic question on your setup. OK, just to be sure I understand: The fan pulls the air in from the "front" of the assembly, through the radiator and discharges at the "back" of the assembly, below the table where the heater sits. Won't using the forge eventually heat up the coil cooling fluid, then the air coming off the radiator? Will this heated air continue to work well to cool the motor and not heat up your fluid reservoir? Needless to say, it is your unit and seems to be heating metal well for you as is. If it were mine I would consider rotating the induction unit 180 on the stand and setting the fan to blow through the radiator discharging the heated air away from the other components and the user, but that is up to you. I don't have a good feel for how much heat these units generate, so this may be a moot point.
September 4, 20187 yr Author I would think pancake coils would work much better for forging. You can also insulate the coils so you won't short them if you accidentally touch them. - I was hesitant on getting one until I saw a video of an armorer making his armor plating with a pancake coil. He made one about 3.5" across and packed it with what looked like modeling clay. He'd hold the sheet steel over it and heat up an area about the size of a grape fruit. Amazon sells 1/4" fiberglass hose used for this. I bought 25' of the stuff in the color black so I wouldnt have to look at dirty white coils. if you make coils with larger apertures to handle larger work will it's ability be reduced - very good question with a more complicated answer. short answer is no, long answer is yes and no depending on the size of your stock. if a coil is not matched closely say about 3/4" to the size of the coil the heating will be much slower. rebar inside a 2" coil heats to welding heat, but takes like 50 seconds to get there. a 1.5" thick bar inside a 2" coil heats to melting in 30 seconds. this unit and many others like it track the magnetic resonance of the stock you're heating and adjust the frequency (30-80 kHz on this model) in an effort to 'ride the wave' of the magnetic resonance point as it heats. The machine can track this by measuring the load created by the stock. if you recall iron/steel's magnetic properties change as it heats up. a 1" coil will heat a half inch bar VERY fast at full power, melting at around 20 seconds if not moved. the same coil/stock will evenly heat to welding temp at half power in about 35-40 seconds. at full power a 3" coil with a 2.5" stock will heat VERY fast but will melt the outer steel before the center is hot. at half power it will allow the thermal conductivity of the steel to transfer heat faster than the coils are creating it allowing a nice even heat dispersal as it's brought up to temp. So no, larger work will heat up fantastically, but yes it takes a little longer. The trick isn't MORE power, its less while keeping your coil to stock size matched properly. Check out https://ultraflexpower.com/learn-about-induction-heating/induction-heating-calculation-tool/ for some neat info and coil design principles. You can even make a coil that turns one direction, then back on itself the other direction to create a levitation pocket. Fun toy for levitation. You can literally levitate like a 2" ball bearing until it melts in mid air, turn it off and drop it into a bucket of water to create FUN metal droplet art. On coils 4 inches or greater you can use a single turn coil to focus more of the heat generated in one spot, but on anything less than 4 inches a single turn coil will destroy the machine. More coils are fine but don't heat as fast. Fewer turns, more focused heat, more turns less focused heat. If you want HOT metal fast in one area 3 or 4 turns is great. In some videos you see like 15 turns and a real slow heat because of it. The fan pulls the air in from the "front" of the assembly, through the radiator and discharges at the "back" of the assembly, below the table where the heater sits. -correct. Won't using the forge eventually heat up the coil cooling fluid, then the air coming off the radiator? -In my testing so far the water temperature has not increased at all. My cooling system is somewhat overkill. You could probably get away with a lot less. Will this heated air continue to work well to cool the motor and not heat up your fluid reservoir? -The motor is rated for continuous use, and generates a good amount of heat. The heat coming from the back of the radiator is indeed warmer than the ambient air temp around the cart, but is cooler than the air inside the motor. Simply having moving air, even though it's warmer than ambient, will help cool the motor by pushing the motor's hot air away from it. The need for this is virtually non-existent as the pump motor temps are not really an issue to begin with, but it seemed a proper way to do it. I don't have a good feel for how much heat these units generate, so this may be a moot point. - I'd say 90% of the heat generated is from the coil absorbing heat from the stock. I don't think the unit itself generates much heat as it's not warm to the touch at all after using it for about an hour. The water temp can be easily checked by putting your hand on the coil. It always feels cold while using it. The temperature threshold is 131F, if the coil ever feels hot to the touch you can be assured it's above 98F. It's about 80F in the garage right now. Here is the fan - cheap automotive radiator fan, only downside is you have to have a 12v power supply for it. I just have that resting in the bottom of the cart. total price for the build table pump motor and induction unit was about $1400. When I decided I was ready to get one I just talked to the bank and financed it for a year. $131 a month. Not bad at all.
September 4, 20187 yr Author i use one of these on my DIY heat treat oven, will be putting one on the power input for the induction forge as soon as it arrives. Will be able to keep an eye on the amp usage. Great little gizmos.
September 4, 20187 yr Author 800+ Full power heated to spark but the outside started melting before the inside was at welding heat. 460 Low power was just too low/slow. 530 heated perfectly. you cant see it in the video but the scale vaporizes all the way to the center as it hits welding temp without melting. i suspect a 5" coil could evenly heat a 4.5" stock at 530 amps output. just have to keep applying heat to the surface of the steel. This WILL melt the surface of any sized stock, the limitation would be when you reach a point where the thermal conductivity of the steel meets the same time to heat the center as the ambient air can cool it. I imagine that'd be like 6" stock maybe. crazy.
September 7, 20187 yr Author Max output, melting the head of a hammer at full power. Most 15kw forges top out at 600amps output at about 30-35amps 240 input, this hot rod of an induction forge hits 805 amps out drawing a whopping 49.9 amps 240V in the video, but i've seen it hit 811 before so it's safe to say an even 50 amps load on the line. Great stuff! You can also see that while just powered on the load is 18 watts. Kudos to the wife for dealing with my hazardous stock overheat at the end.
September 7, 20187 yr On 9/3/2018 at 9:00 AM, HojPoj said: Also, it is my understanding that the power factor for these things isn't real great, so extensive use at home might cause the power utility company to start looking at you a bit more closely. Customers with bad PF consumption sometimes get hit with surcharges (I've seen a few guys who weld a lot at home get hit with it). Hmmm. That might explain my $350 electric bill. I thought it was the AC
September 7, 20187 yr They shouldn't draw hardly anything at all when there is no item being heated. That is one of the energy efficiency points of induction units. Here is a video of the set up we had at work for zone annealing electrical contact ends. https://www.facebook.com/walter.hess.31/videos/10202500465895728/
September 7, 20187 yr I think what he's saying is that the profile of the draw gets surcharges. My interpretation is that if you have very high peak draws, you get charged more. I haven't read my bill that closely yet, but it makes sense. I used my forge a lot in July when it was very hot, and grid load was also likely very high. That seems to me to be the conditions under which you'd see a surcharge. I remember having this discussion with Grant Sarver (RIP) about electrical use. He believed that the net cost of use was lower than coal or propane, and it was based on the same calculation as you are indicating: the total draw over time is fairly low. It may not have accounted for the variation of power companies' policies or a difference between residential and commercial service. But we shall see. Incidentally, that case is black, but all the controls and internals otherwise look like mine. OP did a heck of a lot nicer job routing the cooling lines than I did, though! Oh, and more comments on your setup. Your home-made cooler is really quiet. Nicely done. I have two coolers: an older Miller which needed a pump seal rebuild, and then an inexpensive TIG cooler I bought from Amazon. I'm guessing you spent less than I did, and have more cooling capacity. On the other hand, I have more unnecessary junk in my garage, so I've got that going for me! I also like that you're experimenting with the amperage controls. I just run everything cranked up all the way all the time! I've seen as high as 814, I think, but maybe only 812.
September 7, 20187 yr Power Factor is generally a concern in applications with inductive loads (think motors and transformers). If the unit has a large transformer in it it could still show as an appreciable draw to the power company (though not necessarily reflected in your meter). A quick blurb on it can be found here: https://www.laurenselectric.com/home/business/understanding-power-factor/
September 8, 20187 yr I’ll read that, thanks. I’m curious to see as my heaviest use was for an hour a day maybe an hour and a half. It was idling for well over half that time. So if it’s just the appearance of a draw, I don’t think that would account for $350 at that amount.
September 8, 20187 yr Baja, my shop electric bill was $135 and that was running welders, lathes, and milling machines. Your AC is probably the culprit. Down here in the desert I have neighbors paying $250-$600 a month during the summer when their AC is on 24/7
September 9, 20187 yr Author They shouldn't draw hardly anything at all when there is no item being heated. - Indeed! mine draws 18w when not actively heating. Avg is around 5000w while heating. I'd wager my favorite hammer that the wife uses more electricity with her hair dryer than I do with this forge on a monthly basis. I also recently swapped all our incandescent bulbs in the house with 13w LED ones and we saw a massive drop in electric costs. We went from 2480w total light use to 403. Every single light in the house on wastefully only sucks up 403watts. If you haven't done this yet I highly recommend it. If you note in my power testing video that little unit keeps a running tally of total kilowatt hours until manually reset. Easy to track exactly how much it costs if you know what your kw/hr rate is. I've had success forge welding a billet large enough to make a large knife from. 3.5"x1.5"x1.25" of 1084/15N20. Takes about 3 minutes of heating to bring up to heat though. Need to keep working on my coils pretty sure I can get that better. It does heat to sparking so I've met the overall goal of this project. Still need to make a pancake coil but waiting on parts. In my coil testing I did find that thicker walled (heavier per inch tubing) produced a MUCH better heat. I've ordered some copper/nickle brake line hose that should arrive today that I'm going to test with. Has a much thicker wall than refrigerator tubing. Will post those results at some point. Some improvements I've made over the last week: Added preservative to the distilled water in hopes that no mildew or anything else takes up root and mucks up the coolant. For this I used propylparaben, found in many food products such as food coloring. Fun side effect is a little hot rod red tossed into the coolant. There were some questions about the fan setup, here's a pic. Added copper elbow joints on the 1" hose to eliminate some kinking that set in. Mounting of the load meter.
September 9, 20187 yr I have never seen anything other than copper tube used as coil material. We made crucible coils from 5/8" or 3/4" - it's been a few years - copper tube at the foundry I worked at.
September 10, 20187 yr Author And the big question everyone keeps wanting to know - electrical costs! If I were to hold down the foot peddle at full blast 100% power for an entire HOUR it would cost 54 cents. Its basically free heat!!!
Join the conversation
You can post now and register later. If you have an account, sign in now to post with your account.