New axe maker Posted October 5, 2015 Share Posted October 5, 2015 Hey I'm new to blacksmithing and I need to get a hold of an anvil or be able to make one any in go will be great thanks Quote Link to comment Share on other sites More sharing options...
DSW Posted October 5, 2015 Share Posted October 5, 2015 Plenty of info here on what works for "make shift" anvils. Pretty much any good sized chunk of solid steel you can beat on. Doesn't even have to be steel, a rock would do in a pinch. Of course there are plenty of places where you can buy brand new quality anvils as well. Quote Link to comment Share on other sites More sharing options...
BIGGUNDOCTOR Posted October 5, 2015 Share Posted October 5, 2015 There are some other Alaskans on here that should be able to point you in the right direction, as smithing gear is hard to find, and expensive up there. Quote Link to comment Share on other sites More sharing options...
Frosty Posted October 5, 2015 Share Posted October 5, 2015 Finding blacksmithing tools, especially anvils is tough in Alaska though some guys get lucky.We forgot to talk about anvils when you were out today. Next time your out I'll show you my basic "improved" RR rail anvil.However I REALLY like Charles Stevens improved vertical rail anvil. The man squeezes more tools out of a rail than I've seen before. He did some grinding on one to show us what a little creative imagination can do. It's a real head slapper of a concept and I've been advising the basic idea for years, just never tried it.Rail is a good get started tool. I'll need a little help dragging a piece of rail out of the alders if you want to go that route, I have the gear to do the rest.Frosty The Lucky Quote Link to comment Share on other sites More sharing options...
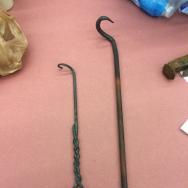
Charles R. Stevens Posted October 5, 2015 Share Posted October 5, 2015 I'd take Jerry up on any offer of help!if you think you need a "real anvil" (snicker) check out this article and set uphttp://www.grandforest.us/AncientAxeBook.pdf Quote Link to comment Share on other sites More sharing options...
Frosty Posted October 5, 2015 Share Posted October 5, 2015 That's a great article Charles! Thanks for the link.Frosty The Lucky. Quote Link to comment Share on other sites More sharing options...
Charles R. Stevens Posted October 5, 2015 Share Posted October 5, 2015 Good thumb nail, isn't? Quote Link to comment Share on other sites More sharing options...
Glenn Posted October 5, 2015 Share Posted October 5, 2015 Quote Link to comment Share on other sites More sharing options...
Frosty Posted October 5, 2015 Share Posted October 5, 2015 Good thumb nail, isn't? It really is. I've seen a couple videos from Grans Bruks about making axes and something else I can't recall. A PDF is a grand addition to my reference files.Thanks for the link to Charles Rail anvil post Glenn! See? You are a handy guy to have around. Frosty The Lucky. Quote Link to comment Share on other sites More sharing options...
Charles R. Stevens Posted October 5, 2015 Share Posted October 5, 2015 Thanks, Glenn. I love the minimilistic 7-10th century nordic set up for axe making Quote Link to comment Share on other sites More sharing options...
New axe maker Posted October 6, 2015 Author Share Posted October 6, 2015 Thanks for all the info and that pdf. I think I'll go with the railroad idea and see where it leads me. Quote Link to comment Share on other sites More sharing options...
ThorsHammer82 Posted October 6, 2015 Share Posted October 6, 2015 Remember, Early smiths had rocks as anvils. It doesn't have to look like an "Anvil", to be an anvil. Quote Link to comment Share on other sites More sharing options...
KpdRetired Posted October 8, 2015 Share Posted October 8, 2015 (edited) Finding blacksmithing tools, especially anvils is tough in Alaska though some guys get lucky.We forgot to talk about anvils when you were out today. Next time your out I'll show you my basic "improved" RR rail anvil.However I REALLY like Charles Stevens improved vertical rail anvil. The man squeezes more tools out of a rail than I've seen before. He did some grinding on one to show us what a little creative imagination can do. It's a real head slapper of a concept and I've been advising the basic idea for years, just never tried it.Rail is a good get started tool. I'll need a little help dragging a piece of rail out of the alders if you want to go that route, I have the gear to do the rest.Frosty The LuckyFrosty, can you give me some hints to info on the Imroved Vertical rail?? Im drawing a blank, and for some reason i cant seem to get to any of the blueprints. For the time being since im just starting out, im pretty much settled on a Rail anvil, ive got feelers out all over for rail sections, im also asking and looking for Anvils, but in my area at least they are asking ridiculous prices for clapped out junk..so anything useable is really out of sight. Thanks,Al Edited October 8, 2015 by KpdRetired Added a few things Quote Link to comment Share on other sites More sharing options...
NickOHH Posted October 8, 2015 Share Posted October 8, 2015 Frosty, can you give me some hints to info on the Imroved Vertical rail?? Im drawing a blank, and for some reason i cant seem to get to any of the blueprints Thanks,Alyou have to access then through the pages tab at the top not throught the links in the forum. Quote Link to comment Share on other sites More sharing options...
DSW Posted October 8, 2015 Share Posted October 8, 2015 Frosty, can you give me some hints to info on the Imroved Vertical rail??Take a look at this thread by Charles. http://www.iforgeiron.com/topic/42290-another-rail-road-iron-anvil/ Quote Link to comment Share on other sites More sharing options...
MarkDobson Posted October 8, 2015 Share Posted October 8, 2015 Take a look at this thread by Charles. http://www.iforgeiron.com/topic/42290-another-rail-road-iron-anvil/if i ever end up with a piece of rail i will be making one of those. ive never seen someone put so many different tools on one piece of track Quote Link to comment Share on other sites More sharing options...
DSW Posted October 8, 2015 Share Posted October 8, 2015 Yeah, Charles did a great job with that. It would help if you added your location to your profile. Sometimes members may know where to acquire a piece of rail. I've had members on another site offer to get me pieces of rail from work knowing I do smithing when the subject of starter anvils comes up. You never know, someone here might be close to you and know where you can find something. Quote Link to comment Share on other sites More sharing options...
Frosty Posted October 8, 2015 Share Posted October 8, 2015 Welcome aboard Kpd, glad to have you. If you'll put your general location in the header you might be surprised how many of the IFI gang live within visiting distance. Unless the K in Kpd stands for Kodiak then just look up Reed Oswalt. If it stands for Ketchikan I don't know any smiths there.My version of an improved rail anvil requires some welding and you need to know how to weld high carbon steel correctly. The generals on it are. Two lengths standing right side up touching side by side. Offset one or make it longer. The last length fits between the two base pieces flange up. This one if the face.A little heavy welding to make it one piece and you have an anvil of decent weight high carbon steel. The one long rail can be cut and ground to make the horn. It'll be off center but that's no big deal.If you don't stitch weld it preheated it will become a specialty shape you can brag about how much experience and skill it takes to get 3 pieces of parallel rail welded together to to that.It's much heavier than a rail anvil the same length and it has a great depth of rebound so it's darned efficient at moving metal. The weight's tripled for the length so it's easy to make a rail anvil in the 100lb - 150lb range. Rail weight is lbs. per yard. For purposes of discussoin lets assume 125lb. rail. An anvil 12" long will weigh 125lbs. not counting a couple few lbs. of welding rod.If a fellow were to want say a 18" face and double horns 9" long you'd be looking at a little less than 250lbs and probably 3-5lbs of rod and some incidentals to help keep it from pulling during welding.I REALLY like Charles version it's no fun welding much HOT steel, you get to find out what a potato in the oven feels like.Frosty The Lucky. Quote Link to comment Share on other sites More sharing options...
KpdRetired Posted October 8, 2015 Share Posted October 8, 2015 Fixed..I forgot all about the Prifile, Thanks for reminding me.. And Thanks for the Welcome, and Information Folks, Glad to be here. Frosty, It's funny you mention the Welding a couple of sections together, I just watched a youtube video of someone making an Anvil like that out of Heavy Gauge track that way. Oh, One other question for you folks...would it be easier to Anneal the rail before starting to work on it for shaping then harden it afterwards? Between the initial hardening, and the work hardening from being in use for who knows how long, I was wondering if it would make life easier in the long run. Quote Link to comment Share on other sites More sharing options...
Charles R. Stevens Posted October 8, 2015 Share Posted October 8, 2015 It realy is that simple. This is an art/craft about using simple tools to make incredible things. Forgot to hit send again, lol. Heating a hunk of rail up to critical is a PITA. And id your using a grinder its just as easy. Quote Link to comment Share on other sites More sharing options...
DSW Posted October 8, 2015 Share Posted October 8, 2015 depends a lot on what tools and equipment you have at your disposal. If you have access to a torch and power tools like a grinder, annealing isn't really needed. If you plan to abuse yourself using a hacksaw and files, it might not hurt. Quote Link to comment Share on other sites More sharing options...
KpdRetired Posted October 8, 2015 Share Posted October 8, 2015 I bought a couple of HF 4 1/2 In angle Grinders a month or so ago because I was going to start doing some welding......i have no qualms about burning them up on this.... I also like the suggestion in the other thread about the portable Hardy, rather than spending a week drilling and filing to get a square hole. Thanks Folks, all of your advise is Greatly Appreciated. I'mmslowly getting together the stuff to make myself a "Super C" Style forge as well. I need to be able to break everything down to put away, i just dont have the room for a dedicated Shop for the time being. Quote Link to comment Share on other sites More sharing options...
Frosty Posted October 8, 2015 Share Posted October 8, 2015 Would you post the link to the video welding rail into an anvil. If someone else put the same idea up it'd save me the time. I'm basically a pretty lazy guy you know. Pre heating rail before welding is a good idea, it really helps prevent warping but I've never annealed or hardened it. Rail has been plenty hard and tough for an anvil.Were I to make a rail anvil for myself I'd make one like Charles made but a little at a time. I'd start with a nice clean end and add features as I needed or wanted them, probably start with a cut off, I know I need one of those.Frosty The Lucky. Quote Link to comment Share on other sites More sharing options...
KpdRetired Posted October 8, 2015 Share Posted October 8, 2015 Rail Anvil part 1its in two Four parts...if i could get a big enough track section i was thinking about trying it...after a WHOLE lot of welding practice though The difference is he welds a faceplate of 1" Ar500 on top instead of using a 3rd rail section as a face Quote Link to comment Share on other sites More sharing options...
Frosty Posted October 8, 2015 Share Posted October 8, 2015 Rail Anvil part 1its in two parts...if i could get a big enough track section i was thinking about trying it...after a WHOLE lot of welding practice thoughNaw, that's nothing like my version. It's a good example of form over function thinking though. While it's probably a decent anvil he put WAY more work into getting it to look like an "anvil" than it really is functional. I'll admit I didn't watch to the end of part 4 so he may have rounded the top of the horn.When he showed the two 24" sections standing side by side is about the last point we were n the same page. Take those two sections cut about 1/4" from the contact point of each flange leaving a couple tabs to maintain a 1/2" gap. Cut one of the body sections longer if you ant a horn or off set them if you want a horn on each end. With the two base sections touching slide the 3rd. section between the cap/rails upside down. Rail stacks interlocked with a near perfect fit, a little of the wear burr may need to be ground off to get a good fit but it's no big thing you want to clean all the rust and grime off anyway. They're MADE to stack two up and one down between.The 1/2" gap between the flanges on the base sections is exactly centered on the cap rail of the upside down section and this is where you stitch weld all 3 together.While the stack is upside down stitch weld the flange of the upside down section to the cap rails of the base sections.When you look at the ends you'll see 3 sections of RR rail web for the body of your anvil. You'll also see that the curves formed by the wear surface of the cap rail AND the transitions from web to flange are near perfect matches.Shape the horns as you wish and you have an anvil with about 1/10 the work. If you use 24" sections of 125lb. rail it'd weigh in the neighborhood of 300lbs.We'll have to see what Brandon decides on for a rail anvil. If he wants to give my version a try we'll shoot some pics but no video. Just some pics and text.Frosty The Lucky. Quote Link to comment Share on other sites More sharing options...
Recommended Posts
Join the conversation
You can post now and register later. If you have an account, sign in now to post with your account.