May 7, 201412 yr I hope to be in the market for a power hammer soon. I'm not sure which type of hammer would best suit me. A local blacksmith was letting me use his Nazel 2B until his insurance company cracked down on him for letting people work in his shop. I was just getting good at it, too! I am forging castings into plate or thick sheet. The castings are drawn out 360 degrees, into a circle. What I want to know is: Which (if any) power hammers can be set to hit at a even depth? I figure adjusting the anvil height would maybe work, but that would mean always running the hammer on "full", which might not be good for the hammer... Or, is that OK to do? Obtaining an even thickness is important. Because the work piece ends up wider than the anvil, I can't use a "stop" as far as I know. Any ideas?
May 7, 201412 yr I'm guessing a rudimentary way to achieve this on any hammer would be to create some kind of stopping system on the foot pedal, which only allows the hammer to strike at the desired thickness, although I suspect this would provide far from perfect results. That said I may have play with this idea if I have a moment today, I guess the effectiveness of this would largely depend upon the quality of the hammer
May 7, 201412 yr Author Oh, right. Sometimes (a lot of times) the obvious escapes me. Let me know how it goes!
May 7, 201412 yr Kiss blocks between the dies is the usual way, unless your WP totally covers the dies. I wouldn't move the anvil, it could lead to the tup bottoming out, bad news.
May 7, 201412 yr Pullmax nibbler with a dome die or large radius fullering dies. The Pullmax, unlike some planishers, has a set stroke speed and throw which is adjustable to a fine degree. I suggest the P9 for size. If you set up the circle cutter tool inboard to the machine you can rotate the sheet through the dies and do full circles just hand planishing on a stake. Maybe a Trump brand would work as well. Ric
May 7, 201412 yr Pretty much any of the 'spring based" powerhammers will not have much fine control of the stroke length. Now the big steam and air hammers a skilled operator for a particular hammer could get quite good indeed! (the old transfer oil from the face of the top die to the crystal of a pocket watch trick.)
May 7, 201412 yr Here is one source that you might talk to. Ken's hammer uses the steam hammer type control linkage system. You can find old catalogue product literature on steam hammers and controls on the Google books site. Good luck.
May 7, 201412 yr Author Okay, so no lowering the anvil. Ric, Thanks, I now remember you told me before about the Pullmax. However, it doesn't look like it will do what I need. I'm starting with 3/4" thick and forging down to 1/8". The Nazel is the only power hammer I've ever used, but I liked it's "squishing power". Thomas, I'll be wanting an air hammer then. Just not sure I'll be able to afford one! I'd like to hear if anyone has used a stop on the foot bar with any success, as mofokaye mentioned.
May 7, 201412 yr Author Thomas, A rolling mill would definitely be more appropriate, but the circles get up to 16" diameter or more. I started planning out a mill but am not sure it will work with my monetary and electrical limitations. Someday, though.
May 7, 201412 yr Use a kiss block, dont work full face of the die block. What is the material you are intending to forge ? Setting the travel position on an air hammer foot-pedal is also a completely pointless exercise, and completely missing the whole concept by which air hammers work, ie, the air is a spring. :huh:
May 7, 201412 yr Use a kiss block, dont work full face of the die block. What is the material you are intending to forge ? Setting the travel position on an air hammer foot-pedal is also a completely pointless exercise, and completely missing the whole concept by which air hammers work, ie, the air is a spring. :huh: I've done something similar with an air hammer with dishing dies set to work together at a constant level through setting up the foot pedal so it can only lower a certain distance. Works well with the thin sheet metal, but like you say, not likely to work forging heavier stock, and would probably make the actual process of forging down the metal slow, painful and totally impractical. Also I suspect the results would be less than accurate. Still, gunna try it, because why the hell not :D
May 7, 201412 yr Author Well, I wouldn't need the foot stop until I get close to the desired thickness. I had no problem forging it by eye, and was getting pretty good at controlling the Nazel. I guess I might just have to use a deep-throat micrometer, but that's going to be very time-consuming and difficult to keep checking it while the metal is hot.
May 7, 201412 yr Is there a reason you're forging down to that thickness and not just starting with 1/8" stock? Seriously, trying to forge 3/4" down a 16" dia circle 1/8" thick isn't something that most folk without specialized equipment undertake. If you don't want to eyeball it you're talking something pretty specialized and expensive for equipment. Tell you what, send me the specs and a 2B Nazel and I'll do it for you for the material. On the realistic side, just start with 1/8" stock, cut the circles and texture as desired. Actually forging down from 3/4" to size would have you paying through the nose were it coming out of my shop. What kind of castings are they and why start with castings? I don't think you're going to find a power hammer or press that will stop at depth in anything like a reasonable budget. Anything with that kind of power just isn't going to stop without something pretty darned serious to stop it. I'm thinking we need a much better idea of what you want to do, what from and why that way, before we're going to be able to give good advice. So far the ideas have been as good as possible with such a vague question. Need input! Frosty The Lucky.
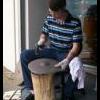
May 8, 201412 yr Author Yes, some very good answers despite my being vague. The material is bronze, 80% Cu 20% Sn. It is indeed something that I decided to specialize in. I'm making it myself because I can't buy it in the sizes and shapes I want. At least not from this country. To give you an idea, here is a casting: And here is one which I hammered out to around 11" and then cut a circle: There are raised areas all over it from the top die on the Nazel having an indentation. He ground it out just before I couldn't use the machine anymore. :( And here is my gas "forge", or furnace for this: Anyways, this is what I'm doing. They are going to be gongs, singing bowls, and hopefully cymbals. The biggest one I've done was a 10 lb, 8 inch casting that got hammered to about 16 inches. Still 10 lbs, though...so too heavy for a cymbal. Good for gongs though. I suppose with practice I will get to making them more even, and thinner. Might try stacking two together or something.
May 8, 201412 yr Your last post uploaded as I was writing all sorts of questions. There is no one who stocks bronze sheet close to you? Most cymbals are spin formed on a lathe out of sheet. Totally different process, I doubt you can get the correct sound out of a forged cymbal vs modern spun cymbals.
May 8, 201412 yr You could set up a big Bradley hammer with oversized dies to allow you the room for stop blocks. I made a 14"long die for mine and could go longer if needed.
May 8, 201412 yr Author You mean the cushioned helve style, right? I just looked up Bradleys and they made a lot of different ones. There's a 100 Compact near me but that can't be what you mean. I just read something about the long helves and working even thickness...makes sense.
May 8, 201412 yr For your application you could build a hydraulic forging press equipped with adjustable switching that could be set for depth and automatically cycle. This would be a bunch cheaper to build than any power hammer you could purchase.
May 8, 201412 yr Author Thanks, knots. I'll take a look over in Presses. I'm not familiar with presses, or how a forging press is different from a regular shop press.
May 9, 201412 yr This is an interesting video. ok, I couldn't get it to link... but go to youtube and do a search for "making cymbals" the first vid that popped up for me was a documentary for Zildjan. Theirs are formed via rolling mill then stamp pressing, then lathe. and a few other steps too.
May 9, 201412 yr Not a lot of experience yet, but there are three ways to control the output of a power hammer. 1. Kiss block to set resulting thickness of the work piece. 2. Forward speed of stroke. Faster equals stronger hits. 3. Backstroke length. Shorter equals weaker hits. Hope this helps.
May 9, 201412 yr If you do a youtube search for 300 lb Bradley the first two clips will be of me forging with stop blocks on my guided helve. The dies in use in those videos are only about 10.5" long but they are easily changed. Most of the forging I do anymore is mokume bar and billet forged to precise thickness/width requirements so I have a lot of dies built with integral stop blocks. It wouldn't be hard at all to do the job under discussion here with my hammer. Unlike a Nazel or other air hammer, and even most mechanical hammers, the orientation of the Bradley dies relative to the ram and guides allows them to be extemely long, even when the hammer itself is fairly small. To get dies with the length I use into a nazel or similar machine would require that the machine be in 5 or 6B size range OR that an "I" model hammer (extermally guided machine) be used. To me, avialable die surface area is one of the chief advantages of Bradely hammers over air hammers and other mechanical hammers. Not only can you use oversized dies, but the guides in these machines are extremely robust for just this type of work. Many production dies sets allowed the smith to forge multipe steps in the same die. This eliminated the need for multipe set ups thereby increasing efficiency.
Join the conversation
You can post now and register later. If you have an account, sign in now to post with your account.