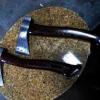
Loneforge Posted July 19, 2012 Share Posted July 19, 2012 Here is some mosaic pinstock I made the other night. Lanyard stock and welding rods with a pinch of black leather dye added to the epoxy. Quote Link to comment Share on other sites More sharing options...
knots Posted July 19, 2012 Share Posted July 19, 2012 As a bit of help for the uninitiated - Describe the process for injecting the epoxy into the tube around the rods ? Thank you for this interesting tid-bit. Quote Link to comment Share on other sites More sharing options...
Loneforge Posted July 21, 2012 Author Share Posted July 21, 2012 I used an empty epoxy tube.....clean it out when empty .....one use for injecting. Or you can buy a dosing syringe for adminstering medicine to kids at any pharmacy. Quote Link to comment Share on other sites More sharing options...
knots Posted July 21, 2012 Share Posted July 21, 2012 Cool . I bet you could use bronze or silver brazing rod to do the same thing hot. Quote Link to comment Share on other sites More sharing options...
Loneforge Posted July 22, 2012 Author Share Posted July 22, 2012 I have some low temp solder.....HMMMM......that's a grand Idea. Thanks! Quote Link to comment Share on other sites More sharing options...
hamer built Posted October 26, 2012 Share Posted October 26, 2012 just clicked on this. i use a brake bleeder ,from any parts store, to draw a vacum. same size clear tubeing, epoxy won't stick to it. put epoxy in small container & draw the epoxy into the tube, release vacum , important, tape the end & forget. cheap 12" mosiac. jim Quote Link to comment Share on other sites More sharing options...
BCROB Posted December 3, 2013 Share Posted December 3, 2013 saw your post Darren , thought I'd add a few I've done as well.......these are just rough cut at this point, used black enamel paint mixed with epoxy , very cheap to make , all supplies from your local hobby craft store..... Quote Link to comment Share on other sites More sharing options...
beth Posted December 3, 2013 Share Posted December 3, 2013 these look beautiful ! do you make slices and inlay them? do you have any work you made with them? ive never seen this kind of thing made before... Quote Link to comment Share on other sites More sharing options...
Eddie Mullins Posted December 3, 2013 Share Posted December 3, 2013 Those look very nice. I have never made or used mosaic pins. Are these peened or what is the installation method? Quote Link to comment Share on other sites More sharing options...
Chinobi Posted December 3, 2013 Share Posted December 3, 2013 Thanks for bumping this back to the top BCROB, I had wondered if the mosaic pins I see various bladesmiths hereon using were homegrown or if they were purchased. im also curious about the installation, its been some time since I skimmed the knife chat lessons so I cant remember if solid pins are traditionally riveted and filed flush so there is a flared end helping keep the scales on, or if they are just there for alignment, shear strength, and aesthetics. these mosaic pins definitely would not want to be riveted in to keep from destroying the pattern no? is there a smaller riveted pin countersunk beneath it and the mosaic used as a cap? (wandering minds want to know :) ) I have attempted this a couple of times from a foundry approach with molten metals (copper and sterling with higher MP metals as the shell and inserts) but success still eludes me :( Quote Link to comment Share on other sites More sharing options...
Matt Smith Posted December 3, 2013 Share Posted December 3, 2013 beautifully done Quote Link to comment Share on other sites More sharing options...
BCROB Posted December 4, 2013 Share Posted December 4, 2013 here's a few samples of homemade.......many more if interested slightly peened just enough so you don't distort the mosaic pattern,( if you overdo by accident most will clean up when hand sand) I usually add an extra couple normal brass or stainless round stock or corby rivet for re-enforcment............hope this helps BCROB Quote Link to comment Share on other sites More sharing options...
Dodge Posted December 4, 2013 Share Posted December 4, 2013 these look beautiful ! do you make slices and inlay them? do you have any work you made with them? ive never seen this kind of thing made before... Beth, as I understand, most use full length through the knife/tool/ect handle, then grind, file or sand down and finish with rest of the handle. Initially I assumed they would be sliced shorter and inlaid over a securing pin. Personally this is what I would consider, simply to stretch materials further ;) BTW, this is my first attempt Quote Link to comment Share on other sites More sharing options...
BCROB Posted December 4, 2013 Share Posted December 4, 2013 Beth, as I understand, most use full length through the knife/tool/ect handle, then grind, file or sand down and finish with rest of the handle. Initially I assumed they would be sliced shorter and inlaid over a securing pin. Personally this is what I would consider, simply to stretch materials further ;) BTW, this is my first attempt 1017131002_zps74e73c67.jpg Yes sorry forgot to mention Beth , I use full length through the handle. I make the pins in about 6'' sections and them cut according to handle width usually around an inch or so and then just enough extra for a light peen Quote Link to comment Share on other sites More sharing options...
me miller Posted December 4, 2013 Share Posted December 4, 2013 Make sure if you use more than one pin in the handle to "clock" them. Make sure the design is turned the same direction on both pins. Quote Link to comment Share on other sites More sharing options...
BCROB Posted December 4, 2013 Share Posted December 4, 2013 beautifully done thanks Matt Quote Link to comment Share on other sites More sharing options...
beth Posted December 4, 2013 Share Posted December 4, 2013 thanks dodge, BCROB, what a beautiful thing that is to use as a pin. i thought they were just for purely decorative function, like chunks inlaid onto surface. really never seen that before :) gorgeous work too. :) Quote Link to comment Share on other sites More sharing options...
BCROB Posted December 4, 2013 Share Posted December 4, 2013 thanks dodge, BCROB, what a beautiful thing that is to use as a pin. i thought they were just for purely decorative function, like chunks inlaid onto surface. really never seen that before :) gorgeous work too. :) one other note Beth and Dodge......when I drill my tang holes I countersink them as well as you already know for a another place for the epoxy to go...........I also give the outside of the mosaic pin a real good scratching with some course grit like a 60 for epoxy bondness as well ( Bondness, ha ! not sure if that's a word or not but you get where I'm goin with it )...........a long setting epoxy is also better in my opinion...............as far as your mosaic design its whatever you can imagine Quote Link to comment Share on other sites More sharing options...
beth Posted December 4, 2013 Share Posted December 4, 2013 yes, accepting bondness as a perfect word choice :) i love the whole idea. its like rock or something, or swiss roll. would be a good way to make eyes. here is rock by the way, if you dont have this stuff - its sold at the seaside here... :) usually sold with icreams and cream teas.. Quote Link to comment Share on other sites More sharing options...
ThomasPowers Posted December 4, 2013 Share Posted December 4, 2013 I'd go with "bondiness" myself. I saw folks in Spain making inlay pieces for decorating woodwork that were much similar just not using the exterior pipe to hold sections of coloured woods in place and not using an epoxy matrix. Hmm it's a bit like doing mosaic damascus using a can, various nickel shapes and powdered steel for the matrix... Quote Link to comment Share on other sites More sharing options...
Frosty Posted December 4, 2013 Share Posted December 4, 2013 Bondness is a perfectly acceptable word to describe stuffs stickytivity. Long set time epoxy is much stronger, I only use quick set epoxies where low strength Bonditude is okay and time is a factor. Frosty The Lucky. Quote Link to comment Share on other sites More sharing options...
Recommended Posts
Join the conversation
You can post now and register later. If you have an account, sign in now to post with your account.