MLMartin Posted August 5, 2011 Share Posted August 5, 2011 It sure was wild running that big hammer with you, I hope to be back at your shop soon. Only one more year of school left! Quote Link to comment Share on other sites More sharing options...
Dillon Sculpture Posted August 6, 2011 Author Share Posted August 6, 2011 It was nice to have some help, guess I'm back to two hands and three legs. I believe I'm a bit past the capacity of the Bradley, wish I had the Niles up and running. The 3" is close, needs a clean up heat which will take another half day, took two days to get this far but together with the 2" you can get an idea of the process. The rear leg will be 14' long when I weld these two together and weighs in at 1800#. I still have two more pieces to add which will make it almost 18' and 2500# when finished and it is only one leg of the base structure. The press had no problem bending the 2"x18" cold up to 8" from the end. Cut up one 4" bar for forging, the longest I will attempt will be 6' @ 324 pounds, I believe the Bradley will knock it down better than the odd shape plate. Quote Link to comment Share on other sites More sharing options...
Dillon Sculpture Posted September 29, 2011 Author Share Posted September 29, 2011 This is getting out of hand! :o Quote Link to comment Share on other sites More sharing options...
MLMartin Posted September 30, 2011 Share Posted September 30, 2011 I love it Quote Link to comment Share on other sites More sharing options...
Mainely,Bob Posted October 3, 2011 Share Posted October 3, 2011 Mike,you are an absolute WILDMAN! Don`t let anything stop you buddy but please be careful. Those are some big chunks of iron and We`d hate to see one of them turn the tables on the operator. Quote Link to comment Share on other sites More sharing options...
HWHII Posted October 3, 2011 Share Posted October 3, 2011 I'm really enjoying watching this come together. I have worked with alot of heavy plate fabrication but never forged any. Makes me druel just watching. Quote Link to comment Share on other sites More sharing options...
Dillon Sculpture Posted October 4, 2011 Author Share Posted October 4, 2011 Trying to keep my head on for sure, almost through with the forging but just moving this stuff around can be just as lethal. Working a bit past what I'm tooled up for, might have to back it down a notch or get some more tools :ph34r: Quote Link to comment Share on other sites More sharing options...
bigfootnampa Posted October 4, 2011 Share Posted October 4, 2011 OH Oh! More tools for sure! BIGGER tools! Quote Link to comment Share on other sites More sharing options...
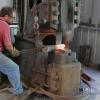
Dillon Sculpture Posted October 8, 2011 Author Share Posted October 8, 2011 Slit, drift and the pin. Quote Link to comment Share on other sites More sharing options...
beth Posted October 8, 2011 Share Posted October 8, 2011 this is going to be so cool danger!!!!........ :lol: Quote Link to comment Share on other sites More sharing options...
Suboc Posted October 13, 2011 Share Posted October 13, 2011 I sure am enjoying watching the progress of the piece. Thanks for documenting the process. Can you give me some info on your torch set up on tracks. What size tanks/torch does it take to allow you to cut through that thickness of material Dan Quote Link to comment Share on other sites More sharing options...
Dillon Sculpture Posted October 13, 2011 Author Share Posted October 13, 2011 Victor track torch, real handy unit, it follows a track, a bent piece rod or a circle attachment. #5 tip for the 4" stock will suck a large oxygen bottle dry pretty quick. Quote Link to comment Share on other sites More sharing options...
HWHII Posted October 13, 2011 Share Posted October 13, 2011 The track torch is a great application for the slitting. It gives me a few more ideas. ^_^ Quote Link to comment Share on other sites More sharing options...
Steve Sells Posted October 13, 2011 Share Posted October 13, 2011 this is Insane thanks for posting, keep it up. Quote Link to comment Share on other sites More sharing options...
Dillon Sculpture Posted October 13, 2011 Author Share Posted October 13, 2011 Insane? Just a bit of backyard blacksmithing, industrial style... Part of the plan involves heading over the pin at the park as part of a installation/ceremony, so here we go (just a bit mad maybe) I am hoping this can be headed over by hand. I am considering grinding the center of the pin down about 1" or so. Having a purpose built single burner, a couple strikers with well placed fuller then flatter it may work. Any other ideas or concerns? Quote Link to comment Share on other sites More sharing options...
MLMartin Posted October 14, 2011 Share Posted October 14, 2011 looks like i need to take a break from school and head back to Ga Quote Link to comment Share on other sites More sharing options...
Steve Sells Posted October 14, 2011 Share Posted October 14, 2011 I would stay with your idea of gouging out a crater or removing a divot. That will make it easier to spread out the rivet head by hand. Quote Link to comment Share on other sites More sharing options...
purdypart Posted October 14, 2011 Share Posted October 14, 2011 Have you started the process for the bearing? I'm really interested in seeing how that works out. Also, how are you treating the steel and wings for outdoor life? Looks awesome! Quote Link to comment Share on other sites More sharing options...
Suboc Posted October 15, 2011 Share Posted October 15, 2011 Thanks for the track torch info Michael. I've done something similar on a smaller scale, and may use this technique on a future piece that will be fairly large. I'll be checking into purchasing one. Dan Quote Link to comment Share on other sites More sharing options...
Dillon Sculpture Posted October 16, 2011 Author Share Posted October 16, 2011 The great thing about the track torch is the portability. In my rush to bend the 2" plate for one of the front legs I overlooked the beveled corners so I had to run on a curved piece. Worked out that I balanced the 1000 pound section and seesawed it through the cut! I guess that would be a fourth axis or 3D profiler? The bearings are still on paper but I will need to forge the 6" round billet soon. :ph34r: Quote Link to comment Share on other sites More sharing options...
Dillon Sculpture Posted October 16, 2011 Author Share Posted October 16, 2011 looks like i need to take a break from school and head back to Ga Whenever your ready! Quote Link to comment Share on other sites More sharing options...
Fosterob Posted October 16, 2011 Share Posted October 16, 2011 Another good use of a track torch is for making long welds, replace the cutting torch with a MIG gun. It will also do curves if you attach a cable to it tied too the center of the arc. You may have to run it without the track for curves or circles, mine does not use track. Rob Quote Link to comment Share on other sites More sharing options...
Dillon Sculpture Posted October 16, 2011 Author Share Posted October 16, 2011 Thats a good idea for sure Rob, I actually used it as a router power feed when moulding some aluminum bar for a gate. Drift and a darn big hole. Quote Link to comment Share on other sites More sharing options...
purdypart Posted October 17, 2011 Share Posted October 17, 2011 what kind of anti-seize did you use? Quote Link to comment Share on other sites More sharing options...
Dillon Sculpture Posted October 17, 2011 Author Share Posted October 17, 2011 what kind of anti-seize did you use? Grease & graphite. I'll have to admit, I torch cut the bed of my machine to accept the drift, everything is game I suppose :( Quote Link to comment Share on other sites More sharing options...
Recommended Posts
Join the conversation
You can post now and register later. If you have an account, sign in now to post with your account.