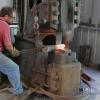
Dillon Sculpture Posted October 5, 2010 Share Posted October 5, 2010 This job is finally rollin after a year delay. 1-1/4" post with the corners chamfered, 1/2" x 1-1/4" top and bottom rail was staged up in the home after templates were made and copied to the bars. Cross braced and cut in segments that will be easy to handle, diagonal measurements were recorded to assemble it back at the shop as well plumb line were drawn for reference (not sure why nothing straight, just habit I suppose). Back in the shop dies and jigs were made to the specific parts to be made in number of panels, 5 large on the stair, 3 small on the stair, 2 large end curves, 1 small corner curve and 2 balcony panels. This rail will have a antique finish with a brass cap. More to come! Quote Link to comment Share on other sites More sharing options...
fciron Posted October 6, 2010 Share Posted October 6, 2010 Looks like a nice job and you look prepared. Quote Link to comment Share on other sites More sharing options...
CurlyGeorge Posted October 6, 2010 Share Posted October 6, 2010 DD, looks like you have the job thought out. I love it when a plan comes together!!! Nice work. Keep us posted on the progress. Quote Link to comment Share on other sites More sharing options...
Bob S Posted October 6, 2010 Share Posted October 6, 2010 Beautiful work. Very nice clean shop. Thumbs way up. Quote Link to comment Share on other sites More sharing options...
monstermetal Posted October 6, 2010 Share Posted October 6, 2010 Nice lookin job ya got there Why dont you show us some of the tooling you used to make the parts? Quote Link to comment Share on other sites More sharing options...
Dick L. Posted October 6, 2010 Share Posted October 6, 2010 Great design ! I would really like to see how it was done if you are inclined to show us. Thanks for posting! Dick Quote Link to comment Share on other sites More sharing options...
Dillon Sculpture Posted October 6, 2010 Author Share Posted October 6, 2010 Thanks all, I'll get a shot of the tooling, nothing special just some scroll jigs and one ball swage. As far as construction goes I would be open to specific questions, but I think the hardest part of building one of these is organization and sequential methods. You cant move forward until the first previous part is finished, I think this idea also relates to the comment of "such a clean shop". Yesterday I thought to myself, how am I ever going to get this place clean and organized? :blink: Quote Link to comment Share on other sites More sharing options...
beth Posted October 6, 2010 Share Posted October 6, 2010 wow danger thats some beautiful looking work - really tidy and great lines:) just lovin the ready for action clean shop too - we are all envious! what is it they say - tidy shop tidy mind or something...? Quote Link to comment Share on other sites More sharing options...
Frosty Posted October 6, 2010 Share Posted October 6, 2010 That's looking really well done Michael. As you say, sequense and organization is pretty much the real secret to doing complex build up jobs. The next most or maybe more important part is instalation, especially if there's a contractor buiolding or prepping the area. I join in giving you kudos for the clean shop. Sure, it's not hospital clean but it's admirably uncluttered and laid out in an organized manner, right down to hand tools and ready components. I like your style. Frosty the Lucky. Quote Link to comment Share on other sites More sharing options...
David Browne Posted October 6, 2010 Share Posted October 6, 2010 Thanks all, I'll get a shot of the tooling, nothing special just some scroll jigs and one ball swage. As far as construction goes I would be open to specific questions, but I think the hardest part of building one of these is organization and sequential methods. You cant move forward until the first previous part is finished, I think this idea also relates to the comment of "such a clean shop". Yesterday I thought to myself, how am I ever going to get this place clean and organized? I think "clean" often gets mistaken for "organized". It's not that hard to push a broom around and clean the shop. It takes some effort to stay organized. Nice work BTW, always a treat to see your stuff in progress. -DB Quote Link to comment Share on other sites More sharing options...
Dillon Sculpture Posted October 6, 2010 Author Share Posted October 6, 2010 Quote Link to comment Share on other sites More sharing options...
David Browne Posted October 6, 2010 Share Posted October 6, 2010 Mike, I confess, I stole that ball drilling jig from your modern masters segment. Still use it today. It's a good one. DB Quote Link to comment Share on other sites More sharing options...
chyancarrek Posted October 7, 2010 Share Posted October 7, 2010 Great looking work Michael! Good to see that you make time for lunch and a little romp with the pup - very important steps to any well executed work! Quote Link to comment Share on other sites More sharing options...
Bob S Posted October 7, 2010 Share Posted October 7, 2010 Mike, I confess, I stole that ball drilling jig from your modern masters segment. Still use it today. It's a good one. DB Is this 'modern masters segment' available? Bob Great pictures BTW. Very nice. Quote Link to comment Share on other sites More sharing options...
nuge Posted October 7, 2010 Share Posted October 7, 2010 Can you tell us a bit about the welded joinery? What process? Are the individual elements fit super tight and then welded on the top and bottom only? thanks Quote Link to comment Share on other sites More sharing options...
Dillon Sculpture Posted October 7, 2010 Author Share Posted October 7, 2010 Now your dredging David, that was done on VHS, I have a copy buried somewhere. There is a video on my site called Working Metal done about the same time, when I had more hair and I wasnt so dangerous Funny thing that vid was shot when I was building the sister rail to this one, look close they are very similar. The story, same architect 10 years latter, same house built 20% larger and it is this clients interior designer that the house was based on, weird! The weld joints are made by cutting a deep grove on the bader for the weld to have plenty of penetration, then ground smooth. You really need a large capacity (hot) mig and really good fit up for this technique. I'm glad the tuna is gone, at least I had a good desert, pumpkin bread! Its hard to get a lot done with that log dog under foot as well. Quote Link to comment Share on other sites More sharing options...
David Browne Posted October 7, 2010 Share Posted October 7, 2010 Now your dredging David, that was done on VHS, I have a copy buried somewhere. Mike, I think I have a VHS copy of it laying around the house somewhere as well. Unfortunately, I don't have a VHS player to play it in. The fit up on your parts is superb. I especially like the two overlaps that go above and below plane. Really nice touch. Quote Link to comment Share on other sites More sharing options...
kburd Posted October 7, 2010 Share Posted October 7, 2010 I must say your work is so good because you DRINK MILK! way to go dairy farmers everywhere appriciate your effort. sorry shameless plug for my familys life work. Quote Link to comment Share on other sites More sharing options...
youngdylan Posted October 15, 2010 Share Posted October 15, 2010 nice work there Danger and I Iike the crisp joinery. Looking forwards to seeing how it progresses. Do you have any photos of making and fitting the top/bottom rails to the stairs? Quote Link to comment Share on other sites More sharing options...
ianinsa Posted October 16, 2010 Share Posted October 16, 2010 Nice work! And you also showed yet another use for the humble soup can. Work of this quality keeps the world coming back for more! A good deed for smiths everywhere. Ian Quote Link to comment Share on other sites More sharing options...
Dillon Sculpture Posted October 16, 2010 Author Share Posted October 16, 2010 David, the templates were made of 3/8" x 1" on site with a #2 Hossfeld bender, vise and a twisting bar, you can kinda make out the bending rig in the background. Basic iron horse I bolt down close to where I'm working. I use the temp. to shape the 1/2" x 1-1/4" bar at the shop, there is minimal shaping with the same rig during stage up. Finished the last panel this week and will be starting the large curved ends Monday, should be interesting. The drawing of the curved end I tried to show three dimensionally. I tried to incorporate the straight panel design as well the clients initials in the center oval. Quote Link to comment Share on other sites More sharing options...
Bryce Masuk Posted October 16, 2010 Share Posted October 16, 2010 looks like you nailed the drawing and the piece your doing it all by eye on paper? I dont see a grid or anything I have to draw a grid to make things even connect and they dont connect like that lol Quote Link to comment Share on other sites More sharing options...
MLMartin Posted October 17, 2010 Share Posted October 17, 2010 Hey! whos the flunky in the background with the bandsaw? Quote Link to comment Share on other sites More sharing options...
youngdylan Posted October 17, 2010 Share Posted October 17, 2010 David, the templates were made of 3/8" x 1" on site with a #2 Hossfeld bender, vise and a twisting bar, you can kinda make out the bending rig in the background. Basic iron horse I bolt down close to where I'm working. I use the temp. to shape the 1/2" x 1-1/4" bar at the shop, there is minimal shaping with the same rig during stage up. Finished the last panel this week and will be starting the large curved ends Monday, should be interesting. The drawing of the curved end I tried to show three dimensionally. I tried to incorporate the straight panel design as well the clients initials in the center oval. Thanks for that Danger. How are you doing the curved sections? Are you making it as a raked flat panel and then curving the whole panel. I've had some sucess with this on a much less complicated spiral balustrade. Or are you pre curving the individual elements before assembling the panel. I did briefly think about doing this but couldn't get my head round the idea. Quote Link to comment Share on other sites More sharing options...
Dillon Sculpture Posted October 17, 2010 Author Share Posted October 17, 2010 I use Kinko copiers for their blueprint machine, 36" wide by how ever long you want, saves time, pretty sure if you draw it 3"= 1' it is a 100% enlargement to get a full scale drawing. Mac hope your learning some stuff this year, I'm going as fast as I can with only two hands. David I post up some pics when I get there but I use both methods, whatever it takes! Quote Link to comment Share on other sites More sharing options...
Recommended Posts
Join the conversation
You can post now and register later. If you have an account, sign in now to post with your account.