October 17, 201015 yr DD- How exactly does your collar jig work? Is it for fitting? Cant seem to figure that one out. I think that one of the big lessons here is the simplicity of your tooling. Thanks for the post.
October 17, 201015 yr I guess making the drawing small saves alot of time making drawings takes me alot of time I usually do a couple to think about everything the fact you can just blow up your drawing it up 40 times bigger and work off that is impressive to say the least. no wonder it is so clean I have been working alot to get my drafting methods the best possible I have been trying to draw full scale as well as use autocad for straight projects (straight bars) autocad is really quick but I havent figured out how to do too much with it yet.
October 18, 201015 yr To make drawings full size I have an opaque projector. I project the drawing on to a piece of masonite with the boundaries marked out and trace it by hand. Opaque projectors can be found, cheap, at swap meets etc. brad
October 22, 201015 yr Author Finished up the small curve, showing the panel with 1/2"x 3/4" bars welded on the backside to support the tin, a 1/4" notch was cut in the ends to bring the design to the middle. The elements were bent both with the hyd. press and by hand in the vise. I will use the hyd. for more intricate parts like the center piece and by hand for the longer sweeping parts. I use two bending bars 1/2" for twisting and 3/4" for curving, setting the element in the vise with reference lines for a guide. The collar jig is used to make a U then the collar is placed on, closed and welded. I use half oval material 3/4" to 1 1/2". For high production of collars a die is used in the hyd. press, shown here is one for three different sizes.
October 26, 201015 yr Author Found a shot of the rail I built the first time around, over a decade ago. Yep, thats a 50lb. LG in the background, the big hammer sydrome hadn't taken full effect yet! :blink:
October 26, 201015 yr very cool the snubs on your scrolls are always really nice I like how you use a thick bar and draw it out it looks really good. the details of stuff like this make the difference. the work you always do is really neat and tidy recently the shop I used to work in was doing a rail of brass or rather modifiying and fixing it it came from argentina. (i still do aluminum stuff there because i dont have a setup at home for it) they were bending everything cold and boy was it a slow process they used the press brake with a similar setup that you were using with your press with half of a large pipe. but they were marring it pretty badly and trying to do the whole panel at once eventually they had to weld up the gouches and polish it out. they also took some of the panels and had them put though a huge set of rolls and most of the welds cracked and had to be rewelded. most of this was because it was done wrong and whoever built the rail ran away with the cash.
October 26, 201015 yr very cool the snubs on your scrolls are always really nice I like how you use a thick bar and draw it out it looks really good. the details of stuff like this make the difference. the work you always do is really neat and tidy recently the shop I used to work in was doing a rail of brass or rather modifiying and fixing it it came from argentina. (i still do aluminum stuff there because i dont have a setup at home for it) they were bending everything cold and boy was it a slow process they used the press brake with a similar setup that you were using with your press with half of a large pipe. but they were marring it pretty badly and trying to do the whole panel at once eventually they had to weld up the gouches and polish it out. they also took some of the panels and had them put though a huge set of rolls and most of the welds cracked and had to be rewelded. most of this was because it was done wrong and whoever built the rail ran away with the cash. Sounds like what they really needed was an older hand that knew how to use a torch and a wet rag. This is just what I was talking about in a previous post about how the deeper understanding of the material and simple techniques are being lost.Seems the standard answer in industry today is to use brute force instead of skill and finesse to get a job done(or un-done as is usually the case). :(
October 27, 201015 yr Found a shot of the rail I built the first time around, over a decade ago. Yep, thats a 50lb. LG in the background, the big hammer sydrome hadn't taken full effect yet! I like the little 50lb in the background, I think I need to talk Rob out of it, It would actually be something I could load in my truck and take to my shop and use!
October 28, 201015 yr Wow... this is mesmerizing to me! Just when I start feeling like I have a fairly varied skill set due to background and education... I see something like this and immediately get slapped right back into the reality that I don't know $&!# Thank you very much for sharing! I absolutely love this project of yours and all the photos. Beautiful, flowing, elegant work!!! I'd hazard a guess, to say that I'm like you about keeping shop. A clean and organized shop helps ME to produce clean and organized work. Although my current shop is a closet compared to yours! Thanks again :)
October 28, 201015 yr Author Nick, two different paths man, I just got slapped by your blades, beautiful work you do there, from one clean freak to another. If your ever in a trading mood let me know.
November 12, 201015 yr Author Makin more noodles, pretty much what they look like when the parts are just lying there. Bout over the top of this one, still have the insignia, newel, balcony, brass cap and finish, oh yea I have to install it, sure hope it fits!
November 12, 201015 yr looking REAL good Danger, real good. How much painting/ finishing do you do on site?
November 14, 201015 yr Author looking REAL good Danger, real good. How much painting/ finishing do you do on site? None, 3 hour install, bolt it together and go to lunch, hopefully anyway.
November 14, 201015 yr real nice I still cant get over how clean you snubs are on your scrolls I attempted to make a tool to help with the final clean up on those near the neck but I think I put the wrong radius on the top and forged the 1 inch round bar in too deep I posted the picture in my wine rack thread, maybe I can modify it and make it workable at least of the two. do you use a tool to make that area really nice or are you just doing it freehand? I keep finding that my problem with the penny scrolls and snub scrolls is getting the right space in between the end of the scroll and where it begins to curve mine turn out wonky. I have been driving the stem down trying to shift it to get the correct flow I just need more work or a better method
November 14, 201015 yr Author I guess I'm going to disappoint you Bryce, they are welded up, yep, thats right it is another concession of money making machine and physical frailty. Since I can do it the proper way, I have no qualms about this deviation and I assure you my arm does not mind a bit. For I have an appointment to see the orthopedic tomorrow about my shoulder pain, hopefully it will be a shot and some exercises as this will be my 4th shot to that arm I am probably getting closer to switching arms entirely, or I can just get a power hammer I suppose When I did hammer them out I had a die in the hammer to neck them down and a grove cut in the side of my anvil to shape the snub, the hardies where always to high for me to get the right angle and not sturdy enough to shape them in one heat.
November 14, 201015 yr I couldnt tell at all and apparently I work with metal I guess we all create what we want to see and that is the truth, I have seen alot of pennys welded on that look like they are welded in In my opinion we are creating some kind of impression if the work creates this impression then we have succeeded. I have been playing with the idea you are speaking of using the hammer to knock them down rough and do the rest by hand. I want to know how to do it good and I guess once you head in a direction its hard to change back, I am glad I didnt become a plumber I would probley be making nearly 40 dollars a hour with a mortgage and some longterm girlfriend, Once you make the good money you wont turn back because you get used to it and seemingly cant live without it. grinding fitting welding is all a part of the trade it has its place. if no one knows than you did it right
November 15, 201015 yr "This rail will have a antique finish with a brass cap". Danger, If your willing to share, I would love to know about your "antique finish". Thanks, Andrew
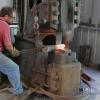
December 18, 201015 yr Author Finishing, my favorite part NOT! Oh well you get this far along it would be a shame to cover it all up with paint. I have about 80 hrs. in the clean up not including what I did in pre-assembly, thats roughly 2 hours per foot. Tools used were 4 1/2" and conical hard rock the conical works well for the pined ball detail, 50 grit 4 1/2"discs, 1/2"x18" 60 grit belt sander, 2 1/2" knotted wire brush, needle scaler and 80 grit emory cloth. The brass cap is a monster, this is where your patients and temper come into play. At $500 for 16' a good plan for material usage is key. The diagonal measurements were taken in the field to aid in staging the rail as it was on the stair and each piece has to go back together as the brass is put on. 45' layout, four pieces with three pined breaks for transportation and no welding in the field. With the sections determined 9/32" holes where drilled approximately every 18"-24" and 1" from the pinned ends. A rough template was made on cardboard and transferred to the table with welded down 1/2" square, this is just a starting point. Heating in the forge to a dark dull red I formed it to the template using a pry with a aluminum swivel block. The piece wile hot was twisted and bent in the Hosfeld using the aluminum covered vise and wrench and blocks in the Hosfeld, as it cools the adjustments are made to make it fit the iron, sometimes I may get it to lay down other times I use a rose bud and wood blocks to clamp it down. Some of the pieces have to be welded, I use a TIG and a mix of parent material and SIB rod also pining these joints for line up. The pin jig is fabricated up with two 1/8" drill guides and is clamped to the brass in one direction of travel. Cleanup is done with 50 grit, medium Scotchbrite, 2" Walter fine and super fine Blendex drum on a variable speed grinder for the welds and the peened joints then polished with white on the straight grinder. This is all the prep for the finish but is the most important part to doing it right.
December 31, 201015 yr Author Finished the brass construction, re-staging the pieces, use of a flat file to match the ends, peening, filed, scotchbrite, polish and patinated, whew! Also got some color on the iron, I use a sandable charcoal black primer (Krylon 1316). Just a dusting, then Scotchbrite hand pads are use to scuff down the rail to bring up highlights of the surface forging. Finally I use Minwax with a brown stain, to really bring warmth to the end project and complement the of the darkened bronze. Hope to install in a couple weeks, pics will follow.
Join the conversation
You can post now and register later. If you have an account, sign in now to post with your account.