Frosty
-
Posts
47,018 -
Joined
-
Last visited
Content Type
Profiles
Forums
Articles
Gallery
Downloads
Events
Everything posted by Frosty
-
I didn't mean to bring the accident up again but I find myself frustrated at not being very articulate since and it sometimes comes out as a long whine. Sorry about that everybody. I don't think there is an alternative, King Tut and Lucy get older every day. Frosty The Lucky.
-
A backing plate and 2 link doorknockers. Frosty The Lucky.
-

Blacksmith songs and music
Frosty replied to George N. M.'s topic in Blacksmithing, General Discussion
Do you know of a solo version of "Amazing Grace" by Judy Collins? Frosty The Lucky -
I think it would be nice to have affordable power tools that will run on whatever power is available, 240vac or 120vac, etc. But I don't know enough about how it would be done to have a useful opinion or want to experiment. Maybe I've just fallen for enough "too good to be true" things in my life I like to wait till it's a proven . . . thing. I just don't have the same drive to try these things as you. It's not like tinkering something together out of stuff in the junk drawer and shelf 3&5 of the local plumbing supply. Heck, my shop isn't even wired, let alone for 240vac, the tree shut me down on a lot of things. Frosty The Lucky.
-
Okay, here's a hack Deb heard about recently. To crack hardboiled eggs, rather than crack it on something like a counter etc. put it in a large coffee mug, cover with your hand and shake it for a bit. The shell will be pretty shattered and all but slide off at once held together by the membrane underneath. Frosty The Lucky.
-
Casting a Gingery Lathe
Frosty replied to Nobody Special's topic in Smelting, Melting, Foundry, and Casting
Yeah, I'm not fond of the X braces as you made them, too many acute corners. I think I'd make a zig zag to make maybe 3 right triangles instead of Xs. Heck, maybe just two. All they are are stiffeners to prevent your ways from wracking and it doesn't take something complicated to do that. Maybe just a couple obtuse diagonals. That prevents the sharp inside corners to make it easier to pull the form. Or maybe just make the long sides of the box thicker. Aluminum doesn't like flexing anyway so making the box a little thicker will stiffen it up quite a bit. Just another 1/4" would make a significant difference. Being thicker will retain heat to help the aluminum stay liquid as it fills. I'm no fan of your X bracing, it'd be hard to ram up and harder to pull the form. Hmmmm, to fill the Xs I just thought of maybe cutting the open edges of the long sides of the box into runners and sprue it at one end, riser at the other. You could just leave the long runners as stiffeners and reduce the X bracing to one or two diagonals. No draft to worry about, just cut them when you pull the form. Frosty The Lucky. -
Blacksmith songs and music
Frosty replied to George N. M.'s topic in Blacksmithing, General Discussion
Thanks for the list George. Some I've listened to often but this is the first for many and I really like a couple of the groups. I've been sifting through Noble Jacks, "The Blacksmith Stomp" didn't seem to have much to do with blacksmiths but it was sure a fun piece to listen to, it'd be a blast in concert. Clamavi De Profundus has a lot of songs I like too. Working down your list is a good way to start my day. Frosty The Lucky. -
What did you do in the shop today?
Frosty replied to Mark Ling's topic in Blacksmithing, General Discussion
How much water will one hold, George? My Uncle Fred said they made soup and stew in them. Frosty The Lucky. -
If you have questions, give me a shout. I wrote that from memory and I got to drifting off course a couple times. I had a good how to but that's dead with an old computer. <sigh> Frosty The Lucky.
-
What did you do in the shop today?
Frosty replied to Mark Ling's topic in Blacksmithing, General Discussion
You're really coming along Pedro chasing and repousse takes time to get the hang of and you're getting there. I really like the emotion or mood you impart in your faces. I feel what you're tinking, Pedro. There is a way to move the material from outside the image outline you're working for the depth you want inside. Dang, that wasn't very clear was it? Maybe I'll recall, if so I'll get back. Frosty The Lucky. -
Thank you Wolfy! May I share the link with members of our blacksmith's club? Frosty The Lucky.
-
The tool I bought that changed everything was my Jet, vertical horizontal band saw. It is the ONLY power tool in the shop I'll start and go do something else. The only thing I use a chop "hot" saw for is cutting thin tubing. I get more use out of my home built 2 x 72 belt grinder than my 50lb. Little Giant though I use the heck out of it too. Frosty The Lucky.
-
Not a bad plan but please drop "TRY" from your vocabulary, it carries an expectation of failure in making what are really very basic projects. "I'm not going to (TRY) to make hooks. "I'm going to make hooks this rainy weekend or whenever." No need to talk about expecting to make poor hooks, it is in fact another way to shoot yourself in the foot. Another thing stop trying to get it right, "git er done" instead. Trying to get things "right" tends to focus you on problems and you lose sight of the project. It's not hard to keep positive about possible failed projects, everybody who actually takes hammer to metal, experiences failures and hopefully can analyze what went wrong well enough to learn from it. I've been doing this off and on for more than 50 years and learn something every time I'm at the anvil. So, STOP TRYING, just just do, take notes and pics. If something goes wrong analyze what you were doing when it went south, if you can't figure it out bring it here and we'll help. One last bit of advice in a more positive light seeing as that's my direction right now. Instead of forging different hooks every time you go out, forge the SAME ONE a couple times as a warm up exercise before exploring different ideas. Being the organizational genius I am (in my alter ego) I couldn't find a pic of the old wall hooks. I start people making them, they have lots of different forging processes but in small bites that go together to make a functional thing and is full of good lessons. I use 3/8" sq. HR "mild" I don't recall how long but somewhere between 4-5". First lesson ALWAYS leave the thinnest section to last so it doesn't get burned off. Step 1, isolate the shank from the leaf stem, Gently! draw the shank down to around 5/16" sq if you want a longer hook against the wall. Mostly you're losing the as milled finish for a "forged" texture. Hold off on the twist for a bit though. (There are lots of different twists but keep it a simple square twist for now!) Draw a point on the end of the leaf how long depends on the kind of leaf you're representing but it needs to be a pretty blunt point. (Just pick one for now!) Draw the stem down to establish, the "preform" stage, finishing the stem comes a LITTLE later. If you draw it down to the finish dia it will bend too easily when forging the leaf. Remember, THINNEST LAST! Draw the leaf laterally to help widen it, this is a good time to use the horn lengthways as a bottom fuller. I address the anvil when doing this by standing in front of the horn, facing down the length of the anvil. The pointier part of the horn will draw faster so adjust. For heart shaped leaves, (Nice for valentine's day) I preform the leaf section by fullering into the pointed end and carrying it back to the widest. Draw the leaf on the corner of the stock, it spreads it a little better. Anyway, flatten the leaf to the desired thickness, center it on the shank and true it up. Incising the veins comes as a final step. Mark the hook end of the shank, take a good heat and place it leaf up in the (preadjusted!) vise just a little 1/16"-1/8" above the mark and twist it how you like. Count the turns for consistent results! You are shooting for consistency at this stage in your skill building, Yes? You can punch the screw holes after doing the hook taper but you will really be thinning the hook taper and it becomes more dangerous to the project. Yes? Next using small flat and a counter punch, first mark the location of your desired screw holes with the flat punch then counter punch so they fit countersunk screws and either punch or drill the screw holes. Doing this step is a GOOD reason to NOT forge the leaf stem to final thickness, you'll be holding it down with a hold fast on the leaf to keep the leaf and screw holes in the same plane like the wall. Hmmmm? You'll note the twist continues into the isolated section for the point, this is no accident BUT just how I do it, because makes the transition from twist to the long round hook taper much smoother. Some folk like the sudden transition better, no harm no foul, it's a matter of taste. Yes? Now we're getting to the nitty gritty, drawing a long EVEN round taper. Are you familiar with the SOR technique for drawing from square to round shapes? Draw to near finish length, (say 1/2" shy) then draw it on the corner into an octagonal cross section, keeping it straight, then round it up with lighter blows at a little lower heat and finally do some final planishing at just above black heat to make it all smooth and uniform. With the hook taper finished it's a good time to draw the stem to it's final thickness, you're about done with any hot hammering, from now it'll be mostly light tapping. Now for one of the trickiest parts, getting the finial scroll on the end of the hook facing the right direction. It's also a decent time to mark the veins in the leaf to help remember which side is up. Go ahead and laugh it's really easy to turn he hook the wrong direction, even after dozens at one demo I did with embarrassing frequency. So I made a laugh for everybody and twisted it around where it was supposed to go and sold it for a couple bucks off. What I started doing was laying the hook veins up in the forge holding it with the tongs, the end of the hook taper is really thin and heats very quickly. Remove it and turn the finial scroll AFTER flattening it SLIGHTLY so it was less likely to punch through a heavy garment. And twisted it to be in line with the hook. Then I heated the taper, chilled the finial to prevent smooshing it, started the hook over the far edge of my anvil and closed it to finished on the face. Finial up. The ONLY thing I did on the horn is a little final truing, I don't shape hooks on the horn almost ever. The last thing is giving it a vigorous wire brushing at black heat, hit the leaf with a brass brush to bring out the high lights and finish it with "Trewax," carnauba paste furniture wax. It is the same stuff that makes a bowling alley pretty much scratch proof. In fact, "Bowling Alley Wax" is another excellent carnauba wax that's popular in the smithing community. If you use a "sharp" chisel to vein the leaf give the veined side a stronger wire brushing to soften the edges. I have a couple sizes of veining chisels, one fairly wide and a couple smaller ones I forged specifically and they have gently curved edges so they are better than my old one. Anyway, I typically incise a wider central vein and smaller laterals. More leaf lobes means more branching veins and more . . . TOOLS! I do the final tweaking on the end of a wood block with a wooden mallet to preserve features and textures. I apply the wax at smoking temp and wipe off the excess and it's ready to go out the door or onto the table. Believe ME it's a lot simpler than it sounds once you've done a couple few it's a really quick warm up project. The first one I forged took probably 20-25 minutes, first timers I show tend to run 30 minutes or better. Once I got the hang of it, developed my own step sequence and practiced up I could knock one out from cutting the stock to handing to a spectator in just under 7 minutes. Getting good at this ONE HOOK teaches you most all the basics you need to make most intermediate projects and if you can make sets of 4-6 matching hooks in an hour, you'll be STYLIN! Frosty The Lucky.
-
Casting a Gingery Lathe
Frosty replied to Nobody Special's topic in Smelting, Melting, Foundry, and Casting
And there's your answer, why indeed. A person can mow lawns and pick up dog poop and earn enough on weekends to buy a used lathe more quickly than learn to and cast the Gingery lathe bed. Have you fabbed something this complex requiring a lathe's degree pf precision? The question and answer is the same regarding blacksmithing, there are very few things you can' buy or order cheaper than pursuing the blacksmith's craft to make one yourself. There is only one positive answer. Why not? Frosty The Lucky. -
What did you do in the shop today?
Frosty replied to Mark Ling's topic in Blacksmithing, General Discussion
If he didn't suggest it first I'm sure he had lots of good ideas to add. Pics of surgical forks and the appropriate side track would've been SO Thomas. <sigh> Frosty The Lucky. -
Offensive to SOMEBODY was a "Doors" trademark wasn't it? I'll take the times effort to shock and whatever the general public over today's tendency to just be crude and vulgar. Oh OH I sound like my parents! Good tune, I have it playing in the background. Frosty The Lucky.
-
Hacksaws more than 25-30 years old were right handed to compensate for the ergonomic(?) torque of right vs. left handed users. It isn't much but it's there. I never noticed that Scott! Who do we contact in GVT. to get left handed printing on the left side of our writing tools! It's, a scandal a crime I say! Oh wait, I think this about the only time I've ever read the pen itself. I think we're going to have to start a movement! Frosty The Lucky.
-
What did you do in the shop today?
Frosty replied to Mark Ling's topic in Blacksmithing, General Discussion
I like the tines though they're a bit wide though flat is a good way to avoid the oft disastrous and much dreaded weeny spin! I know it doesn't show in the pic but the pig tail fork tines are flattened. I really found 1/4" rnd. tended to bend, especially is a youngster was using it. Someone on IFI had a great idea for a scout project toasting fork from 1/4" rnd. made around the camp fire even. It was a length of 1/4" rnd. (don't ask how long, SHEESH!) They file sharpened the ends then heated the center in the fire and bent it around a mandrel, pipe nipple spiked into wood or similar. When bent double they twisted the length to the fork location, opened the fork, wire brushed, and finished it in something food grade. AND toasted/roasted dinner. I found ladies generally liked a softer handle than a straight twist let alone pineapple twists. Now I have my belt grinder built I soften sharp edges with it. Before I broke them gently on the anvil during twisting. THEN I thought (head slapping moment) of doing a rope/ cable twist and everybody was happy, it looks cool, is easy to grip and there are no corners. Lindsay was a very hands on gal and liked the corners as milled so that's what she made. Frosty The Lucky. -
What did you do in the shop today?
Frosty replied to Mark Ling's topic in Blacksmithing, General Discussion
Thank you Gewoon, and please feel free to use the pigtail and spread it around. Everybody. Be VERY CAREFUL messing with that spring. Here we call them "struts" and the piston cylinder in the center is under very high pressure. Typically nitrogen gas and lots of people have been crippled and killed taking them apart. Automotive shops that specialize in suspension have special tools that can compress and hold the piston while the spring is released and then gradually allow it to spread. Please PLEASE do NOT try taking it apart! I don't have so many friends I want to lose one if I can do something about it! Frosty The Lucky. -
What did you do in the shop today?
Frosty replied to Mark Ling's topic in Blacksmithing, General Discussion
Thank you Jennifer. I made later versions with one more turn on the pig tail with a little finial scroll on the end turned to lay flat but angled up so it was easy to hook a finger on and loosen the coils to remove the stick. Put your thumb on the tab and turn the stick clockwise and out it slipped. Lindsay made a similar tab mod to the pictured one around a campfire. I was bummed Lindsay didn't stick around longer but she was pursuing a veterinary degree and traveling in conjunction. I'll put money on her being a terrific vet! Frosty The Lucky. -
Casting a Gingery Lathe
Frosty replied to Nobody Special's topic in Smelting, Melting, Foundry, and Casting
I don't know if I've said it already but the second pic above sure looks like the bed form is straight sided. If so pulling it WILL be a serious PITA and depending on the sand maybe impossible without breakage. It is always safer to lift the pattern than the flask. If the pattern board flexes reinforce it with a couple hardwood boards, say 1" x 4" with little screw tabs you remove to ram up the mold but install to make the pattern board inflexible to remove and maybe even put convenient hand holds in them and skip the coffee. If you use sodium silicate bonded sand it will HARDEN on contact with air in a while, day or two maybe, a lot depends on how much sand is exposed to the air. Orr if you don't want to wait put it in a relatively tight container and either give it a squirt of CO2 or toss in a piece of dry ice and close it up. You WILL need to wax the mold and board or sodium silicate (water glass) will stick in a permanent sort of way. Frosty The Lucky. -
They're probably about like an automotive axle, medium carbon is a good bet. Cut a couple coupons, forge them out and evaluate them. If not you're guessing so make things that won't break the bank or your heart if they fail. Frosty The Lucky.
-
I understand, I lived around a nearly constant work cycle myself. Being a field guy about 3 weeks in 4 and getting to spend the in town week repairing equipment didn't leave me much time for myself that eating and sleeping didn't take up. You know Japanese swordsmiths often use a traditional stake anvil maybe 3-4" square and small charcoal fires for heat. Hammers, chisels, files, stones, etc. Of course but the entire kit fits in a bag and I'm not talking a duffle a small suit case would have enough extra room for your apron and safety gear. Anymore I put more than I'm probably going to use in a plastic bucket. The minimum equipment list is really quite small. Frosty The Lucky.
-
Looks good from here. Beefy is good we always have heavy things to hang up. My one suggestion is to NOT forge the finial scroll so thin, so it can't be punched into a heavy coat, etc. Once one does get punched into say a fleece or old knit wool coat liner the scroll acts like a barb and it's a PITA getting them untangled. If you market hooks, I'd mark this one for use with leather weight coats, etc. It's a nice job, well done. Frosty The Lucky.
-
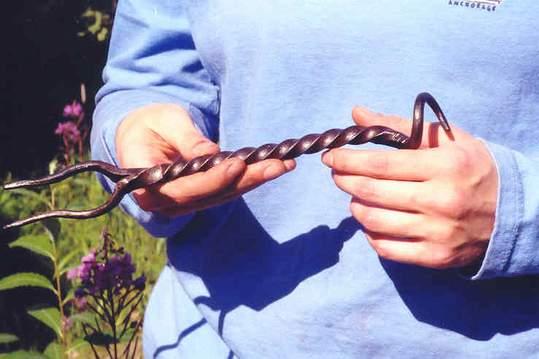
What did you do in the shop today?
Frosty replied to Mark Ling's topic in Blacksmithing, General Discussion
I do toasting forks entirely differently than carving forks. Most people I've known can't seem to make a small fire to cook on, it has to be a serious BLAZE and you see red hands and faces, smoking clothes, etc. Nobody wants to deal with a steel toasting fork heavy enough it won't sag if it's long enough to be a comfortable distance from a fire. Sooooo, I had a student briefly that needed blacksmithing course to meet college requirements and looked me up. Lindsay was very into back pack camping and like most people I know was tired of her food falling off the pointed stick. Below is what I came up with for her to forge. I call it a "pig tail toasting fork." It weighs maybe 1lb. I don't recall and never weighed one and fits in a back pack easily a couple pieces of rubber tubing or a little tape to cover the points and you're golden. When you get to the campsite you cut a dead stick and screw the fork on the end and you're cooking. Once you've finished toasting you can poke the tines in a piece of wood or the ground, insert a candle in the pig tail and enjoy a romantic candle lit hot dog supper. Hmmmm? Frosty The Lucky.