

Frosty
-
Posts
47,015 -
Joined
-
Last visited
Content Type
Profiles
Forums
Articles
Gallery
Downloads
Events
Everything posted by Frosty
-
A sand box makes an excellent anvil stand and damps the ring nicely. If the anvil wants to shift because you used alluvial sand rather than crushed, stapling it to a plywood base solves the issue nicely. It also prevents dropped tools or small pieces from disappearing in the sand. A sand box stand is surprisingly easy to move, pull the anvil out and dump the sand into buckets, load it in your rig and reverse the process where you're going. Frosty The Lucky.
-
Ayup, there they are! Thanks Steve. Frosty The Lucky.
-

Mixing castable refractory and fire clay?
Frosty replied to Treywa's topic in Insulation and Refractories
Welcome aboard Trey, glad to have you. If you put your general location in the header you'll have a much better chance of meeting up with members within visiting distance. We aren't going to remember you mentioning it in one post after we open another one. Honest, we're blacksmiths not mentalists. I hope you didn't already buy it. A quick search shows it to be refractory CEMENT, not a fire face refractory. It is meant to cement things together like firebricks. It is unlikely to survive long in direct exposure to a VERY chemically active propane flame. The current consensus on Iforge for probably best castable refractory is, Kastolite 30-li a water setting high alumina bubble refractory rated to 2,600f constant. The bubbles are evacuated silica spherules that are intended to make it physically lighter but also slow thermal conductivity. Insulates. Better for our purpose it is calcite bonded and being high alumina it is very resistant to caustics like molten borax at forge welding temps. It is GREAT stuff. I believe but haven't checked there is a "Distribution International" in Spokane, if so give them a call, it is where I buy all my refractories and the Anchorage store carries Kastolite as well as Morgan Thermal Ceramics, K-26 insulating fire brick which is rated at a solid 2,600f and is borax based flux resistant. Frosty The Lucky. -
Glossary From American Iron and Steel Institute
Frosty replied to Scott NC's topic in Reference Materials
That's an interesting read, thanks for the link Scott. Frosty The Lucky. -
Blacker B info wanted
Frosty replied to Bearforge's topic in Power Hammers, Treadle Hammers, Olivers
If you look at the time stamp you'll see the original post was almost 5 years ago. He may still be on the forum but last visited July 26 2019. Frosty The Lucky. -
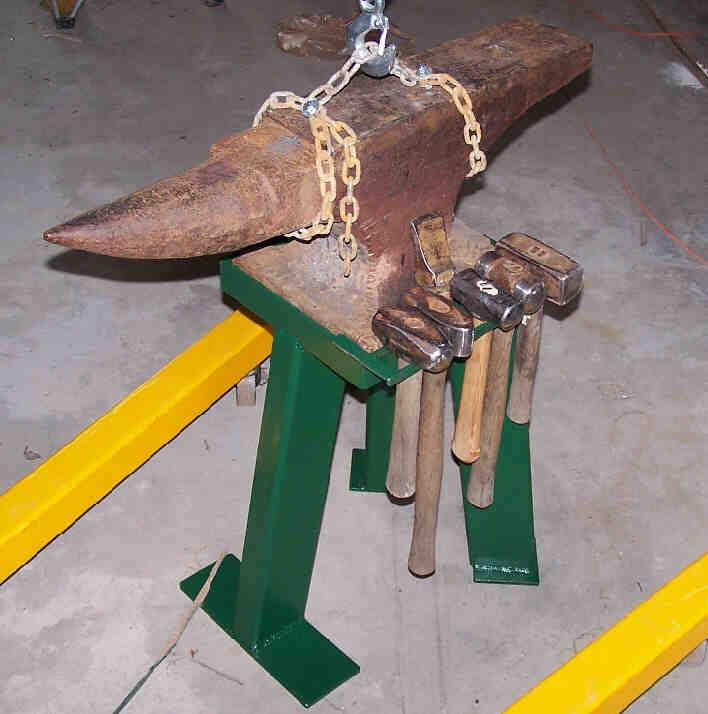
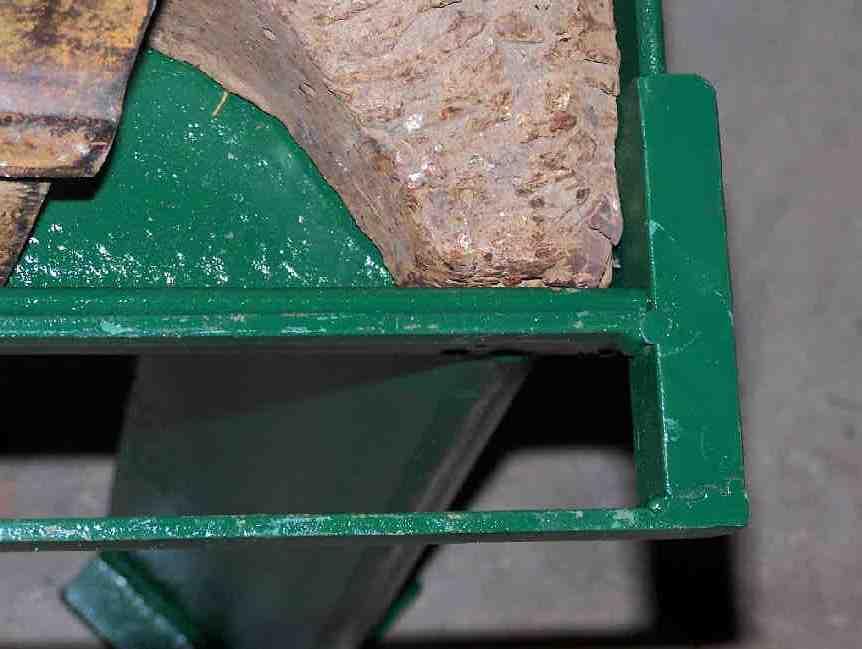
This is how I mount anvils now, it's solid as a rock, being dissimilar steel it damps the anvil's ring and it is stable on almost any surface. I won't go back to a wood block. Below is my Trenton on it's tripod stand, I have pics of my Soderfors on t's tripod stand but can't seem to find it. <sigh> The first is the stand and anvil, it wedges tightly enough to lift it into the pickup with the engine hoist as it's rigged in the pic. The second pic is a detail of how the hammer / tong racks wedge the anvil in the stand snuggly enough to lift with the engine hoist while damong the ring of my two dangerously LOUD anvils. Frosty The Lucky.
-
Don't kill yourself Steve, it will take as long as it takes. I tried "articles" earlier, found the link but it looped back to the article section. I decided to leave you be then and will wait quietly unless I think of something I can do to help. Frosty The Lucky.
-
I followed your sketches easily David, not what/how I would've drawn but I followed right along. Must be Dad teaching me to read blueprints before I was 8 and then taking something like 6-8 semesters of drafting. Draw a cow in a flat pasture? HAH! Draw dimensioned prints of a 2 story house on a daylight basement with wiring, plumbing, heating, well, septic, etc.? Took a little time but no problem, I spent more of the time looking up the right codes and symbols. I do virtually all my shop sketches on graph paper. A friend gave me a big white board that's divided like 3" graph paper. I was surprised how seldom I even think of it let alone use it. I guess for now BMTU take it slow and easy, speed will come AFTER you develop the hammer control and eye for the movement under the hammer. All trying to hurry is guaranteed to do is make your mistakes permanent more quickly. "Your patience WILL be rewarded." Alton Brown. Frosty The Lucky.
-
I can listen to those, Black Bullet, "Kidney Thieves," didn't do anything for me but I may have to watch some of the anime series and see. Amazon Prime has it's advantages. It's funny Das but as soon as Covenant Bullet finished this one popped up and started. New videos, etc. always take time to start but not this time. I'm not really a country western guy but this is one of my favorites. Weird huh? Frosty The Lucky.
-
No picture Mike? You know how we are about believing wild claims without photographic evidence don't you? Hmmmmm? Frosty The Lucky.
-
The learning curve can get to us, especially when breaking into a new craft. One of the reasons many of us hang out here is to lend folks a hand past that sort of thing. I really like the drive hook, nicely done. Next time try making the shank of the hook longer and the hook a little smaller. That wide things hanging will put excess leverage against the drive point. A longer shank will put most of that force against the wall. And lastly if you bend the drive point a BIT sharper than 90* weight on the hook will want to push it deeper into the wall, post, etc. Nice job on the coil how does the impression in wet clay look? The screw hanger is kind of straight out for my taste but it looks well enough made for a Frosty "good job." I don't see anything lacking in your products, my least favorite is just a design experiment, keep it to compare with what you had in mind and to see how far you've come down the road. I have some really old UGH things I made. . . Somewhere. Right now I think making drive hooks is a good exercise, you're already good enough at making one you shouldn't be disappointed and there is a world of variations you can apply. Say twisting the shank. Even if you use round stock you can flatten 4 sides slightly and twist it for a little fancy. Maybe put a fish tail or "reverse scroll" finial on the hook end so heavy coats aren't resting on a thin steel scroll. You can make large drive hooks, small ones, indoor, outdoor ones, etc. It's even marketable so you can defray the cost of smithing and gift friends and relatives galore. Hmmmm? Frosty The Lucky.
-
I may be able to listen to more than one thing at a time, background music is always welcome but my headphones just make a muddle of different sound tracks playing at once. Roll off the low side of the bed. <SHEESH!> Kids today, what can you do with them? Keep it up Scott, I'm warming up the rubber chicken. Frosty The Lucky.
-
What did you do in the shop today?
Frosty replied to Mark Ling's topic in Blacksmithing, General Discussion
Good to see you have quality control well in glass. Nice looking opener Tommy, it's cool seeing something different. Frosty The Lucky. -
Welcome aboard JC, glad to have you. Sounds like you caught the bug alright, welcome to the club! Please don't do any more grinding on your anvil, the pits and such will smooth out beating HOT steel on it. Grinding removes steel forever and there wasn't that much there new, MAYBE 3/4". If you need a pristine surface to finish projects on, say a blade, make a bottom tool from say 3/4" or 1" plate x 3"-4" on a side that fits the hardy hole but rests closer to the center of the face. You can grind various radii on the 4 edges and keep it shiny and smooth for finish work. Make sense? As she sits there is still a couple generations of good work in her. Nice job on the fire pot though it looks kind of deep from here but that may be the photo. What are it's dimensions? You've done a nice job on the forge all round though the fire grate will burn out distressingly quickly. When It does, hopefully a couple years from now, I suggest you replace it with 1/2" dia. round bar bent in open hair pin shapes, about 3/8" of space and lay enough of these to cover the tuyere. They're effective as an air grate and very easy to clean best of all cheap and easy to replace. Not being attached to the flange where the tuyere is bolted (another suggestion) they're free to move when you rake them to clear clinker, just rattling them back and forth does a good job of breaking stuck on clinker loose so it can drop through or be raked out. Might want to shorten the ash dump a little, it looks like you could hook a pants leg or apron on it. You may not need to, you'll find out these little details as you use it. So, what else did you get? Frosty The Lucky.
-
How am I supposed to listen to Dr. James Dilley talking about knapping flint and the paleo-archeology of knapped tools when you post this tasty a selection of things to listen to? Good listening for an old fart like me, thanks. Frosty The Lucky.
-
What did you do in the shop today?
Frosty replied to Mark Ling's topic in Blacksmithing, General Discussion
Nice door pulls Gewoon. A little dab of paint will match the screws up nicely. Using what is at hand is very much blacksmitherly. Frosty The Lucky. -
Glenn hadn't gotten them all sorted into the blueprints forum before the OS change lost them did he? I think he just lumped things that fell into his "blueprint" definition into the forum and was working his way through organizing them. At least I seem to recall him asking the forum for suggestions to help organize things. I recall the blueprints section being kind of hard to navigate though random selections could be fun. Frosty The Lucky.
-
Didn't the blueprints disappear in an update maybe OS change a few years ago? Taking a month or two longer than you anticipated would've gone unnoticed when they came back. You know what they say about absence making the heart grow fonder? Having access to the blueprints makes my fondness levels cross giddy! Thank you all for the hard work you've been pursuing so diligently for the last few years and congratulations for a job well done! Frosty The Lucky.
-
What did you do in the shop today?
Frosty replied to Mark Ling's topic in Blacksmithing, General Discussion
How memorable, thanks for bringing it up Scott. I don't get a spell check notice for that one, I wonder how many times I've signed that way? Frosty The Lucky. -
Handling holes in anvils were used to grind the face against BIG grinding wheels too. Frosty The Lucky.
-
YIKES, you won't catch me proofing any firearm like that! I only double charged when I proofed my old marble gun. 2 times the 3x power and 2 marbles. The duplex charge was impressive when I proofed it with a double load though. I made my own shot by carrying a pot of molten lead to the top of our 2 story barn shaped garage and slowly pouring it into a pan of water on the ground. It wasn't properly metered or high enough for the lead to form proper spheres but they were close enough. Made interesting patterns at 30' and was a true scatter gun farther out. I stopped using fuse to fire it and made a simple bridge in the cut end of an old extension cord and used jumpers and the car battery. A fresh 9v transistor radio battery worked fine too. For a few shots. I'm SURE Deb is happy I stopped doing that sort of fun years ago. <sigh> Frosty The Lucky.
-
What did you do in the shop today?
Frosty replied to Mark Ling's topic in Blacksmithing, General Discussion
Good for you Chad! Involving new folk in the addiction is a fine thing! Maybe suggest she join the IFI gang, hmmmm? I've been called worse Nat, I couldn't count how many times I've signed posts Forsty to be caught by spell check, I flagged it as never good. It's actually blinking at me in a most annoyingly attention getting way on the screen right now. Frosty The Lucky. -
MAN, that must've been good steel, filling the bore with sand like that should've caused it to explode! I used to shoot pop cans of ice or plaster of Paris from a home built cannon using oxy acet as propellant. The one I built for the 4th of July at the hatchery in Prince William Sound fired cans close to 1/4 mile. Empty cans or those filled with water got turned into chaff. . Frosty The Lucky.
-
Goodness BMTU! I'm going to make a couple suggestions that may fly in the face of some of the good advice given so far. Hmmm, I'm saying this again, twice in two days! ARGHHHH! I take exception to you saying you lack "TALENT", you lack skill. Talent is or isn't, like eye color. Skill on the other hand can be learned and is the combination of a little knowledge and a lot of practice. PERIOD! You're making a couple bad decisions as to expectations too. First, forget about perfection, I don't care who the smith is if you look closely you'll find imperfections. Forget timing yourself and worse still competing against video demonstrations. Good grief do you compare yourself to soap opera "hunks" or TV heros? Stop trying to make complicated projects. On the how to list. Every complex project is nothing but a series of simple pieces or processes joined together. Believe it or not there really are only a few basic processes: drawing out, upsetting, bending, punching, cutting and joining. Welding, riveting, collaring, etc. being sub categories of joinery. Combining them yields your products say, a mortis and tenon joint is a punched and perhaps drifted hole, a bar drawn down to round for a specific length, heated, inserted in the mortis and peined. 3 basic processes to make one join. Do that half a dozen times and you have a grate, trivet, etc. Make 4 of those long and narrow, join them together and you have a door. etc. Discounting measuring, cutting and such really basic skills you can dress an entire house with 4-5 basic processes. Mastering the craft is nowhere near as complicated you've convinced yourself. Honest, it's pretty simple. Frosty The Lucky.
-
That and just because it's dry doesn't mean the ingredients can't react and degrade the whole. Frosty The Lucky.