Cleave
-
Posts
58 -
Joined
-
Last visited
Content Type
Profiles
Forums
Articles
Gallery
Downloads
Events
Everything posted by Cleave
-

Restoring Incomplete Starrett Dividers Compass
Cleave replied to Cleave's topic in Tools, general discussion
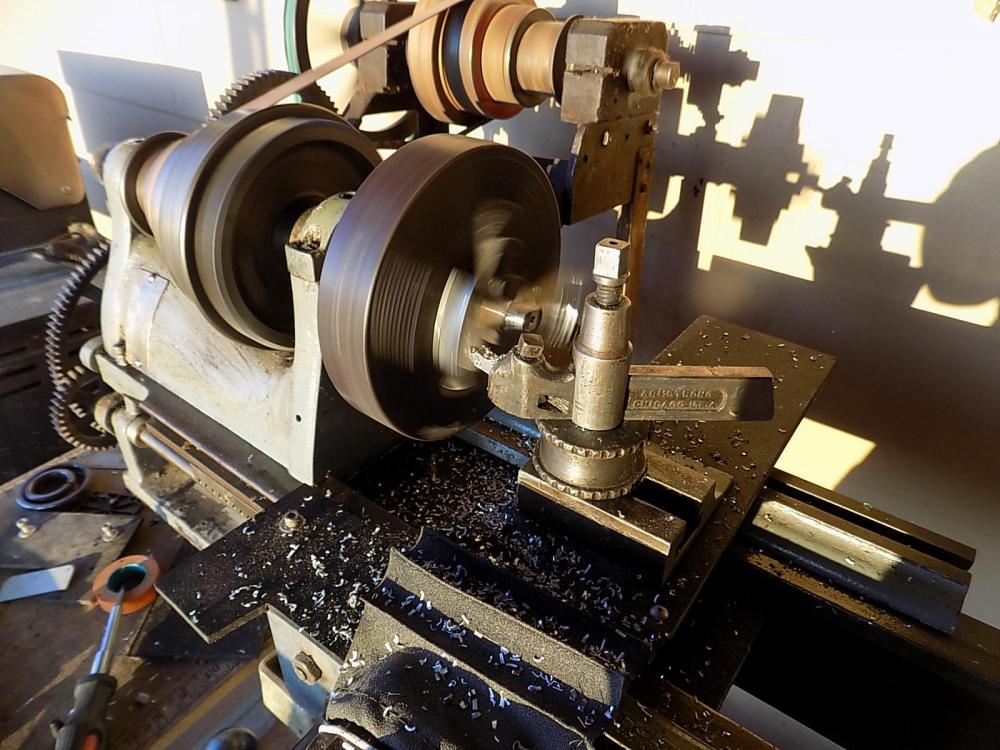
The Barnes lathe is powered by an old 1/4 hp motor some previous owner cobbled together. Sure beats pedaling. -
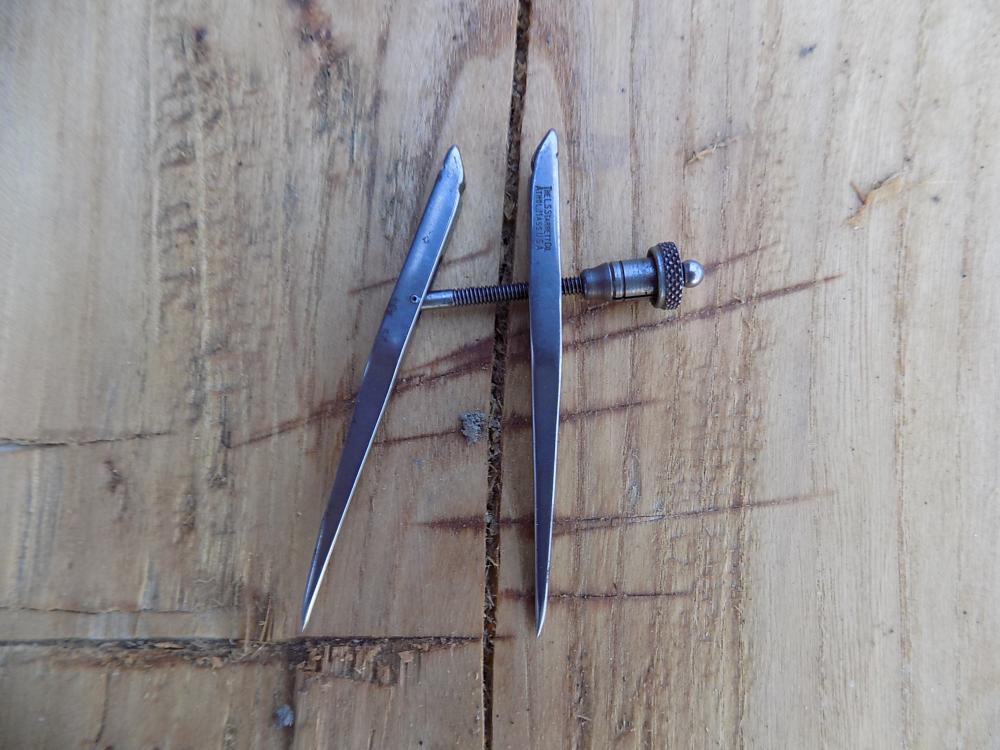
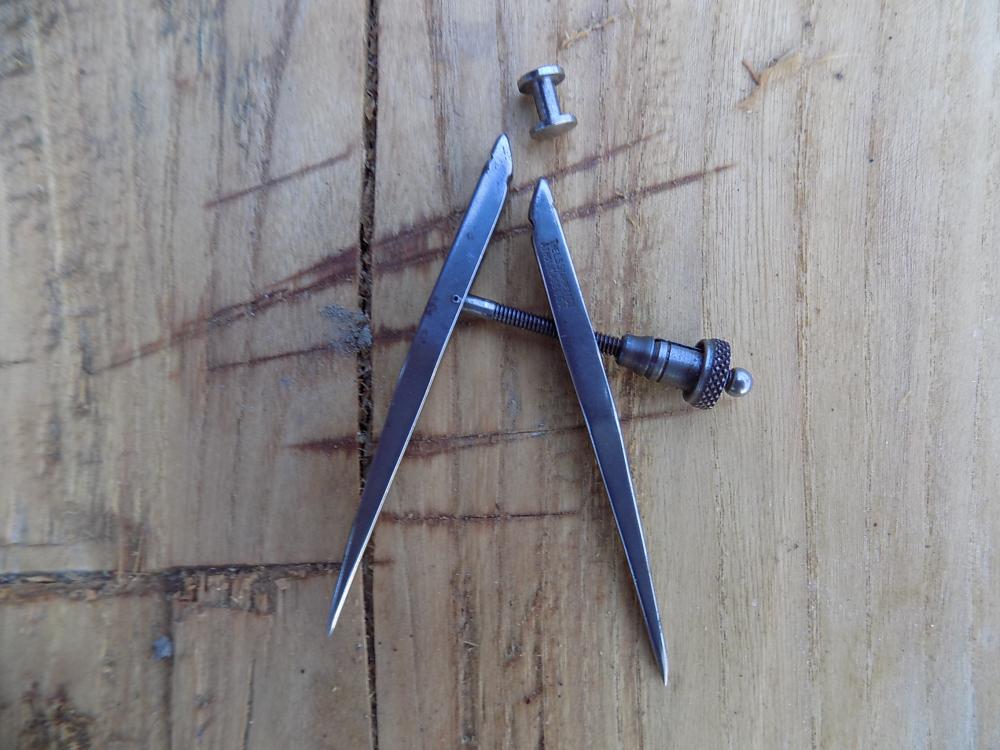
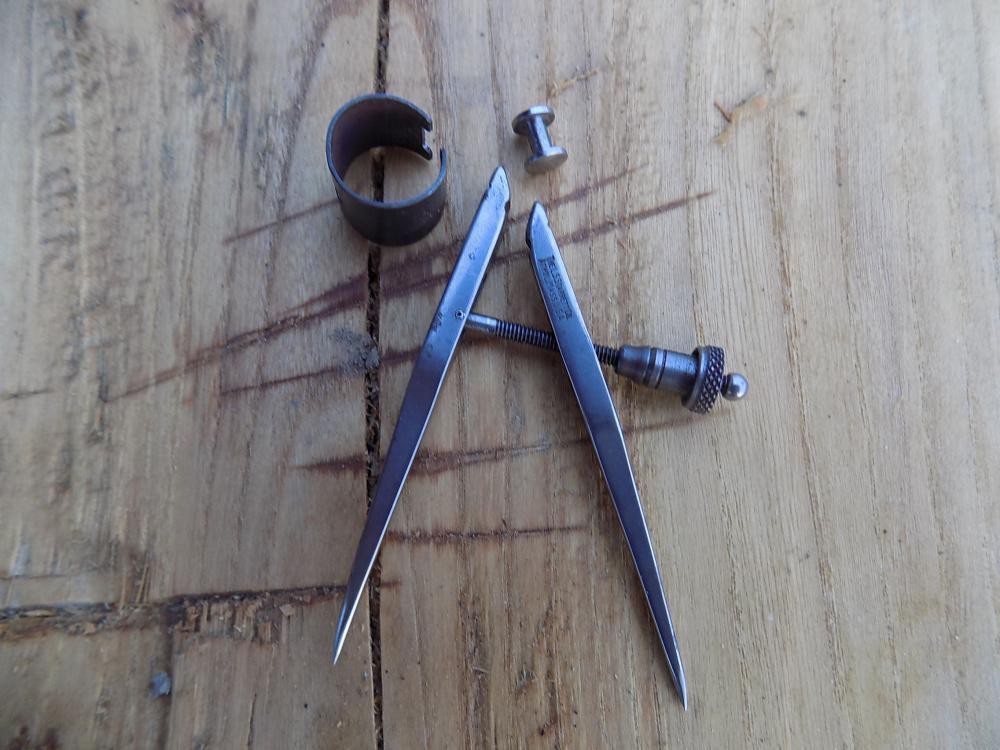
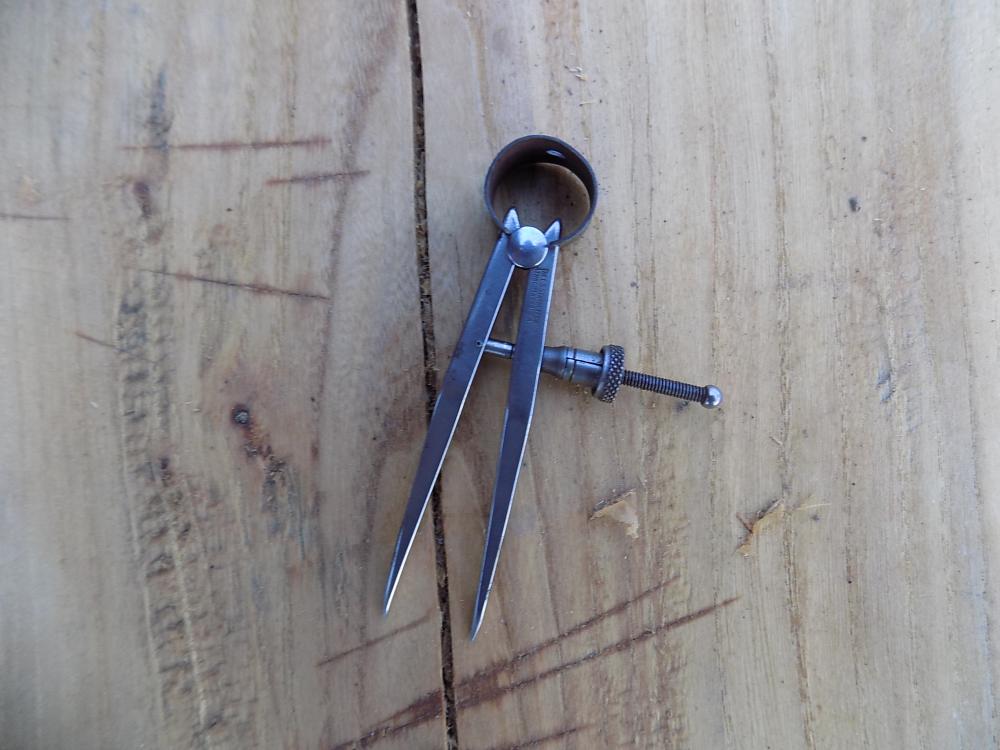
Recently I stopped by my favorite antique store and picked up an incomplete pair of Starrett dividers/compass. They're the 3" size I think. It appears the spring popped off and got lost for the previous owner. While I have several other pairs of dividers this seemed like a fun machining and blacksmithing challenge. First, I turned a pivot pin on my circa 1900 WF Barnes #6 lathe. The pin was made from a grade 8 bolt I found in the street. This morning I took a piece of a broken handsaw blade, cut and ground it to shape, heated it up and bent it around to fit. Now the dividers work! I still have to harden and temper the spring, but may also remake the spring out of slightly thicker material as this spring is a little soft. Finally I'll finish up the handle stub that sticks up out of the spring.
-
You know you have been hammering too long...
Cleave replied to Dewnmoutain's topic in Blacksmithing, General Discussion
A welder once told me what his favorite woodworking tool was - a match. -
Very nice. I once had a bunch of 2x8 lumber to jigsaw off templates, and wanted a fast way to hold it on the workbench. So I cut a cam shape into the end of a few scrap pieces of 1x4 wood. The cam just pivots on a bolt in a hole in the bench, and pushes the work up against a fence. It worked great!
-
I forged a piece of drill rod (with thru hole like in your picture) into a newbie's timber framing chisel. The handle is drill rod too. I just forged the blade flat closing the hole in that section. It works great so far.
-
It did actually surprise me how easy it was... in a way. One heat for the weld, a few good taps, and it sticks together. For me it was all in getting the fire figured out.
-
Thanks for the tips guys, I'm just excited to have done a weld at all. Making a good weld, with the right shape on everything, may come with time.
-
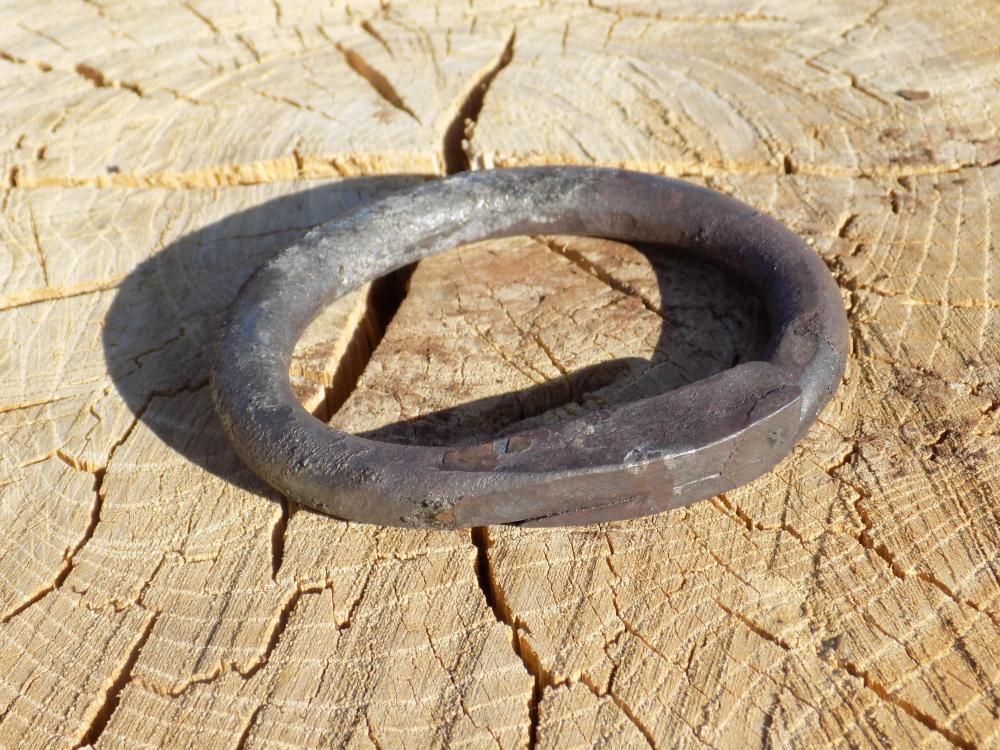
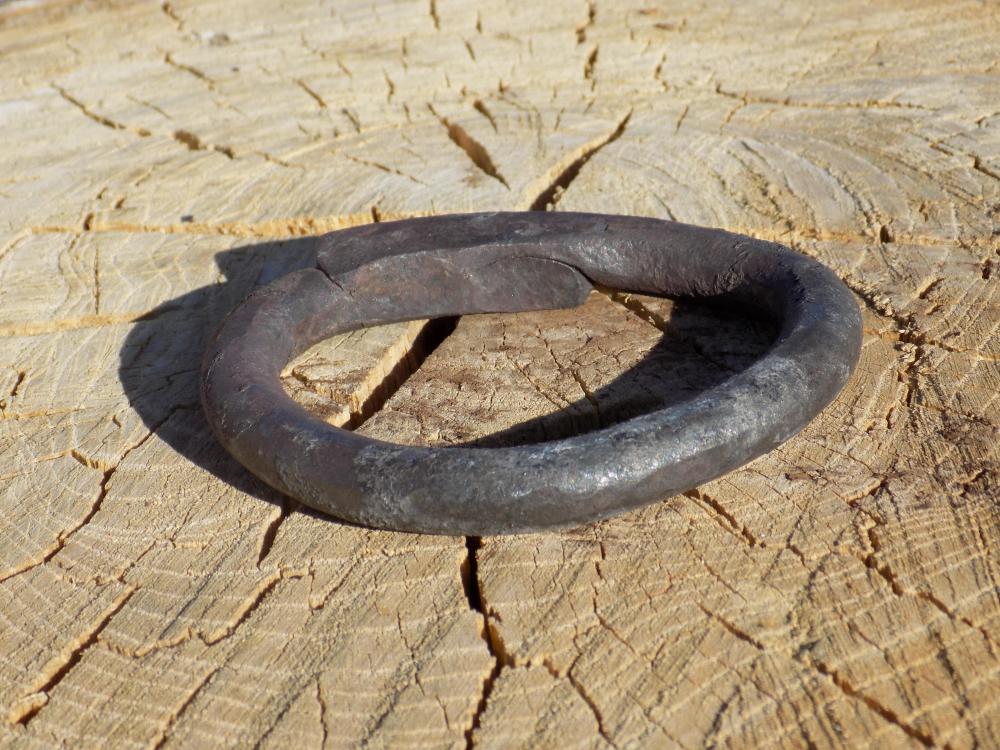
Yesterday I tried out charcoal for the first time (Cowboy brand lump charcoal). Hithertoo I've just used scrap wood in my trench forge, with varying results due to the varying fuel size and quality. Getting beyond orange heat has been elusive. I ran the charcoal first with the fuego style bellows I made, worked well enough, but took a lot of work sitting there pumping it. I still used maybe 50% scrap wood in the fire along with the charcoal. A few small chunks of construction lumber, and a bunch of hardwood drawknife and hatchet shavings. So for comparison, I got out the electric fan. That worked better, and the steel I was working came out looking "semimolten." It was a bright 102 F afternoon so color was hard to see accurately. So I got a short piece of 3/8 round bar, scarfed the ends, bent it into a ring. Heat to red, dump on some Borax, heat until it looked "semi molten". Take it fast to the anvil, rapid hammer blows, now it feels like I'm hammering one piece. Clean it up a little over the horn, maybe it actually worked?!!! Maybe another heat or two of cleanup, I forget. Then let it cool slowly. Later I stuck it in the bench vise, put a pry bar in there, and yank until the bench moves. Feels solid! Whack it with a hammer some, feels solid. Now, I have the ability at work, to pull test this with a 20,000 lb load cell and big chain pulls, and see how it actually fails. But I'll just keep this one as a victory piece.... Maybe I should make this into a properly shaped chain link, and try to add a few more links to it?
-
Here's a good video covering a variation of Frosty's center punch in the drill press trick, which I've never used but will try.
-
Good point maybe that was unclear to others. You make the center punch or mark away from the drill press. The tap is ONLY because it has a reliable point on it, to visually align the spindle to the desired hole location. Light pressure on the quill can be used for the ruler trick.
-
You can also use a tap to line up on a mark in the drill press. Or any accurately pointed object like a center punch (I hadn't ever thought of that) if it is really straight and ground true. For cross drilling in the drill press, to accurately line up the stock in a vee block or vise, take your 6" ruler, put a tap or other accurate conical item in the chuck, touch the point on the center of the ruler, and adjust the stock's position until the ruler is parallel with something horizontal - edge of vise, table, etc. Then clamp the work or vise down, recheck the alignment, then drill. Note you need to know the table is square with the spindle, and you need to know the spindle is pretty straight.
-
Tennis elbow / Blacksmith's Elbow -- Relief Technique
Cleave replied to Quench.'s topic in Blacksmithing, General Discussion
Thanks for the video hint, my elbow/forearm feels a bit improved already just following along with the massage. -
Re heat treat old half hatchet?
Cleave replied to Cleave's topic in Heat Treating Knives, Blades etc
Thanks all for the advice. I'd much rather make mistakes on something like this than on something I'd lovingly pounded into shape for 3 days straight... -
Re heat treat old half hatchet?
Cleave replied to Cleave's topic in Heat Treating Knives, Blades etc
With the campfire forge, I don't know if I'm capable of getting the heat that localized. Or perhaps the forge can do it and I haven't figured out how yet. -
Re heat treat old half hatchet?
Cleave replied to Cleave's topic in Heat Treating Knives, Blades etc
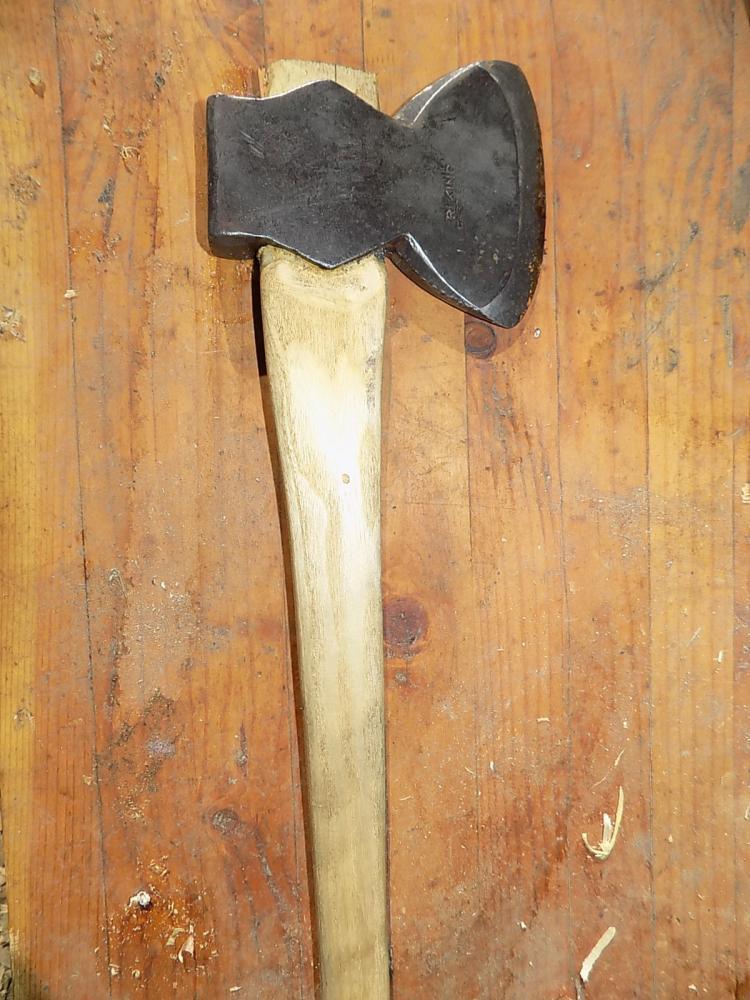
Well, my hasty side got the better of me. I got the campfire forge going, heated the blade side to a red, checked on the magnet, let it cool for maybe 10 minutes. Put back in, heated blade side a bit hotter (to make sure the whole way across the blade was hot enough). For some reason, I went straight for the water quench as I only have about a gallon of used motor oil and a #10 can on hand........ Got some warm water in the 5 gallon bucket, and quenched, held her in there and stirred it around for a while. There were a couple ominous pops. A file couldn't touch the edge. My gracious wife didn't complain while I tempered it in the oven at a bit over 500 F, got a nice blue color on it. Then I noticed, twin cracks halfway through the sides of the eye one on each side. Should have heeded better wisdom and quenched in oil first! Or maybe don't hold it in the water so long, or don't heat up that hot. Not sure which it is. But still, a good experiment and learning experience. Now.... I have access to the father in law's welder but am pretty new to that myself... would it be a good idea to grind a v groove on the cracks, preheat, and weld the cracks back, then re heat treat??? Really this is just for the learning experience at this point.
-
Re heat treat old half hatchet?
Cleave replied to Cleave's topic in Heat Treating Knives, Blades etc
Right, I wondered about if the blade was forge welded HC and is gone now. And figured that "cast stee" meant the whole thing was likely the same alloy. Maybe it got in a fire and killed the heat treatment? Or somebody went nuts on it with a grinder at some point? Anyway, the edge rolls a burr within a few minutes of use. May as well try the re heat treat and learn something. It was raining yesterday so didn't light my campfire forge. -
I just today got a very similar vise, maybe the same model off Craigslist for $175. Even has the little holes under the jaws, what are they for anyway? Feels very robust, much better than the 35 pounder at the antique store without bracket or spring for $150, been sitting there for a couple years. My first post vise, and feels solid enough it could very well be the only one I ever need.
-
Re heat treat old half hatchet?
Cleave replied to Cleave's topic in Heat Treating Knives, Blades etc
By normalize, I meant bring just above critical and let air cool, back in the fire 5 or 10 minutes later, repeat 3x, to stabilize grain structure before quench. The eye did look even, so could be hung either way. The thing is very symmetric, maybe you could even run a wedgeless handle, with a snug tight fit, and flip it around as needed to access tight spots. That way a carpenter only needs to carry/purchase one. I successfully drilled out the wedge and removed the handle without destroying it and plan to try heat treating again when I get a chance. Thanks all for the counsel and entertainment. -
Here's my old WF Barnes and Co. #6. It was originally pedal powered. Someone long before my time made a motor and mount out of their junk pile, someday I intend to make a better motor mount, with better motor and pulleys. But it runs and does better work than I know how to do. I'm missing a critical change gear so haven't been able to run the lead screw yet. Maybe one of these years I'll cut my own gear for it....
-
Re heat treat old half hatchet?
Cleave replied to Cleave's topic in Heat Treating Knives, Blades etc
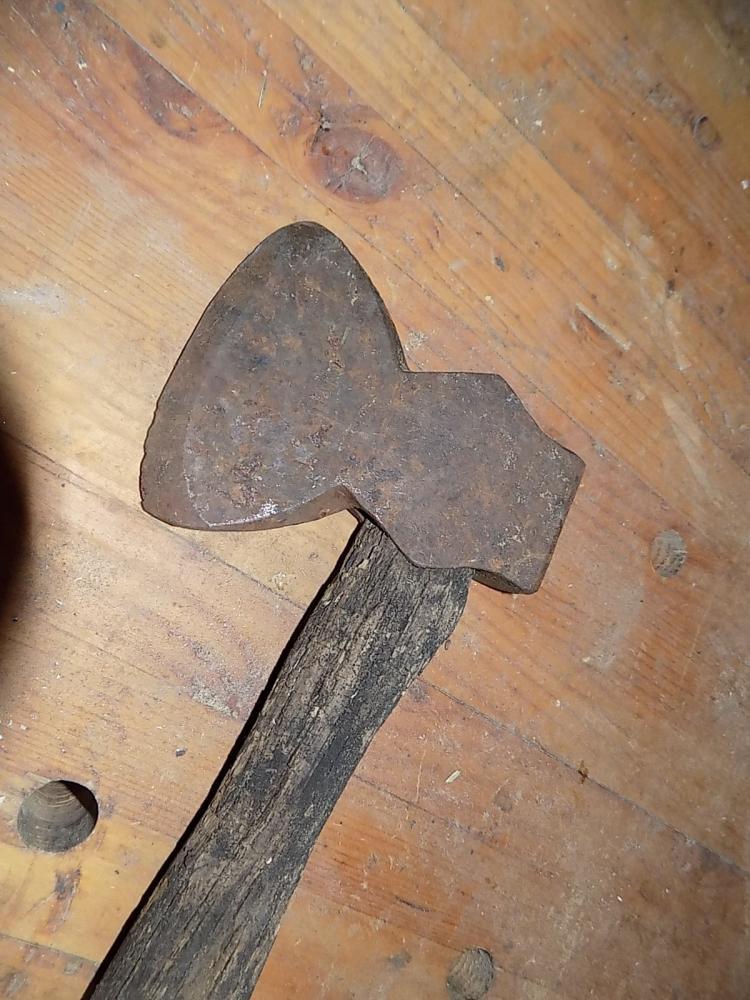
Yes the other side is flat for hewing beams. I have no real reason to keep tools that don't get used. Also, should I normalize 3x before heat treat or take it straight to heat treat? -
Drill rod timber framing chisel, new guy style
Cleave replied to Cleave's topic in Slitters, Punches, Drifts, etc
Thanks guys, I was sure there were good reasons, but wanted a little more elaboration on the topic. I know the feeling of a piece of struck steel vibrating in my hand! -
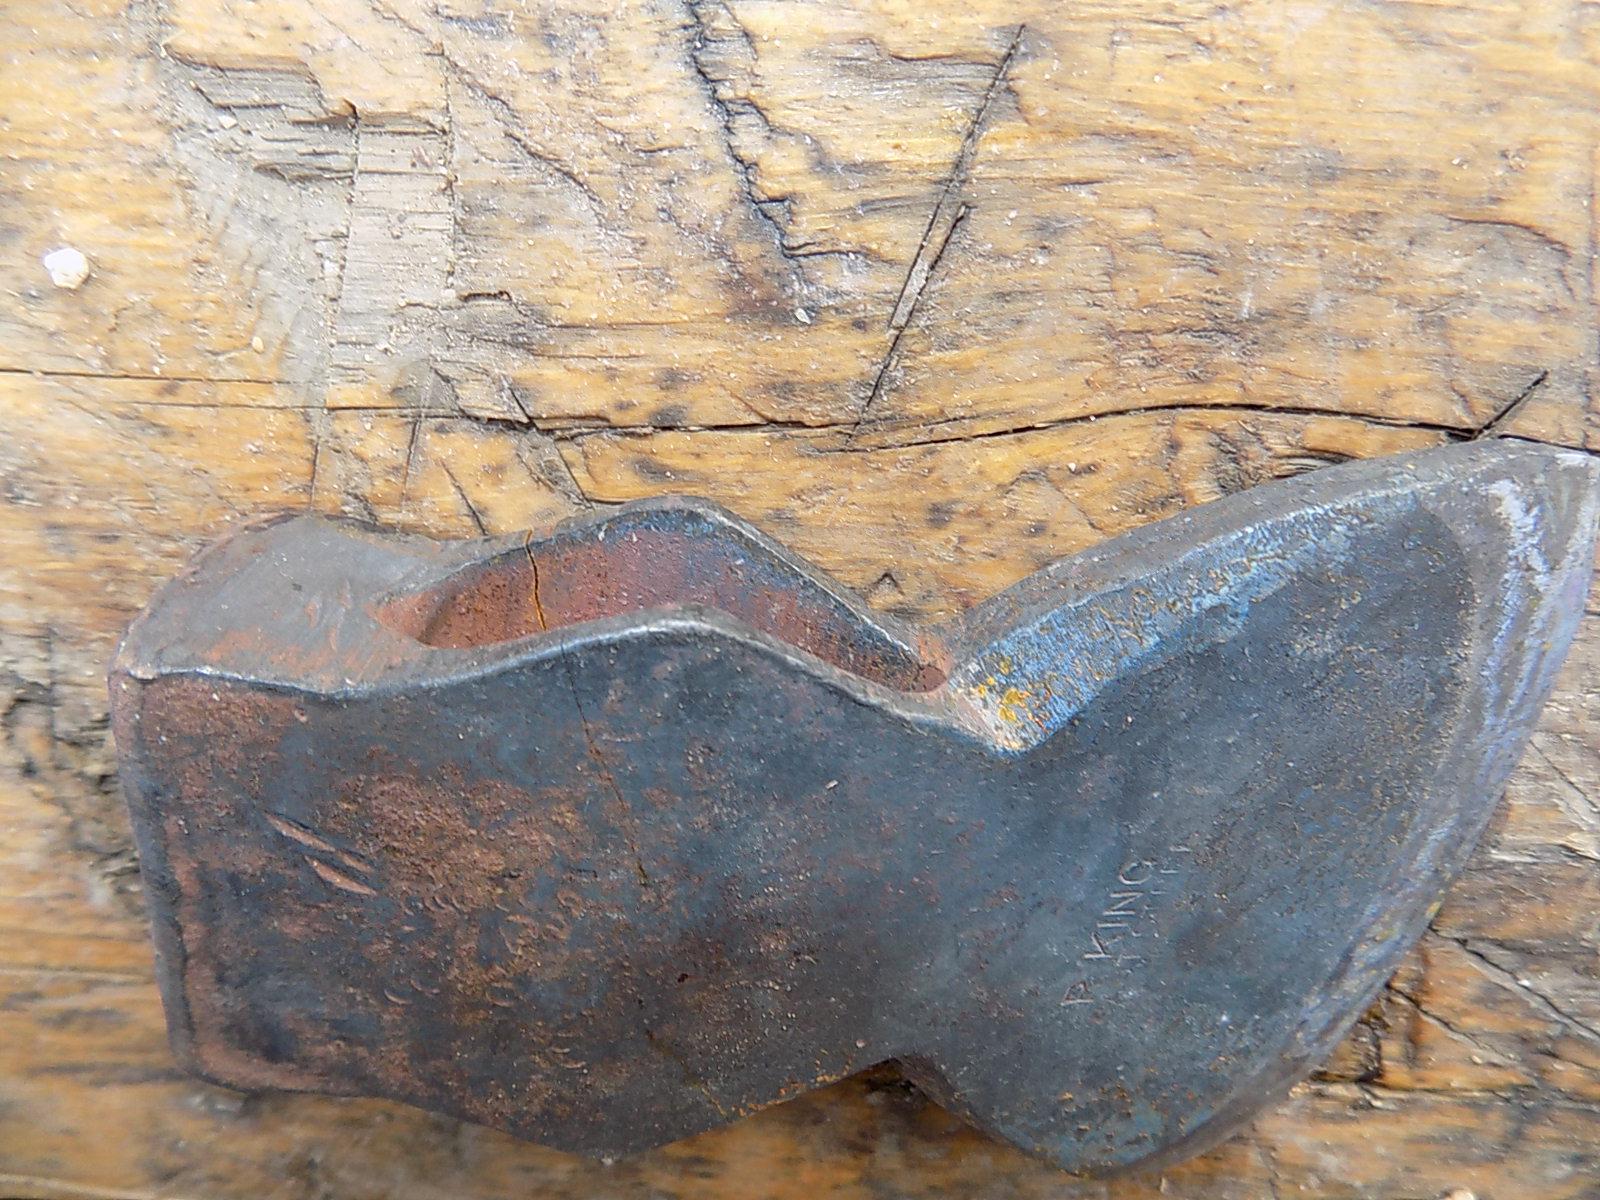
So I got this old half hatchet recently. It is marked "R. King Cast Steel Made in United States." A quick wire wheel de-rust, flatten the back a bit, new handle from a honey locust tree. Then filed the bevel. It filed very easily, too easily. Sharpened it up a bit on the stone, and tried it out. The edge rolled over pretty easily confirming my suspicions that the steel is too soft. Now, I've done a bit of blacksmithing recently (still a total newbie), and am wondering if it is worth pulling off the handle and re-heat treating this? Anyone have experience with this? I'd bring just the blade edge up to non-magnetic heat, then try oil quench first, then water quench if it didn't harden enough. Then temper it in the oven (I have a great wife). I suppose since the tool doesn't hold an edge well now, there's really nothing to loose if I'm careful and don't burn it up.


-
Drill rod timber framing chisel, new guy style
Cleave replied to Cleave's topic in Slitters, Punches, Drifts, etc
This big chisel did make me wonder why old chisels and slicks have a socket and a wood handle rather than being forged from one piece of solid bar like this one.. Certainly when steel was scarce, that was the only real option. Also the wood handle is lighter, more vibration absorbing, and more comfortable in cold weather. But the chisel I made was so much easier than forge welding a socket, then turning a wood handle! -
I am a mechanical engineer, and can do the math, but when I'm actually getting a job done, this is what I do too!
-
A collection of improvised anvils
Cleave replied to Charles R. Stevens's topic in Anvils, Swage Blocks, and Mandrels
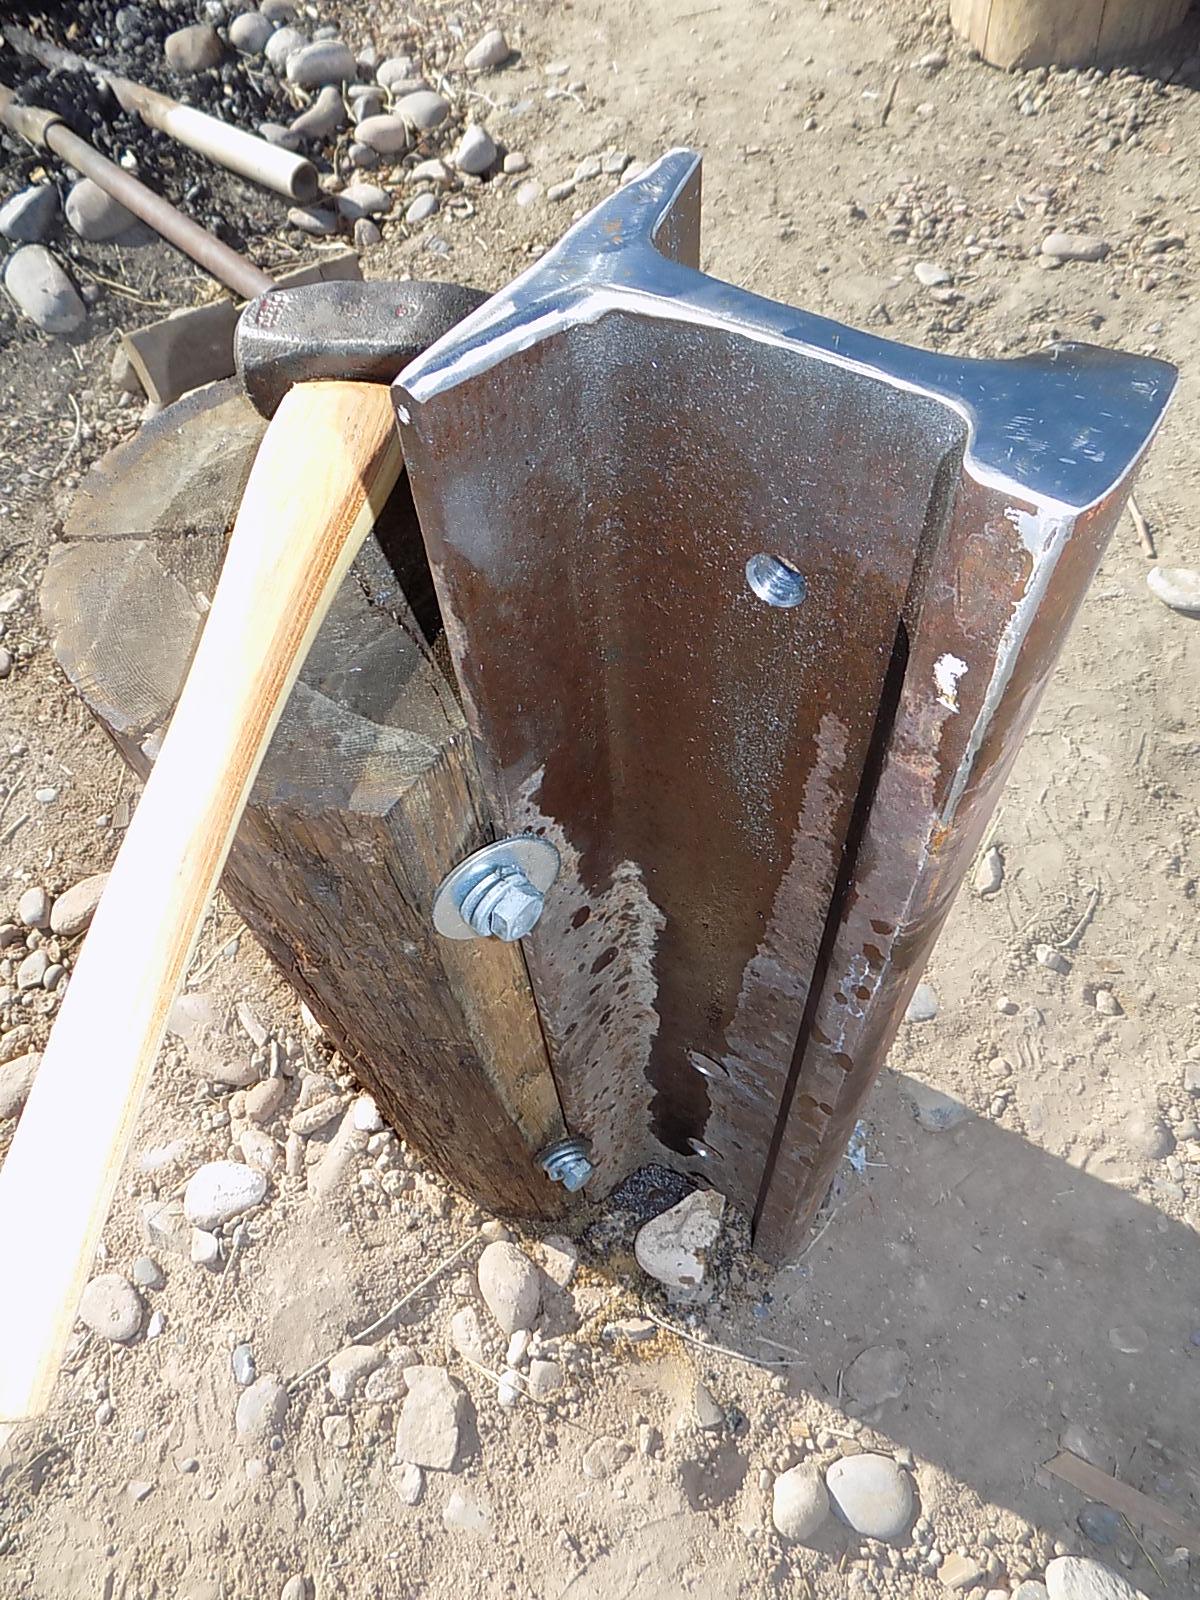
Here's my new RR track anvil, installed to supplement the Fischer Norris 1886 60 lb anvil, with really beat edges. The RR track gives me some nice crisp edges for bending and drawing. RR track was purchased from an antique store for $30, about scrap price. Probably weights 130 lb for 38". Center web is about 3/4". I ground a fuller onto one section of it. Its secured to an old utility pole section about 5' long, buried in very rock soil. I added a 3/4" hole through the web near the top for bending and such. The RR track anvil is very solid under the hammer and a very useful addition. (For you safety advisors, the Fischer horn was blunted long before my time, so not an imminent danger to the apprentices climbing on it).