Cleave
Members
-
Joined
-
Last visited
Everything posted by Cleave
-
Sounds great, thanks guys. I've had a couple things crack in a water quench. I learned to quench thin stuff in oil first, and not to grind the edge down all the way to nearly sharp.
-
I know files have been used many, many times for making knives and other edged tools. Here's my main questions, 1. For using a single cut mill file, do you need to grind off the teeth before forging or can you just flatten them with the hammer? I know we'd want to avoid cold shuts or stress concentrations creating cracks during the heat treat. 2. What would you quench in? I'm thinking to make a crook knife and a carving adze (the kind you lash onto a branch handle). I've made a few knives successfully from a table saw blade with stock removal and a heat treat, and done some other beginner forge work but that's about it.
-
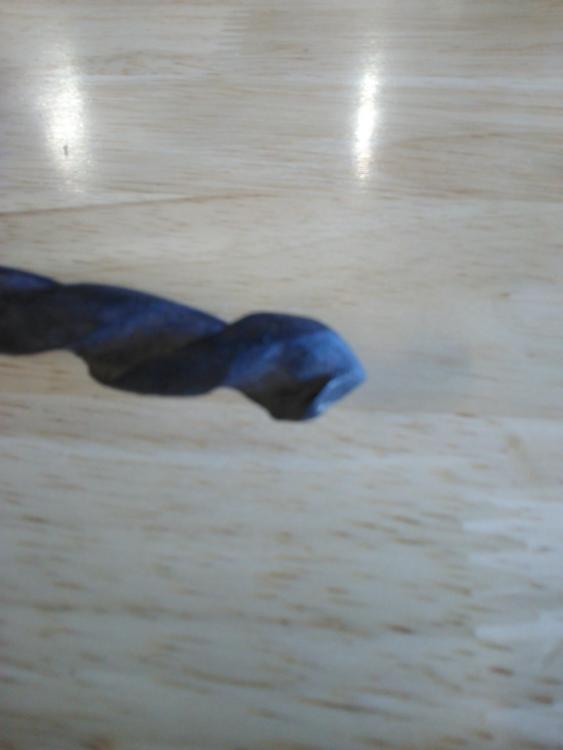
I'm no master but no stranger to freehand sharpening drill bits. Being a lefty bit I'll have to mirror my muscle memory at the grinder but it'd be fun to see how well this thing works once sharpened.... If it were for setting lags in wood, why not use a wood auger? Unless the man just didn't have the right one. Also, if it were a mistake, why not heat it up again, untwist, and retwist the right way around? Whenever it was made, steel was cheap enough they didn't bother I suppose.
-
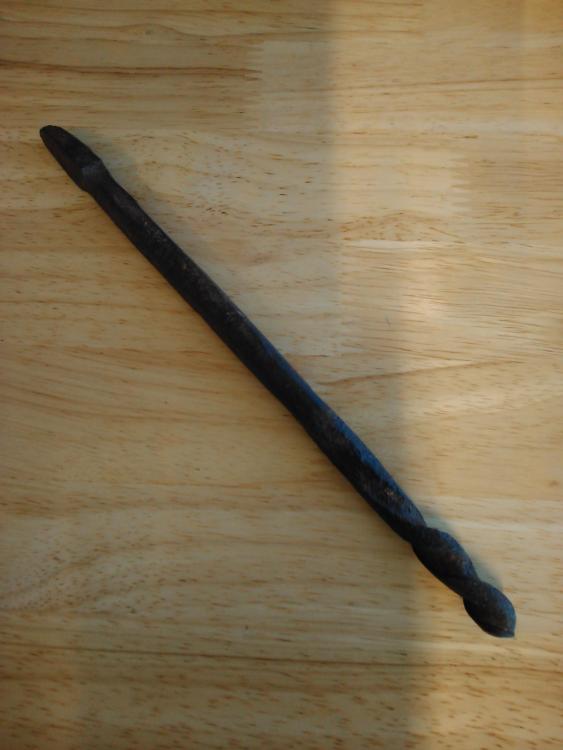
This odd drill bit followed me home recently. Its hand forged, with a square taper at the top to fit a brace. Then there's a nice twist, and hand forged cutting edges. A quick check with a file shows its hardened at the business end. The diameter is very nearly 1/2". The really odd thing is, its a left handed drill, and the tip was never sharpened after forging. I tried to drill through 3/4" thick pine, and gave up about halfway through - only one cutter was cutting (scraping actually) and it was slow going. Why did he make it left handed? Was it a mistake? Was he just getting practice? If he wanted a lefty bit to remove a stuck bolt, why was it never sharpened? If this was its purpose why the effort to make a long twisted section to remove chips from a deep hole? Or maybe he was a lefty and want to rotate his brace in a more natural direction? Now - do I leave the mystery as is, or sharpen this up and see how well it works then? Any thoughts out there fellas?
-
-
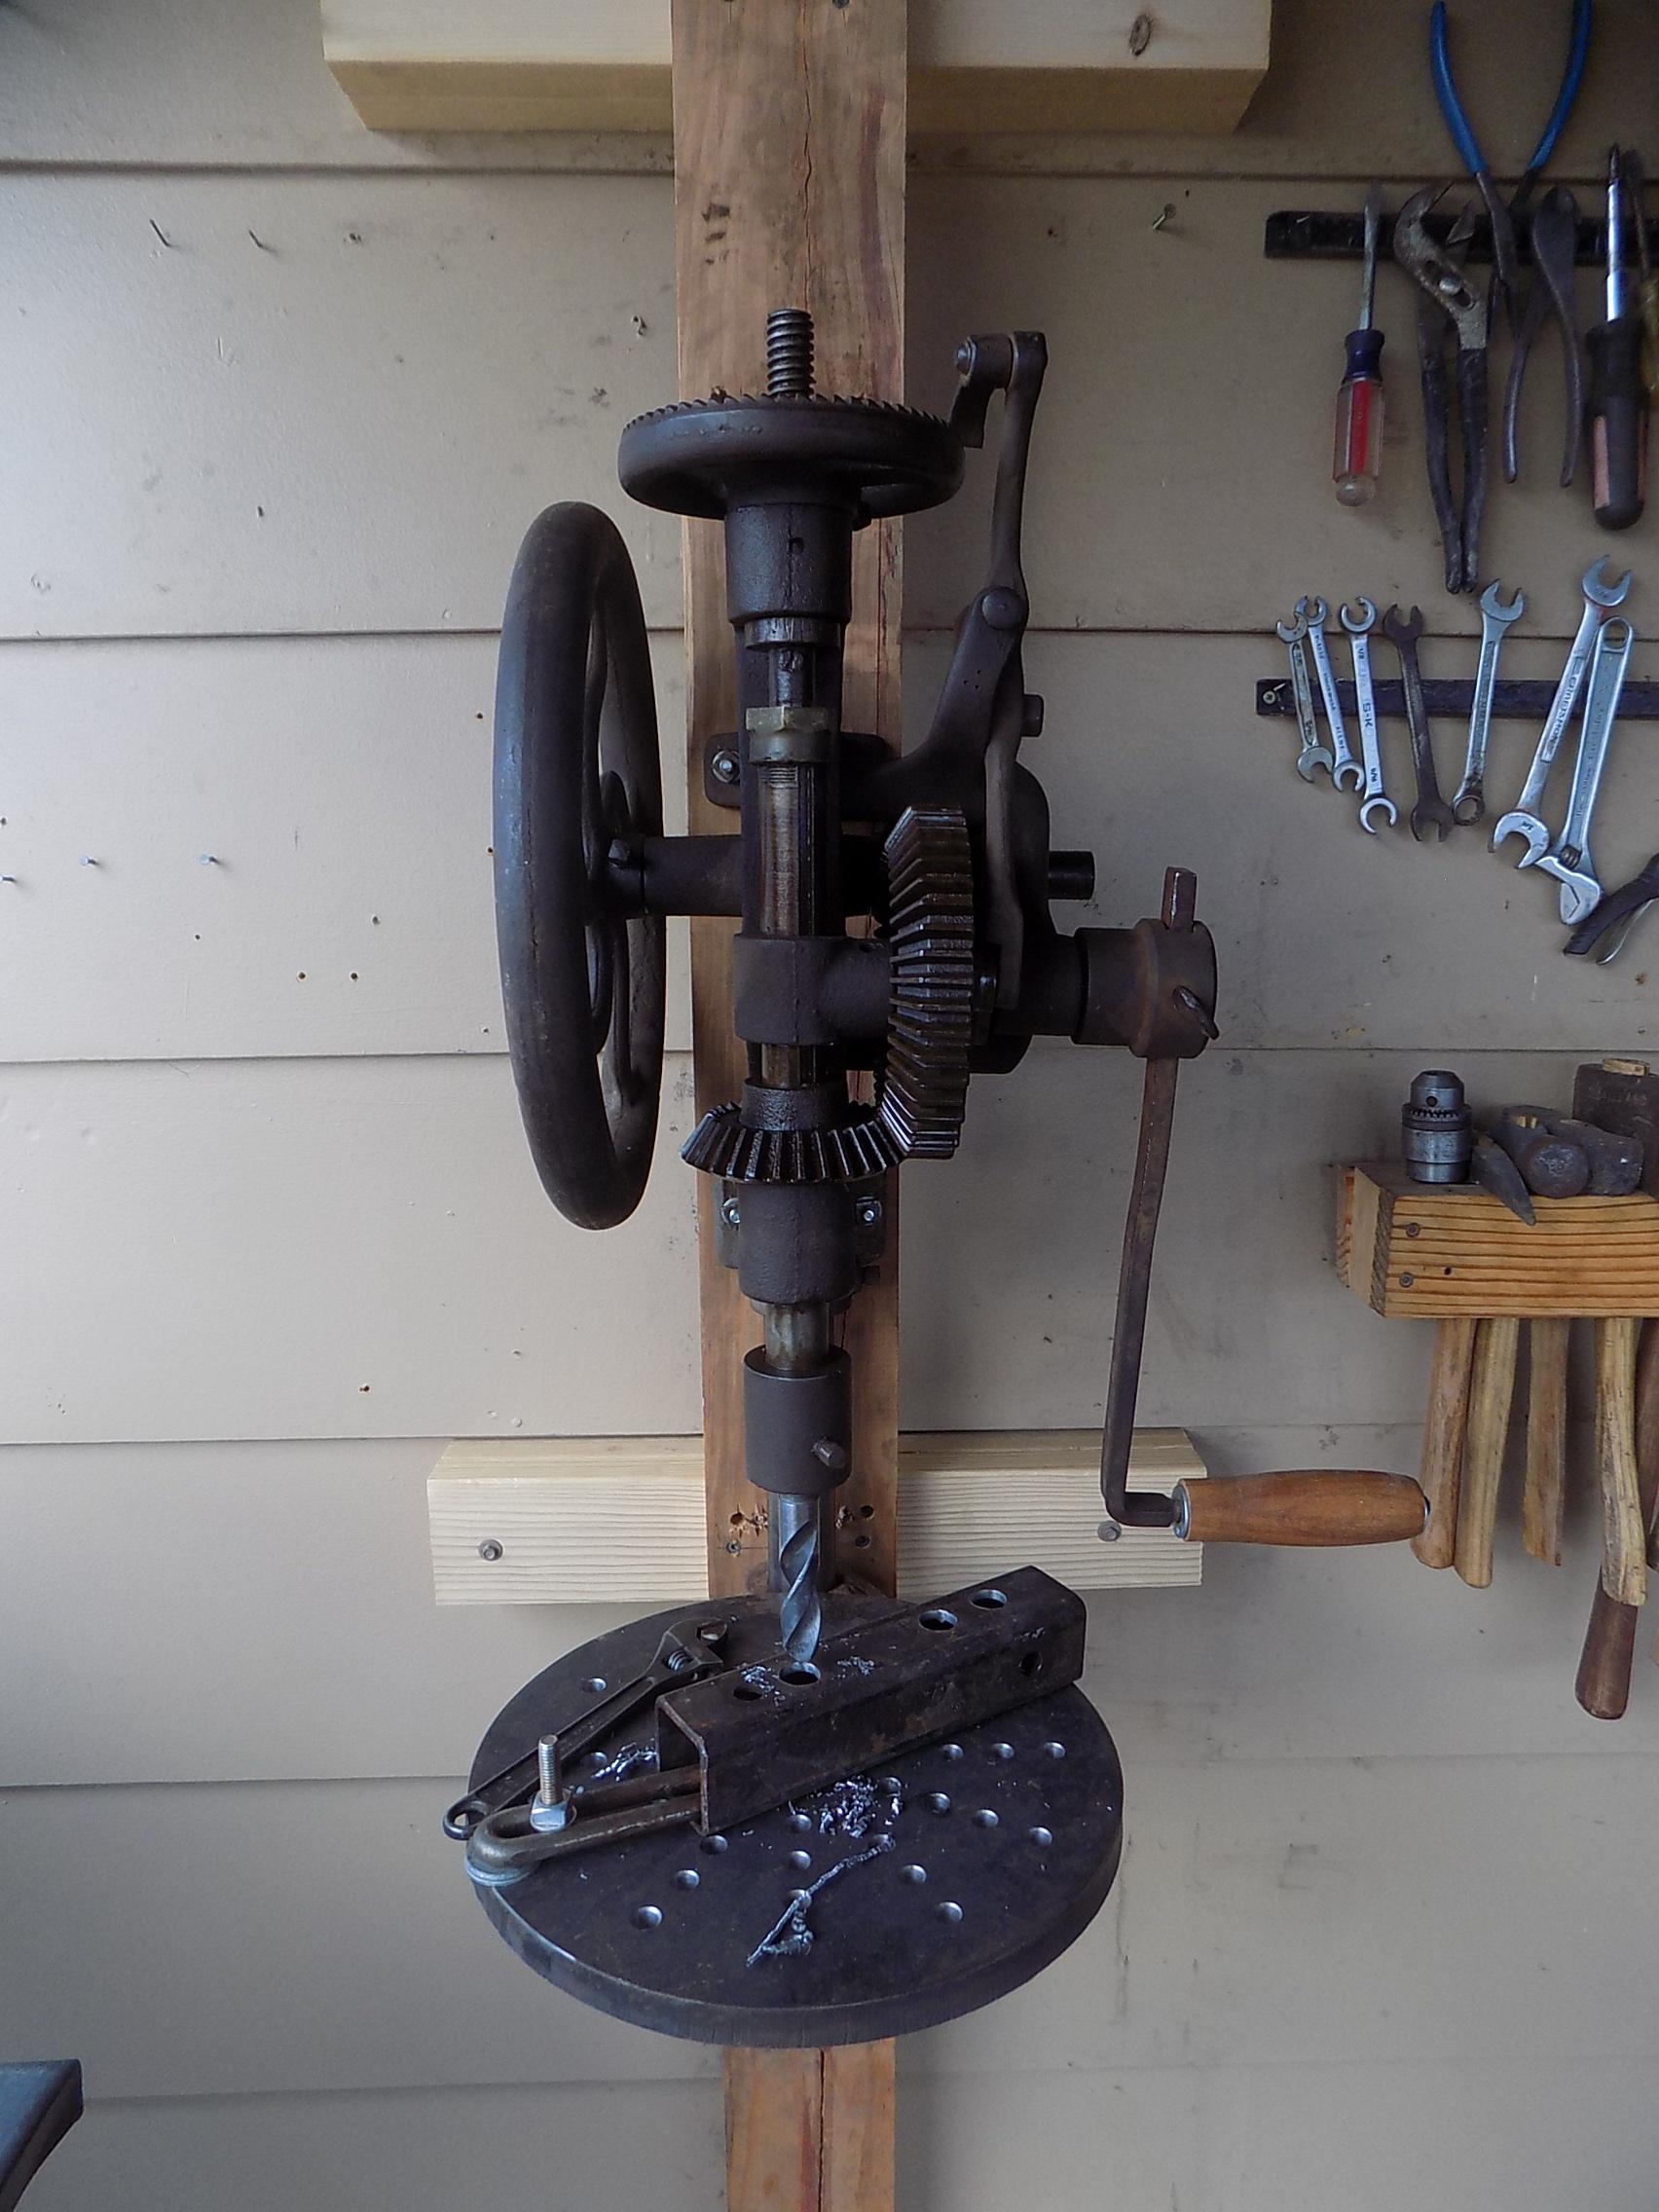
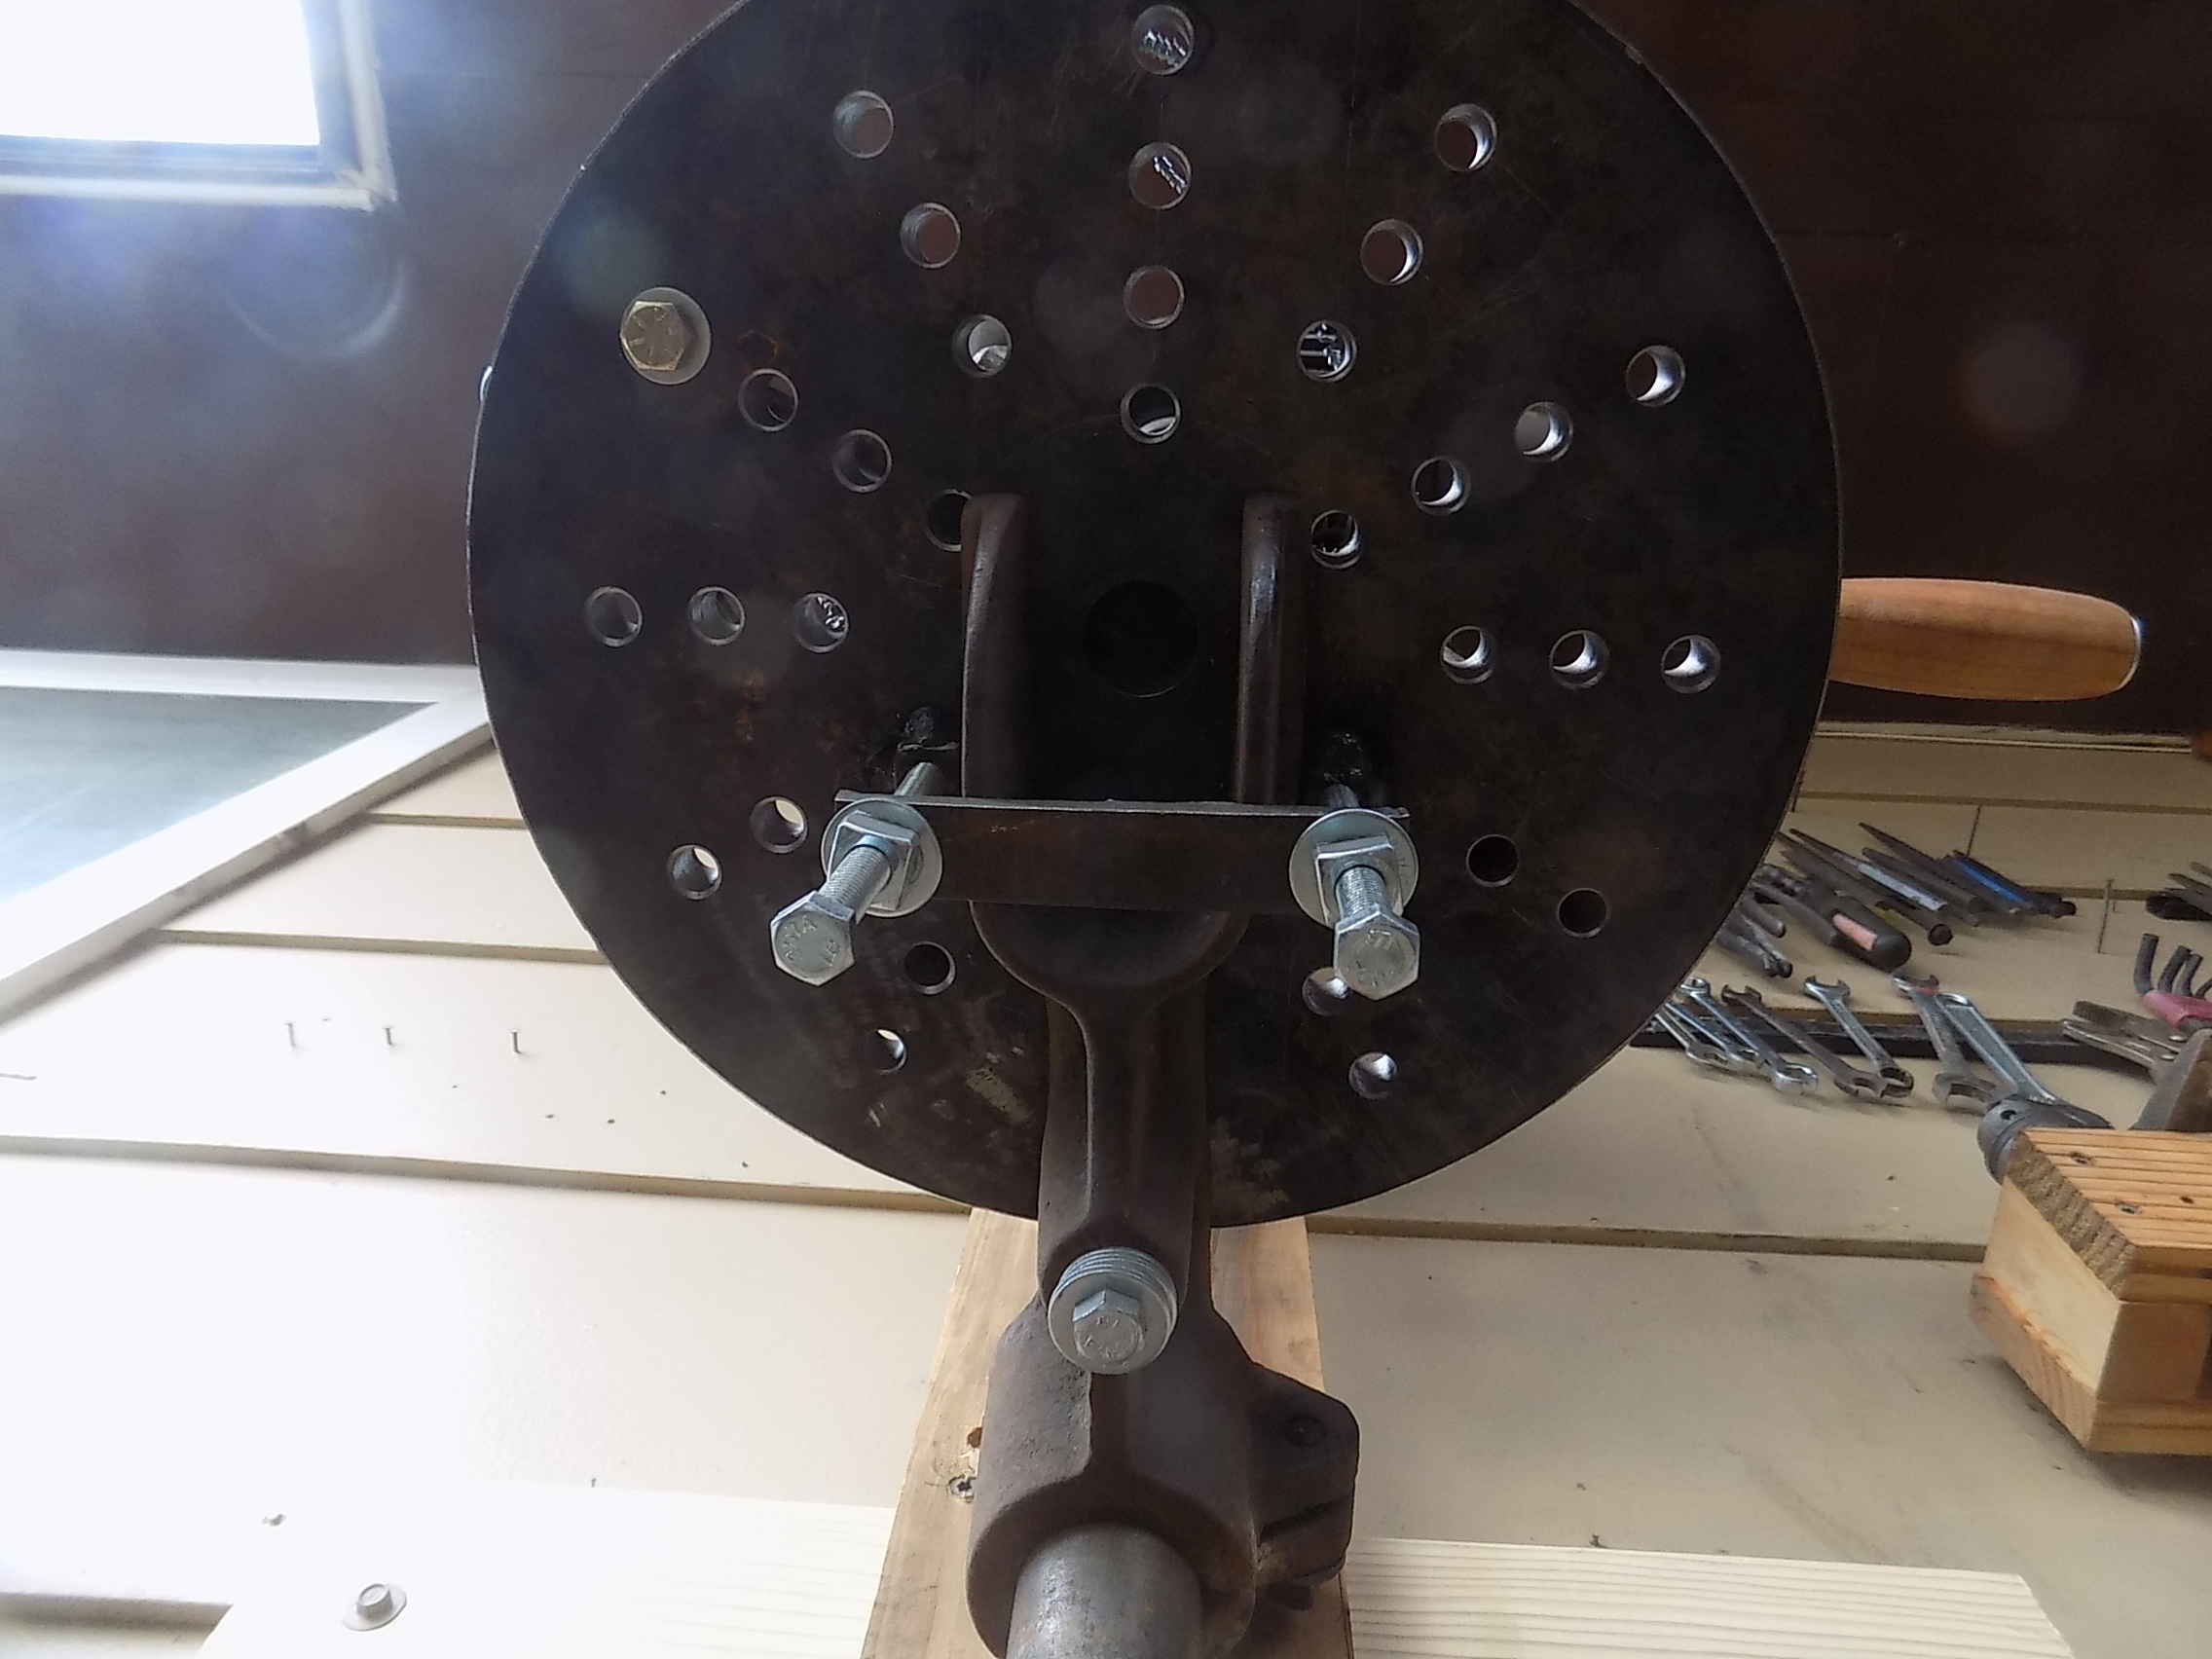
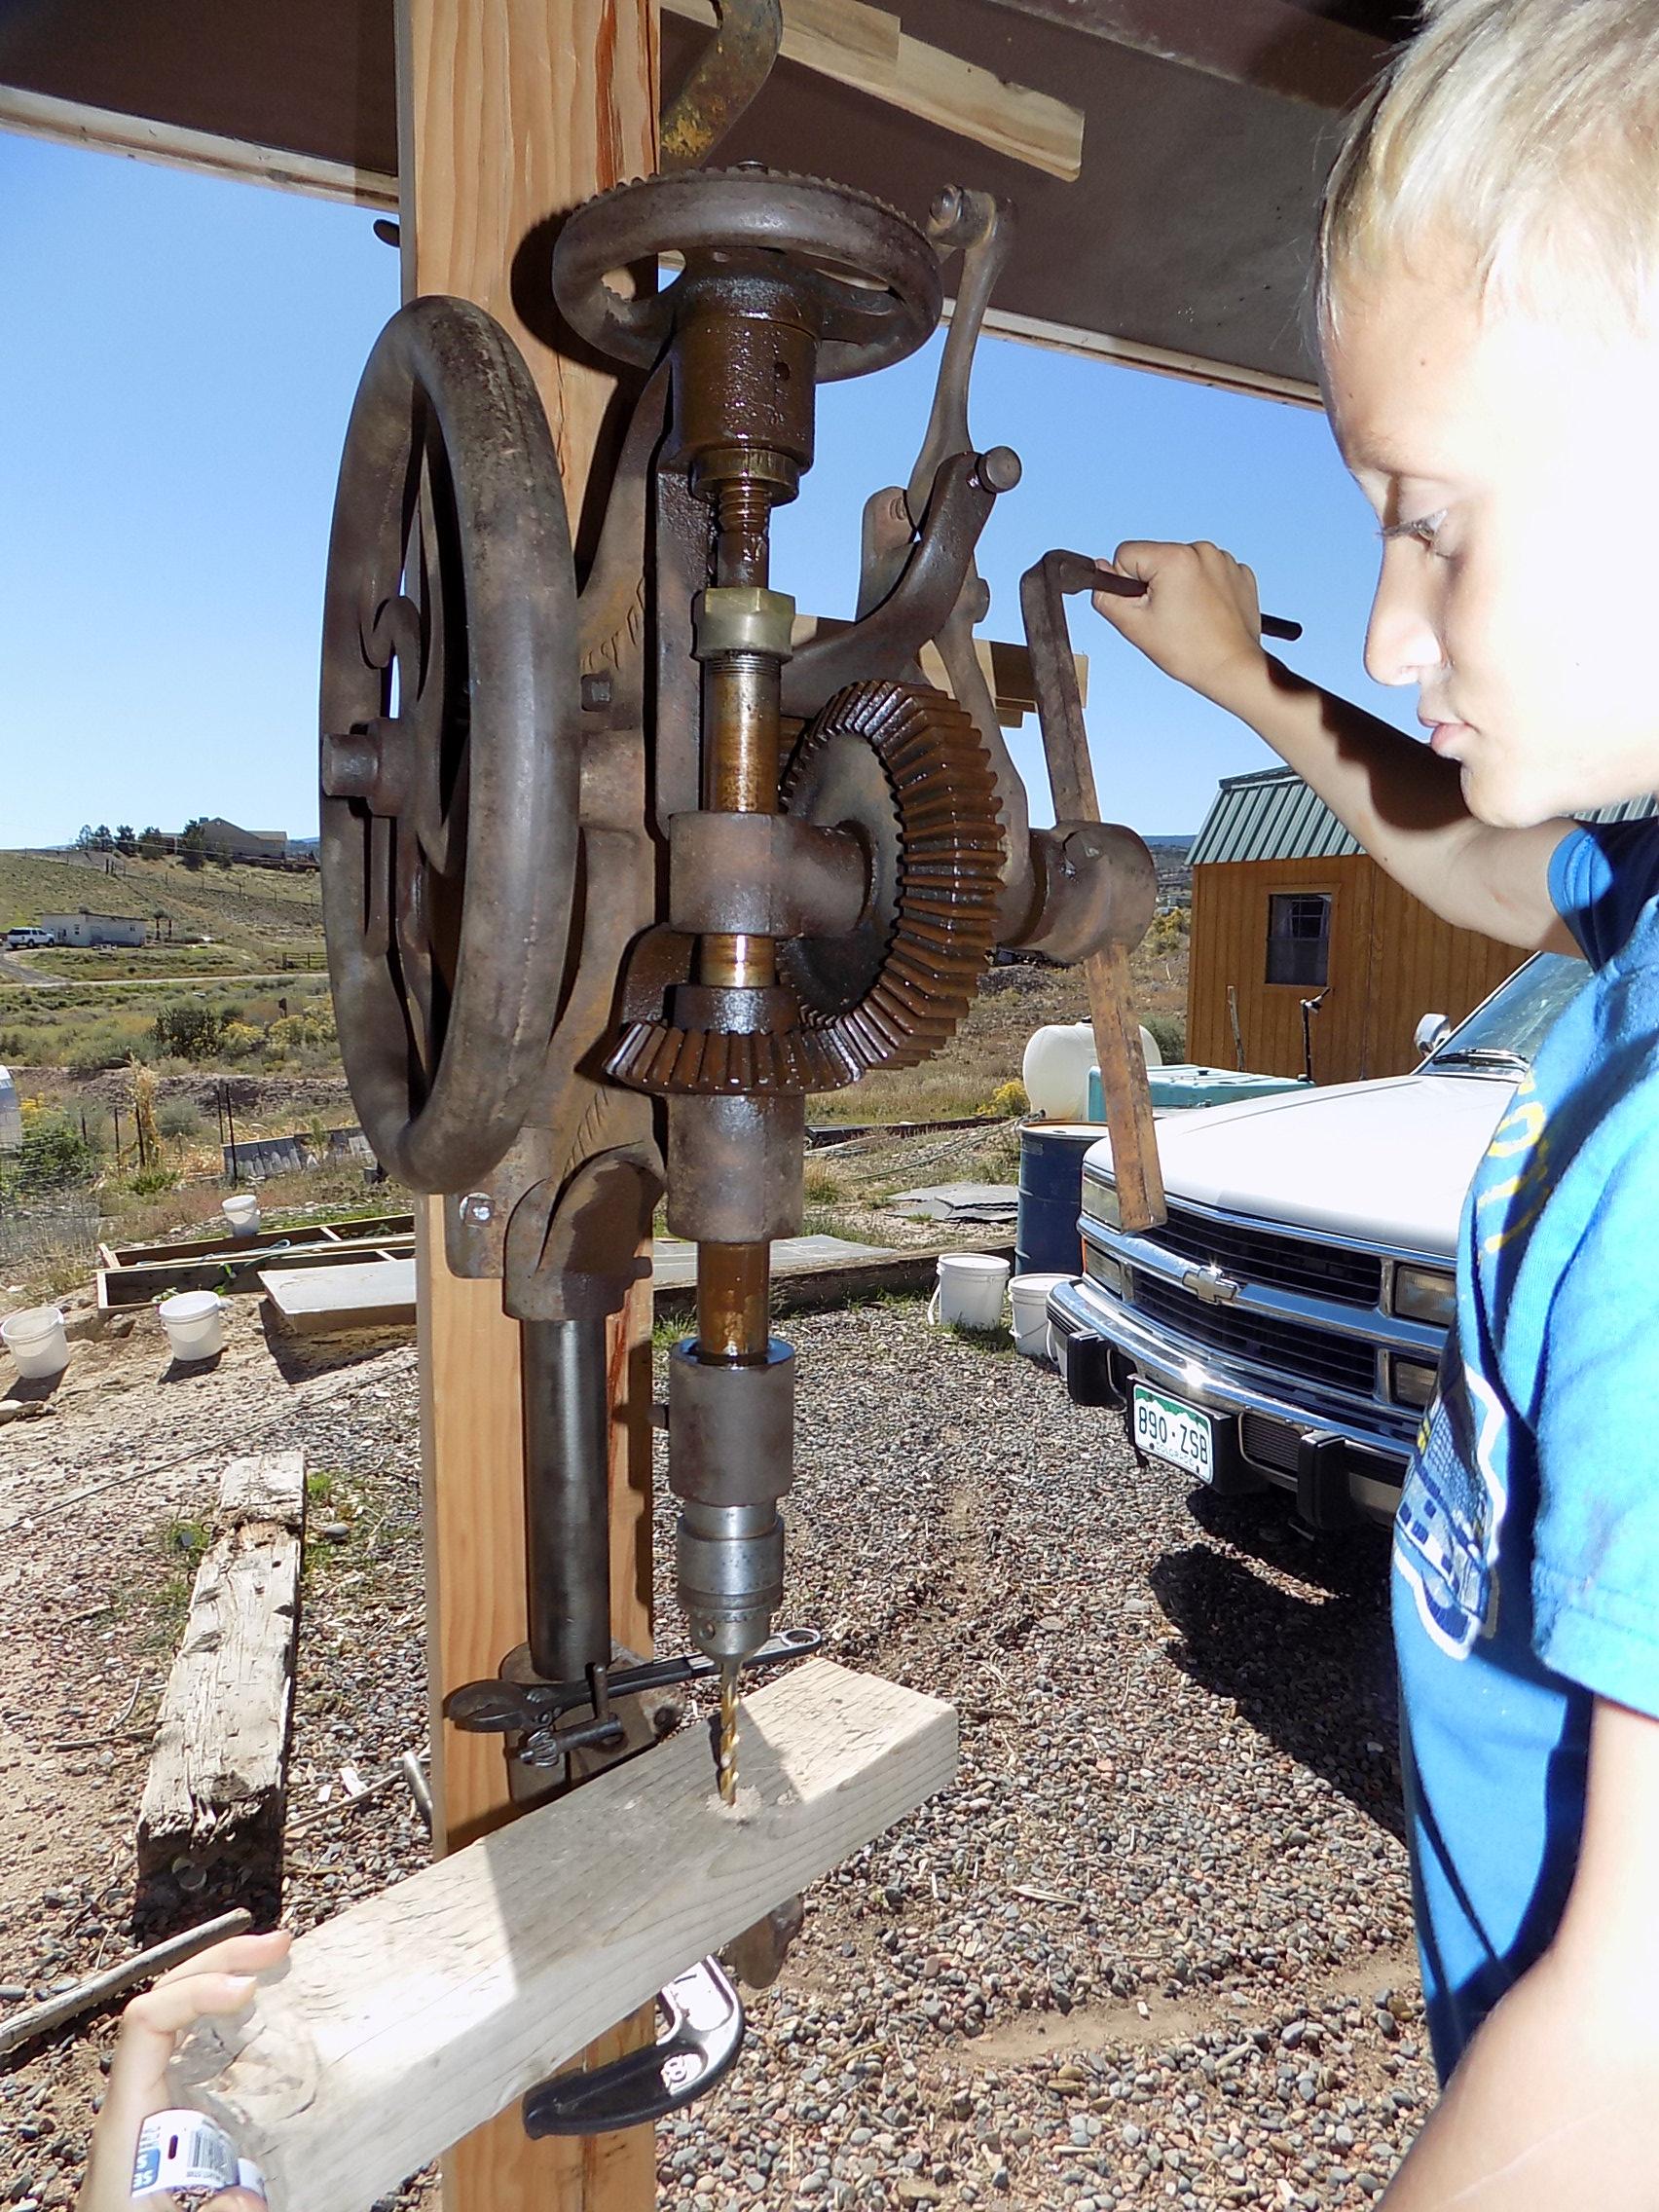
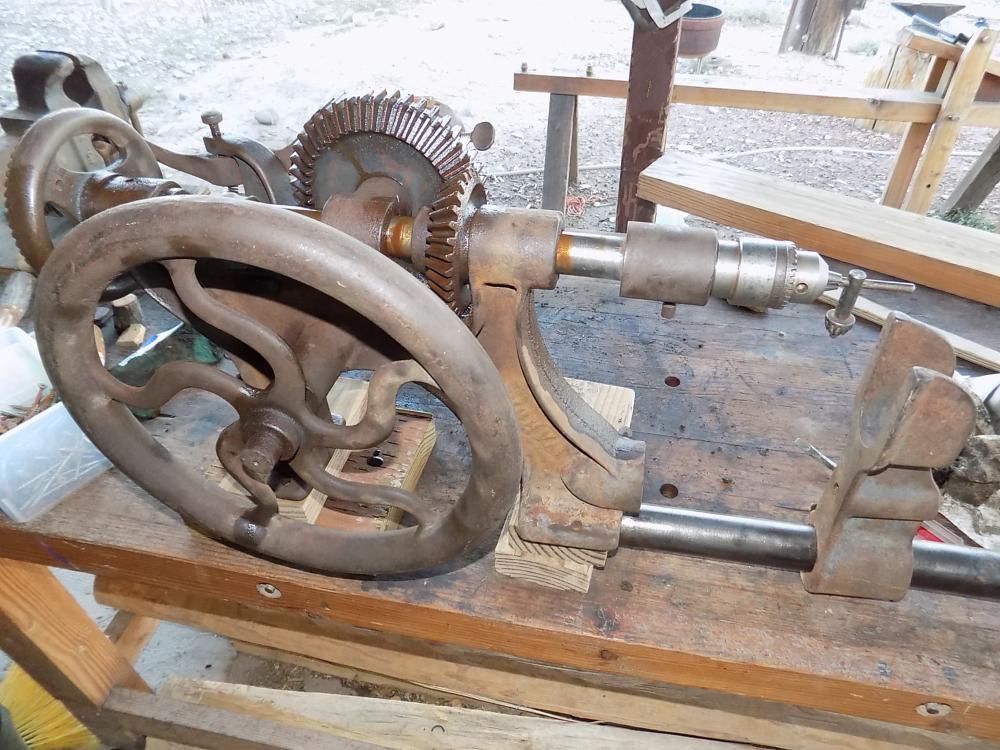
Here it is, finally mounted. After freeing everything up and getting it working, I made a table from a drop of 3/4" plate from a plasma table (already round!). Then I turned a handle for it from free cherry firewood. Works great, now lets see if I'll ever use it. I am curious if it'll be good for tapping holes, by disengaging the big nut that connects the spindle to the feed screw, the spindle should float. The crank gives good forward and reverse control, while the sloppy fit of the spindle bearings will allow the tap to float where it wants too.

-
So that's what the two little holes under the jaws are for, attaching pipe jaws! Mine is similar and has those holes. I paid similar to the asking price on that one. Maybe you could wait and get it cheaper, maybe not.
-
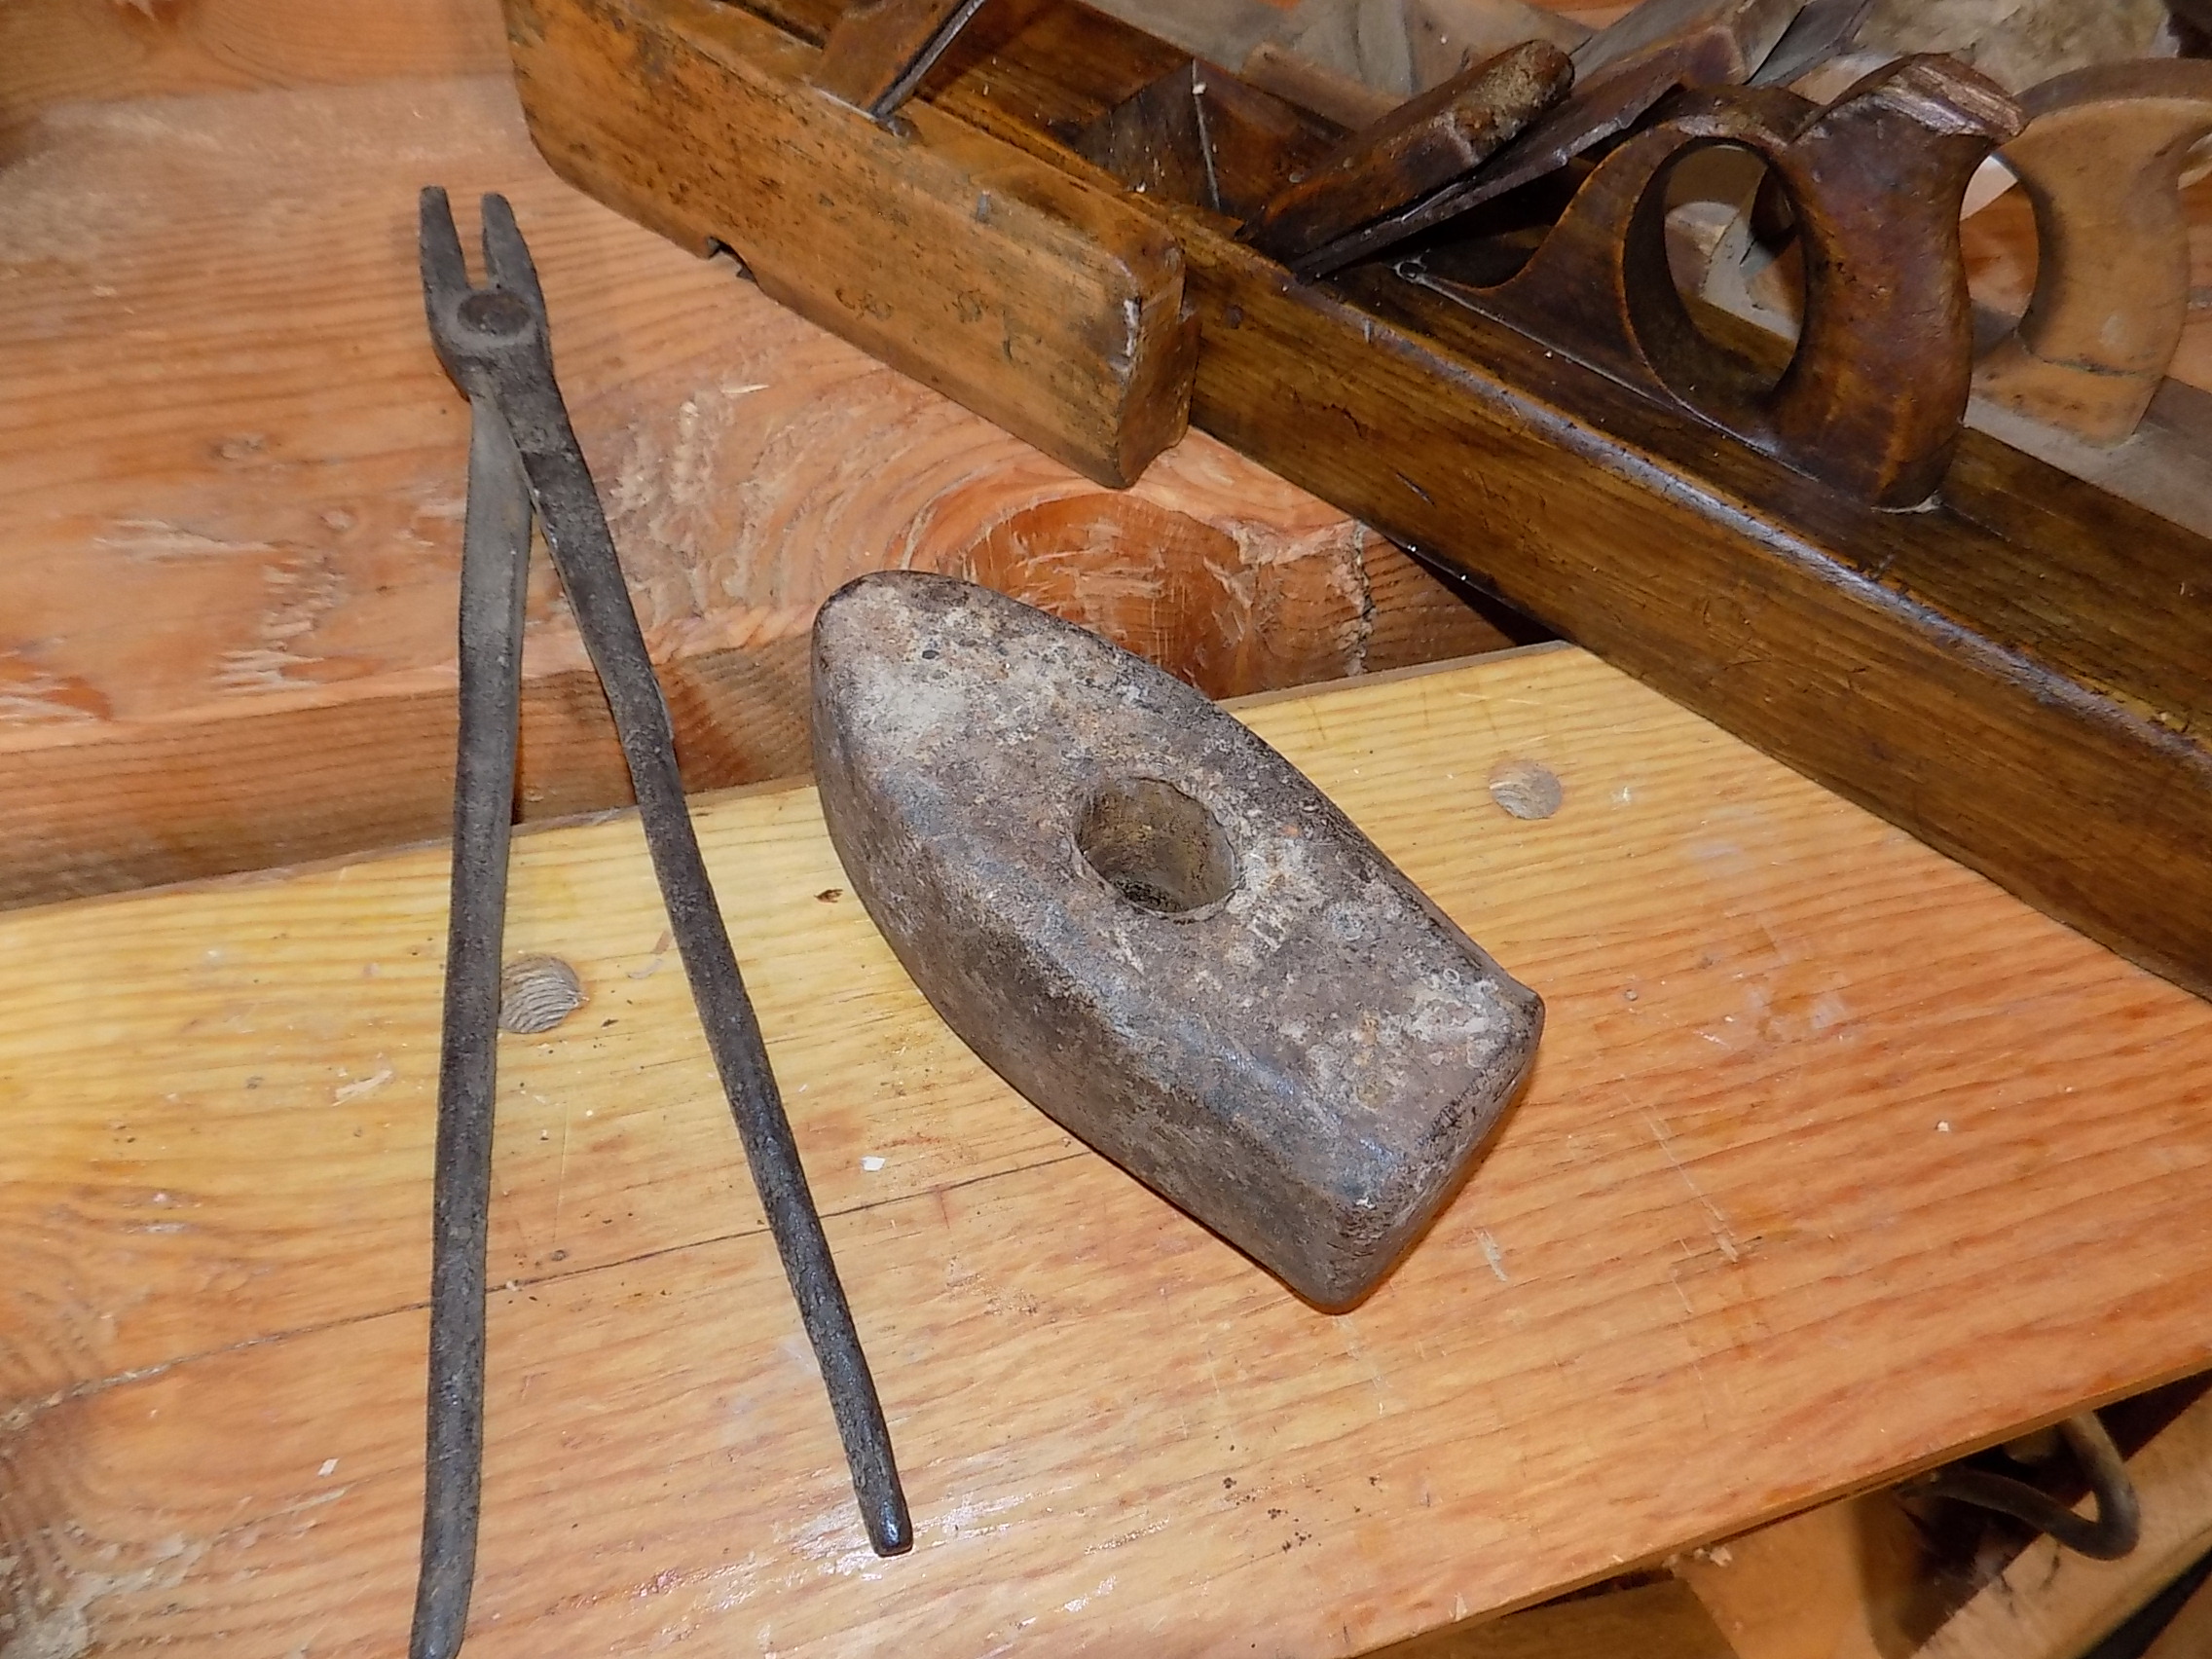
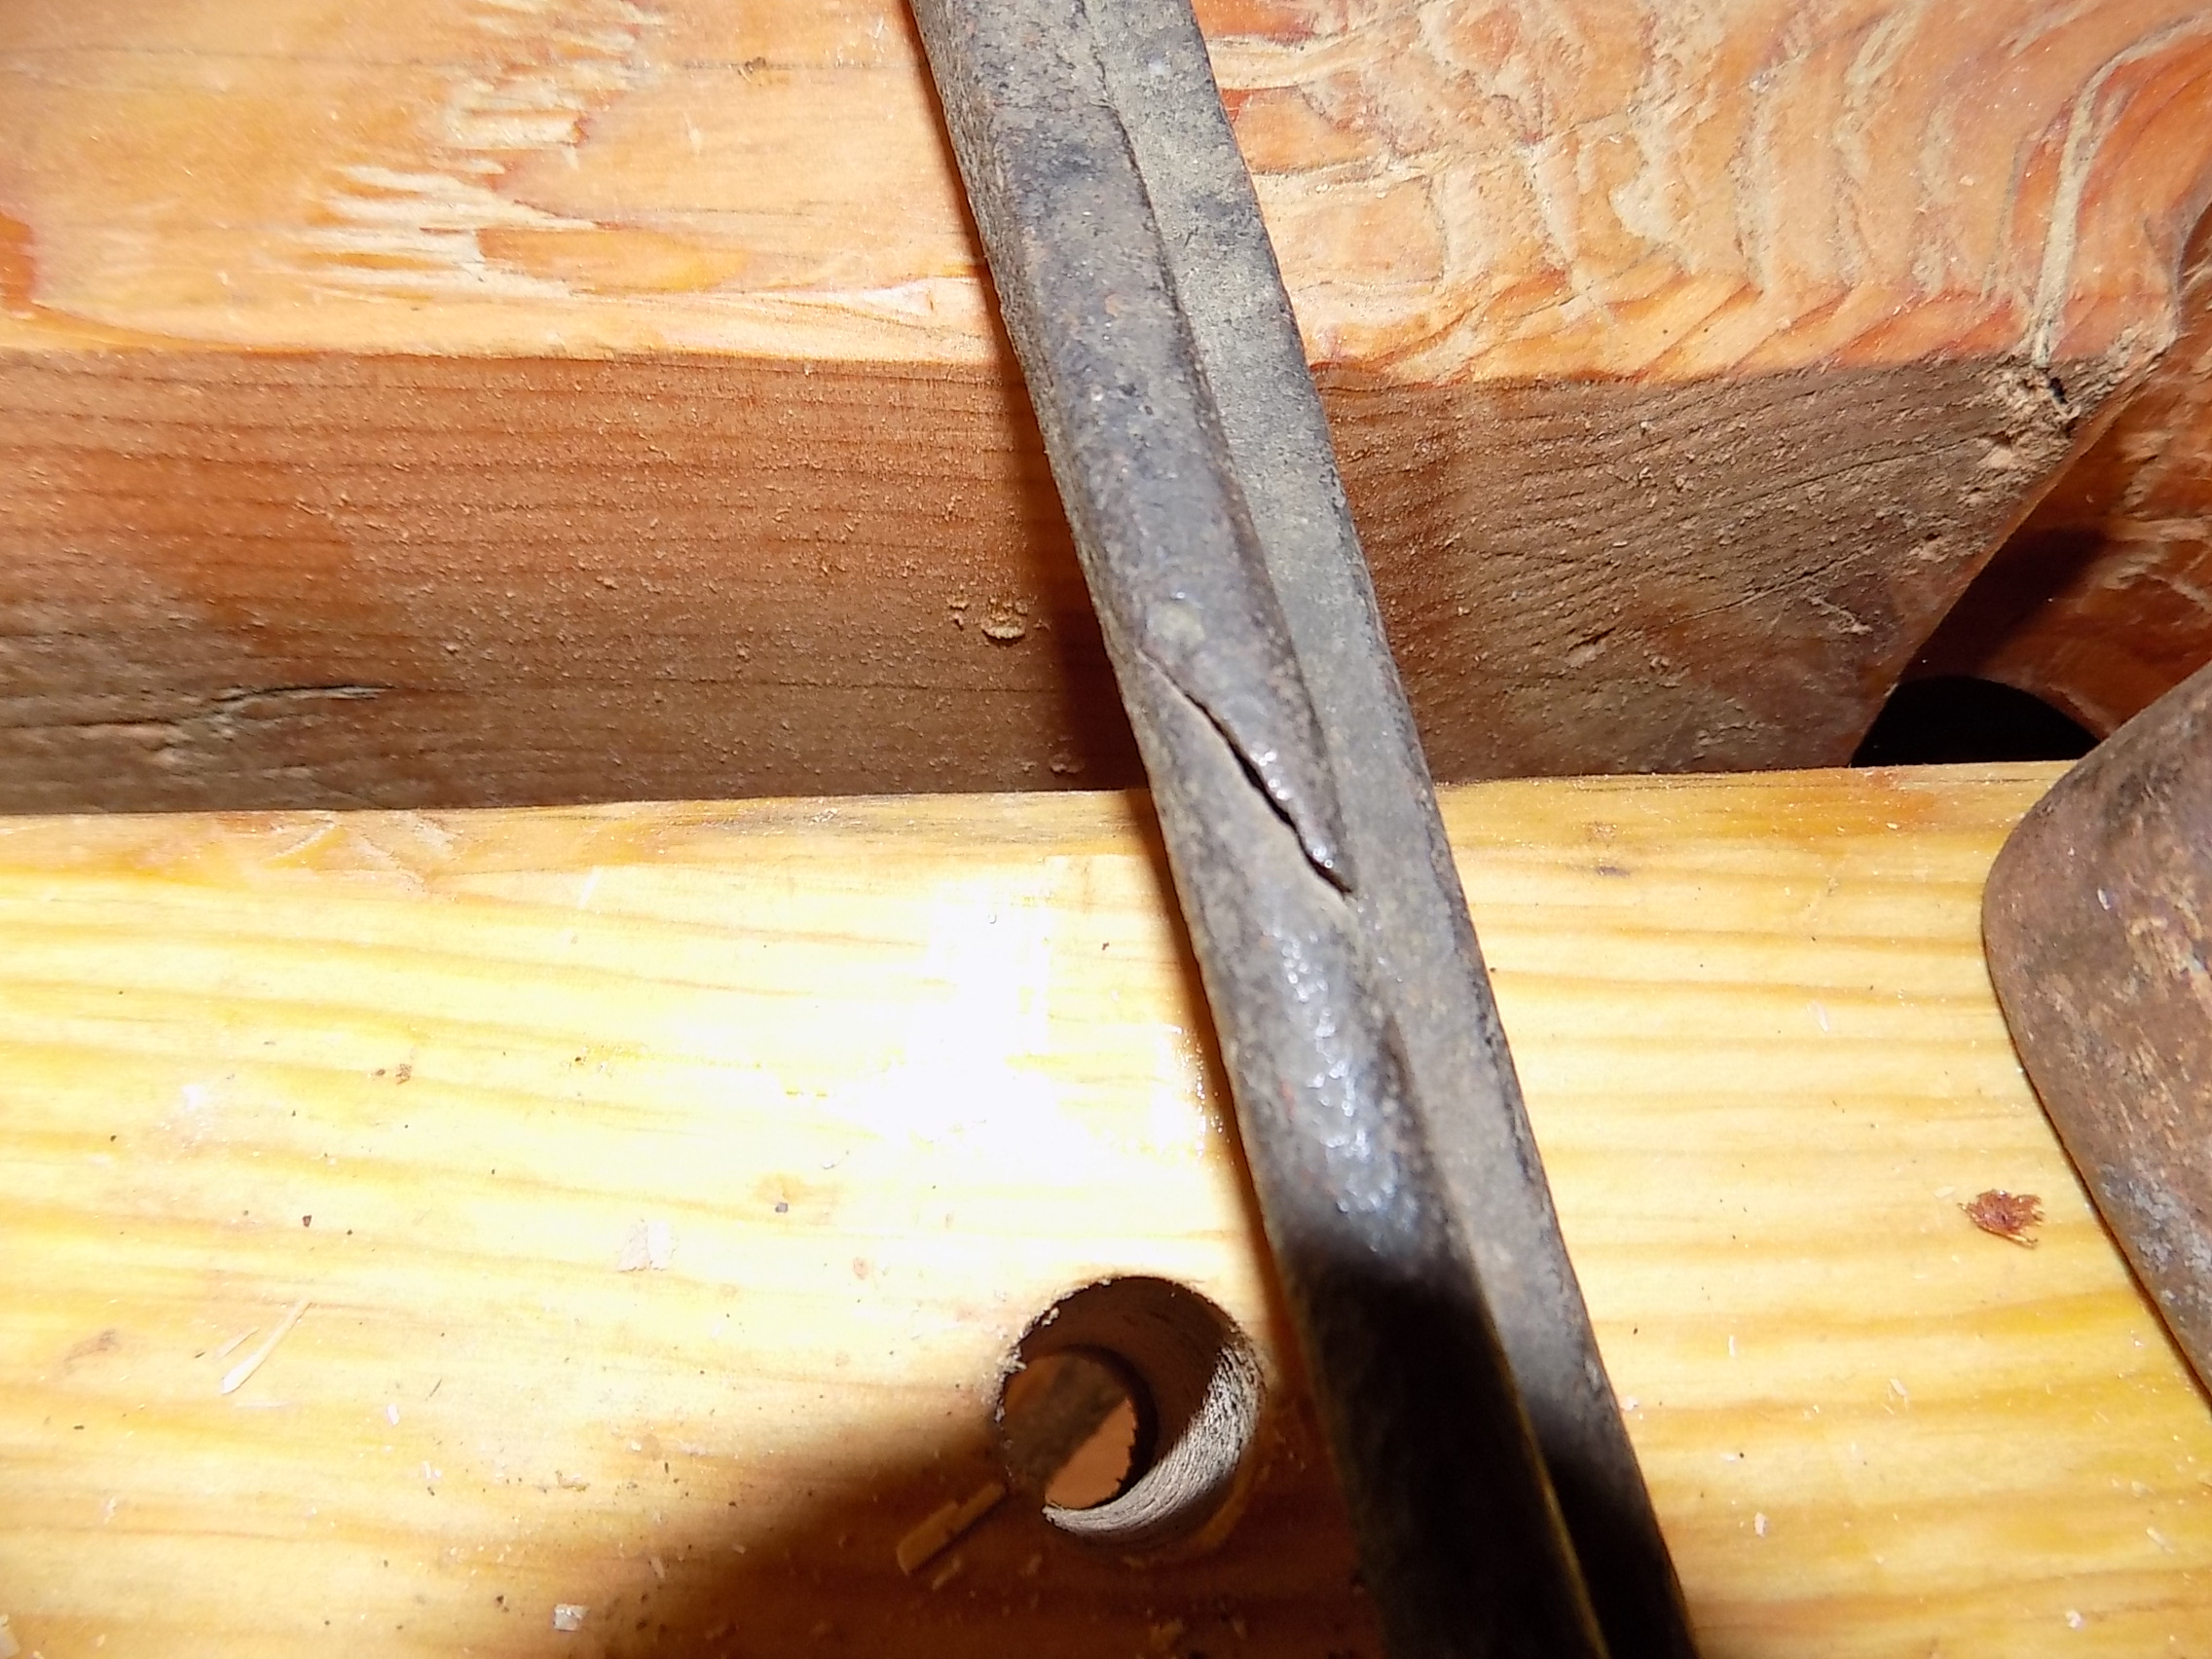
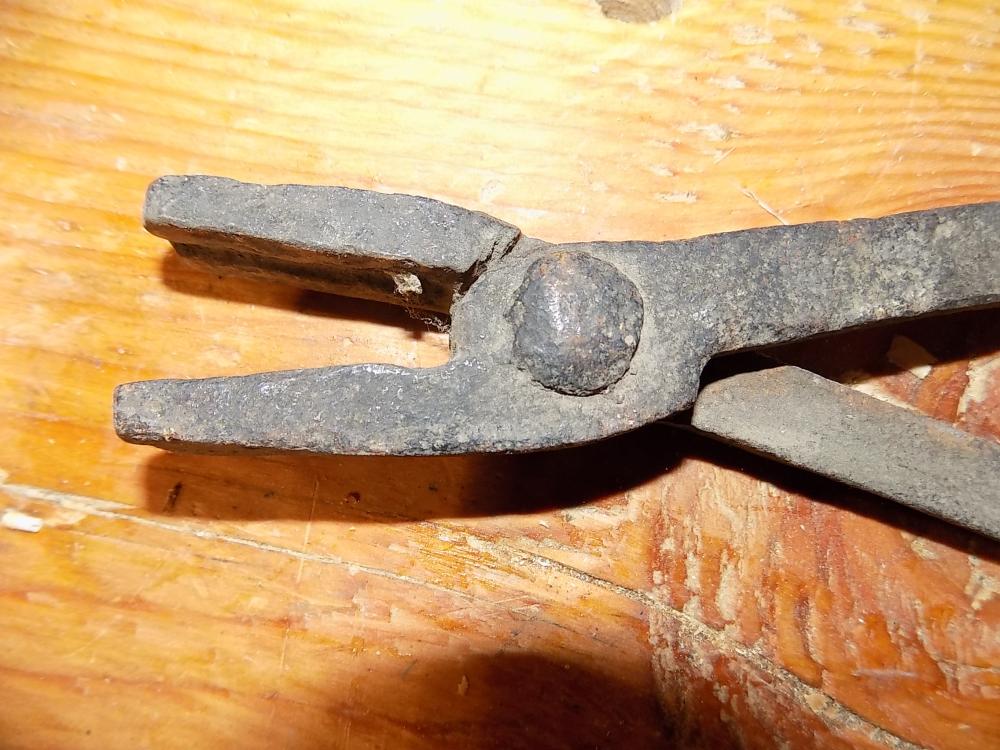
There was an estate sale, I went on a few different days and got some nice wood planes and other stuff. My 7 year old picked out the straight peen sledge hammer head. The last day was $1 per item, and I found the tongs hiding in the corner with some other hammers and wrenches. There's a forge weld cracked, I plan to arc weld it shut. The tongs look handmade.


-
How about JB Weld?!!
-
If you're already doing basic forging, can't you just punch the holes hot?
-
A few weeks ago I won an old Champion post drill at online but local estate auction, sight unseen (since I didn't make it to preview) under $50 out the door. This is partly a tool addiction, partly a homeschool project. It was mostly frozen up, but otherwise intact. It took a weekend, a can of PB Blaster, and a bit of plumbers torch heat to free it up and get it working again, then sat on the workbench for a few weeks until I could get it temporarily vertical in the carport. It'll get mounted out back later, but the guys at the weld shop wanted to try it out. It works, the kids love it, but one question - you can see in the last photo, the cam and roller are both horribly grooved, Also the max range of motion of the rocker arm, is one tooth of advancement. I could either, 1. Build up the cam with weld bead and file it smooth, then turn a new roller on the lathe. But is the cam cast iron? I suppose me checking is more accurate than you guys guessing. I just don't want to weld on there and crack it. 2. Turn a new roller on the lathe that's a bit oversized, to get more throw on the advance mechanism. Once there's more throw on the advance, there's an adjustment screw to decrease the amount of feed when appropriate. We'll plasma cut a new table for this too as it really needs good workholding. I also learned, you need to mount these with the crank axle no more than shoulder height. So I need to move it lower on my post.


-
Yes. Maybe someday I'll use the post drill as a boyfriend intelligence test...
-
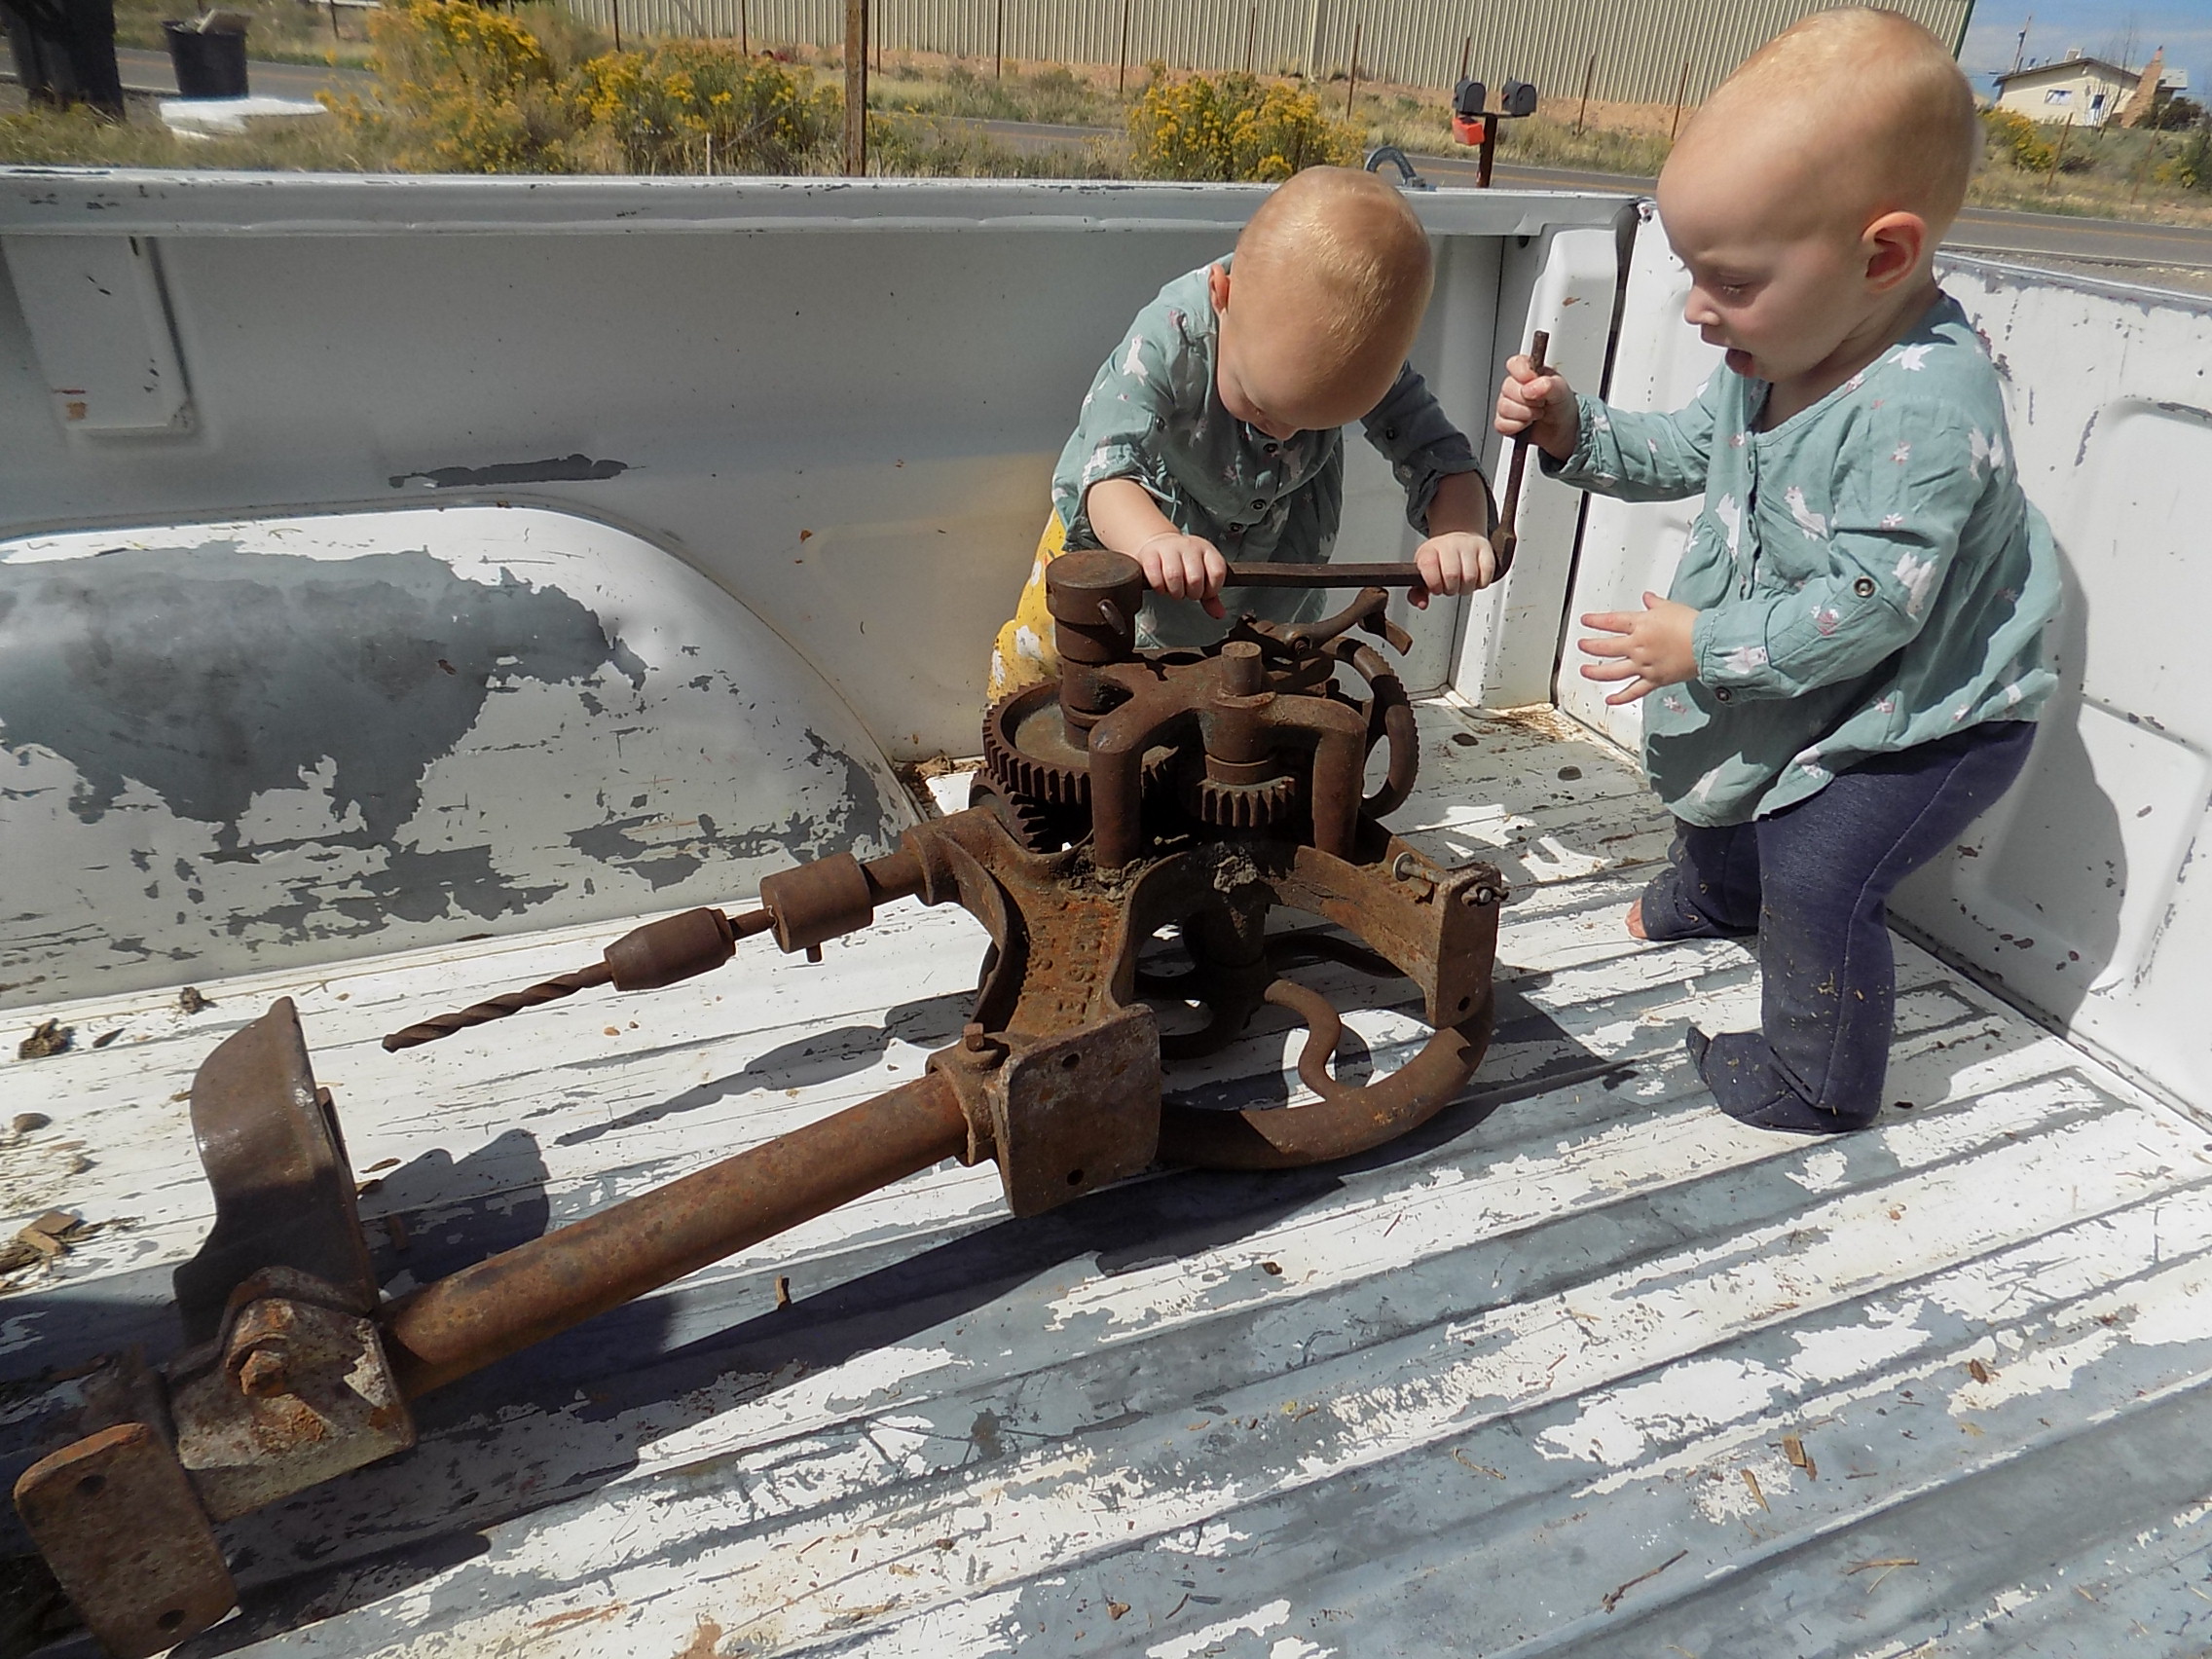
Here's a great old piece of iron I won at an auction for $40. Its a Champion, but I haven't looked for the model number yet. My twin girls are checking it out. I hope to get it up and running, and cleaned up, but don't ever plan to make it shiny and paint it. I'll likely get a piece of 1/2" plate plasma cut into a nice table for it. Our young boys are really into Lego gears right now, and this will be a great homeschool project too!

-
That's a great DP! I once saw a small camelback but it was rusted solid, beyond the point of any reasonable restoration.
-
Thanks for the input guys. Can the mapp gas get to local red heat on say 1/2" round bar? The heat sink trick on the scythe is a potato on the blade.
-
I've done some backyard blacksmithing with a campfire forge, but occasionally have need of quick localized heating for small jobs like the one in front of me now - heat and bend the tang on a scythe to get it properly fitted. This particular job I can't do in the fire or a traditional forge as it would kill the heat treatment on the blade. I have access to a weld shop, and could do this there, but would like the capability at home. The plumbers torch I have is inadequate for these tasks though it did work on a small spring heat treat job. Any options out there short of buying a full size welder's torch?
-
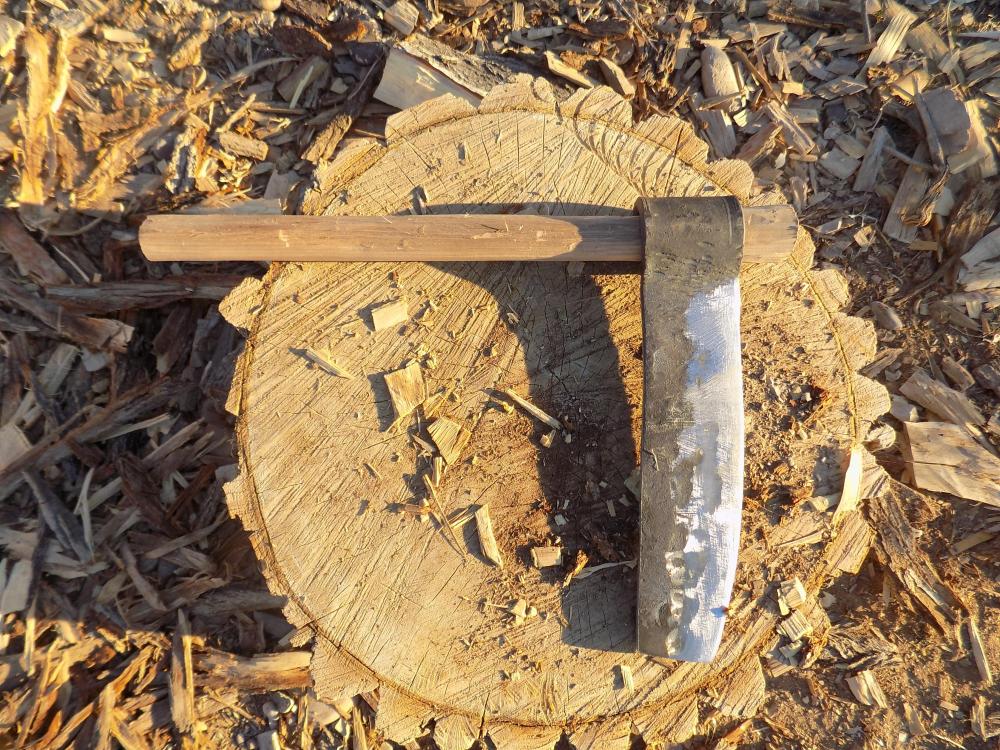
Here's a froe that's mostly finished. Its made from truck leaf spring, probably 3/8" x 3" thick. I left the eye unwelded, it's pretty hefty. I just have a side blast into a trench in a fire pit, and used wood chunks and a bit of lump charcoal that threw a lot of sparks. This forge struggles to get things really up to temp. I worked a while on tapering the blade, but seemed to hit a point of diminishing returns, where the blade bows with the pounding, so you have to pound it straight. That was hard to keep it all lined up on the 60 lb Fischer Norris anvil. Finally I got my wife to hold the other end still with tongs and that helped. So while pounding to straighten it, its also making the edge you want skinny, wider again. Anyway, I flattened it out and let it cool slowly, and finished it with a lot of grinding and filing. It may still benefit from more taper. The handle is elm, because that's what is readily available around here. Fun project, good learning experience, and a useful tool for general homestead use and traditional woodworking.
-
This weekend, I forged a froe from old truck leaf spring as well. I didn't measure but its about 3/8" x 3" spring steel. I used the eye from the spring. Forge was just a few bricks and a side blast pipe on the ground with dry scrap wood chunks and a bit of "Cowboy Charcoal" from the store (that threw a lot of sparks). Maybe the forge just wasn't getting it hot enough, but that was really stubborn to forge. At best it looked orange when the sun was setting or down. My cross peen was a little light and too "pointy" so I went to the regular hammers to do most of the drawing of the blade. That arced the blade, so straightening was tough to hang on to that thing since it was longer than the anvil. Finally I got my wife to hold the eye still and that helped. So with shot forearms and small children needing daddy's attention, I shut down the operation for the night after flattening it out one last time. Still, I didn't get the blade tapered how I wanted, it goes from 3/8" full thickness to 3/16"-1/4" on the skinny end. A lot of sparks later, its cut mostly straight and has a blunt convex grind awaiting a handle... My last project was making a spatula from 1-1/2"x1/4" mild steel, and that was a lot easier to heat and hammer. Do "real" coal forges heat more quickly and effectively than this?
-
Great find, I'd chance $20 on that too.
-
Just the broken piece of heel will make a nice anvil... Good find.
-
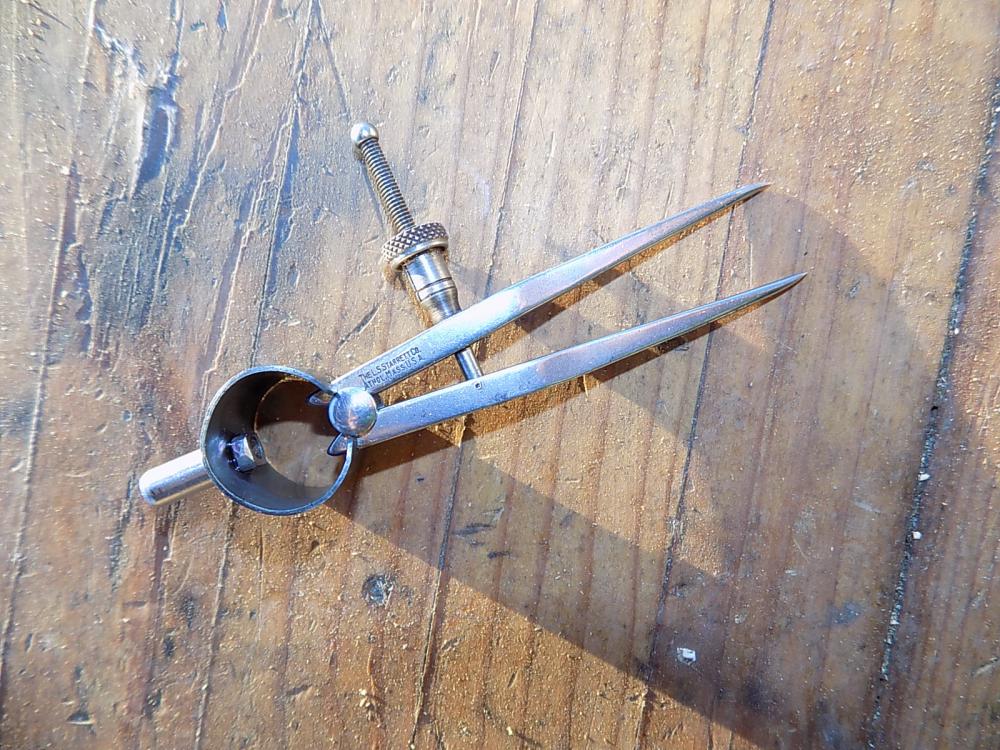
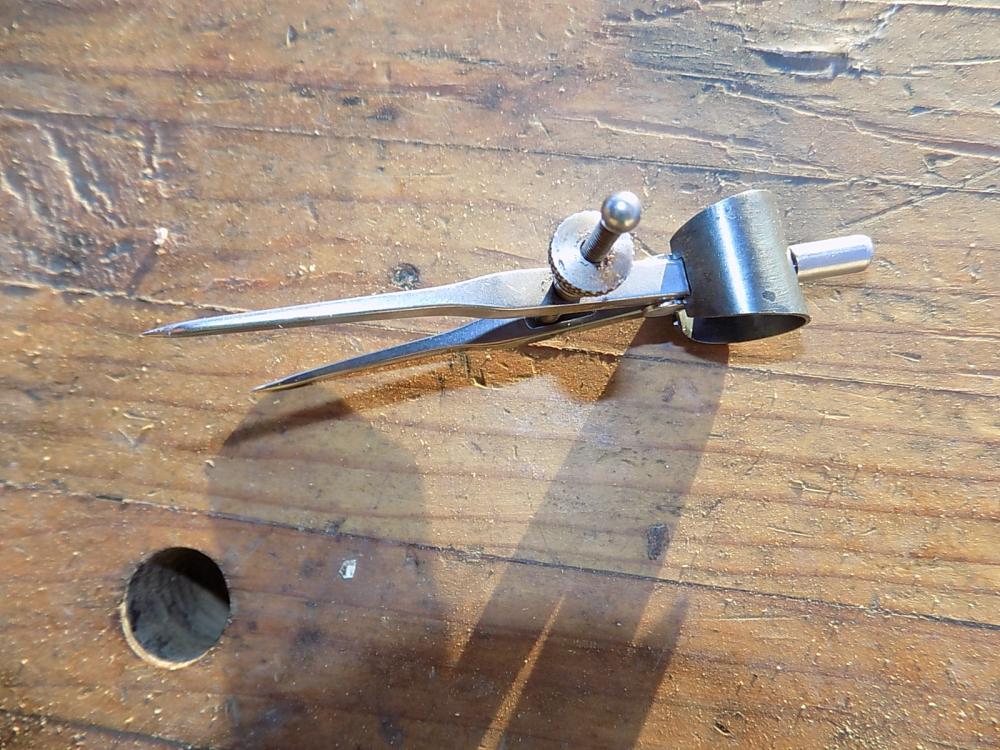
Yesterday I made up a third spring, this time out of a dull sawzall blade (0.035" thick). I did a test heat treat and temper on a scrap of this blade. I made the spring about 1/8" longer, and a little wider in the middle. I quenched in a small tin of oil, then tempered in the oven as hot as it would run. It came out a very even pale blue. And, it works! Full range of motion, great feel. I also machined the little post on the top. Now they can sit in my toolbox and keep the other dividers company. Thanks all for your remarks.
-
Maybe I'll just try that tempering method with a scrap of metal from the same saw blade.
-
Bill, I am thinking to take that very approach. Its the same theory as bow making (I've successfully made one 10 lb kids bow from walnut), where you taper the spring to get the same stress throughout the spring, so no one section gets overstressed causing a weak point. I've never tried tempering in the manner you described, not sure if I'll try that or just try to evenly do it with a propane torch.
-
Will do when I've got a few minutes to make it up.
-
I wondered about pushing the temper temperature higher. I don't know just how hot the oven will go on broil. I'm not set up for a lead bath - would you recommend tempering with a propane torch and watching the colors? I've done that before but want to keep the temperature as even as possible.