jwmelvin
-
Posts
117 -
Joined
-
Last visited
Content Type
Profiles
Forums
Articles
Gallery
Downloads
Events
Everything posted by jwmelvin
-
I hear what you are saying about both nozzles installed at once. I did consider that approach but decided a modular design would compromise less, at the expense of a more involved changeover. That’s and interesting point Mikey makes about one or another burner suiting a particular forge. I’m sure that is a lesson I will learn the hard way...
-
I’m doing something like that with my forge. Though I wouldn’t use the distinction of Venturi vs. ribbon. To me the Venturi (aka NA, naturally aspirated) relates to air induction and is the alternative to a forced-air or blown system. The nozzle may be a jet nozzle (large single outlet) or a ribbon nozzle (array of many small outlets). So for my forge, I made a burner entry port large enough for a ribbon block and then made a plug for the jet nozzle to use that entry port. Here’s my thread if you’re interested. I don’t really know what I’m doing, so it’s all just a bunch of experiments.
-
^^^ Yes I agree. KOL has fibers in it that make it seem difficult to screen. The refractory that Wayne Coe sells does work better for ribbon-burner blocks. I’d like to understand the range of possible materials better to really get a feel for where the finished characteristics come from.
-
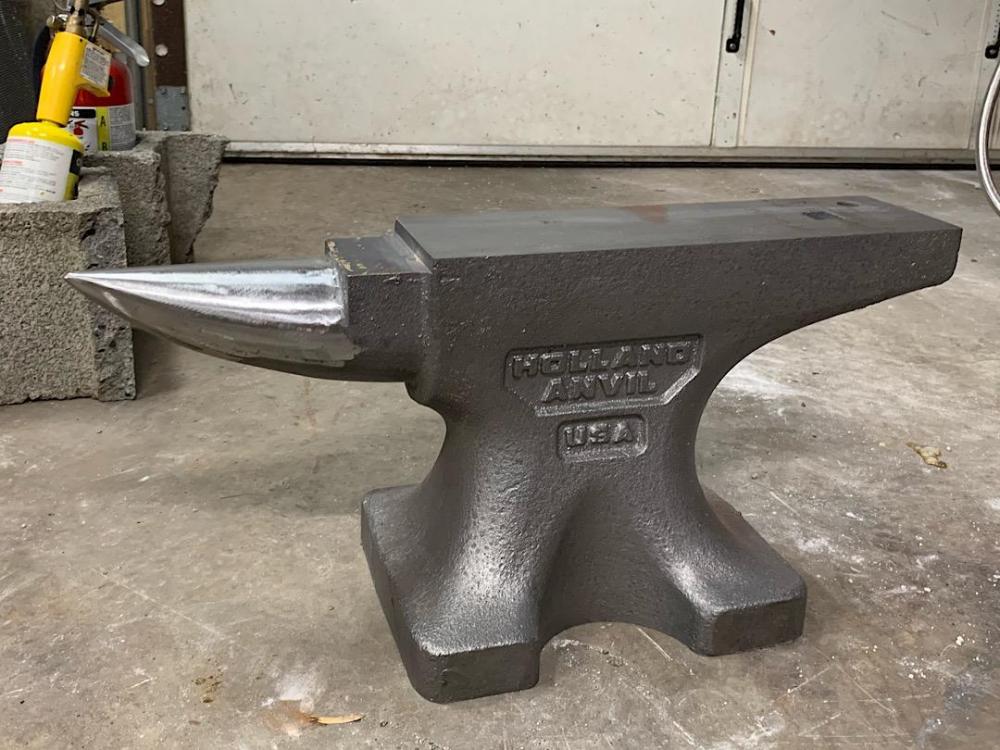
My beautiful anvil is here. Now I need to figure out how to mount it! I don’t seem to have a section of tree that is the ~18” length I need. May have to bundle some large lumber; or make a reinforced-concrete stand. I think the former, at least until I know exactly what height I want.
-
Good advice all. My KOL seemed to set and fire fine, but it was, as Buzzkill guesed, working with it before it set that I found difficult. With premade forms, it would not be nearly as difficult. I think it turned out pretty well though for a first forge.
-
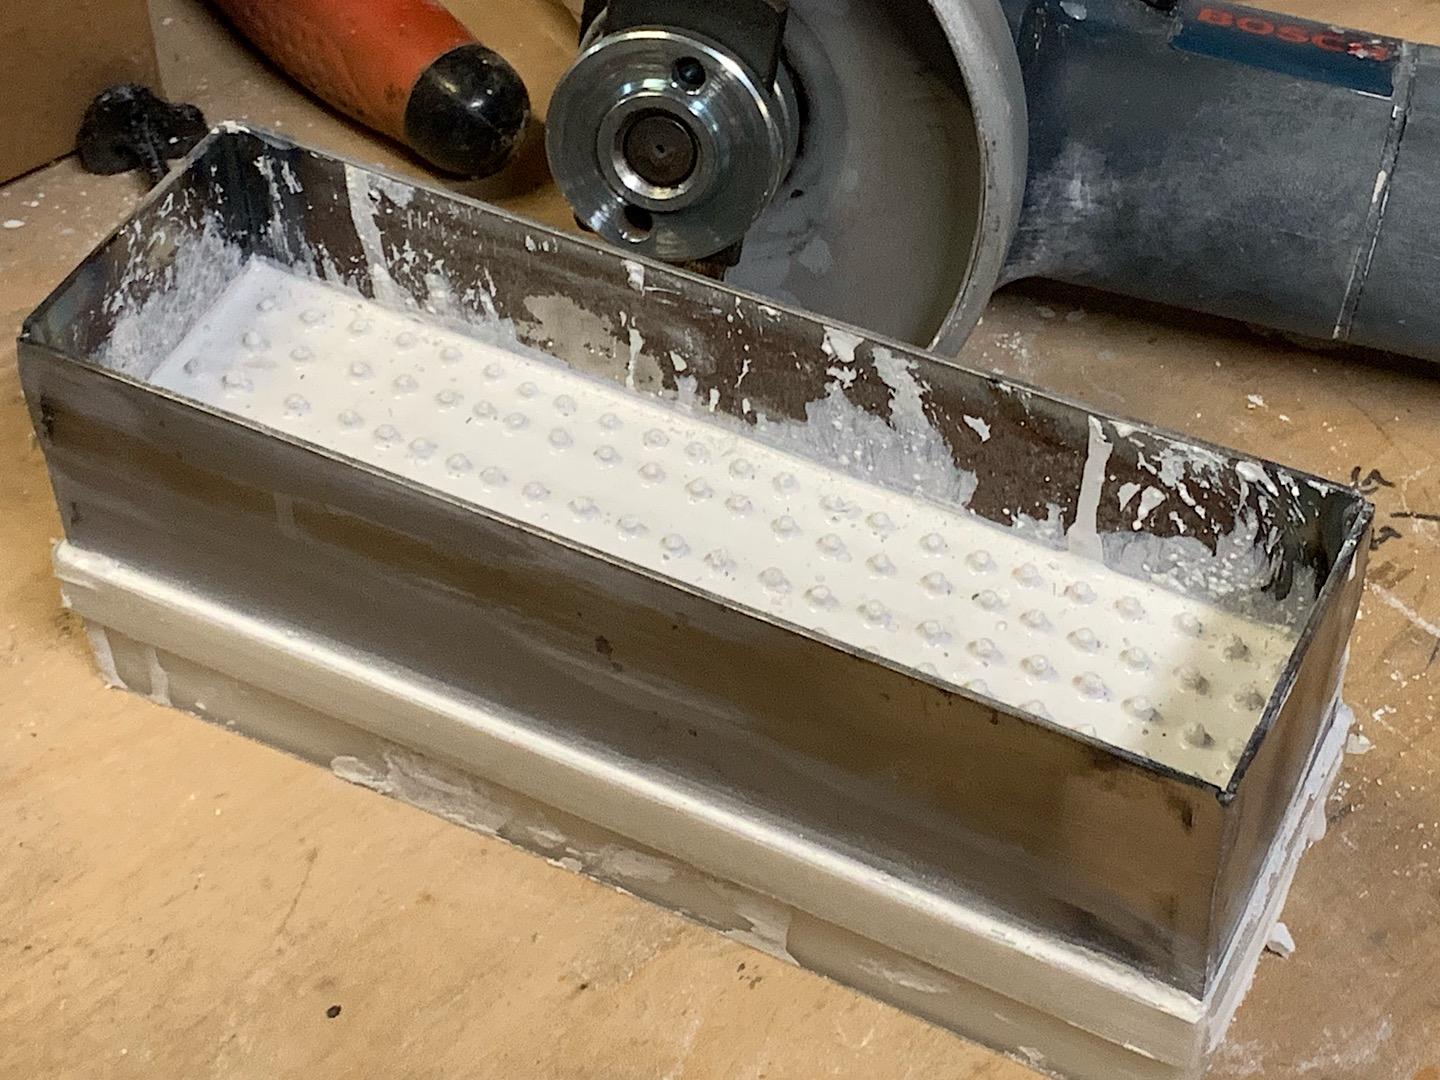
A thought on Kast-o-lite for those new to it. I did not appreciate before using it how crumbly and unable to support itself it is. I highly recommend carefully making forms for it before you start mixing the KOL. That way you will have ways to support it and define the surfaces you want. Posterboard seems to be sufficiently strong to make a form; I just wish I would have had a full form ready to shape and hold the KOL. It turned out okay after a couple iterations of patching but I have only fired it once and don't know long term how it will fare.
-
It depends on the model of tip. I use the 11- or 11T- tips, which are M6. I believe the 14- or 14T- tips that Mikey has recommended are 1/4-28. For me the M6 was perfect to directly thread the brass tube I am using for an accelerator, which is also the right size to solder into a drilled 1/8 NPT plug.
-
Naturally Aspirated Ribbon Burner. Photo heavy.
jwmelvin replied to Frosty's topic in Ribbon Burners
I was about to get my forge working with my single burner (is that a "jet burner"?) and use it to burn out the PLA core for my ribbon burner: I think it came out pretty clean; I'll update as I make a plenum to feed it.
-
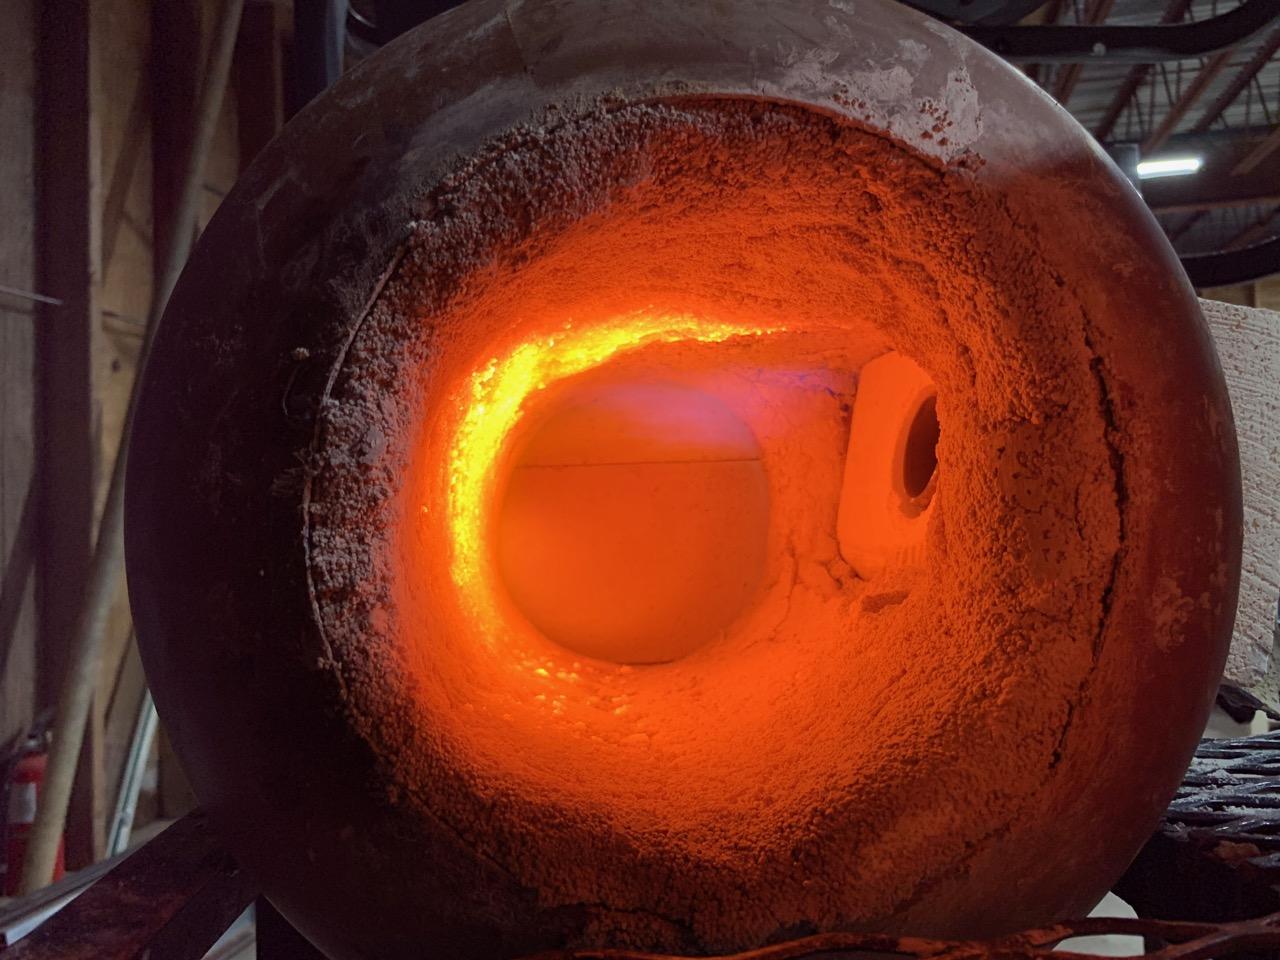
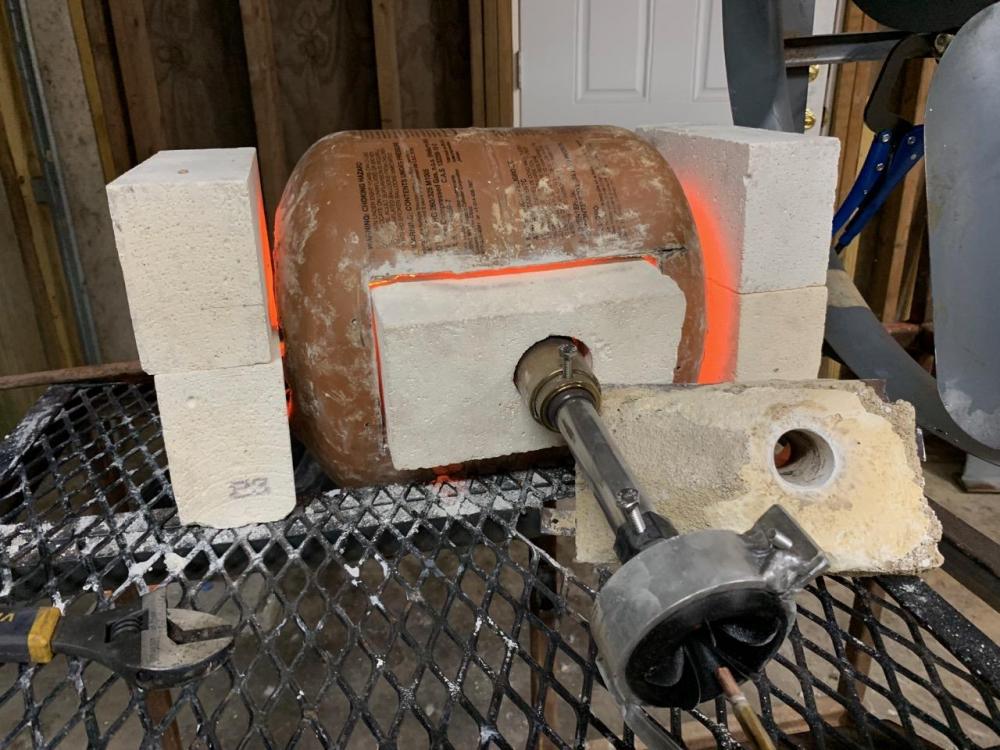
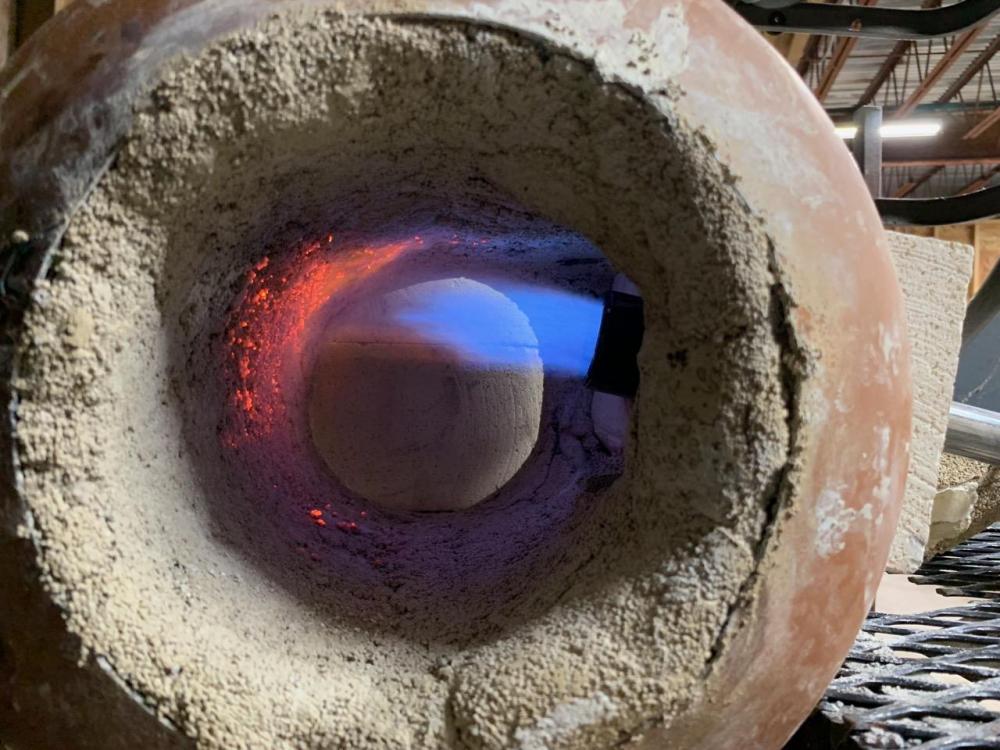
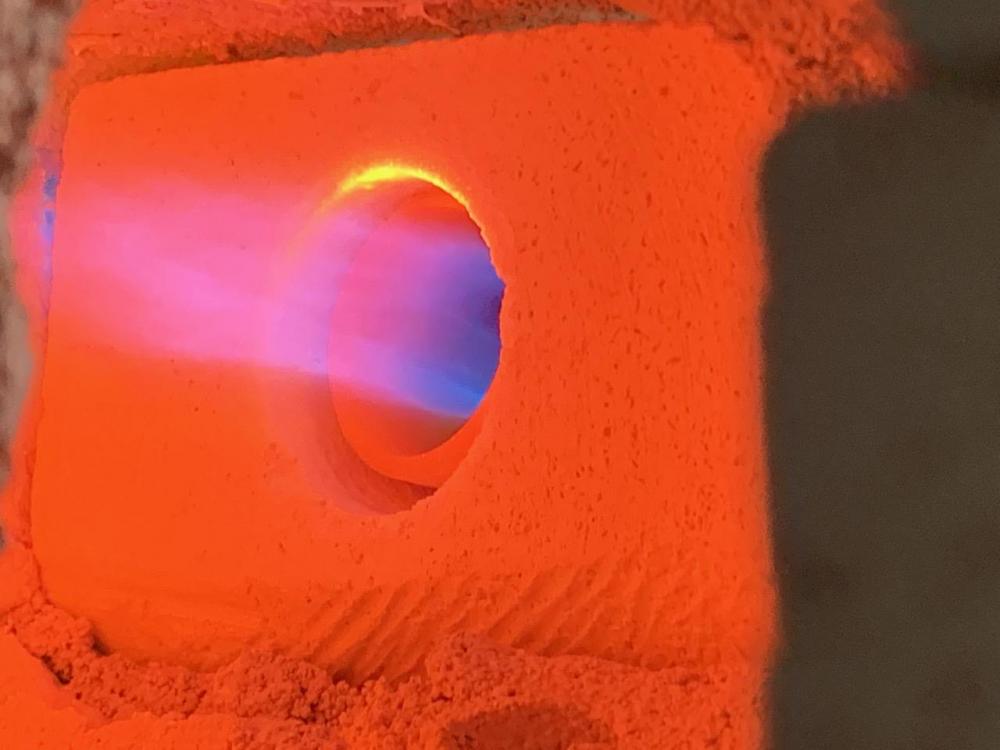
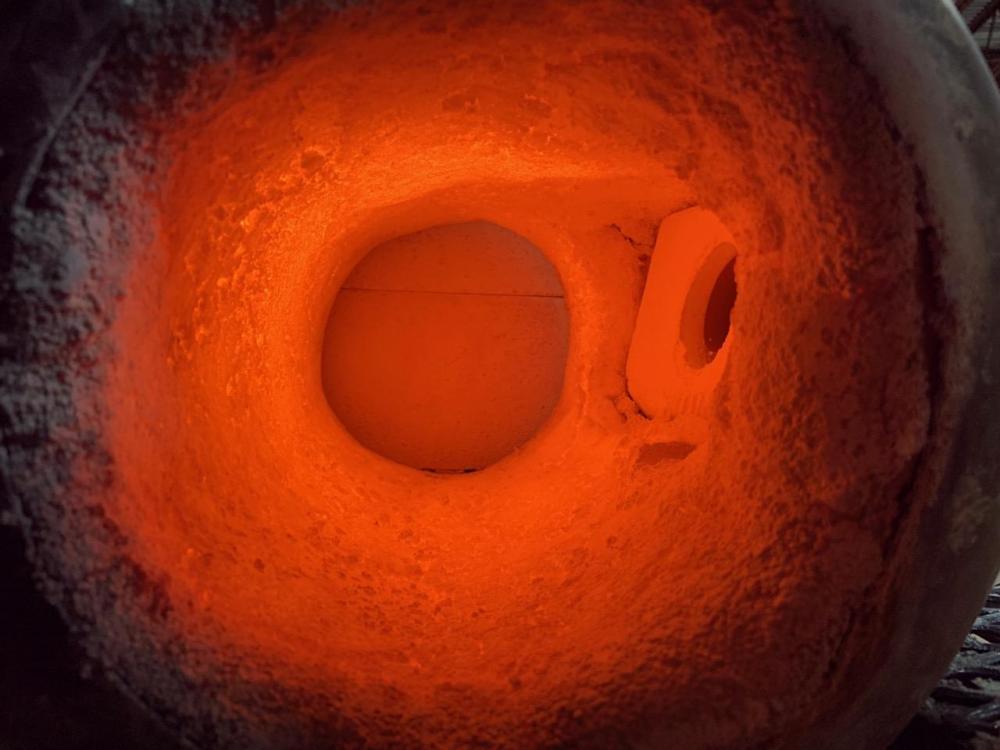
Over the past couple days I have added KOL patches to some areas I didn't like in the initial attempt. KOL, once set overnight, is pretty crumbly. I was careful as I went over it, but a couple sections were too thin and came off. I mixed a couple batches of patch, partially because I wanted to know how well it would adhere to the set-but-unfired refractory. For the second patch batch, I mixed the KOL quite on the wet side. Today I baked the forge in the oven, ramping up to 500 ºF over five hours. I tried to fire it with the refractory nozzle I cast, but it was too little expansion and the flame wouldn't stay lit. I had read that one doesn't really need a flame-retention nozzle once in the forge but I couldn't get the flame to stay lit. So I shaped an IFB to fit the entry port and drilled a hole in it for the 1.5" stainless-pipe nozzle I have been using in free air. That worked well: I adjusted the nozzle so the flame front was around the mouth of the nozzle and let the forge heat up for a while at about 5 psi. It seems good to me: Sometimes the fame front detached from the nozzle but it never went out: After a holding temp for a while, I increased to 10 psi and it got a lot hotter: Then I turned the burner off and the color of the KOL lining seems to indicate that the temperature distribution is reasonable: I put the ribbon-burner casting in on a tray to let the PLA core burn out, which it did nicely running as low a pressure as I could: So now I have to finish making the plenum for the ribbon burner, then I can test that. Next time I will try to hook up the thermocouple too, as it seemed to work well to cast a port through the refractory for the thermocouple sheath. Pretty soon I will coat the inside with Plistix 900F. I think there is no reason to wait for that now that I've fired the KOL.


-
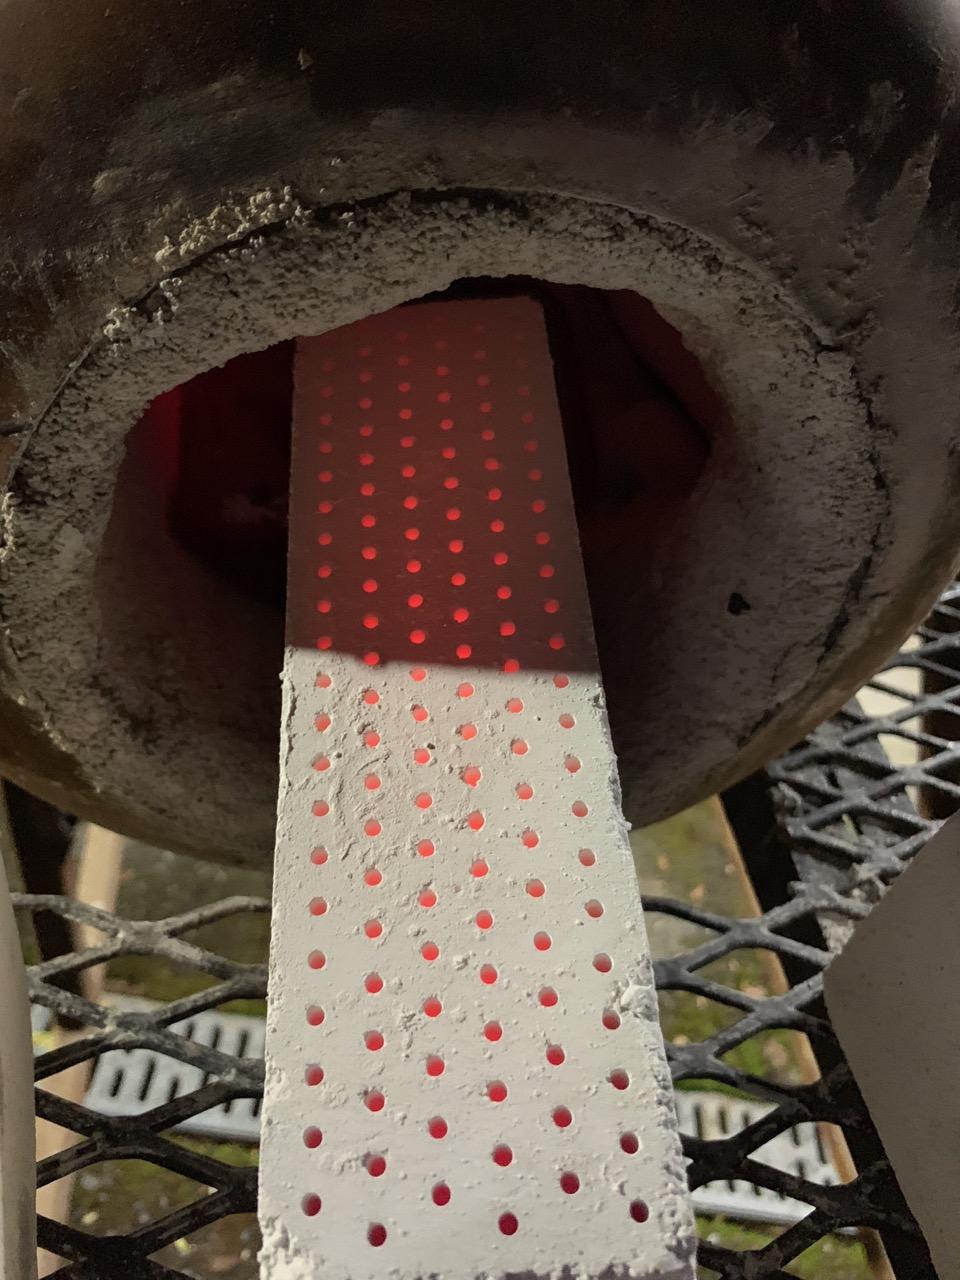
Based on Dan R’s comment to an earlier post where I showed a mold core with flared outlets, I redesigned with straight 3 mm outlets for the nozzle I just cast. I haven’t tried it yet but will report once I do.
-
I’m interested to hear a flame analysis from someone who knows. The video makes the flame look rich to me, but better at high pressures. Have you optimized the axial position of the gas jet? It may be that you are a bit close to the mouth of the funnel. Hard to see from the picture. I slid the jet back and forth while running to get a sense of where it worked best. I like your mechanical arrangement, thank you for sharing.
-
Naturally Aspirated Ribbon Burner. Photo heavy.
jwmelvin replied to Frosty's topic in Ribbon Burners
I’ve been talking with my aerodynamicist brother about the best way to expand the flow from the mixing tube to the ribbon block to get even pressure distribution at the block. We will see how it works out. -
Naturally Aspirated Ribbon Burner. Photo heavy.
jwmelvin replied to Frosty's topic in Ribbon Burners
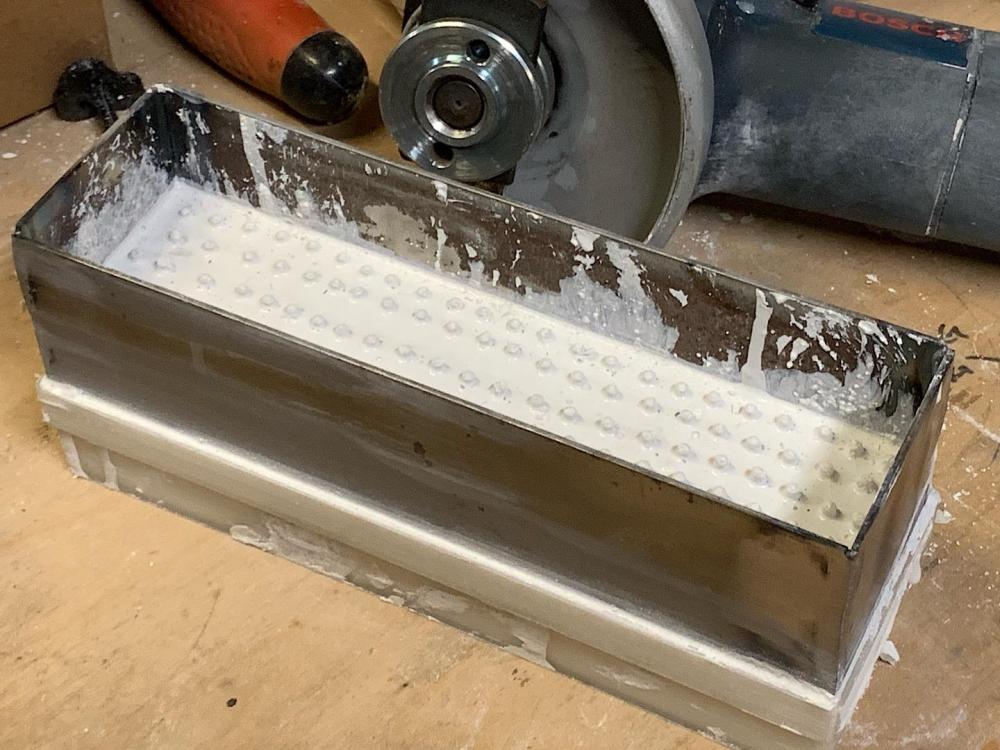
I attempted my first casting. I printed a new core because I wanted to include the outer mold along with it, with a ledge to support the steel frame: I’m a bit careless and used a heat gun to quickly clean up the stringing that the 3d printed left behind but it softened the core pins and they got a bit wonky. I straightened them as much as possible but couldn’t bear to repeat the 20+ hour print. To cast, I used 3 pints of Wayne Coe’s ribbon-burner refractory #2. I started to tamp it between the core pins but then I tried vibrating and it seemed to work perfectly. As soon as I vibrated, the refractory turned liquid and filled the mold with a level top; after about another 30-60 seconds, the little bubbles stopped, so I think it was pretty effective. I used an angle grinder with a small piece of metal drilled offset to create the vibration. I’m still working on getting the forge ready, which I will need to burn out the core.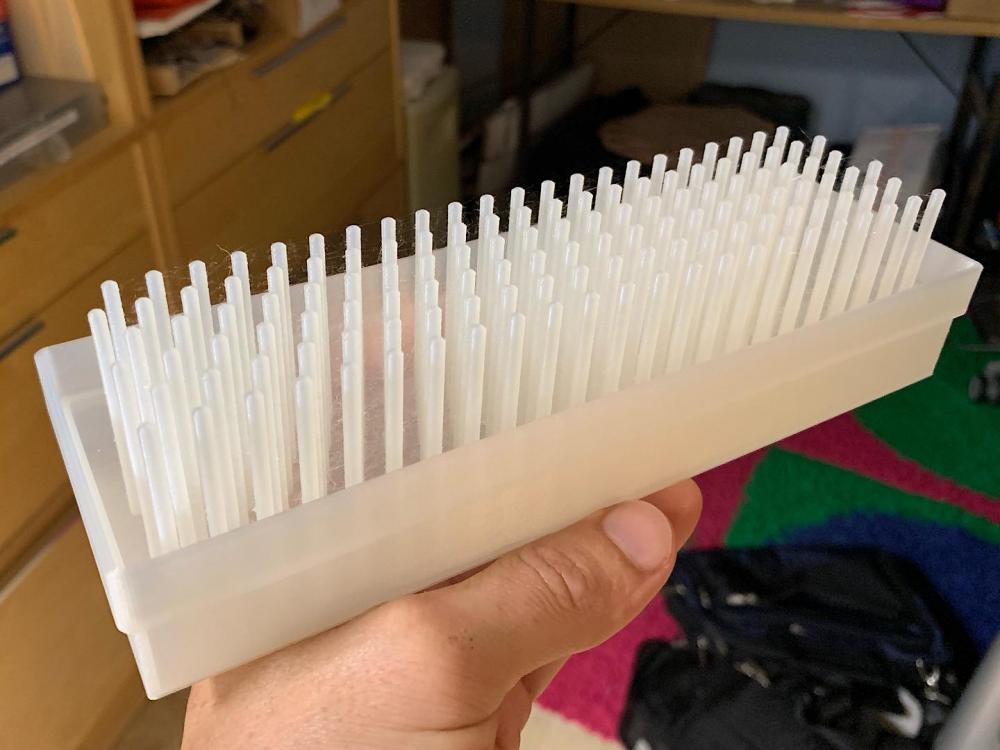
-
Seems like a good plan to me. Just make a way to mount the jet tip so you can center it in the funnel and adjust its axial position. The air induction isn’t as sensitive to axial position as I expected.
-
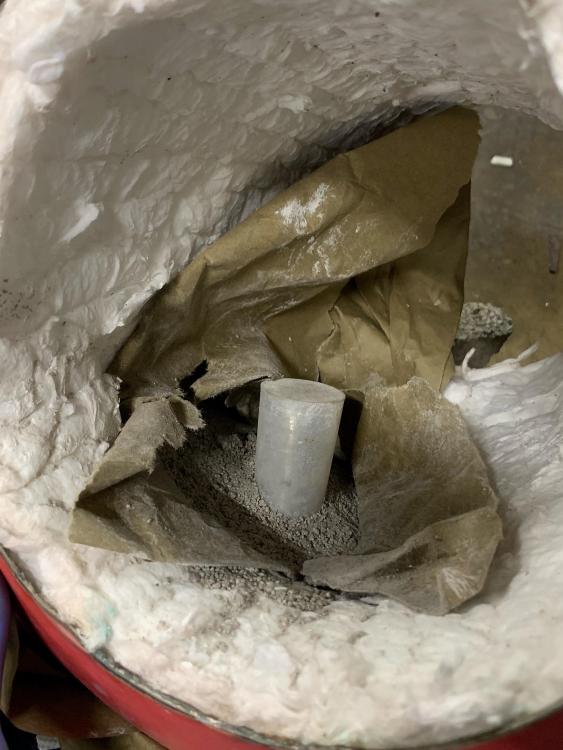
Yes it’s in a plastic garbage bag so should be pretty high humidity. The contents were pretty wet. Linoleum is a good idea. I am hoping I can burn my poster board away so I’m not too worried about it sticking. I’m excited to take the next step but it sounds like a day or two of sitting around will only help it. Regardless, I know more for next time. I hear you about the nature of KOL. That’s why I’m glad I have another material to try for my ribbon-burner block. (I’m printing a new mold for that right now.)
-
Thanks Frosty. It did seem easier to work with more water (my first batch) but then I got concerned I would ruin everything by overdoing it so went with 18% hydration. I am still hopeful that it will turn out okay. I will try to fire it up in the next few days but have a busy weekend ahead with the family.
-
More Efficient Threading
jwmelvin replied to Nathaniel Lee Winkler's topic in Drills, Post drills, Mag drills, etc
Blind holes are tough. What kind of tap are you using? What size hole are you using? I'd try a #27 or maybe even #26 drill. What taper tap? Maybe start with a plug tap then go back in with a -
Has it been tried: Aircrete Refractory
jwmelvin replied to Don Lyons's topic in Insulation and Refractories
It's kind of amazing how many refractory products HWI makes. How did you pick the HPV-ESX? I suppose thermal-shock resistance would be good for a nozzle especially if used to modulate forge temperature by alternating high-low outputs. For the foam, do you mix the F.M.-160 with water to make a foam and then mix that in, or do you foam the water used to hydrate the refractory (I suspect the latter)? Is the foam stable enough to mix with the hydrated refractory and not collapse? I'd be interested in hearing more about your technique. It's a bit like bubble alumina or even mixing with another void-leaving substance. It sure seems like OP is talking about using a proper refractory -- HWI's HPV-ESX: HPV®-ESX CASTABLE: Designed to be used for port blocks on carbon anode bake furnaces that are exposed to thermal cycling, HPV-ESX CASTABLE is a fused silica based castable possessing high strength and excellent abrasion resistance. I think casting a burner block from it is the only way to really test it. -
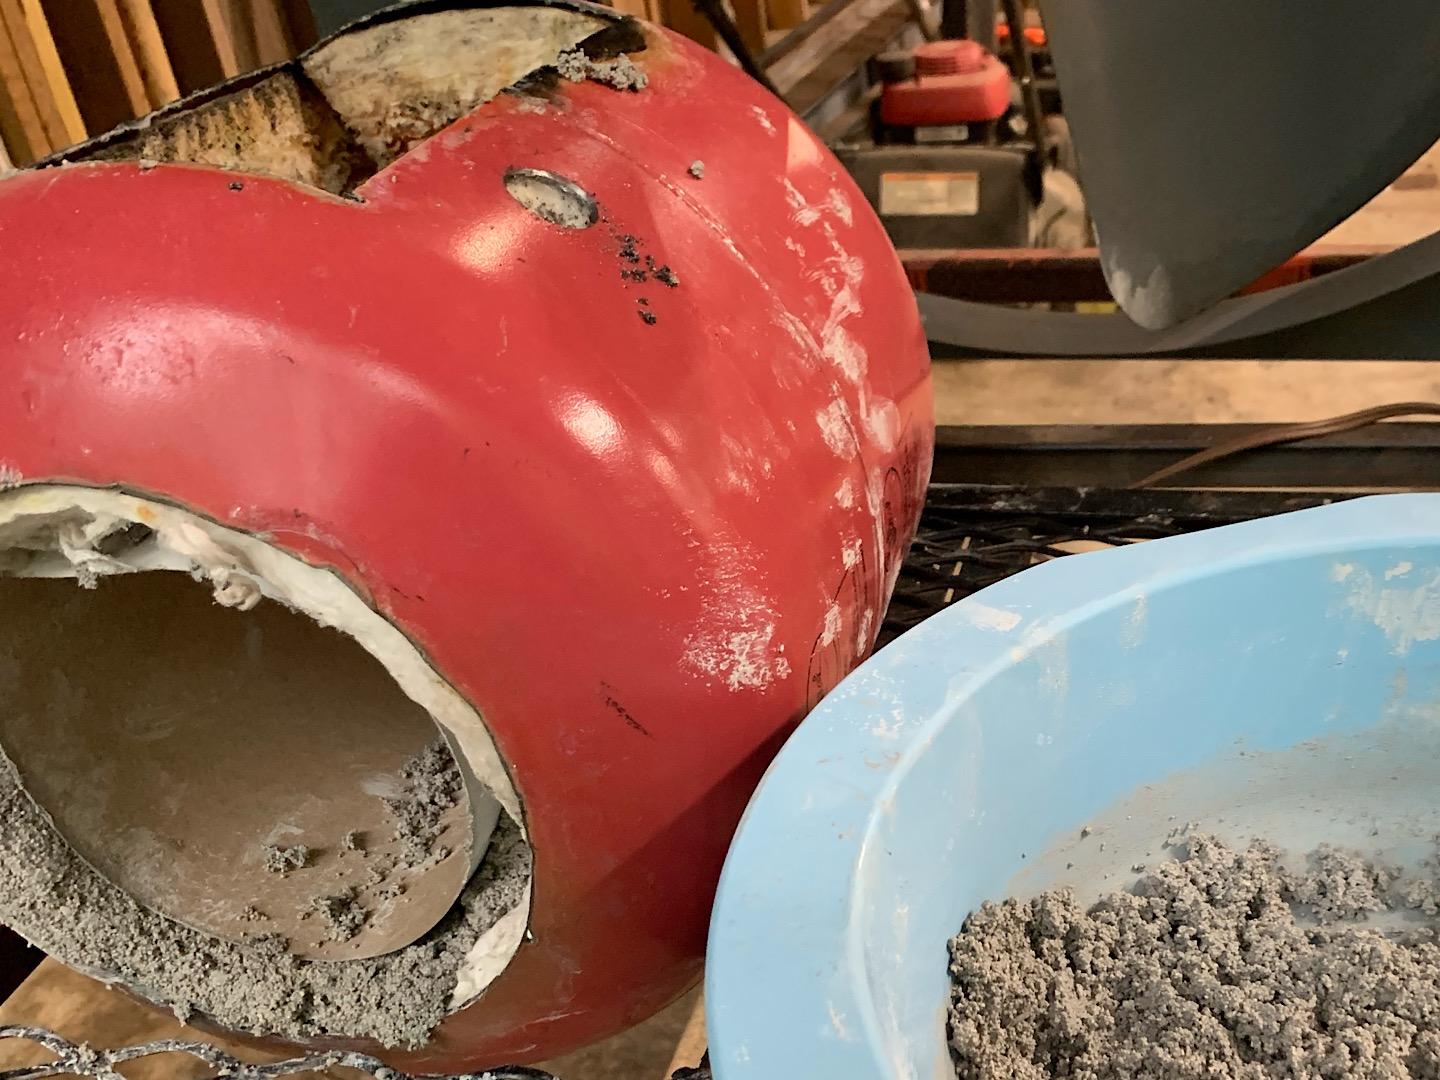
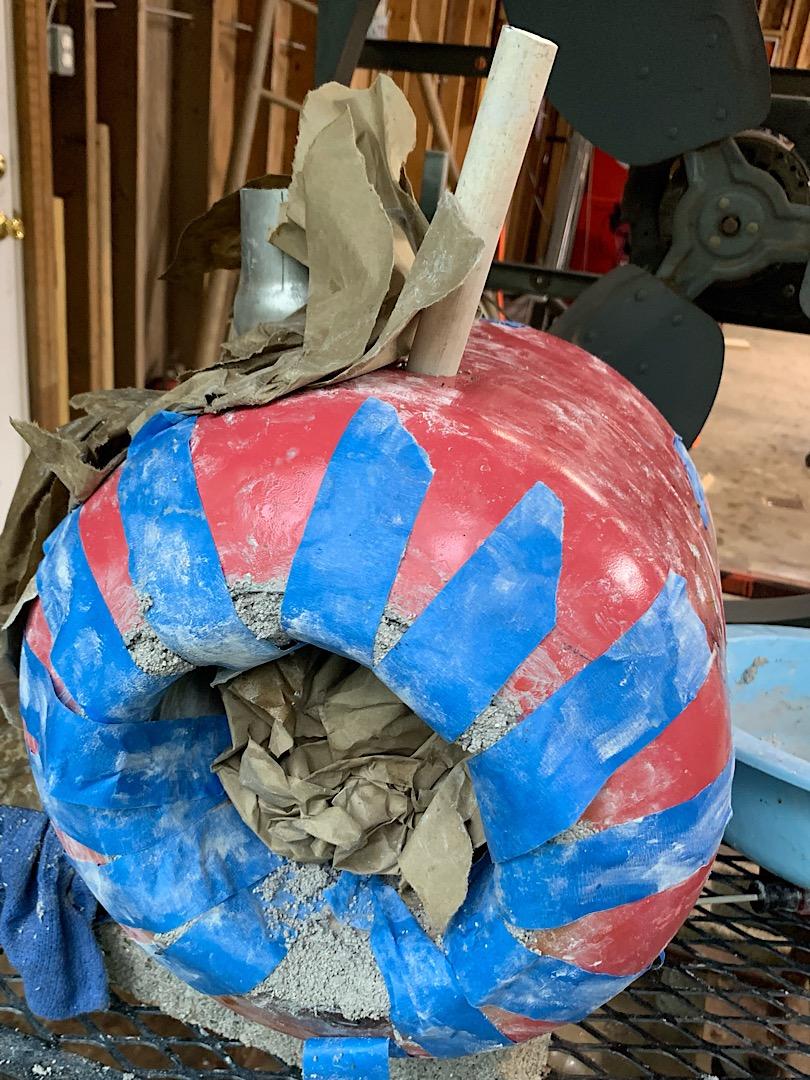
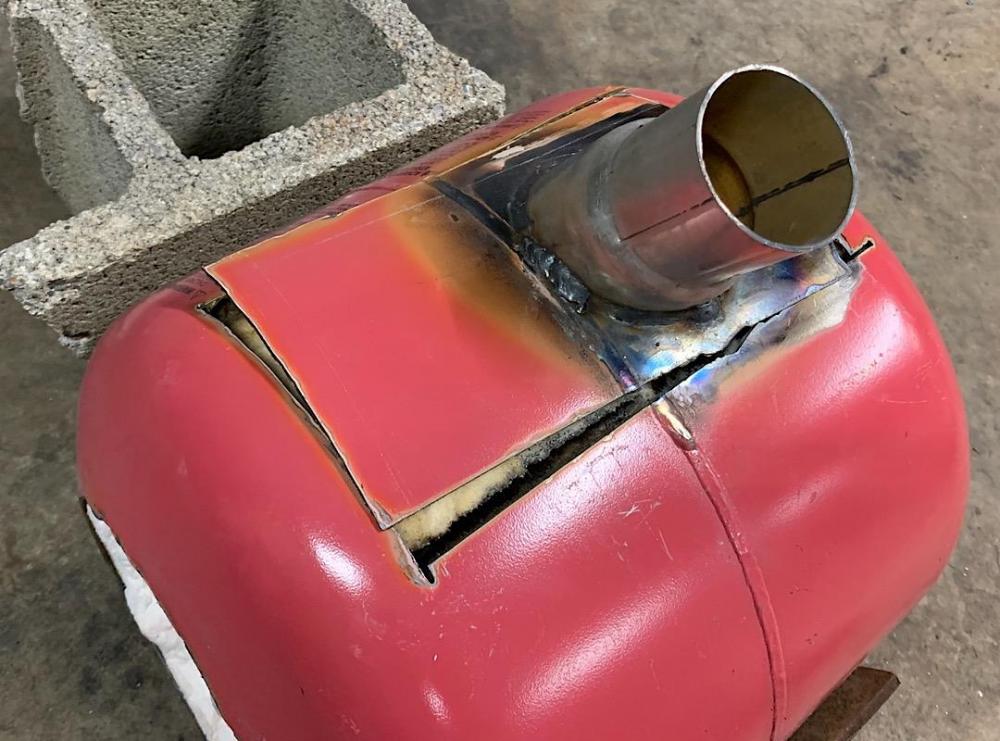
I had a go at forming a refractory lining for the forge from KOL30. It was pretty dry and difficult to form into a uniform shell. I used poster board inside to support the inner surface, and stuffed that with crinkled paper. Around the openings I applied blue tape, which had a hard time sticking to the damp poster board, but helped quite a bit to get the full opening supported. I added a little refractory to the nozzle I had earlier cut out and cast separately, and then with paper between the nozzle and forge-body refractory, inserted the nozzle unit into its opening. My plan is that I can later remove the nozzle unit and replace it with the ribbon burner. The whole assembly is now wrapped in a garbage bag to set.


-
What about mounting a bench vise on a post to the ground? Still no good just due to differences in the vise bodies themselves? (I’ve been wondering the same thing as OP)
-
Yes, eBay is where I went. The thermocouple I found by searching for "kiln thermocouple" and the listing is titled "NEW High Temperature Type K Thermocouple Core Ceramic Kiln Probe 2372°F". It is a K-type thermocouple with ceramic insulators and a ceramic connecting block. I also bought a ceramic sheath to protect the thermocouple from the chemical environment (and I think the insulation will help average the temperature fluctuations). That item is a "High Temperature Protection Tube Sheath Kiln Thermocouple Ceramic 2372F" and has a 0.54" ID for the thermocouple (with its ceramic insulators) to slide in. I will make a port to secure the sheath adjacent to the burner, but on the upstream side of the circulation, so it should not get any direct flame. I figure especially the ceramic sheath is a fungible item so wasn't too careful about selecting it, or the thermocouple since that is easily replaced. My plan is a needle-valve controlled idle flow and a PWM-controlled solenoid opening the high gas flow.
-
I cut out the burner entry so I can make it changeable (for the ribbon burner later) and started casting a nozzle for the single burner to enter through an expansion. I formed the KOL around a PLA plug in the entry pipe so we’ll see how it turns out.
-
Good stuff, thanks for the encouragement. I will definitely update as things progress.
-
I just ordered a Holland 140. Best of both worlds hopefully, and I’m excited to start this new hobby... (and I do realize how much overkill it is)
-
Before I order one I may spend some more time checking scrapyards. Thanks.