

Fowllife
-
Posts
165 -
Joined
-
Last visited
Content Type
Profiles
Forums
Articles
Gallery
Downloads
Events
Everything posted by Fowllife
-
There is an older post just related to COVID, but nothing like what you are looking for. My wife is the CNO at a critical access hospital in southern Ohio. They are currently getting hit pretty hard down there. While only about 85% full right now they are at a pretty serious staffing level due to employees testing positive. I asked her your question to try to get you a better answer. Her reply was food is always appreciated, also caffeine and chocolate. I think I would try to shy away from home baked goods right now and try to stay with something store bought and or individually wrapped. When my wife has picked up some night shift spots she has swing through the drive through and grabbedsome tacos or sandwiches to take to her nurses and they have really appreciated it. If you would like to forge something I’m sure a some small heart key chains would also be appreciated. Sending something with your neighbor for her and her co-workers would be the easiest as the proper channels might be hard to find. If you would just like to make a gesture I’m sure a hand made sign at the end of your or her driveway would warm her heart as well. As a spouse of someone taking the risk and putting in the time I also appreciate your thoughts for them. The last 9 months has not been easy for a lot of people in health care. In a lot of rural areas the pandemic started with massive layoffs and hours being cut. Now, if they are in an area with high case counts they are being overworked as long as they are healthy. Seeing co-worker after co-worker test positive is also pretty disheartening. My wife told me yesterday that she is on the schedule to work the next 12 days straight. Between her “regular” job and picking up shifts to cover most of those days will be 12+hr days. I’m afraid she is probably not alone in that position.
-
When I first got started I bought the same kit from Ken's. The were literally the first things I made. They turned out a little crude but they work just fine and I still use them all the time. I think they are defiantly enough of a cost saving that if you are on a budget are worth it. Then I bought a used set of wolf jaw's and I wished I would have done that from the start.
-
Christmas 2020 is headed this way
Fowllife replied to Glenn's topic in Blacksmithing, General Discussion
Friendly reminder that Christmas is only 3 weeks away. Last years theme for me was bottle openers. This years theme is going to be a assortment of wall hooks. I have a decent start but still more work to go. -
What is flipping the cylinder 180 going to help? With this design the cylinder will always be retracting to apply pressure and not extending. Depending on your flows and pressures on both the high and low sides of the 2 stage that seems like too big of a pump for only a 5hp motor. I would step back and look at all the pieces of your press and analyze all of the pressures and flows from start to finish. Every piece has a rated pressure and flow, make sure they are within your design perimeters. There are a lot of resource online to help you work through all of your pressure & flow numbers along with expected speed and HP requirements. All of the details matter and are needed to find the answer. Accumulators are not that common over here in the US and most systems don't use them.
-
JLP Blacksmith Teaching Center.
Fowllife replied to jlpservicesinc's topic in Building, Designing a Shop
Frosty is trying to say he thinks using mesh is cutting corners. Unless your going to get a pump truck though it's hard to pull off rebar and set it placed right. Granted mesh also has the same placement issue. Regardless of the reinforcing type it needs to be in the middle of the slab. Your installation crew should have at least one person assigned to pulling the mesh up to mid slab as it's being poured. I would not used galvanized stock panels for reinforcing. Whoever is pouring should have access to mesh in sheets, 8' wide x 16-20' long. The two most common sizes in my area at least are 6x6 10/10 and 6x6 6/6. the first two number are the spacing (6"x6") and the second two numbers are the wire size (10ga and 6ga) If the supplier is progressive they may be using the newer metric designation of W1.4 and W2.9 respectively. If you can't find any sheets though I would use stock panels before I would use rolls. When they were talking about using heat they could have been talking about actual heat, or an accelerator. An accelerator essentially heat up the concrete and help drive our the moisture sooner which speeds the curing process. It's not a matter of it not setting as much as the crew doesn't want to be there until 2am waiting for it to set enough to finish. Unless someone screwed up bad at the match plant it will all set eventually. They should know what additives they want to use depending on pour size and what their crew can handle. If you are super worried just request a copy of the tickets along with any additives used and make sure they are clear if they use accelerators and you are not happy with the finish they will need to fix it, either by grinding or replacement. I have found a lot of people way overthink concrete floor pours in terms of thickness and reinforcement. Does a lot of the "extra" stuff help, sure, but it's not needed 98% of the time. When it is it's usually because they didn't do a good job with the base. The base is more important then what's in the slab. I should say that all of my knowledge on this subject comes from the company I work for. We do several hundred job a year and have poured millions of square feet of floors over they last 70 years. We have fine tuned what does and doesn't work and balanced that with what is cost effective. I'm not just a guy who has poured my own shop floor and that's it. Proper base and proper placement are the two most important things, if you need to rely on reinforcement you missed the mark on one of those two.....or you have really crappy soils and you should have built somewhere else. -
JLP Blacksmith Teaching Center.
Fowllife replied to jlpservicesinc's topic in Building, Designing a Shop
Branding Iron - I personally don't pour a whole lot of concrete anymore, but I'm sure your right on the vibrascreed. We have a couple at work I just haven't ever used one. Most of our concrete placement is sub'd out and placed with a laser screed. I'm not sure what kind of form you are revering to, but on that note construction joints should not really be tied together with rebar. Smooth dowels (one side grease ideally) should be used so the slabs can shrink as they cure and not produce and extra stress at the joint from the rebar not letting it slide. Jennifer - Typically we only use a 10 mil VB in office building or a medical setting 6 mil is what we use the vast majority of the time if we put one in. I hear a lot of people mention a high water table, but the only time I ever see any additional requirements from a soils engineer is when we are building on wetland/swamps. Remember also if you use a VB all seams and penetration need to be taped. I know I have mentioned before that I am not a fan of anything below slab, but a lot of extra caution needs to be taken with anything below slab if your water table is truly that high. The possibility of an epoxy floor would have more of an impact to me then water table. Make sure you know the epoxy manufacturers recommendations before you pour. Most will require a VB of some kind. Most will need to shot blast before installing and some are real picky on curing chemicals. There are quite a few that require a water cure. There are a lot of different types of chairs or stands for rebar/mesh support. If your going to hire it out I would leave it up to the contractor what they use. If they lay much concrete they have a preference and buy that type of stuff in bulk for hopefully a better price then you can. Commercially we almost always use mesh instead of rebar for floor slabs. As I said earlier, rebar at that wide of a spacing is only there to help with shrinkage cracking, not for reinforcing. Mesh does that same thing and is way easier to to install, which is why we almost always use it. If the contractor prefers to use mesh I would not rule it out. Some people may tell me I'm wrong on this, but I would like to see the proof. From what our engineers say there is no engineering data to back that up, until you get to a rebar size and spacing that qualifies as an actual reinforced slab. The same thing goes for a sand base under the slab. I sat through a ACI seminar a few years ago where the presenter discussed multiple case studies where a sand base caused problems with excessive curling and other slab issues. I'm not quite sure what sure what you are talking about for tying the front slab into the building. Can you draw me a sketch? Tying your foundation wall to your exterior slab is a good thing. A layer of rigid insulation (blue board) over a washed stone base can go a long way to reduce frost heave. Maybe some east coast guys can correct me, but HERE you always try to a washed stone base under a slab, and never sand. I personally like a 5" slab. In a lot of light application where 4" doesn't quite seem like enough but 6" seem like overkill it makes sense to me. -
JLP Blacksmith Teaching Center.
Fowllife replied to jlpservicesinc's topic in Building, Designing a Shop
To expand on what I said above. I get the wanting to do it yourself and saving some money. IF I were to do something like this myself here is how I would do it. I would cut the building into 1/3's lengthwise and do 3 different pours. Do both of the sides first and then come in and fill the center. This is assuming you can get a truck into the building (concrete trucks are 12'-6" high.) If you did it this way you may be able to do it with 3 people, but it would be back breaking work. Mag float and set your concrete to height at the expansion on the exterior wall, and at you form. The fill the center as you run the screed board across the areas you just set to grade with the mag float while someone pulls the excess concrete away from you with a come a long. Do this the whole length of the building 3-4' at a time. After you get a few feet in the 3rd person can drop back and start to run the bull float, and steel trowel the edges. This is way easier with front discharge trucks, which you may not have available on the east coast. If you wanted to try to work across the entire width of the building you could set grade pins to pour to in a 12'x12' grid or so. You need to be on the ball a lot more this way and it's way easier to mess up your grade. Essentially it's the same as the other way, pour a puddle of mud around your grade pin and set the height with your mag float and hammer the pin below the surface. Do this to all 4 pins making a square and then fill in between and screed across. It's easy for the edge of the screed board to dig in some and lose your grade. If you haven't run a screed board at all (sorry if you have) I find it easier to do a couple big pulls back to get the grade close, and then a final pass or two pulling back with side to side motion. The side to side motion helps work the stones down and level the cream out. Renting a power screed would also be a good idea if there are any locally. I have never used one because I can usually round up the manpower needed, or it's a smaller pour. Mind you, a 12-14' screed board is a load for an amateur and a rookie on the com a long makes it worse. You will also want to make sure you dowel all 3 slabs together with either smooth dowels or diamond dowels at 18-24" o.c. If you can't get a truck in you would need an extra person to run the power buggy to bring the concrete into the building. Having a grid of rebar also makes it problematic getting the concrete in the building either way. That's why most guys will use mesh instead, or use a pump truck if they have a grid of rebar. It may take all night to cure in these cool temperatures, but do NOT let them talk you into using an accelerator. The last thing you want is the concrete to start to get away from you because it's taking longer then you thought to get it laid. As far as tools, you would need a laser lever, mag float, bull float & handles, steel trowels, concrete saw, screed board (aluminum ones are nice and not to $$) trowel machine, sprayer for the curing, and possibly a power buggy. For materials you will need form pins, forms, curing, and you might want to put plastic up so you don't splash mud on your white liner. I would line up all of the equipment I needed and get it rented for a whole week. Get everything formed and ready for the first pour Monday morning. Set it up where you pour 1/3 Monday, the other 1/3 Weds. and the last third Friday. Modify the schedule as site & body condition dictate. 10-15 yards a day should be that hard on you as long as it's not a fight every day to get it down. After the first day you'll have a real good idea of how to schedule the rest. No way would I try the 30-45 yards the first day unless I had a GREAT crew lined up, which would probably need to be a Saturday as they would all work full time pouring concrete. -
JLP Blacksmith Teaching Center.
Fowllife replied to jlpservicesinc's topic in Building, Designing a Shop
That big of slab is not something you want to just jump into and try for the first time, unless your only pouring part of the building. If I were pouring the whole 40x60 I would want 5-6 experienced guys, or 3-4 really good guys. If you doors are not at least 14' high you would need more since the concrete truck would not be able to get in and you'll need someone on a power buggy. The base is the most important part of your slab. Proper slab design takes into consideration many different factors. "Here" we usually don't put a vapor barrier under the slab, and we never use sand. The only time we use a vapor barrier is in office building that get floor finished, non of the warehouses or factories we do receive a VB. The reason why is it increases the slab curling (especially at control joints) because it promotes uneven curing of the slab. Typically we use 6-8" of 304's (3/4"-fines) with 2-4" of 57's (washed 3/4") on top. Your saw cut pattern for you control joints will depend on your slab thickness. There is a ratio for thickness and maximum spacing, along with a length/width ratio. Generally 12'x12' is about the maximum spacing, ideally with a soft cut or early entry saw as soon as possible and not produce any raveling of the joint. Also make sure you spray a good coat of curing/cure & seal on as soon as it's finished. Personally I hate a burned in finish as I think they are too slick. Even though it's a little harder to clean I like a little more texture to the finish so your not falling on your face with wet shoes. As for the rebar, not enough info to give you any advice. Whatever you do will more then likely just be for differential shrinkage cracking and not a true reinforced slab. #4 rebar @ 24' o.c. each way will do that, as will welded wire mesh at mid slab. Also, make sure you use expansion joint at the perimeter against your poured wall, ideally 1/2" thick and the depth of your slab. I would recommend hiring this part out. Any decent professional will know all of this and will know of any slight deviations that work better in your area. It can be done and look good, and it can also be messed up easily. If you hire it out and your talking to a contractor and mention the ACI (American Concrete Institute) and they don't know what that is call somebody else..... -
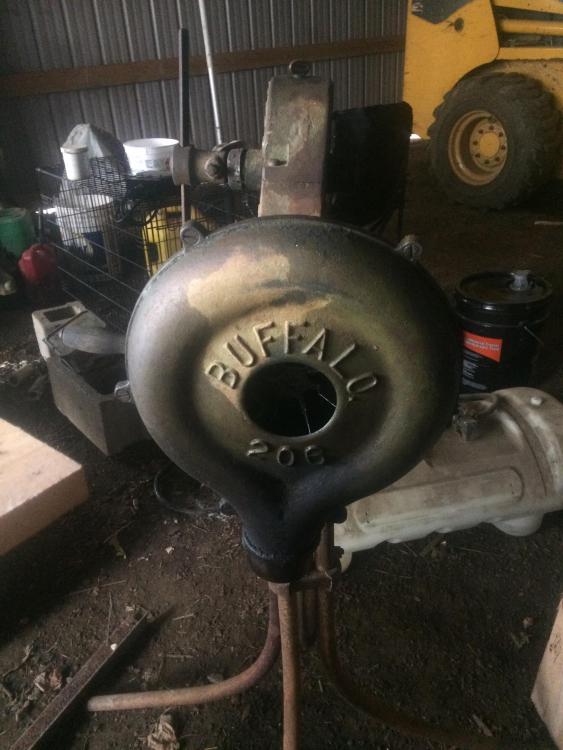
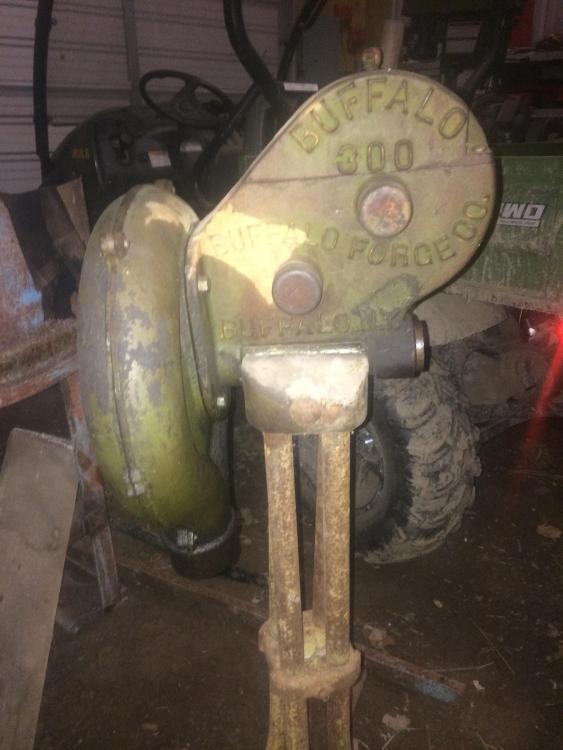
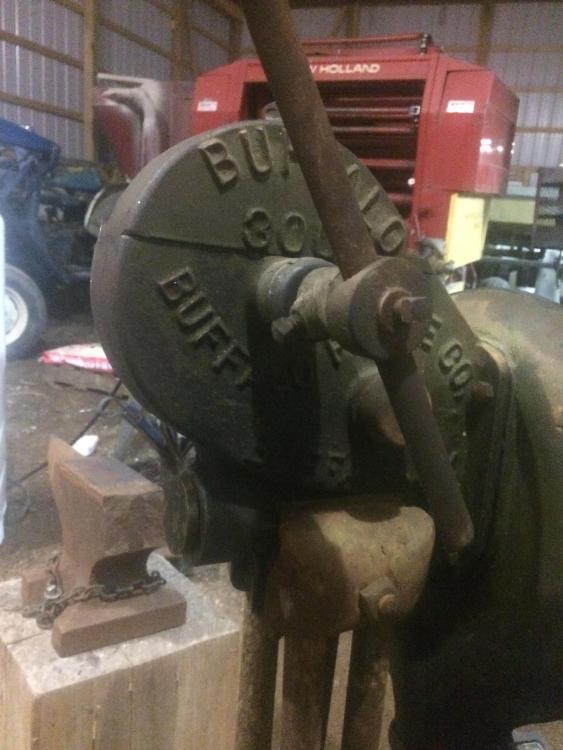
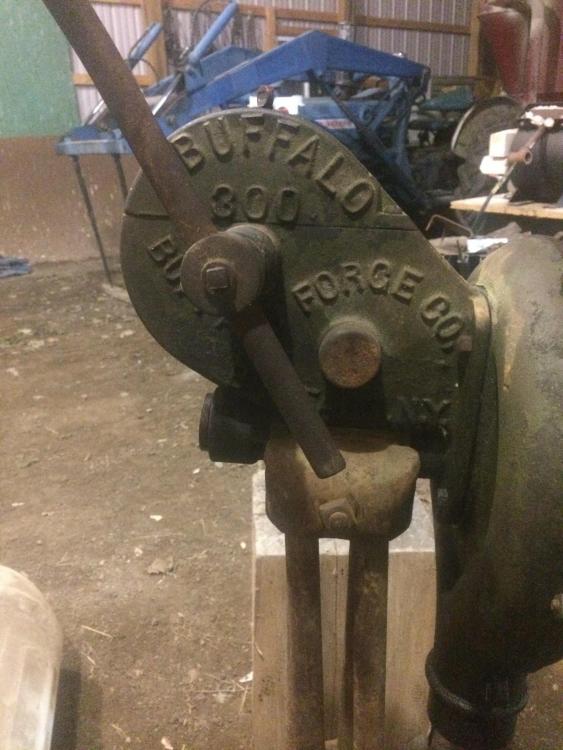
It looks a lot like my Buffalo 300. I seem to see very little info on the 300 as most are 200 or 400’s. It also seem odd to me that the front of my blower says 200, so maybe mine is a mash up.
-
That was my first thought, using a shoulder length glove is way better then needing one and not having it.....some smells take a while to wear off. I'll always remember the very first calf out of our first group of cows. It was a hard pull of a large bull calf, a lot of lessons learned that day. The fun isn't just limited to larger animals though. My wife has been elbow deep delivering a group of piglets before. Luckily she's a little lady with little hands, some jobs are just more meant for her.
-
JLP Blacksmith Teaching Center.
Fowllife replied to jlpservicesinc's topic in Building, Designing a Shop
Do you plans actually call for your bolts to be torqued to a certain spec? We erect quite a few of these types of building every year in a commercial setting and very rarely have to torque to spec. I'm curious if they require that since we have never installed a Bison building. Almost all of our building require a post erection inspections and 99% of them only require a snug tight bolt connection. It looks like you are using a liner system on the roof and wall, those systems are a pain to install. There is a lot of special detailing involved to tighten everything up right. You may need another angle at the wall/roof intersection that they may not have provided. Also if it has a raised ridge cap make sure you stuff it full of insulation. That may sound silly but you would be amazed at the amount of condensation that can form in that ridge cap. If you are missing pieces or stuff is fab's wrong please get a hold of the company. They will make it right and send you what you need. Granted it's a different company but we are routinely reimbursed to refab if something is wrong. -
Share something the world doesn't know about your job
Fowllife replied to rockstar.esq's topic in Everything Else
To tie into to current part of this conversation, I am an architectural designer by trade. I create preliminary, bid, and construction drawings for commercial and industrial projects (yeah, I'm the guy Rockstar is usually complaining about making poor quality drawings, although I don't usually do electrical/mechanical drawings).It could be something as small as adding a new door to a warehouse or a small office renovation, or as large as a multi million dollar office building or 100k + square foot warehouse.The part of my job most people don't know if a lot of what I do is code research. The main building code references hundreds of other code books for specific life safety issues and hazards, like explosion proof areas as mentioned above. I need to know the main building & ADA code, as well as be familiar with plumbing, mechanical, and electrical codes and be able to reference any NFPA codes that may pertain to he project I'm working on. There are multiple categories for explosion proof construction with varying requirements depending on the hazard. I have only worked on a couple, all had explosion panels that were designed to blow out in the chance of an explosion. By having the panels blow out the energy would be released and the integrity of the main structure would be kept intact by sacrificing parts of the exterior walls. I do not enjoy working on hazardous projects as there is a lot of research and back and forth between MSDS sheets, NFPA codes, and building codes and they do not use the same standards. -
Frustrated with progress...
Fowllife replied to Dewnmoutain's topic in Blacksmithing, General Discussion
These guys are right, it's somewhat of a good thing to always expect more or want to do better. I've been woodworking for 25 years and I have never made a project I can't find flaws in. The average person may not see them, but I know they are there. The day I feel I made a perfect project will never happen. I've only been smithing for a little over a year and haven't gotten a lot of time to devote to the craft yet. I have one of the first pieces of steel that I worked on at an open forge, and several of my earlier "projects" hanging in the shop. When I look at them compared to what I can do now it's obvious to see I am progressing and improving. Do you have some old pieces handy you could look at and compare? Maybe your progress is better then you think. Are there any intermediate blacksmith classes available in your area? Are there any local blacksmith groups you could join? Maybe your friends just aren't explaining the process to you in a way that you understand, not everyone is good at teaching some are just good at doing. -
Unfortunately your dealing with one of the problems of "re-purposing" equipment. You don't really know exactly what you have for some of the pieces of your system. There is also a chance that you control valve is not rated for the flow rate you are at now (unless you have already checked that) As I have mentioned earlier, there are websites and calculations to figure out every piece of you system. I strongly suggest you take a few hours to find those calculations and analyse every piece of your current system. With the current pump flow and pressure analyse all of your pipe sizes and flow rates of the whole system, and the return pressure. Make sure every piece will work for your flow rate and your pressure. Your system was originally a low volume system so there may be one fitting too small, or one port too small that is causing your issue. With all of the changes you have made nobody really knows exactly what you have but you.
-
I know I should just keep out of this but.....What's the Max operating pressure for your filter assembly? I'm pretty sure that's going to end up being less then the working pressure of sch 40 pipe.....manufactured reservoir tanks have a breather (no pressure) and suction line is rated for what, 250 PSI? Most filter assemblies are Max 250 PSI?.....I'm just saying.....There are calculation to figure your return pressure depending on pipe sizing and flow rates.....My return is 3000 PSI hose (it came on it), and my filter assembly is only rated 250 PSI max......but I don't know what I'm talking about with hydraulics..... Edit - In looking at your earlier post, you answered my question. The 15 PSI BYPASS means anything under that pressure does not go through the filter, the 250 PSI is the MAX rated pressure......unless I'm misunderstanding what you said.
-
Yes, I am 100% sure they are filters, I have replaced them several times. I have never heard of a hydraulic fluid dryer on any agricultural equipment. I also don’t really agree with “the hotter the better” Hot fluid is rarely a good thing, operating temperature yes, hot no. I think the filter change interval is 100-300 hours per the manual depending on which tractor, or the skid loader I look at, and they are all between the tank and the pump. Heck, my little Ford tractor doesn’t even have a filter and the pump on that lasted 4500 hours before I had to rebuild. My old skid loader didn’t have a filter either (it was ancient though). My point is though, a filter somewhere on the return side is better then nothing, and it’s usually easier between the tank and pump. Change the filter after a few hours and as long as your hoses are not coming apart on the inside you should be fine for a LONG time. A little common sense goes a long ways. Also, my filter assembly is rated for about twice my pump flow so even with a little obstruction l should not starve the pump. As I’ve though, I’m not an “expert”, I just know what has worked for the major manufacturers of the equipment I currently own and maintain.
-
John - Yes, that's the one I got from HGR. I just need to do a little clean up on things and figure out the die holder and make some dies. Frosty - I cant take credit for the build. John noticed this one at HGR and I bought it, minus the pump, motor & tank. We will have to agree to disagree on the reservoir tank thing, which is fine. I'm guessing the fluid capacity of the system as is is probably only 1/2 gallon-1 gallon of fluid. With a 13 gpm pump that's 15-20 fluid cycles per minute. that just feel like a lot to me. Mr Griffin - Yes, technically you are correct. The plumbing was easier the way I did it, and in a closed system like this I'm not too worried. A pressure gauge as Jennifer mentions would solve this issue. I took a calculated risk, in an open system with more contamination potential I may install they filter before the tank. Come to think of it, I'm pretty sure even my farm tractors have the filters between the tank and the pump. They do have sensors with dumby lights in the cab though.
-
While I have not had much time in the forge lately I have been keeping my eye out for useful stuff. It seems like more stuff pops in in the southern part of the state then in the northern where I live. Since my lovely wife lives in the southern part I convinced her to drag home a couple of hand crank blowers for me. The first is a I think a Lancaster 140 which was smaller then I was looking for, and the second is a Buffalo 300. The Buffalo should work nicely for the water cooler coal forge I’m in the process of building.
-
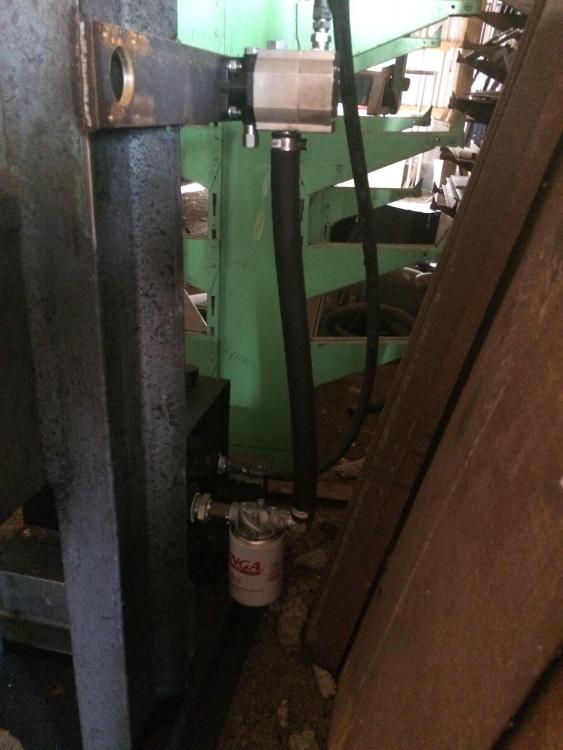
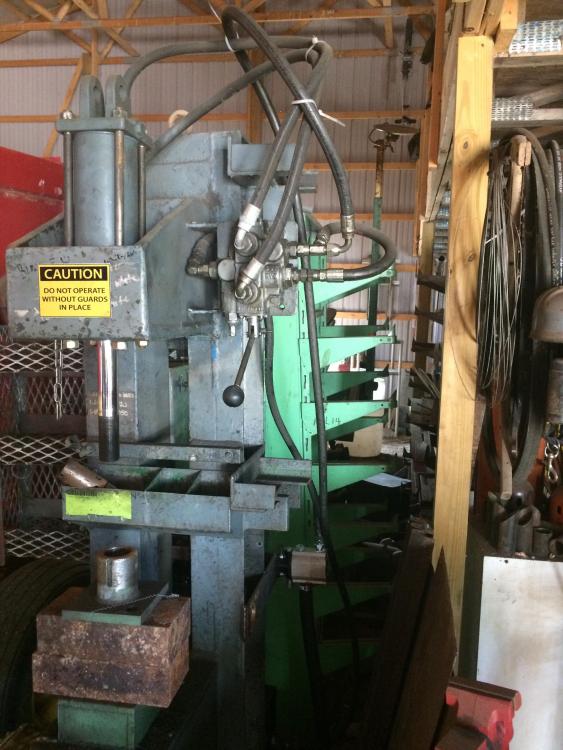
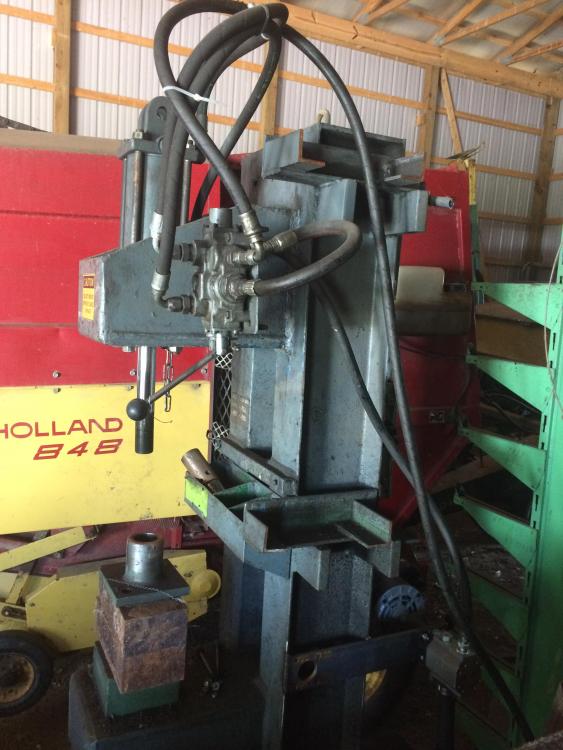
No. I ordered the tank, pump, filter, and all the fittings I needs at the same time from Surplus Center. I think I may have seen them locally at either Rural King or TSC, but I might be wrong. While I am not an “expert” in hydraulics, following are a couple picture of my setup for reference. As I already said, I have not really used it yet as it’s not done. It’s fast and will squish the crap out of a 2x4, but I don’t know how it will do on hot steel. The pictures might not be very clear, so the basic are - pressure line from the pump to the control valve, one line to each end of cylinder. Bypass line looped at exit of control valve with a tee for the return line. Return line runs to reservoir, then from reservoir to filter assembly and back to pump.
-
I went with matching the high pressure side and put on a 3 gallon tank. It's fast, but I haven't had the time to finish the rest and see how it will perform.
-
The other issue you may run into is lack of reservoir capacity for your now larger pump flow. If I'm not mistaken you have a small 1 Qt ? reservoir tank on your setup, with a 13 gpm pump you may end up starving the pump and creating too much pressure on the return side. I think I mentioned in one of my PM's awhile back that the old rule of thumb is 1 gallon of reservoir capacity for each GPM of pump flow (my tractors all seem to be about 1.5x flow rate, 18 gpm @ 25 gal & 22 gpm @ 35 gal tank). My pump and motor are the same as yours are right now, but I have a 3 gallon tank with a filter between the tank and the pump return port. As said above, filter between the reservoir tank and the pump return. The pump you have only has a 1/2" return with makes me wonder if it setup with a low pressure return? Most pump that size will have a 1" return port (low pressure barb/hose clamp fitting.) I would think you will end up building some pressure with that small of a return line, maybe this wont be a problem though. I would lean more towards a bad pump, hopefully.
-
Building a new space - any advice welcomed
Fowllife replied to Goods's topic in Building, Designing a Shop
I would also question whether a 6" slab would be worth it, but it is only an extra 2 1/2 yards of concrete so if it makes you feel better....Having a good base and proper install is way more important. I'm not totally following what you are trying to cast into the floor. Typically I'm never a fan of casting any chase ways or power outlets into the floor. There is way to much risk of having them in the wrong spot, or having them get in the way in the future. It's just more trouble then it's worth and they usually get filled in later or just not used. Commercially it's rarely done, power, air, ventilation ect. are dropped from the ceiling. I'm also assuming you want to keep the wall between the 2 spaces completely open? With just a curtain you will still get a lot of dust/dirt between the two. I would think an overhead door or double door might be better. Finally, unless you plan on conditioning it year around, I don't know if it's worth the cost to spray foam. It provides a great air barrier and thermal envelope, but I don't know if it's worth it for a shop. I would think more along the lines of Zip panels and 2x6 walls with fiberglass batt insulation. -
What did you do in the shop today?
Fowllife replied to Mark Ling's topic in Blacksmithing, General Discussion
Thanks Pnut. Since making a spring fuller a few weeks ago I have been looking for projects to use it on. When this came up and I was told to "do whatever my little heart desired" (you have to say that in a southern lady accent) it seemed like the perfect time to try some new things. My wife requested a pair of plant hangers similar to what I made for my mom, since her birthday is next week that is my next project. She likes to looks of the looks of the spade ends that are shouldered, so that is what I'll probably do. -
Mr Stevens. Thank you for your reply. Your post which you linked above, and the chart is one I have referenced in the past. For some reason it never clicked until just now that chart references tuyere OPENING size and SUPPLY pipe. Do you think my 1 1/4" supply pipe will be large enough or should I cut it out and put in a 2"? My tuyere opening is currently 3/4" but would be easy to drill out to 7/8" or 1" You did not muddy the waters with your explanation, I do understand the concept of modifying the fire bowl and the fill material required.
-
Just an update from earlier, apparently my wife did find and order some reasonably priced antibody test. I’m not sure how accurate they will be but at least it’s a step. On another note, I’m starting to get pretty disheartened with how a lot of states are dealing with this. In Ohio at least we have been told to expect “the surge” for the last few week, and it just isn’t coming. Don’t get me wrong, that’s a good thing. On the other hand we need to be fully utilizing our resources. Our hospitals are currently at about 20% pre-pandemic capacity, and we have added capacity considerably. Unfortunately, there is no vaccine in the near future. We need to start switching to optimizing our heath care system instead of thinking we can stop this, but apparently our government is to short sighted to see that. I do understand it’s a fine line to walk, but hopefully some people start to see the light.


