Ranchmanben
-
Posts
697 -
Joined
-
Last visited
Content Type
Profiles
Forums
Articles
Gallery
Downloads
Events
Everything posted by Ranchmanben
-
Hmmm, I get those strange circles on my anvil too! Wonder what they're from? Might have to have a cold one and think on it.
-
What are these scales made of
Ranchmanben replied to cedarghost's topic in Finish and Polish for Knives
It's called c tek. Most of it that I've seen was a more unform honeycomb though. -
The bosses might not be as isolated as others but that's a fine set of tongs. It's good that you are adding in some of things that set apart good pair tongs from a pair of tong. The flaired out reins and the jaws with a perpendicular groove are great additions. Keep working on insolating the boss and you might also want to use more material for your rivet. When you get to the point you are it becomes about working on refining each part, jaws, boss and reins. You learn something from every pair and every pair gets better.
-
July 2017 Something for hanging on the wall
Ranchmanben replied to Glenn's topic in What can I make?
I've never contributed to one of these monthly builds but I've been looking at an old Mercury glass mirror that fell off the wall of my house. It would be a bigger project than I've taken on before so I've put off doing it. I might have to tie into it for this though. By the way, it was in the original wood frame when it fell and I don't think the frame can be salvaged. -
Yee of little faith...I agree.
-
Anvil Stands. Make'em nice and clean
Ranchmanben replied to David Kailey's topic in Stands for Anvils, Swage Blocks, etc
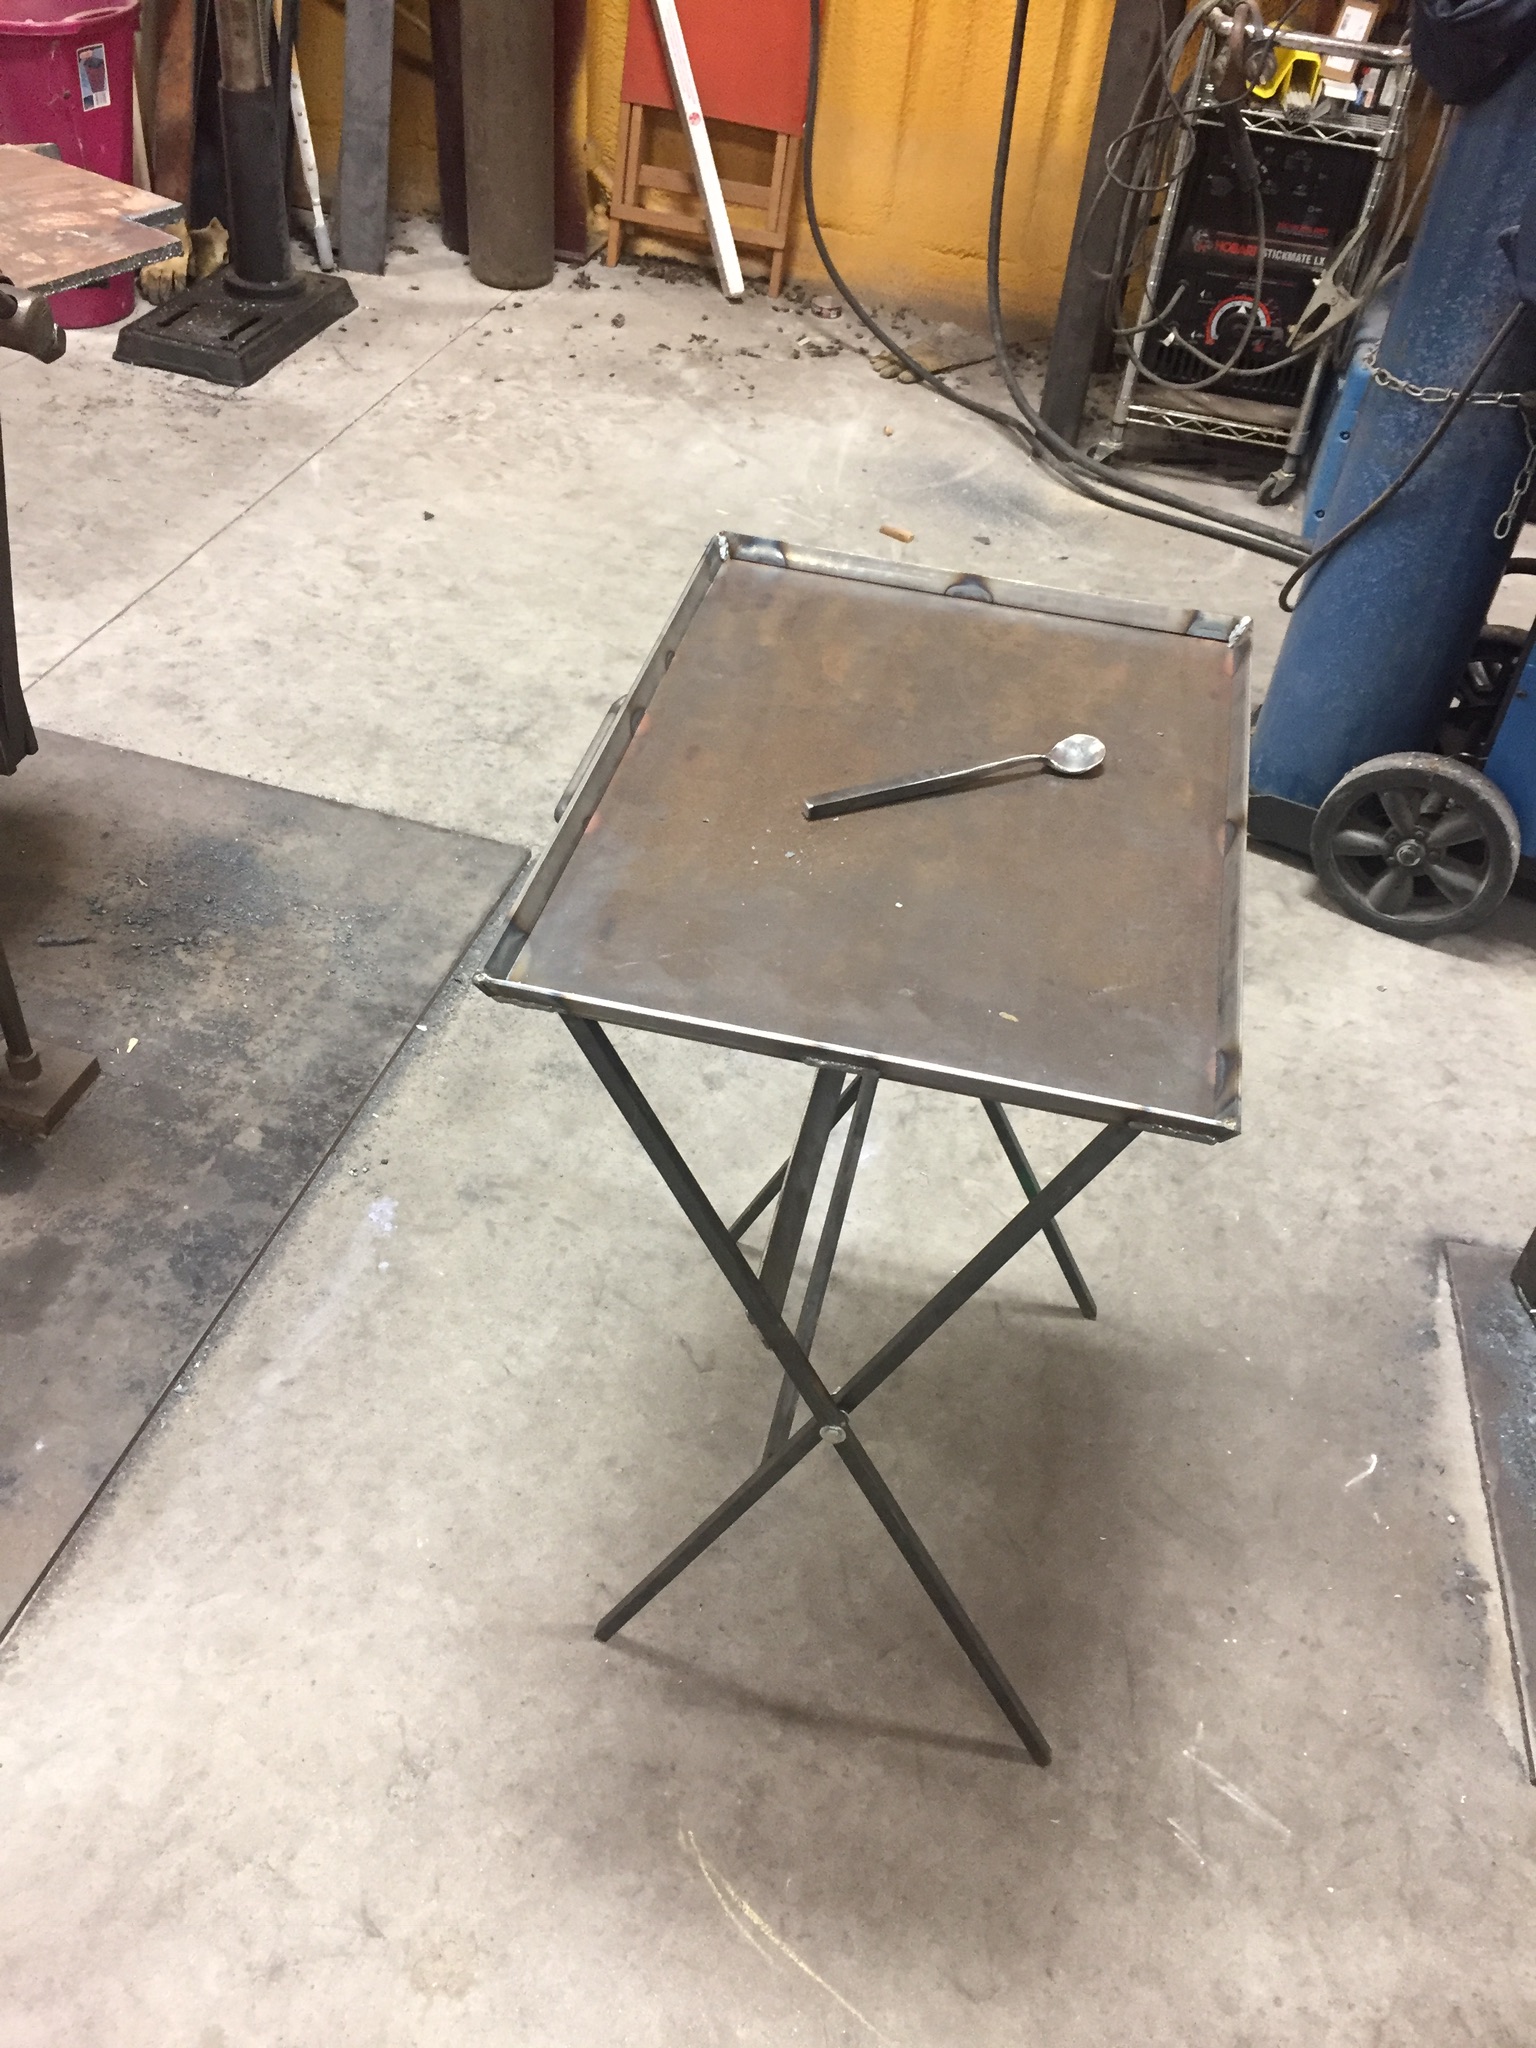
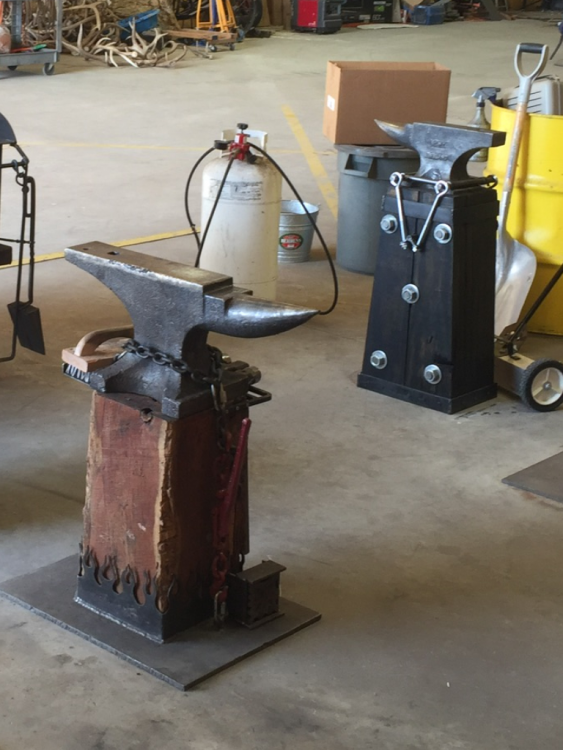
While I was somewhat playing devils advocate earlier about the anvil stand and what I intially took for the point of this thread, I whole heartedly agree that a smiths shop needs to look as professional as he or she has the means to do. Often times a shop is where a person can showcase their ability, not for other people but for them selves. It shows a pride in their work and a love for what they do. Here are my anvil stands by the way. Both are obviously wood but not your run of the mill stump. I also added a picture of my "tv tray" that I use instead of a shelf attached to my stand so I can move it around as I need it.
-
A better way to use your anvil
Ranchmanben replied to Glenn's topic in Anvils, Swage Blocks, and Mandrels
I appreciate the link but I'm happy with my horn pointing south. -
That looks outstanding! I really like the square flat face and round rounding face.
-
A better way to use your anvil
Ranchmanben replied to Glenn's topic in Anvils, Swage Blocks, and Mandrels
Glenn, you've give me some couple of ideas but more importantly started me looking at my anvils for new ways to use them. Going back to how I think this thread probably started, left or right horn direction. After looking at my forge I realized that I keep my anvil 60/40 inline with my forge with the 60% within the easy one step with the horn to the left, heel facing the forge. I realize that I fairly often use it with the horn to the right so I've set it up like that without thinking it, I've just adjusted things every so often til I was more efficient. I'd say it's a step and half to get to my off side and usually when I'm doing that I'm working on heavier pieces that will retain heat a little longer. -
Found a 305 lb PW today
Ranchmanben replied to G-ManBart's topic in Anvils, Swage Blocks, and Mandrels
When you both leave feeling like you're steeling is the best kind of deal. You usually know it's fair when both parties feel like they got screwed. -
Found a 305 lb PW today
Ranchmanben replied to G-ManBart's topic in Anvils, Swage Blocks, and Mandrels
That's a beauty of a bullet vise. Have I seen that on Instagram? -
Found a Peter Wright anvil today
Ranchmanben replied to HP500's topic in Anvils, Swage Blocks, and Mandrels
No one really knows what those marks signify. Richard Postman suspects they are inspectors marks. Yours is the coolest one I've seen. -
Found a 305 lb PW today
Ranchmanben replied to G-ManBart's topic in Anvils, Swage Blocks, and Mandrels
Really, it's not about the disk. It's more about being careful and not going overboard. As often is done here, this information is not necessarily directed at Bart but to anyone else reading this who might be new to smithing and think they need to do a lot of clean up/grinding on their newly purchased, previously owned anvil. As you all know, not all grinding is bad but it could be easy for someone who's never had an anvil before to get carried away trying to "bring this anvil back to life". I've often read the suggestion that people should spend a year getting to know their anvil before doing any sort of modification and I agree with this. But a little bit of work on an anvil like this is more of a safety issue and any grinding on an anvil should be done with care lest more damage be done than good. That's why I suggested a worn out, broken in or less aggressive disk. -
A better way to use your anvil
Ranchmanben replied to Glenn's topic in Anvils, Swage Blocks, and Mandrels
Until recently, it's had been a few year since I'd had an anvil with handling holes, the anvils I've been using are cast steel. I had never thought of using the handling holes for anything when I did have them though. After reading Glens post and having an anvil with handling hole again I'm going to be looking for ways to use them. Great ideas here. -
Found a 305 lb PW today
Ranchmanben replied to G-ManBart's topic in Anvils, Swage Blocks, and Mandrels
I guess broken it would be a better description. I mean one that the edge is rounded and isn't going to take off too much material at a time. It's pretty easy to take off more than you want or grind in a groove with a brand new 80 grit flap disk. -
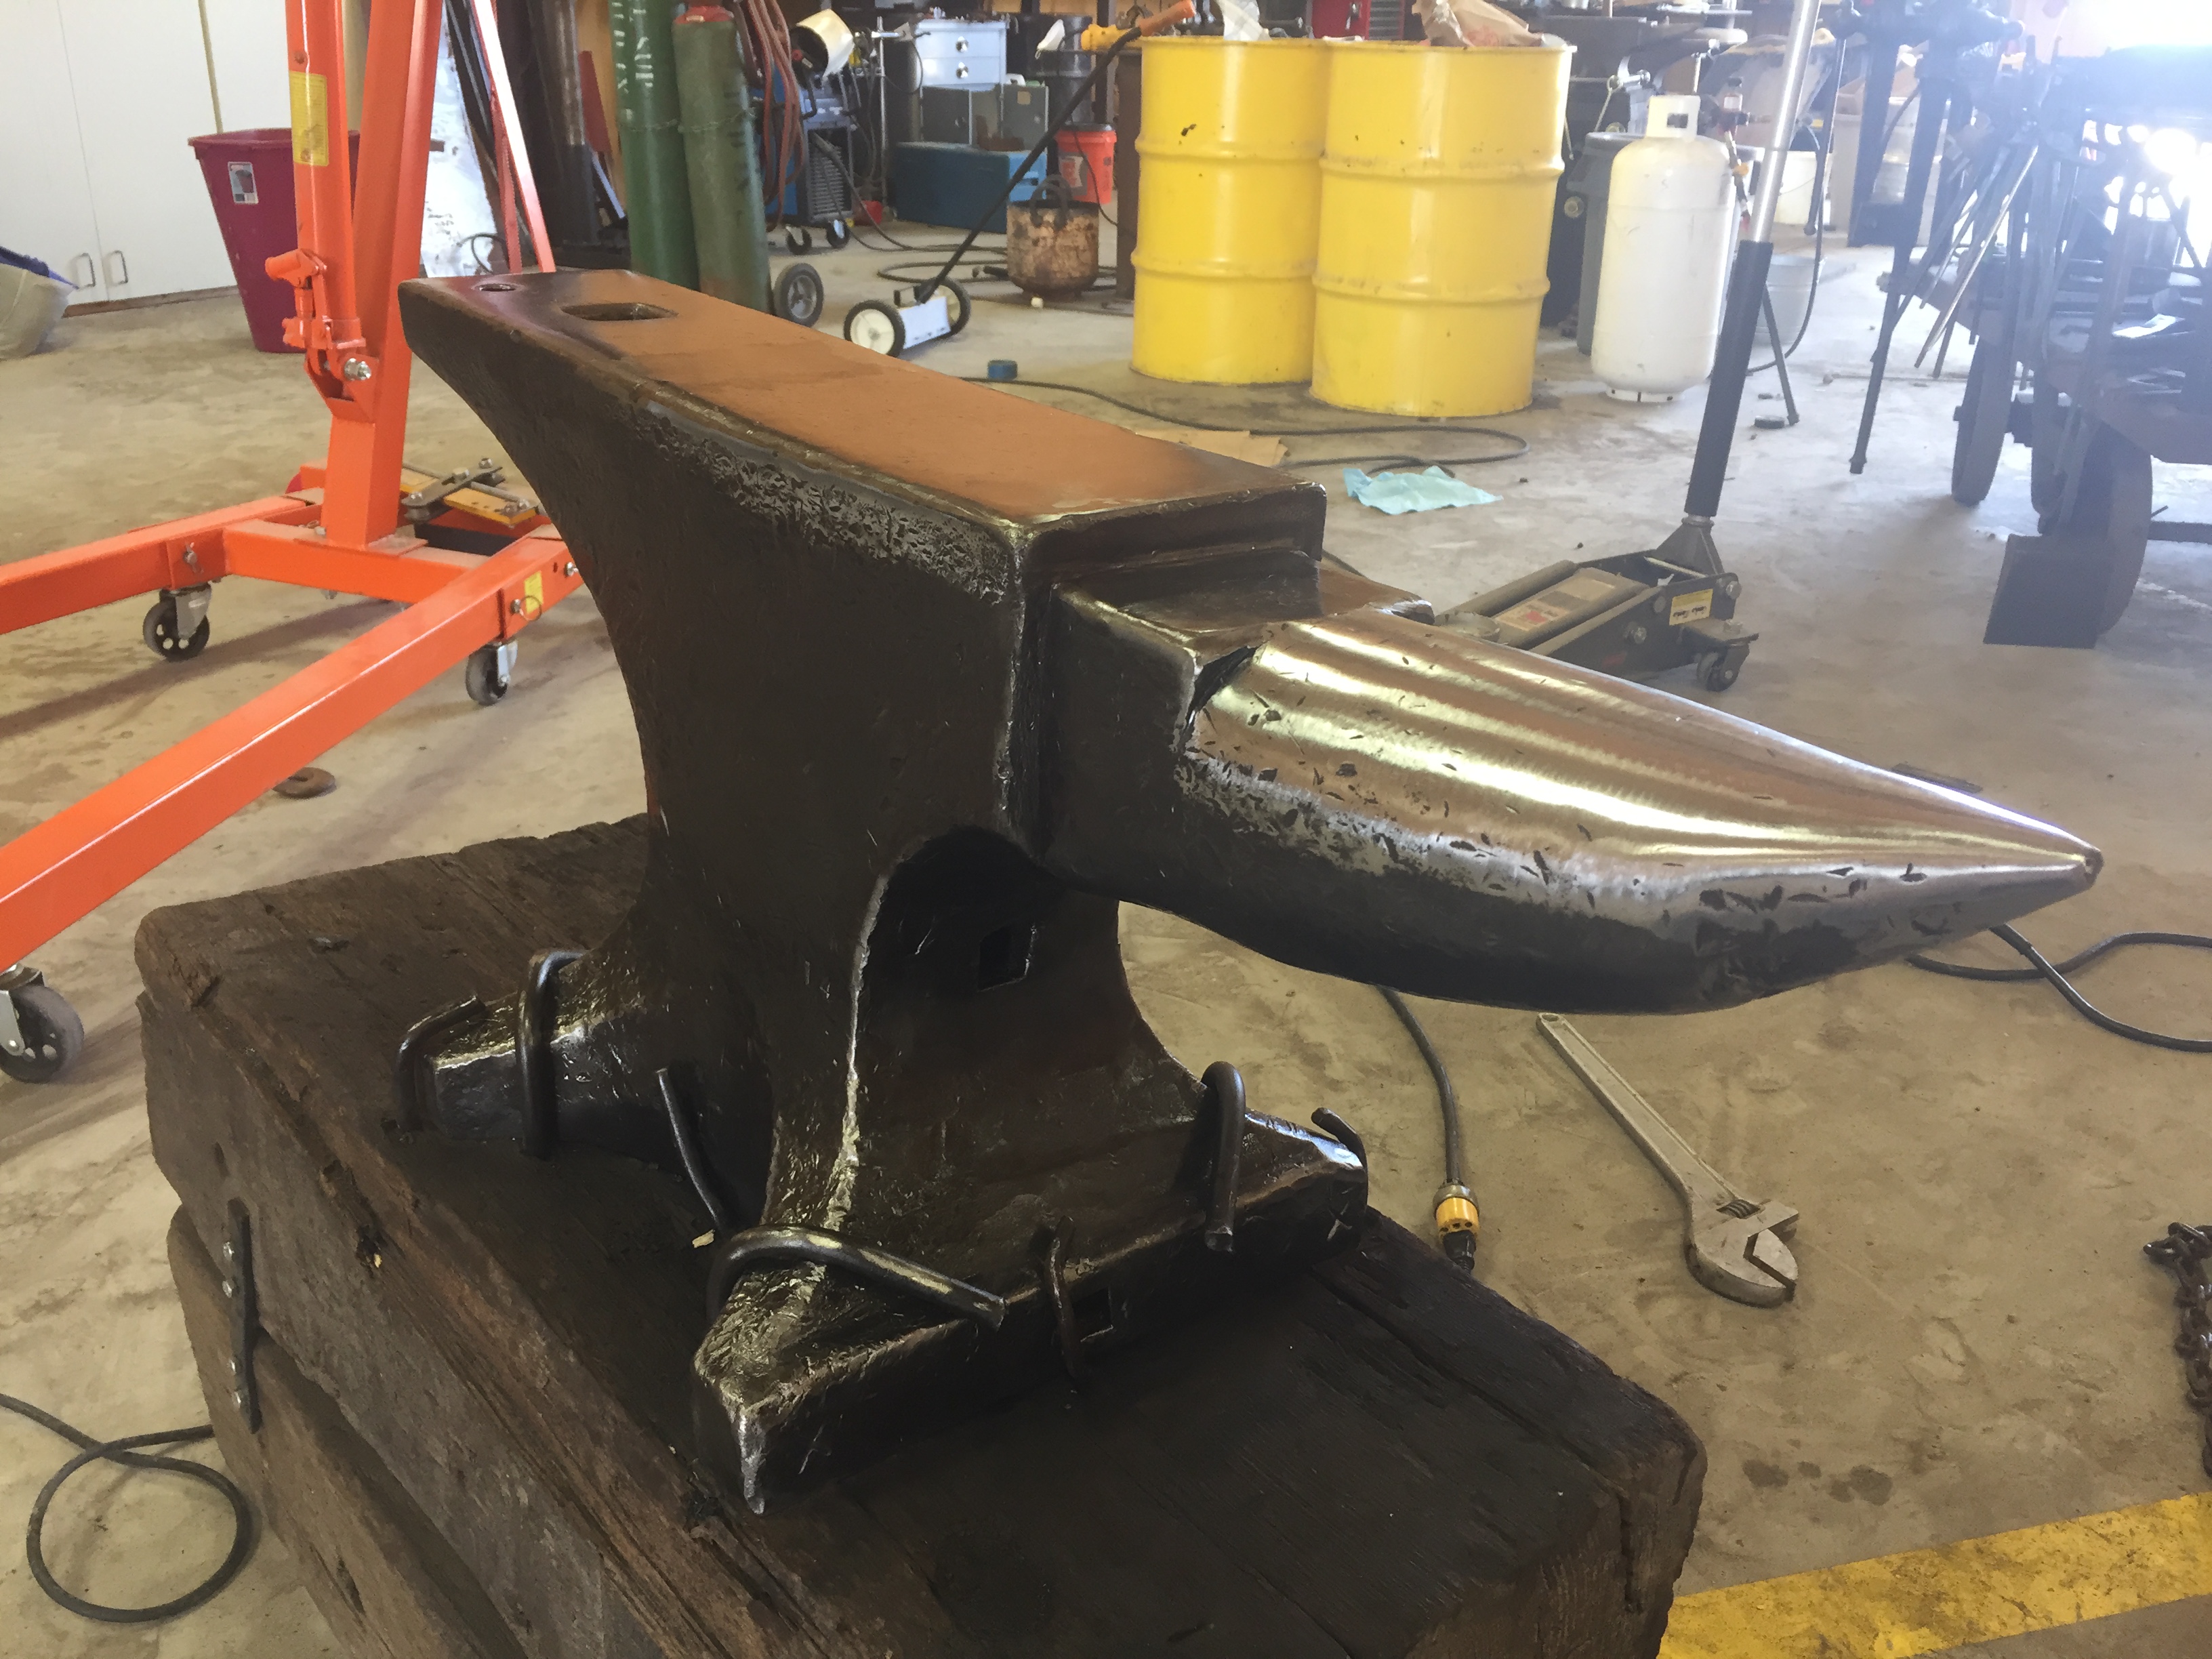
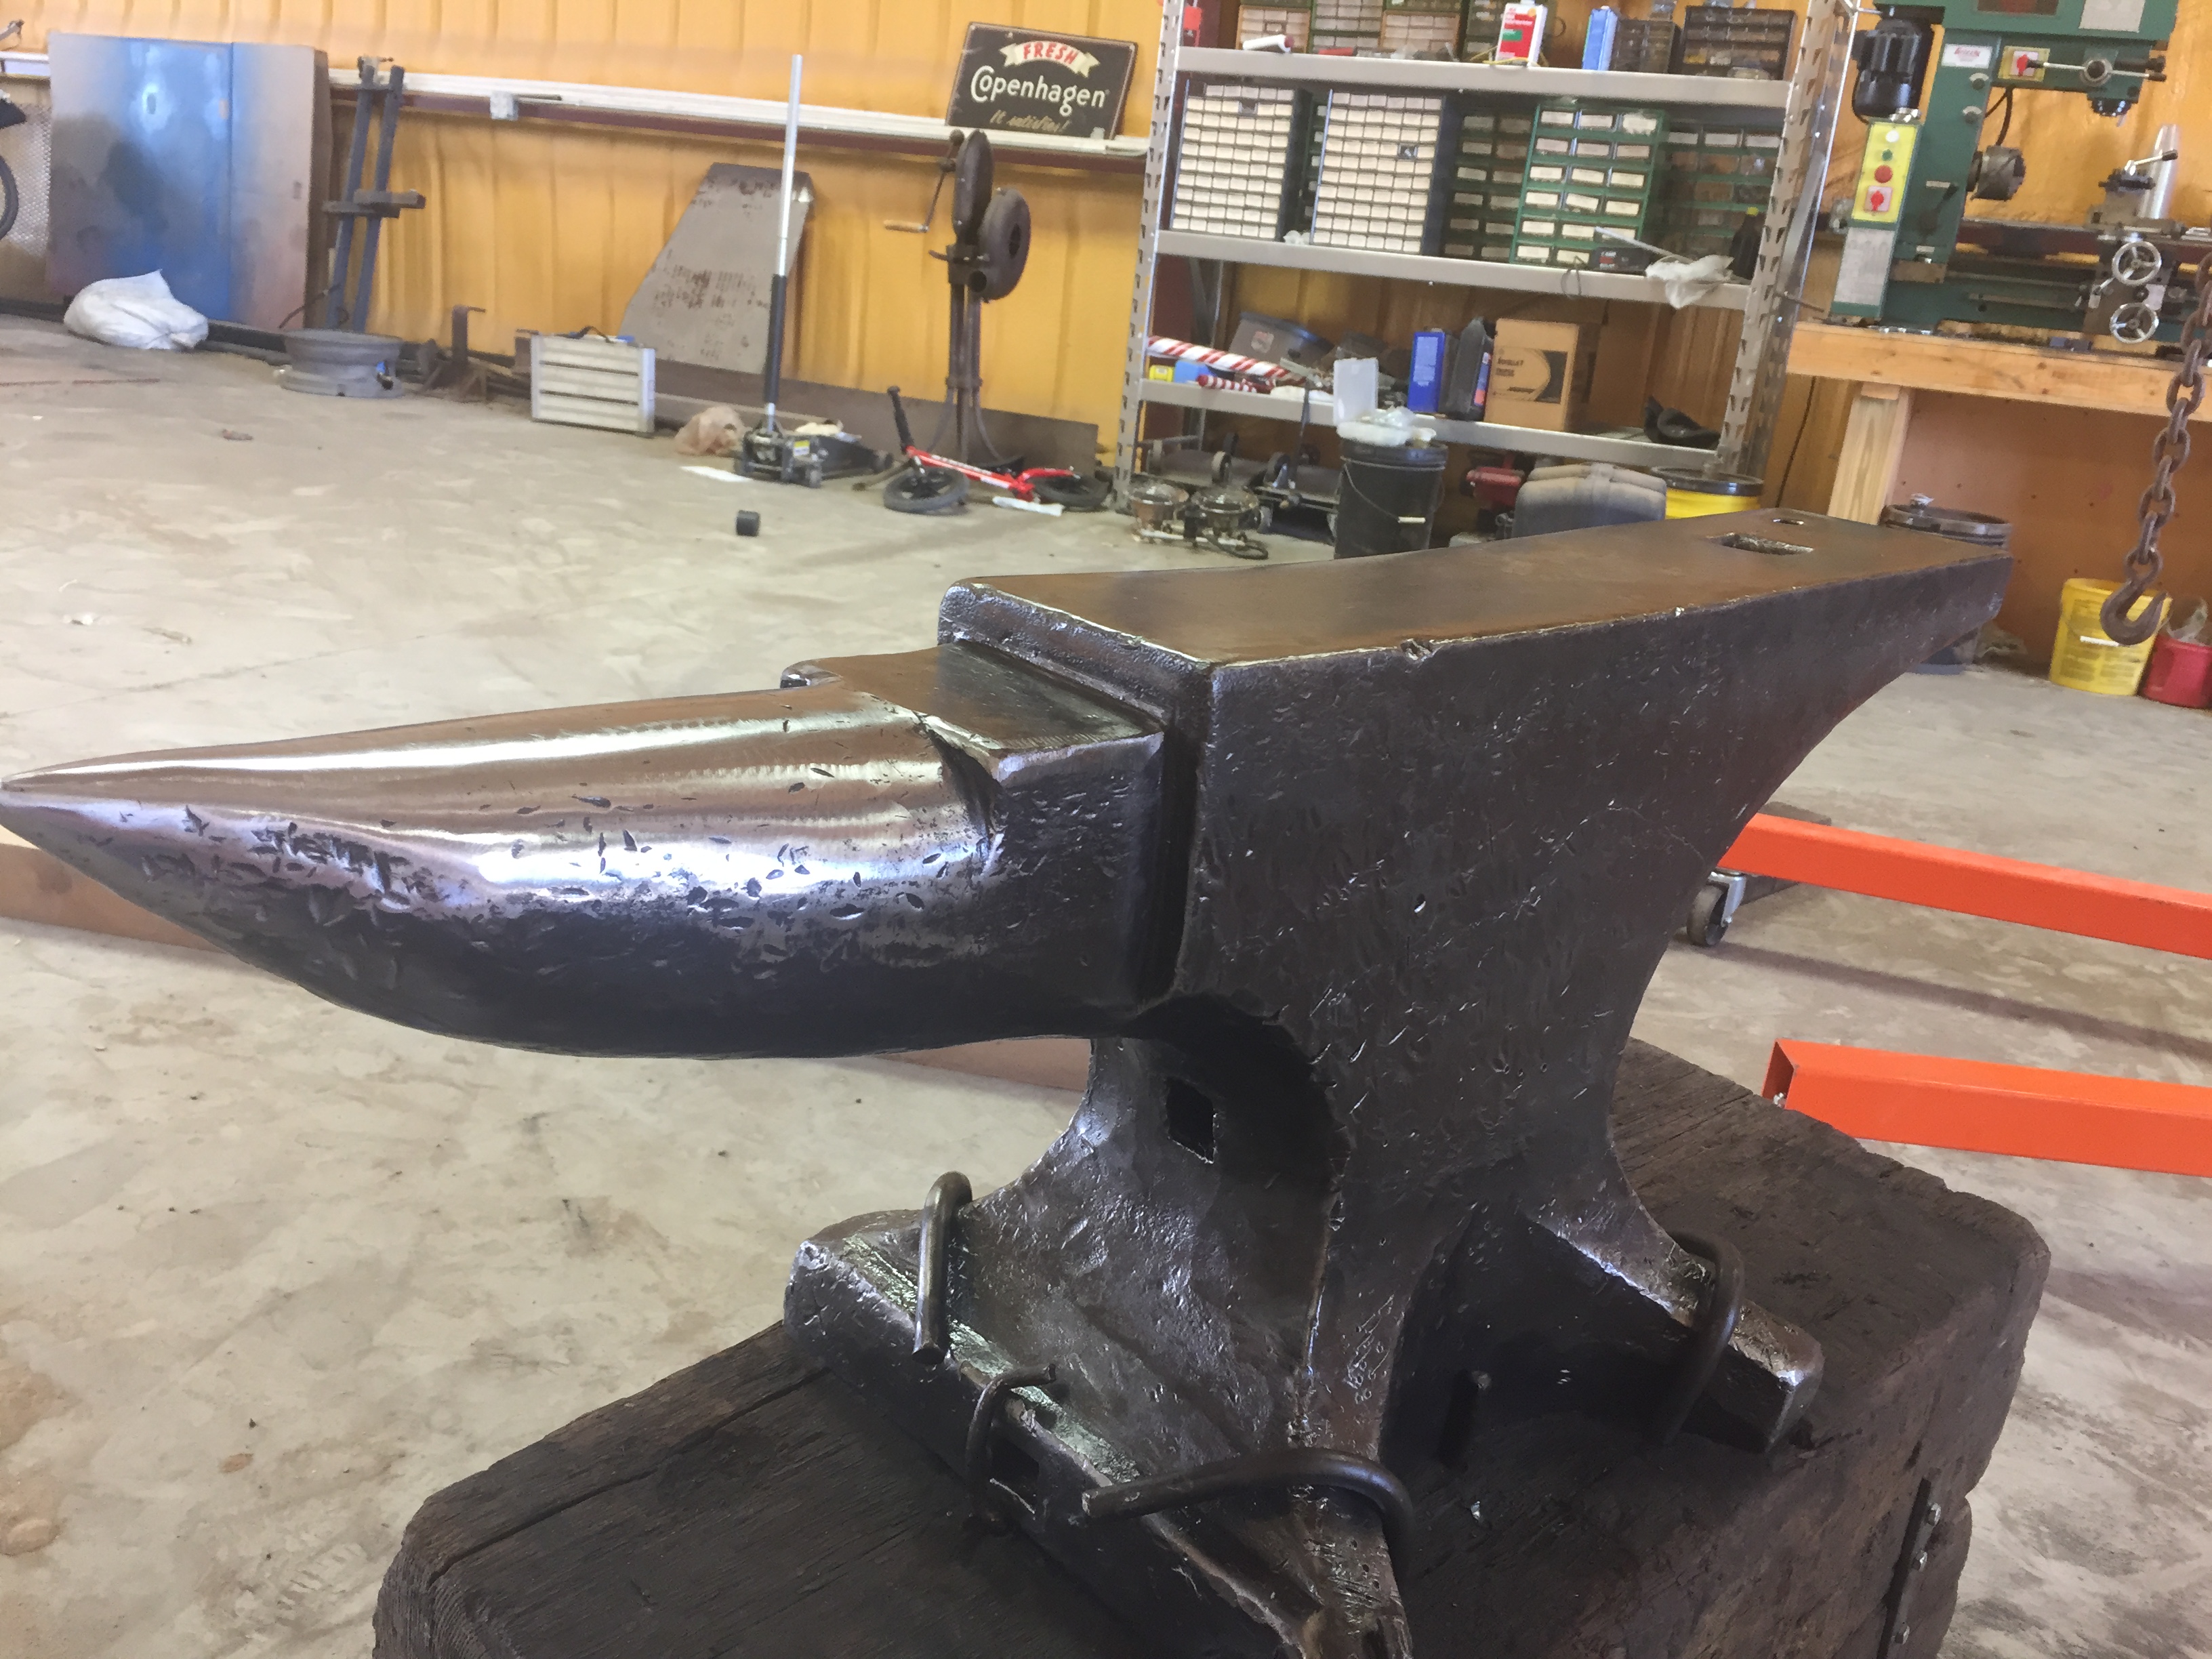
New Big Boy Peter Wright
Ranchmanben replied to Ranchmanben's topic in Anvils, Swage Blocks, and Mandrels
You'd be surprised about the weather around here. I spent a number of years bouncing around ranches between Lordsburg, Nm, Wilcox, Az and Douglas, Az day working on various ranches and working at a feedyard for a year. The weather on a good year is most certainly wetter but on an average year the humidity is pretty similar to that south east corner of Arizona. True, we often get more rain but often times we will get 80% of our yearly total in two or three rains and it all falls in half an hour. You're dang sure right about storage. I don't think I've ever bought myself something with the intention of safe keeping. This is a user. -
New Big Boy Peter Wright
Ranchmanben replied to Ranchmanben's topic in Anvils, Swage Blocks, and Mandrels
When I get a new anvil I like it to develop it's own patina from the start of our relationship, we grow as a couple. I learn its parts and how to use them and it learns how much I miss when I'm frustrated and should have quit 20 minutes before. I'm in a borderline high desert location so humidity and rust aren't really issues, WD-49 works fine for me. If I was really interested in long term protection I'd give it a coat of BLO at the end of a long day of forging while the anvil is nice and warm. Mainly, I wanted a picture of it all nice and pretty. -
What did you do in the shop today?
Ranchmanben replied to Mark Ling's topic in Blacksmithing, General Discussion
Fair enough. -
New Big Boy Peter Wright
Ranchmanben replied to Ranchmanben's topic in Anvils, Swage Blocks, and Mandrels
Using a straight line is a far better method than my usual approach of trying to eye ball it. Although I have always like the results, it's still somewhat of a craps shoot. I'm going to beat some steel on it for a bit before I commit to many changes. One of the first things I'll probably end up doing is putting a square edge on the heel. I've always liked having that sharp edge to mark mild steel and as a cut off in a pinch. -
Found a 305 lb PW today
Ranchmanben replied to G-ManBart's topic in Anvils, Swage Blocks, and Mandrels
You should be. -
What did you do in the shop today?
Ranchmanben replied to Mark Ling's topic in Blacksmithing, General Discussion
Like I said, just curious. I've tried my anvil with the horn on the right and it just doesn't work for me. Actually, when I started out I had it on the right for a couple of years because I didn't know how to have it. Decided to try turning it around and it was like a light switch was thrown, everything on the horn became easier. What prompted the change? -
What did you do in the shop today?
Ranchmanben replied to Mark Ling's topic in Blacksmithing, General Discussion
Out of curiosity, are you a south paw? -
Found a Peter Wright anvil today
Ranchmanben replied to HP500's topic in Anvils, Swage Blocks, and Mandrels
1885-1910. Also, that's a really cool stamp on the foot! -
Found a 305 lb PW today
Ranchmanben replied to G-ManBart's topic in Anvils, Swage Blocks, and Mandrels
Yeah buddy! Great haul! I'm with you on cleaning up the mushrooming. As I'm sure you know, just be sure to go slow and don't take too much off. At most just take off enough to bring that deformed area back to square with the body, if possible and if not round off the sharp edges that are liable to chip off. I use a rather worn out flap disk when I've got to do it. -
New Big Boy Peter Wright
Ranchmanben replied to Ranchmanben's topic in Anvils, Swage Blocks, and Mandrels
Did a little clean up on the old gal. Spend an hour and a half with the wire wheel and 20 minutes or so with the flap disk. The horn was covered with hammer marks but luckily most of them were very shallow and buffed out easily. The off side edge was mushroomed a little so it took that tiny bit off as well. Finished with a dose of WD-40. She's looking good and ready for some hot steel.