HEAP of JEEP
-
Posts
203 -
Joined
-
Last visited
Content Type
Profiles
Forums
Articles
Gallery
Downloads
Events
Everything posted by HEAP of JEEP
-
I love what you have done so far! Its a beautiful blend of rusty industrial (which I love) and the glass shapes give a touch of color and class. I especially like the one that looks like a tongue melting over a wrench... maybe you weren't shooting for a tongue shape, but that's what I see. I think Rorschach would have a field day here. Still can't offer any good advice... but just wanted to let you know I really like your work so far. Get some smithing involved and I can't wait to see what you come up with.
-
Hi Ray. Thank you for your service. I'm new to smithing, so can't offer much advice, but as I've been teaching myself how to heat and form metal, I've also been wondering about learning how to blow glass and melding the two arts together. There's no way I have the time to learn glass blowing, but I would love to see what you come up with. In my mind, I was picturing something like garden sculptures, using the iron to hold glass globes and other dangly glass things, but like Daswulf said, the ideas are endless. Let your mind flow.
-
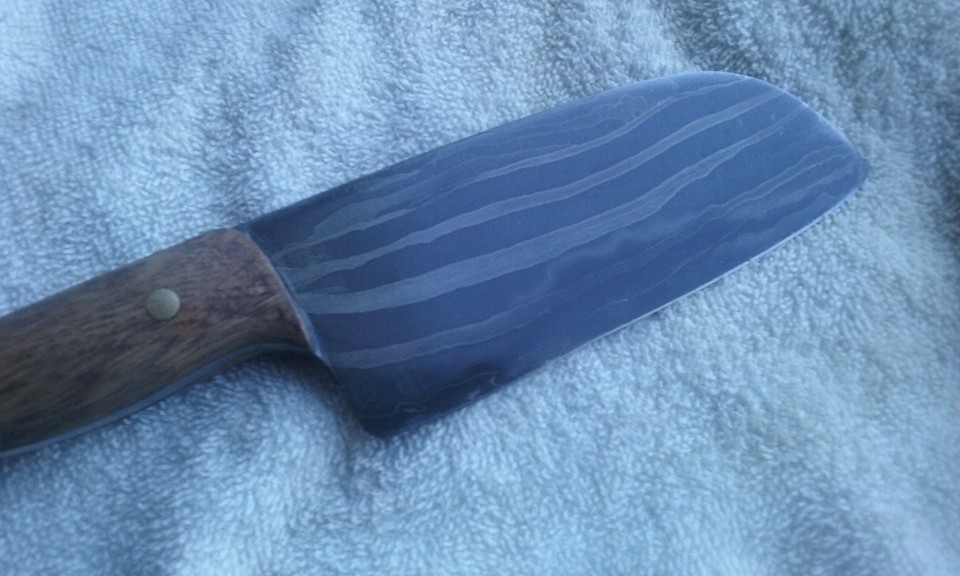
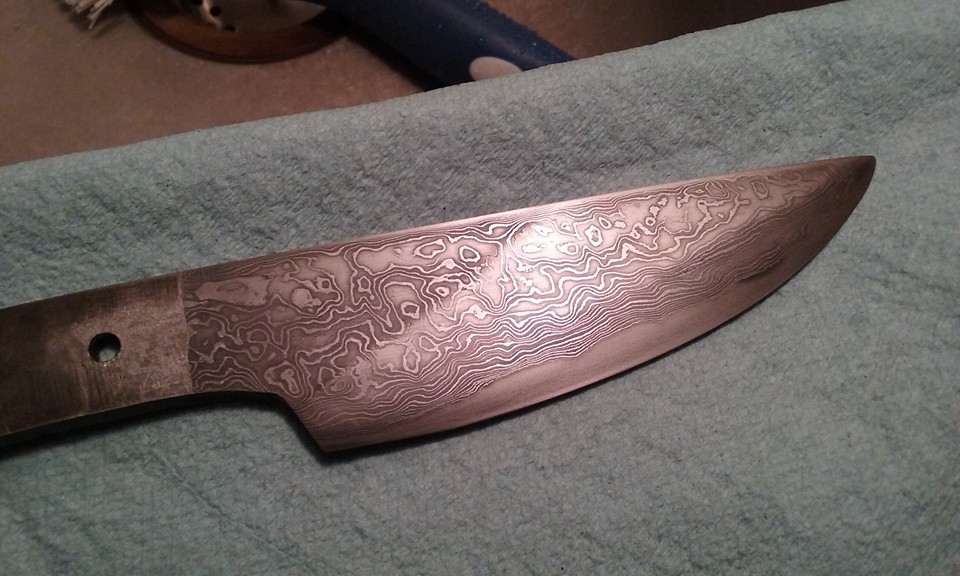
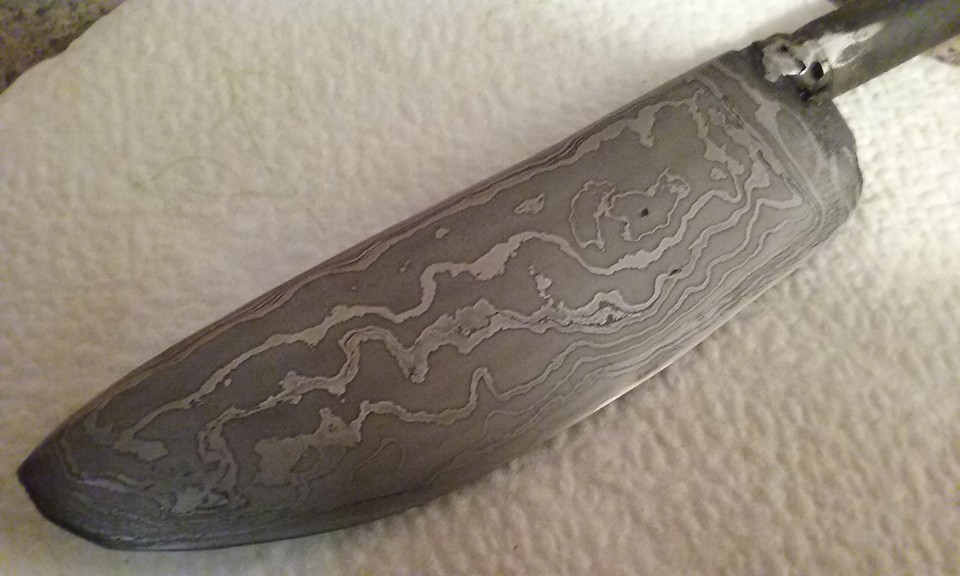
Completed my fourth knife tonight. Its 40 layers, but the pattern is quite large and doesn't show all of the layers. I am still a newb, so don't know exactly why that happened, but it still came out kind of cool. I was trying for a Japanese inspired Santoku, but in the hand hand it feels more like a small clever. I think it is to thick to have that chef knife feel. I did manage to get a hamon on it, but it is stronger on one side than the other. All in all, I see some improvements, but then with the pattern welding, I feel like I may have taken a step backwards. Oh well...always learning.... on to the next.

-

Knife Making Log, Advanced Class 201: Damascus patterns
HEAP of JEEP replied to Glenn's topic in Knife Making Class 200
If I remember correctly, on that one, I twisted each billet about a twist and a half... I wanted to do more, but I was getting frustrated with things at the time, and settled for that... I may have folded them again after that... I've been trying so many different things to try and get some cool patterns that they are all scrambled in my brain. Like the one I'm working on now didn't start out as complicated in the planning stages as its turning out to be in actuality. I was shooting for 20 layers, a twist, one more fold, and then I was going to forge it from the side, so there was a distinct line going down the middle, separating the twisted layers. The current one has been fighting me, left and right, and when I tried to fold it after the twist, only half of it stuck to itself after 3 weld heats.... so I stopped there, cutting apart at the seam, and ground the surfaces clean... then decided I didn't have enough steel left for the knife I wanted to make, so decided to make another billet to sandwich between those two halves. That turned in to 10 layers with a few twists and another fold... so I have no idea what I'll wind up with in the end. The top and bottom of the knife will have the same pattern, but the middle will be decidedly different... might wind up really cool, or might look awful. The experimenting is actually the fun part for me though... because I don't know how it will look until I etch it at the end... its sort of like anticipating a Christmas present... LOL. I'm doing the laminate thing on this one too, so hopefully I'll have that final sandwich welded tonight and get it formed into the blade I want... so maybe in a few days I'll have knife number 4 ready for some critiques. I thought I had a thread with this finished, but maybe not... here's a pic of how it turned out. I'm trying to take a little more time with the fit and finish with this next one. A lot of my early mistakes, I think, have come from just trying to rush things. So fingers crossed. One thing I did notice on this new one, is the size of my billets makes a huge difference. Doing this by hand, I lose so much to scale, I figured I was going to go big to start with. I used 3/16 to weld with the leaf springs where as usually its 1/8, and I started out 2" wide, rather than the 1" I usually shoot for. If I had a press or power hammer, that would have been fine, but with all the extra heats it took to draw it out, I think I actually lost more steel than if I had started smaller. Like the extra one I made last night to go in the middle... I went back to the thinner stock, 1" wide, and I gave it three welding heats, and then two or three more to draw it out and it was ready for the first fold, and the rest was just as easy. By the time I was ready to add the original two halves to it, my smaller new billet was actually almost as large as the first one... and I had started with less than half the steel... I was just able to shape it so much faster that I lost a LOT less steel. Another lesson learn the hard way... but from now on, as long as I'm doing this all by hand, I'm staying at the 1" wide and using the thinner stock. That was actually the perfect lesson to learn before I ordered anything.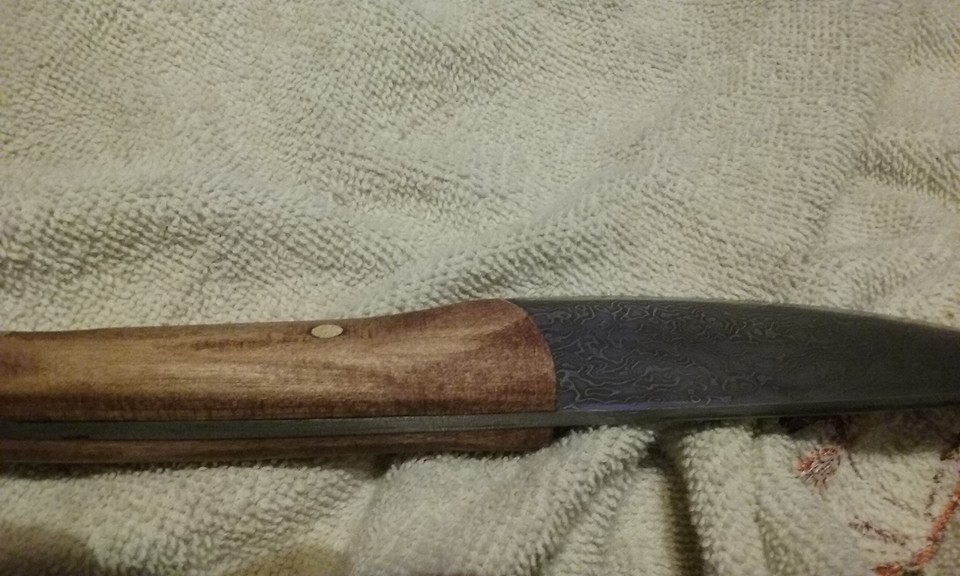
-
Question about HT with a pipe
HEAP of JEEP replied to HEAP of JEEP's topic in Heat Treating Knives, Blades etc
Ahhhh... hadn't thought of that. -
I've been reading up on some different HT treating techniques, for those of us just using coal forges, and one idea I've seen is using a piece of pipe in the fire to hold the blade in, to help even out and control the heating process. I was thinking of giving that a try. I don't have any scrap pipe I can use since what I have is galvanized, but I do have a 40" chunk of 2x5 tube. The walls are 3/16. I was thinking of cutting off a 12 or 14 inch section, welding some scrap on one end to close it off, and just using that. My question is, do you think this would be an okay option? As I got to thinking about it, I wasn't sure how the rectangle shape of the tube would effect things. I'm not great at physics or thermal dynamics, but it does seem like a round pipe would radiate the heat inside more evenly. So, just wasn't sure if this was even worth trying, or if I should just wait until I run to the hardware store next and just get some black pipe.
-
Knife Making Log, Advanced Class 201: Damascus patterns
HEAP of JEEP replied to Glenn's topic in Knife Making Class 200
Thanks Shamus. Its all a learning thing for me, at this point, but for my second knife ever, I'm really pleased with how it came out. As for my steel of choice... well.... since I'm still a super newb, I haven't invested in any known steel at this point. I'm learning and practicing with scrap I have lying around. For the most part, everything I'm doing early on is all old Jeep leaf springs, and whatever else I happen to grab from the scrap pile at the time. This one is just a few layers of mild steel mixed in with the leaf spring. For this one, I did two billets, and then laminated a piece of leaf spring between them. From everything I can find, Chrysler used 5160 in the springs during the years that I have them from, and I figured, a piece of 5160 right on the cutting edge should make for something better than the mix I made for the aesthetics. My early knives are all gifts for friends and family, and I don't think any of them will ever see any actual use, but I am going to be taking my process to task and testing a few blades... that way I can be certain my HT and tempering technique, which is as new to me as making knives, is decent, just in case someone ever decided to actually put one of my gifts to use. Worse comes to worst, I'll just tell them to use it for opening letter or something. I've got a few under my belt, at this point, so I think I will be ordering some known steel in the next few days, just so I can actually make something with an intended use and purpose in mind, and I think my fit and finish is reaching a point where I can be proud to show off my work, and stop trying to hide behind the "newb" label. All of my work is done with just my arm and an assortment of hammers... just cross peen hammers in different weights and I dressed the faces slightly different on each one to see how the differences move metal in different ways. My grinder is just a 2x36 that fits on my bench grinder, but it only attaches horizontally, and I can't find belts locally, so I just buy the 4x36 belts and cut them down the middle to make 2 belts. Its gotten me by, but I just ordered the wheels and other parts to build a proper 2x72 grinder. I figure, even if I don't stick with the knife making hobby, the grinder will come in handy for a lot of my other projects. And at some point, I am seriously thinking of building a forge press, just to make things easier in making the billets, but even building one can get pretty pricey, so I'm waiting to see how long I find enjoyment in this... I tend to try a lot of things in life, just for the experience, and some I find really enjoyable and stick with, like airbrushing, and some... well.... I'm glad I tried them, but you will never hear me say, "boy, I sure wish I could lay tile floors for a living" So, I'll give it a few months, and if I'm still enjoying it as much as I am now, then by all means, I plan to make this as easy on myself as possible. Oh, and tang thing... I did end up forge welding a piece on to extend the length of the tang, but the line where the etching stops was just where the level of the Ferric Chloride was in the jar I keep it in. Figured the tang was getting covered anyways, so didn't worry about how far up the etch went. I don't know if that was right or wrong... "newb"... but it made sense in my mind, at the time. -
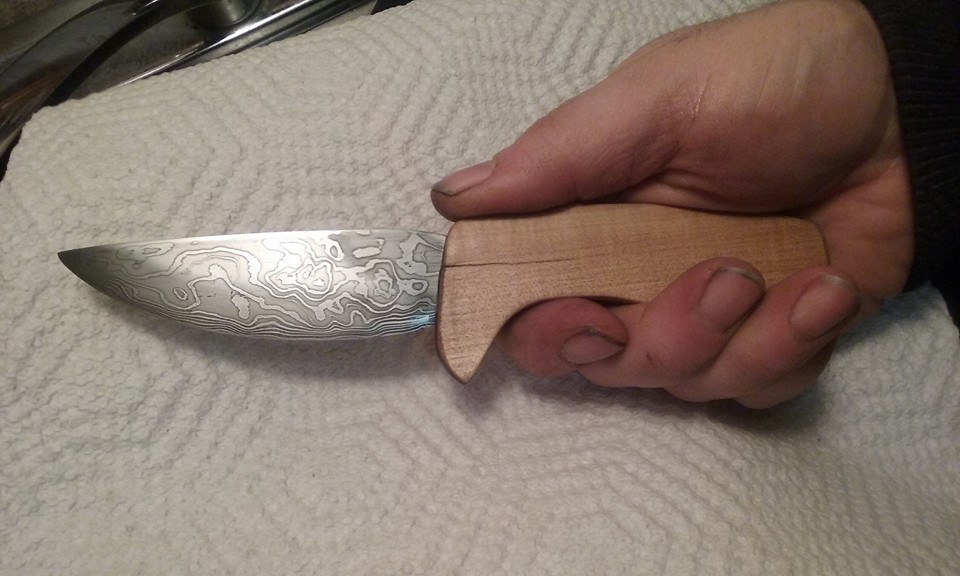
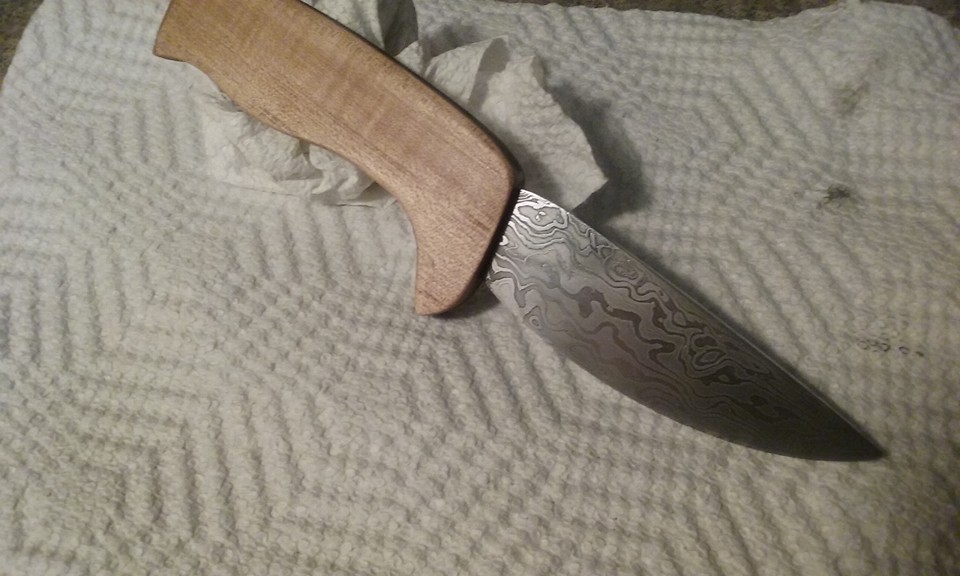
Third knife is comelete... ten layers with a maple handle
HEAP of JEEP replied to HEAP of JEEP's topic in Knife Making
He was overjoyed. Much happier than I even anticipated, so calling this one a big win. -
Those are great! You gonna do a "how to" video or anything for us newbs?
-
Third knife is comelete... ten layers with a maple handle
HEAP of JEEP replied to HEAP of JEEP's topic in Knife Making
The steel on this was a major mistake on my part... since I'm so new at this, I'm still going through all of my scrap Jeep parts... figured I'd save a few bucks during the major learning curve before I purchased some known steel. I've been using, mainly leaf springs, since I seem to have an unending supply of them, but for this one, I flattened out an axle, cut it up, and then layered a few pieces of that with a couple of layers of mild steel to get the contrast. After reading up on the axle steel though, I realized it is most likely 4140 and from what I have read, it was not a good choice for a blade. I've made a couple of hardy tools with the same axle and in my mind, I was thinking that since it was such a tough steel, it should be good for a tough blade. It did harden enough to have a file skate over it, but I do not have any way of actually testing it. So, I suspect, it will be a nice durable knife for my step-son, but he may spend a lot of time trying to keep it sharp... that's assuming he ever actually uses it. The last camping knife I bought him (Spent a pretty penny on it too), sits on a shelf because he says its too nice to actually take out in the woods and he doesn't want to get it beat up. I suspect this one will occupy a place on the same shelf. As for the 90 degree cut out... I knew that was wrong from reading other threads on here... and I actually had the file out and was ready to round that out, but I was rushing to get this done for xmas morning, and me being me... got on to some other process with it, and totally forgot to do it. I'll be able to slow down on my next effort, and hopefully will not make a lot of the same mistake that I did with this one. Next on the list of gifts is a chef knife for my oldest son, who is actually a chef and WILL probably use what I make for him. On that one, I think it may be time for some known steel, and I'm not under any time constraints, so I can take my time and start learning how to address some of the early mistakes and start working on some of the more detailed aspects of the process. -
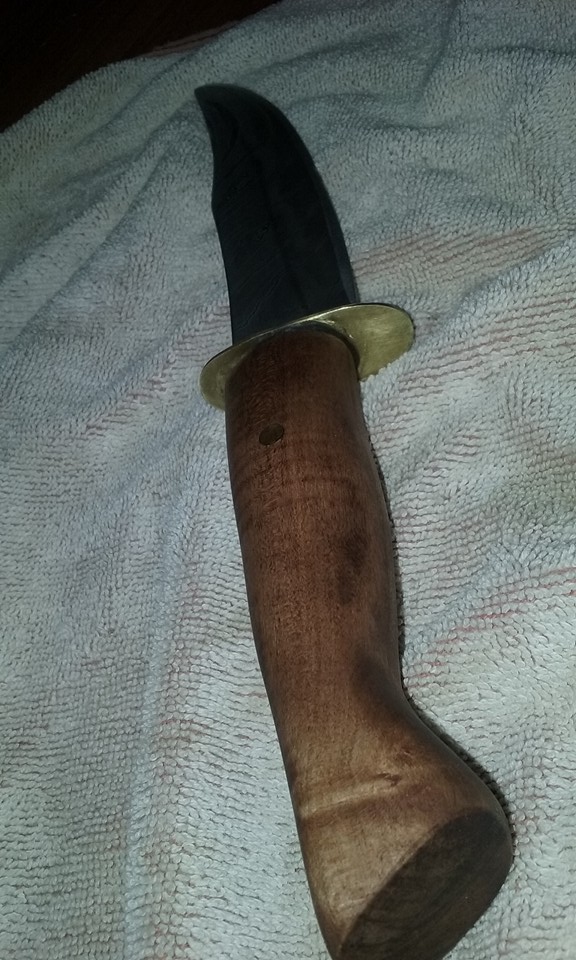
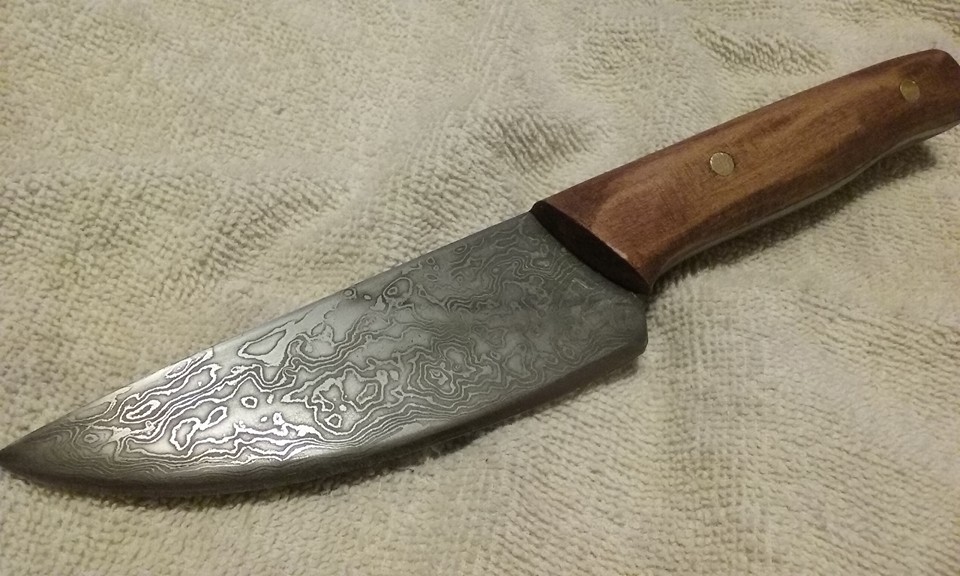
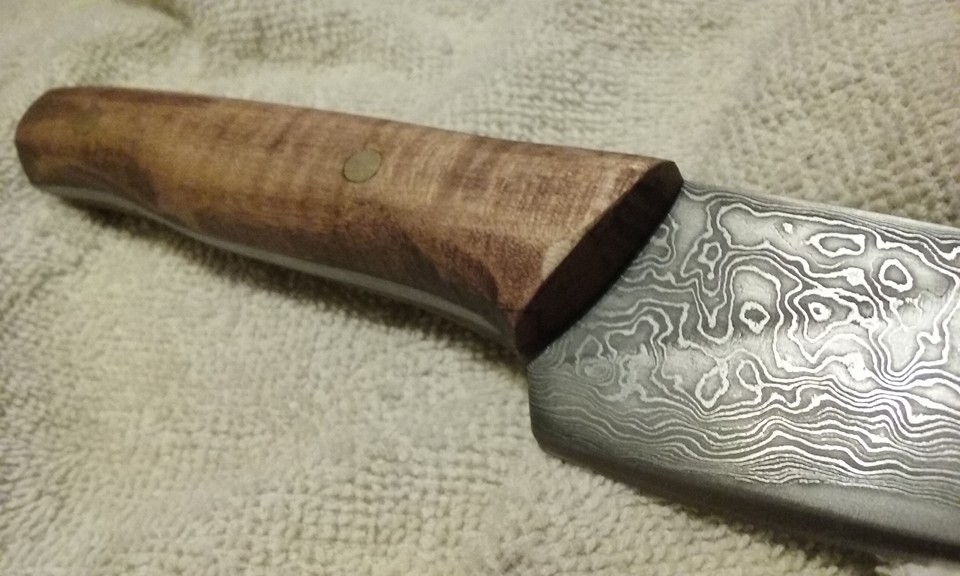
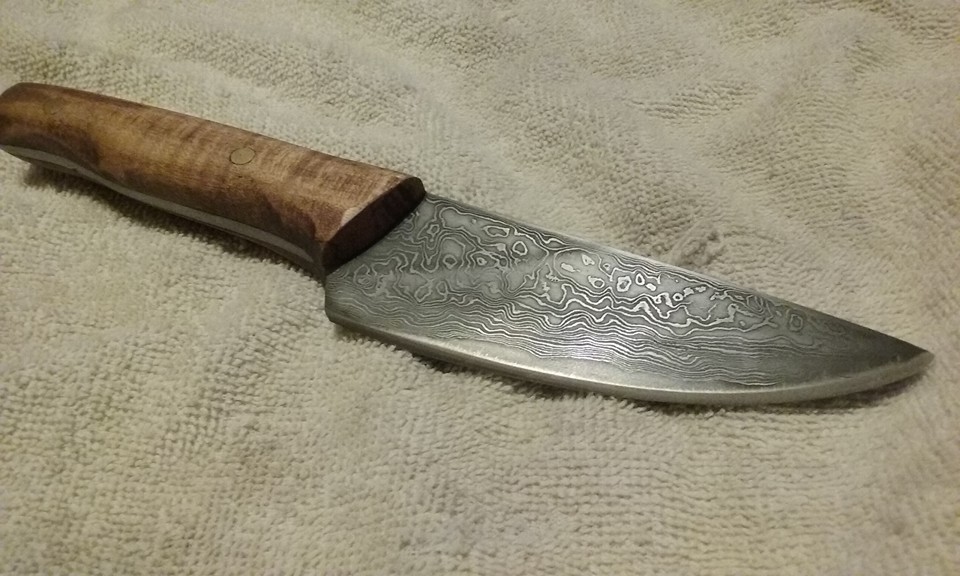
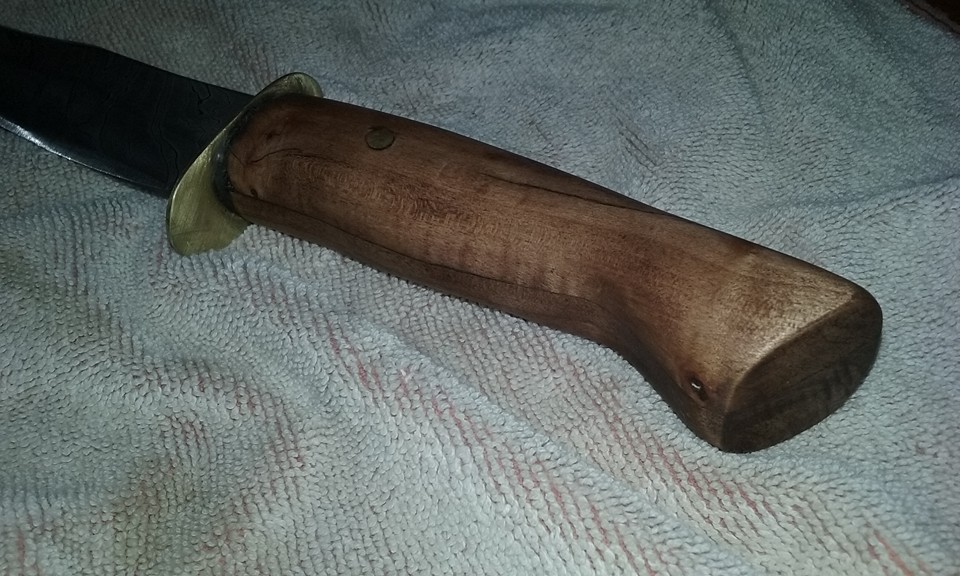
Well, I got it done with a little time to spare. THis is a gift for my step-son, and where as its not perfect, for my third knife, I'm pretty stoked. Its ten layers with about 3 twists, for a pretty simple pattern, but I really like how that came out. Here it is right after I got done forging it. Got it ground and ready for the heat treat and tempering Then etched in Ferric Chloride at about a four to one ratio. I etched it for 15 minutes, then sanded it with 800 grit... did that twice, then on third dip in the FC, I sanded it 1000 grit, and thought it looked pretty good, so stopped there. MAde the guard from a scrap piece of brass I had lying around... It should be thicker, but its all I had on hand. THe handle is made from some maple I salvaged from some old pallets and stained with a dark mahogany. I had the handle mated "perfectly" with guard, so drilled the hole for the pin... then noticed my "perfectly" wasn't perfect and had to work on the front of the handle, which messed up the alignment of the holes for the pin... another learning moment... wait until the handle is glued to drill... so I cut a piece of leather to act as a spacer. I should have cut the leather bigger and sanded it to the final size but I'll chalk that up to another learning moment, so it does look a little odd between the handle and guard, but its for a 21 year old to take camping, so I don't think the fit and finish is going to be a major issue. Screwed up again when I was sharpening it, and you can see some grind marks going up a little high, again, because I was rushing, but I'm calling it done and grabbing a beer. Third knife complete, and learned a lot on this one.


-
Does everyone have days like these?
HEAP of JEEP replied to HEAP of JEEP's topic in Blacksmithing, General Discussion
Amen to that! No its actually from '96 so not even AMC... Chrysler.... yeah.... that might explain everything. -
That's a beautiful pattern! Wish I had more experience to be able to offer solutions. Best I can suggest, is maybe differential hardening to keep as much stress off the tang as possible. Whatever you do with that hunk of steel though, it would be a shame to not wind up with something to show off. Even if its practical use was limited, it would, at least, look awesome sitting on a shelf. Your ring came out awesome, by the way.
-
Got some pretty good progress progress on the xmas gifts. THe knife I made for my brother, my second, came out much better than my first. I still need to quit rushing the wood work, but even that is much better than the first. This one was some pieces of leaf spring with some mild steel for the damascus, and a piece of solid leaf spring in the middle for the cutting edge. THe thrid one, I just got done grinding on and I think its ready for the heat treat and tempering. That one is for my step son, so hopefully the shape of the blade is more "cool" for him. I screwed up in the choosing the steel for this one. Should have done a little more research. I used an axle from a 4 wheeler that I got for free, and have made a couple of hardy tools from it, so thought it would be plenty tough for a camping knife, but then I learned these are usually made from 4140 which is a pretty low carbon content. So, it might be tough, but probably won't hold an edge very well. Oh well... another learning experience. It should look good though, and I don't know how much actual use it will get, so all should be good. For this one, I flattened out the axle, and took three piece of that, and two of the mild steel and folded it once and then gave it a few twists. I'm hoping for a slow, lazy spiral going through the blade. I'm going to do the same type of twist for the guard. We'll see how it all turns out.


-
I'm not in any position to offer advice, but I will give a hearty thumbs up. I didn't even know what a pineapple twist was until I read your post and then had to go look it up. LOL. I will say, I dig the shape of the blade. I've only just started my third knife and I still can't seem to get a blade shape that I really like. I think you nailed it (pun intended... RR spike... nailed it... oh come on... that was funny... or at least punny). Anyways, I'd be XXXXXX proud of that slicer! Watch the language
-
Love the rose. Mama's gonna dig it.
-
Knife Making Log, Advanced Class 201: Damascus patterns
HEAP of JEEP replied to Glenn's topic in Knife Making Class 200
Thanks for the info, everyone. I went ahead and glued and pinned the scales on, and I'll just chalk this up to a lucky break. If its actually a good thing, then now that I'm aware of it, I'll never be able to do it again. LOL. Already started on the next billet for another xmas gift.. this one is for my step son, and was thinking about trying an actual hamone. The only problem is time is running out, so fast, I'm not sure I want to try anything new... The problem is, my nature is to just jump in and try something, and thus I tend to make a lot of mistakes... but that's how I learn. I'm a hands on type of guy... what can I say? But, can't say thanks enough for the time that everyone takes on this forum to share their knowledge. Its already saved me, big time, on the learning curve. -
Knife Making Log, Advanced Class 201: Damascus patterns
HEAP of JEEP replied to Glenn's topic in Knife Making Class 200
I'm still working on my brother's xmas present, and things are coming along, but I ran in to an issue that I'm wondering how to correct. In the pictures, you can see where there is a difference in the etch... it starts on the same spot on both sides, so I'm wondering if you think this is because I screwed something up in heat treating it. I'm almost positive it isn't caused from any contaminates. After sanding it, I cleaned it thoroughly with acetone, while wearing rubber gloves, and after drying it with a shop towel, it went right in to the acid. So, after reading up on it, it seems like the likely cause might be me not getting an even heat during the heat treating, and I'm wondering if heat treating it again could correct it, or if it will cause more headaches. Its just my second knife, and its just a gift to my brother who might or might not appreciate the work that went in to it, so I'm questioning if its worth even trying to correct.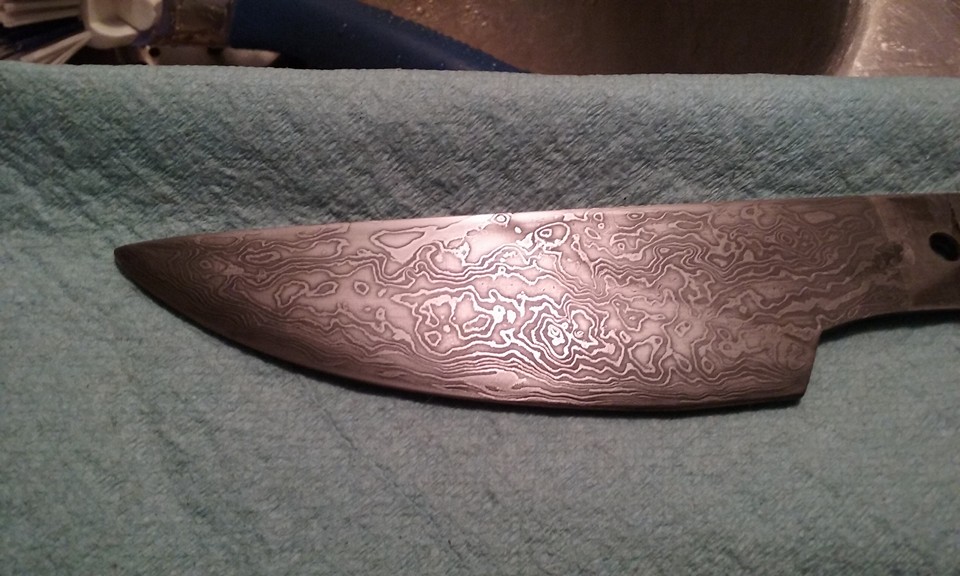
-
Wow. I don't care if that is only your 9th knife. Look beautiful! Your Father-in-law will love it! I'm working on one for my brother for xmas... I wish mine was coming out as nice as yours. You got some wicked skills.
-
Working on my second knife. I got both pattern welded billets done, and laminated a piece of leaf spring between them for the cutting edge. Got it forged to the general shape, but I didn't leave enough for the tang, so decided to forge weld on a piece of mild steel to give me another couple of inches to play with. That seems to have worked ok. So after finishing at the forge, thinking all was good, I refined the shape a little with some files, and then to the belt grinder to start a rough grind, and that's when I noticed the spine is not perfectly straight. So tomorrow I've got to fire up the forge again just to get a little bend out, or maybe just heat it with the torch, but either way, its one more added step to a knfe that has already taken me twice as long to make as I was figuring. After such a decent first knife, I was really hoping this one would come together without as much difficulty, but it seems like this one just wants to fight me at every turn. Here's a quick picture of where it is now. The bend is very slight and I couldn't get it to show up on the camera no matter what angle I took it from, but its definitely there and needs to be taken care of.

-
That sheep's horn is wicked. Beautiful knife.
-
I told my story in the introduction thread, but since my real goal is to become more proficient in knife smithing, I figured I'd introduce myself here too. I'm still very new to black smithing in general, with just a couple of months under my belt. After getting the forge set up and tracking down and anvil and a few different hammers, I spent some time making some tools... tongs, a hardy cut off, etc... and then decided I wanted to try a blade. My ultimate goal is to make pattern welded knives, but since I'm brand new to this, I didn't want to waste a whole of time if I didn't have the right steel, so I decided to do a proof of concept, knife shaped object. Its made from an old Jeep leaf spring, and some mild steel I had lying around from a bumper I fabricated this past summer. I got it to 56 layers, did the rough grinding, hardened and tempered it, then sanded and etched it. Proof of concept complete, so decided to try an actual knife. I started out with a few more layer, so the finished layer count on that one is 72. Its a hidden tang, and the handle is made from some old scrap maple with a strip of walnut in the middle. Its been a long time since I've done any wood working, so I've got to re-learn that, as well as learning about smithing. Over all, for a first knife, I'm pretty happy with how it turned out. Just from reading up on this forum, I've already picked up a ton of advice, so I want to thank everyone for sharing their knowledge and helping a whole new crop of hobbyists to learn more about the craft. I'm working on my second knife right now, which is going to be a Christmas gift to my brother. I'm actually spending a lot more time on this one, laminating a solid piece of leaf spring in between two billets of the pattern welded stuff, so it has decent cutting edge, and I'll be doing a full tang and hopefully actually shaping the handle a little better. My first one will jsut be sitting on a shelf for my own posterity, but I know my brother will put his gift through all of it's paces, so I want to make it pretty decent.
-
Does everyone have days like these?
HEAP of JEEP posted a topic in Blacksmithing, General Discussion
As a 46 year old newb to this, I'm trying to wrap my head around something... I know I run in to this in my "real" life, but for some reason, I was really hoping that there would be some better constants in blacksmithing... but alas, I seem to be plagued with reality, even in my times of escape. I have been trying to make some patterned steel knives... for the joy of doing it, and for some holiday gifts. After completing my first one, I was geeked. I mean, I see a lot of room to improve, but just the fact that I got steel to stick together in my own forge, on my own anvil, with the strength of my own arm and hammer... I could not have been happier. I learned a lot in the first attempt, and jumped in to the second, which is going to be a gift for my brother. I am using a combination of some old Jeep leaf springs, and some mild steel I have lying around in abundance. On my first one, I knew it would never get any real use, so wasn't worried about how the combination would hold an edge or anything... but on this one, I expect my brother to put it through it's paces. So for knife two, I am doing two billets of twisted damascus, and I am going to laminate a layer of the leaf spring in the middle for the cutting edge. The day after I got the first knife completed, I started in on the billets for knife number two. Got the first one done in pretty good time. The next day, I'm out at the forge, and started off the day making a candle holder for another gift. It wasn't my first, and I thought I could whip it out in an hour and move on to the second billet. But it fought me every step of the way. No matter what I did, I couldn't get the forge to burn very hot, and then when I finally did get it behaving, it seemed like every hammer hit was just a bit off the mark, or wasn't having the intended affect. I pushed through it, got the candle holder done, shut down the forge, and went in to watch some football. After I watched my beloved Lion's loose again, I went back out, cleaned out the forge, and figured things would go better with the billet, because I really do have a lot of fun making them. Don't know why, but there is just something very fulfilling to me about taking a whole bunch of steel pieces and convincing it to form one solid piece. Fired up the forge, and after cleaning, it was behaving quite a bit better. SO to make the second billet match the first, I had to get two folds in, then give it a twist, and one more fold. This would net me 56 layers, plus the twist... not a huge layer count, but I figure its plenty for someone doing it by hand. Initial weld goes okay... but again, just like earlier in the day, it seems like it is fighting me. Get it drawn out and first fold. That went pretty smoothly, and with my improved hammer technique (thanks to the advice on this forum), it seems like drawing it out is going a lot quicker. Second fold time, once again, everything seems to be fighting me... but I manage to get the surface clean, get it folded, up to welding temp, and go to set the weld, I can tell something just doesn't feel right. I usually give it two or three more welding heats, so I'm thinking whatever the issue is, I'll be able to sort out in the next heat. Brush it clean, re-flux, back up to welding temp, and this time it feels like the weld sets. One more heat to make sure and after this one, I give it a light tap on the side to see if any area is going to come apart, and the whole back quarter of the billet comes free.... Well XXXXXXXXXXXXXXXXXXXXXXXX I quickly cleaned it the best I could, re-flux, back to welding heat, but from everything I've read, its probably to late, and I start making contingency plans. Since this billet got to shape so much faster than the first, I haven't lost as much steel to scale, so I'm thinking I can salvage the 3/4's of it that are solid and I decided to keep going with it. As I drew it out, I wasn't even that concerned with the part that didn't weld... I've got it all planned out, so full speed ahead. I got it drawn out, and started the twist... and low and behold, its not just the back 1/4 of the billet.... that last weld came apart over 2/3 to 3/4 of the thing, and now, with the twist, it looks like some kind of mid-evil corkscrew/ torture device. At this point, its beyond hope, and I threw it in to the scrap bucket, having wasted en entire afternoon/evening. Fast forward to last night... Watched the Lion's lose again, then went out to work on a new second billet. Got the metal prepped, fired up the forge, and right away I can tell it is going to be a good day. The forge fired right up, burned nice and hot, the welds went perfectly. I ended up calling it a night right before the twist, just because I had to work in the morning, but as I'm lying there in bed last night, I kept trying to figure out why there should have been such a night and day difference between these two particular days. Weather conditions were about the same, but even if they weren't, I can't see it affecting the way the forge is behaving... I did just dress my hammers (thanks again to the forum), but that shouldn't have had that much of an effect on whether my welds held or not, or whether I could hit where I was aiming. I don't know... it just seemed like the blacksmith gods were fighting me one day, then blessing me on a different day. Did I inadvertently make some required sacrifice between then and now that I'm not aware of? I hoping all of you experienced folks will tell me that everyone has days like that, and that its worth it to fight through, or better to give it up for the day and come back tomorrow. Maybe I'm looking for to much meaning in all of it. Maybe I need to kneel before my anvil and sacrifice a piece of aluminum... Just trying to wrap my head around it all. -
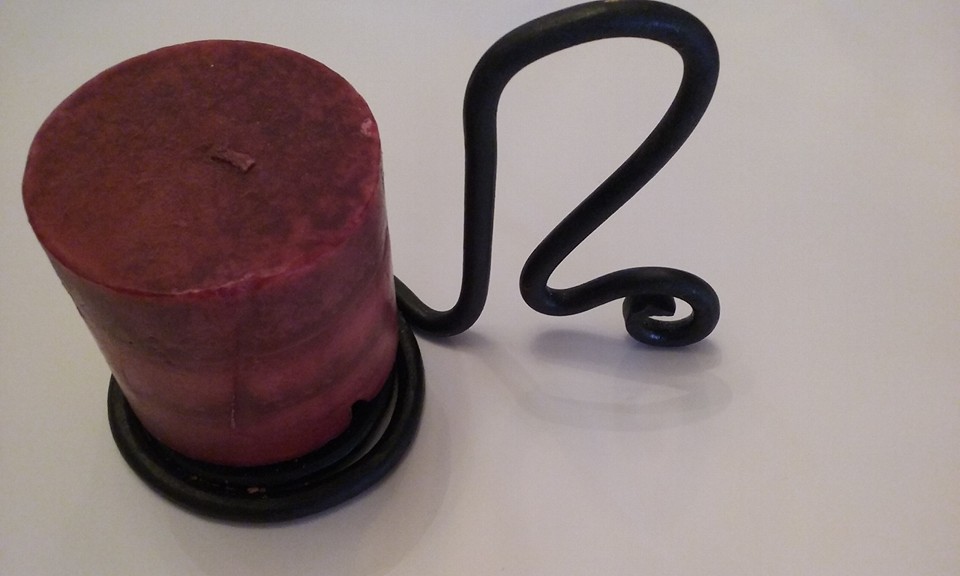
Thank you. I started with 48" of 3/16 rod.
-
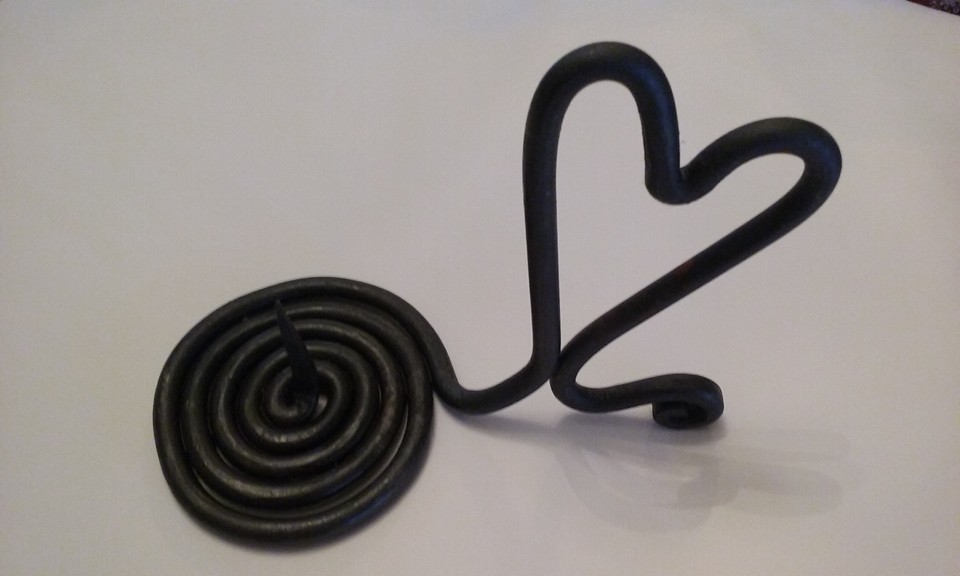
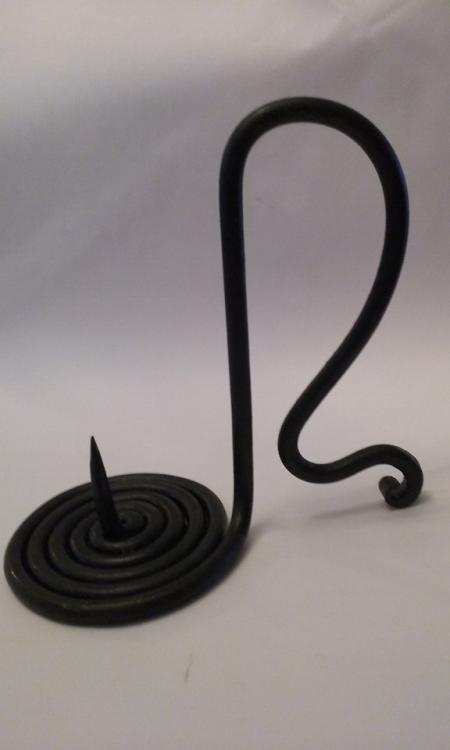
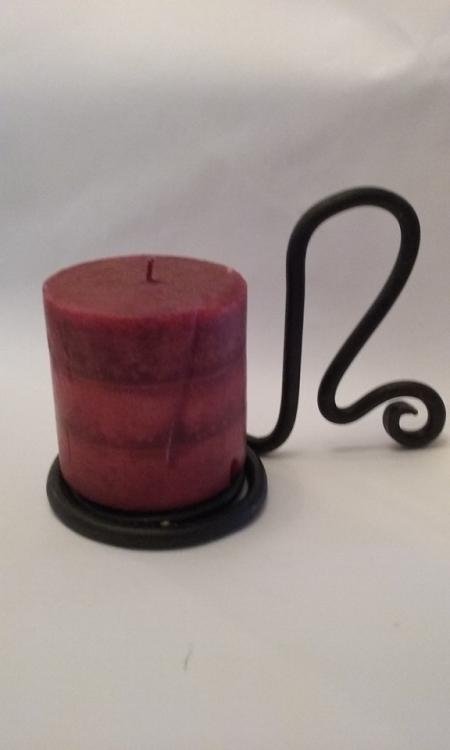
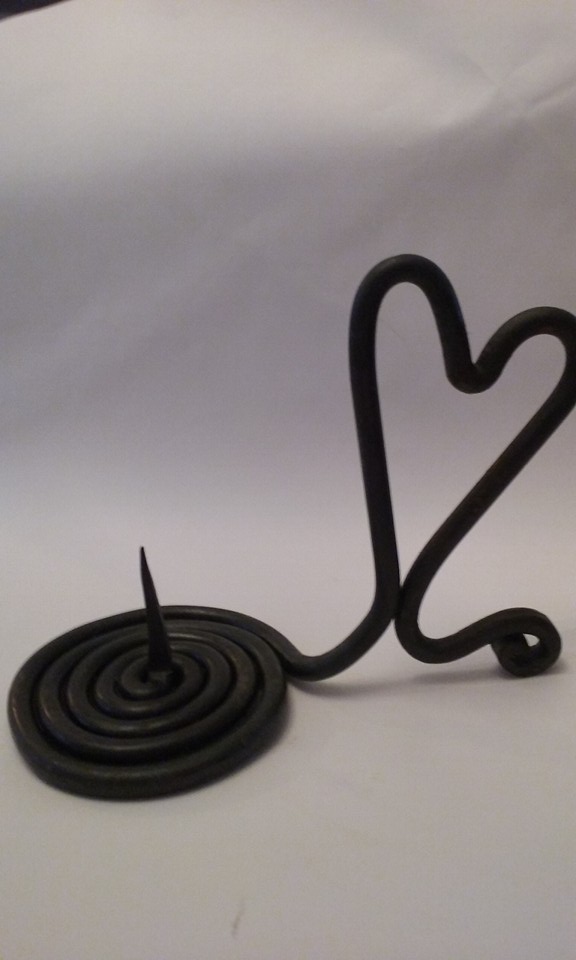
I've only got a couple of months under my belt, and most of that has been getting the brake drum forge set up, making some tools, and just generally figuring out how heated metal reacts, but I figured I ought to get some projects under my belt. These are some candle holders I've made for xmas presents. Saw the basic technique on a few different youtube videos and really liked how they looked so decided to give it a try.