HEAP of JEEP
-
Posts
203 -
Joined
-
Last visited
Content Type
Profiles
Forums
Articles
Gallery
Downloads
Events
Everything posted by HEAP of JEEP
-
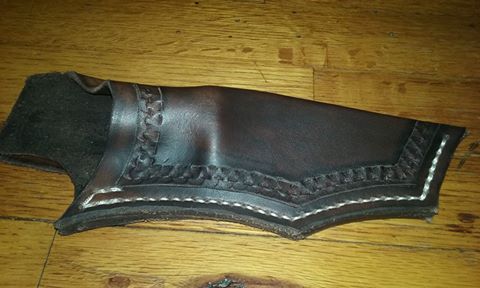
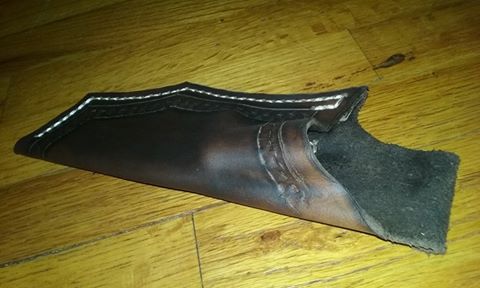
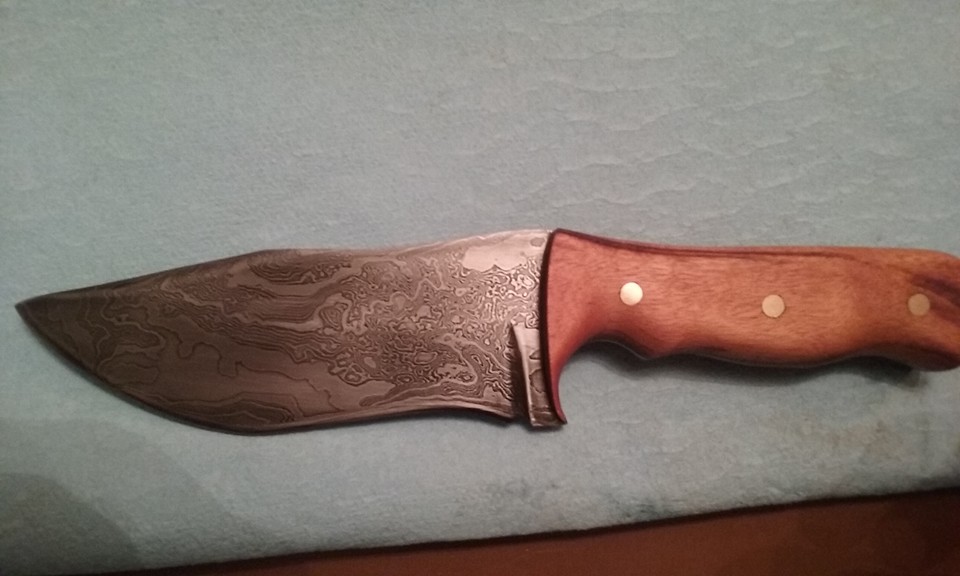
Just got the sheath done for this. I haven't spent a whole lot of time on learning the leather aspect, but this time, I really put some effort in to it, and I really like how this one came out.
-
Yup, very worried... hindsight being what it is, and all. I'm still learning though, so chalking that up as a mistake that won't get repeated in the future.
-
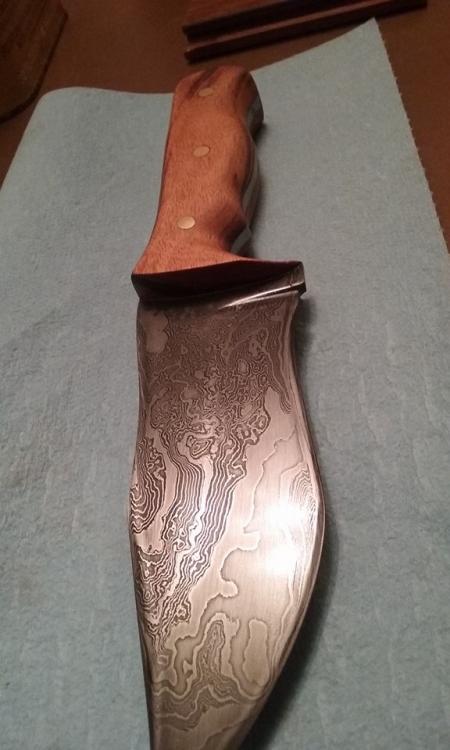
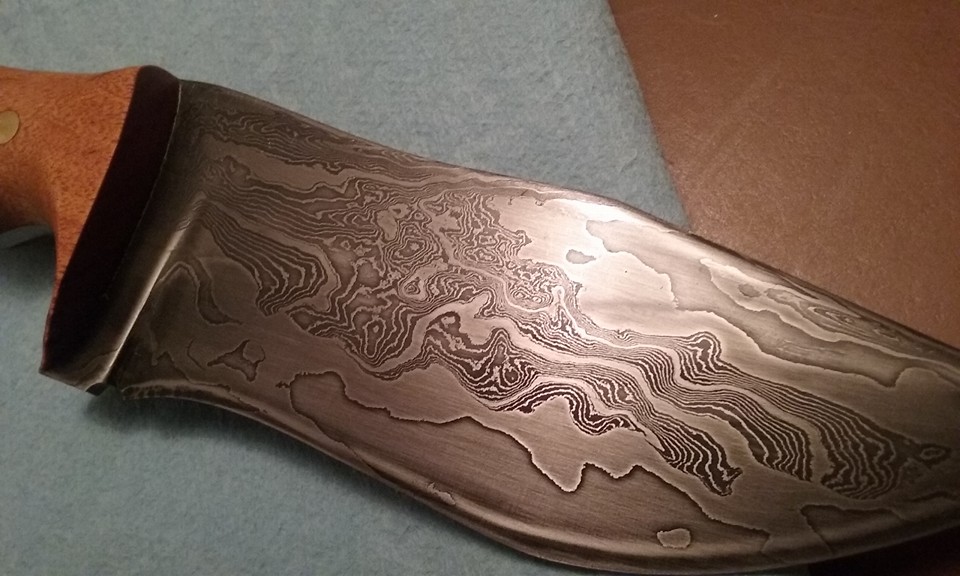
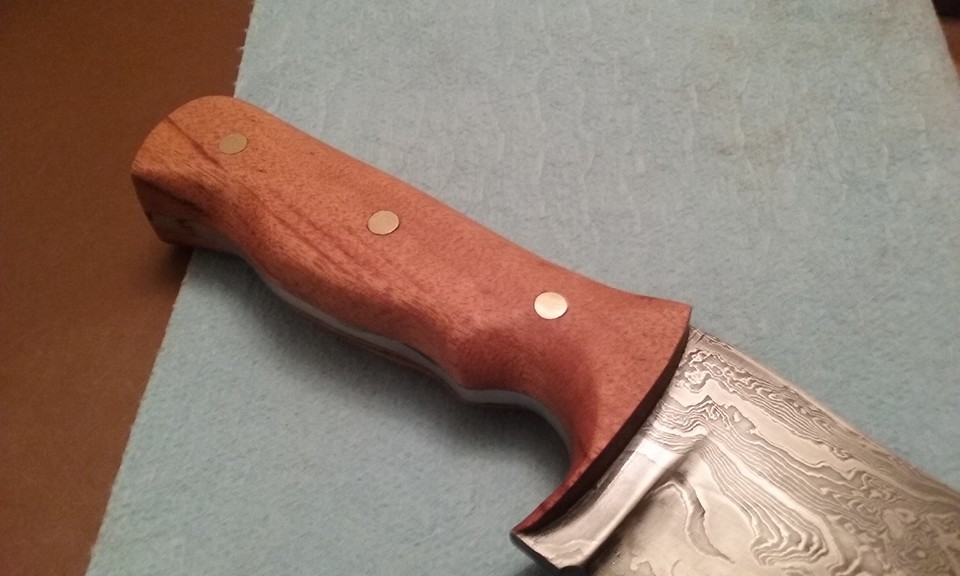
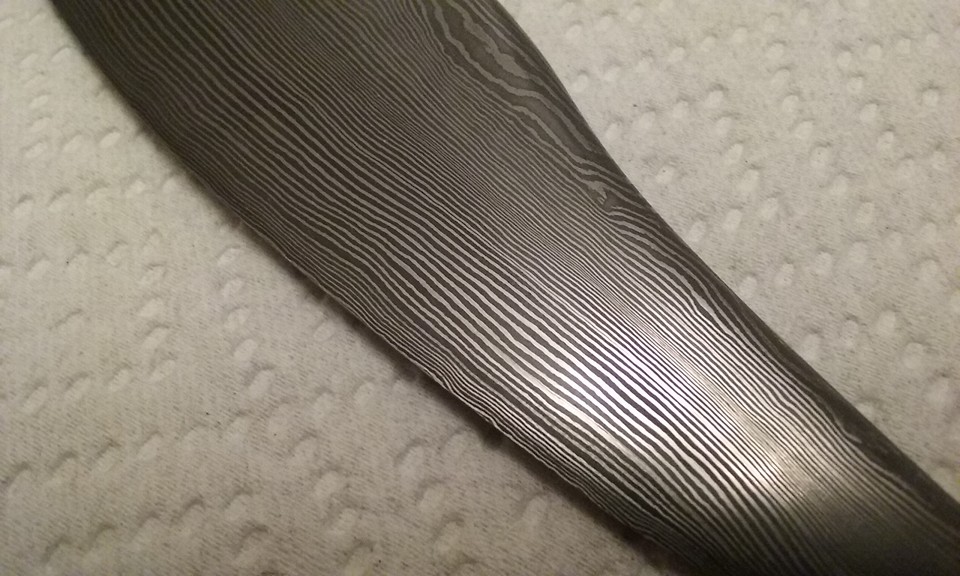
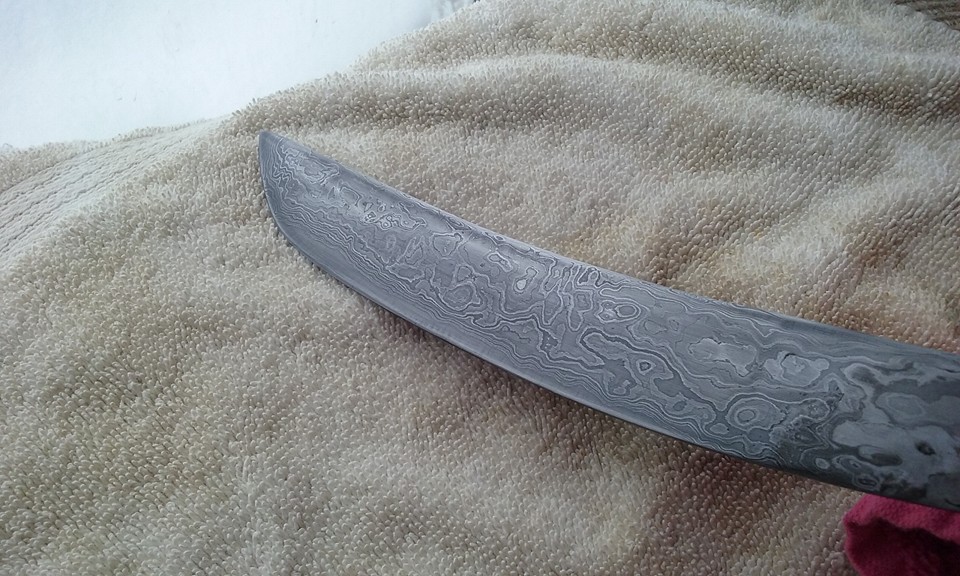
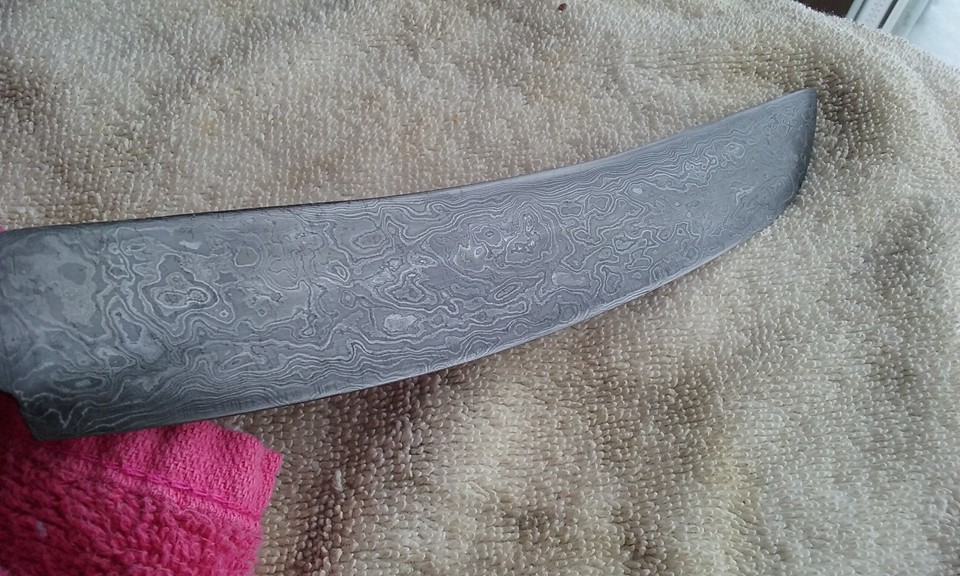
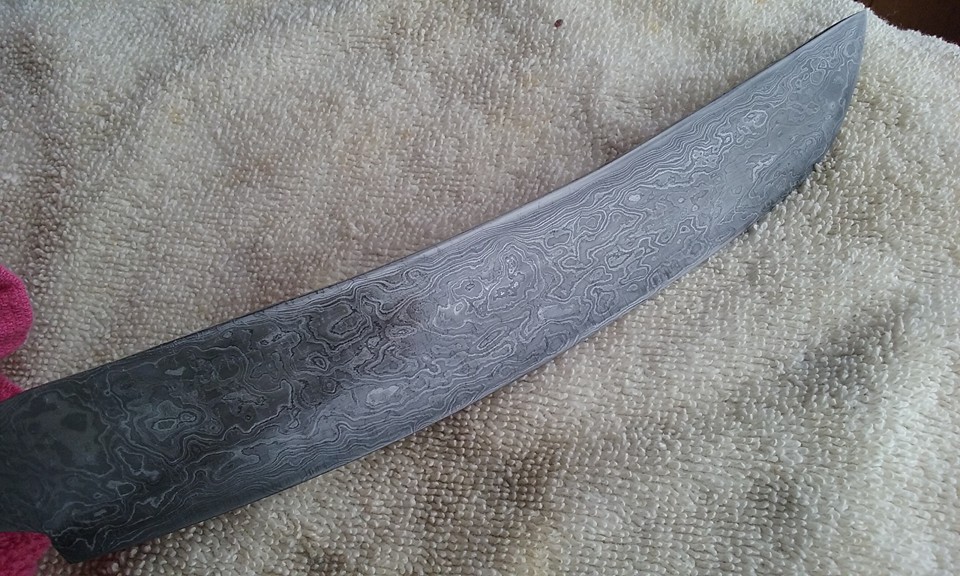
Here's my latest effort. I think this is my 6th knife overall... maybe 7th. With all the hammering, I've lost count. I started this one as a commission for another Jeep guy. He wanted a knife made from steel off of a Jeep, so I got a deposit and started a billet. He ran into some financial problems a couple of days later, so had to cancel his order, but I got to keep the deposit and since I was already well on my way, I just decided to finish it.... maybe I can sell it to some other Jeep guy. Its a total of 283 layers. I made the billet from the leaf springs and 15n20. Every time I cut and folded, I sandwiched another layer of 15n20 between, just so I wouldn't have to deal with trying to weld the leaf spring (5160?). When I got to 140 layers, I gave it a good twist, then I treated it like sort of like a san mai blade and put a layer of 1080 between two layers of 15n20 and then the leaf spring billet on the outsides. So, with the 1080 running down the center, it should have a pretty decent cutting edge. The handle is from a tiger wood flooring sample from Lowes. Its not my favorite pattern that I've done, but the overall shape of the blade along with the fit and finish tell me I'm making some pretty good improvements. On to the next, I guess.


-
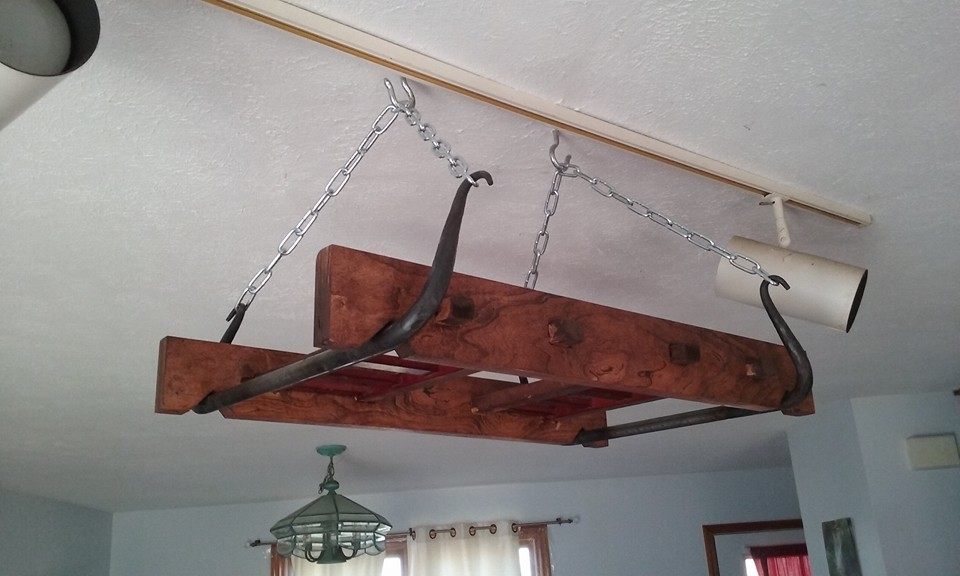
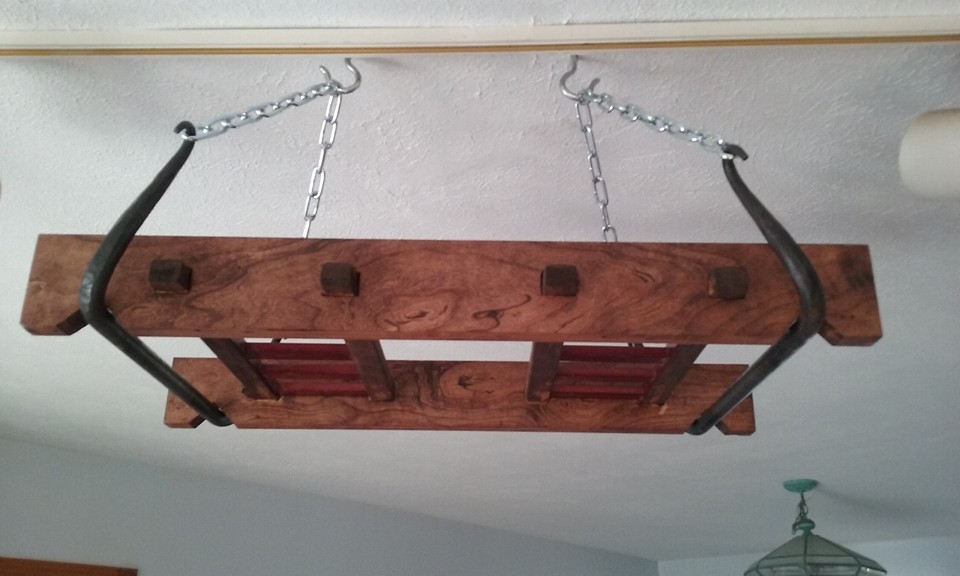
Yeah, lucked out on this stuff. The pallet wood I salvage usually doesn't have such nice grain patterns. I just grabbed a can of stain off the shelf... I believe it was Minwax Red Mahogany for this one, and then a light coating of the Minwax rub on poly. So I googled it, and I gotta say, I really like the look. Might have to play around with this idea when I get a little more time.
-
Thanks, Thomas. It never even occurred to me to use some old rusty chain. I probably have just the right stuff lying out behind the shed.
-
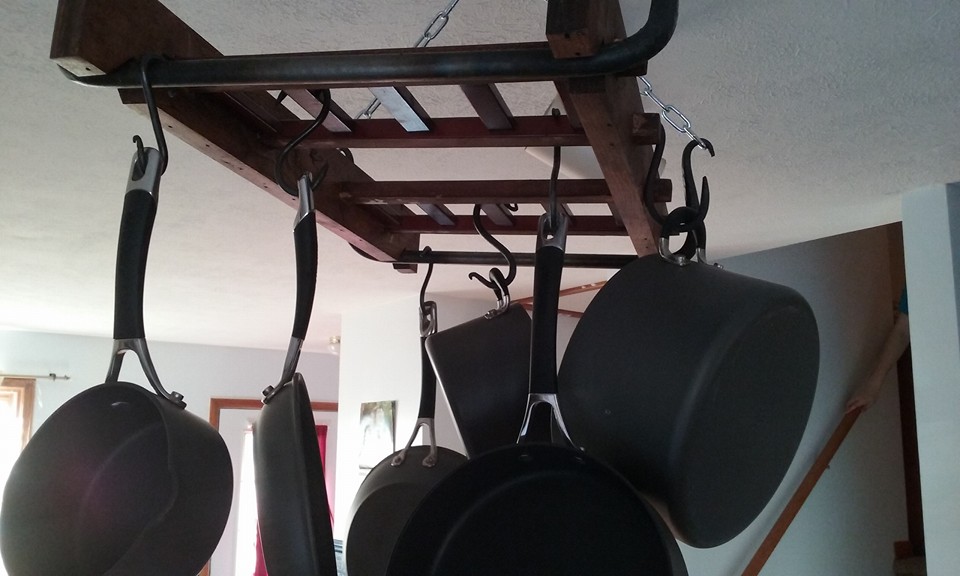
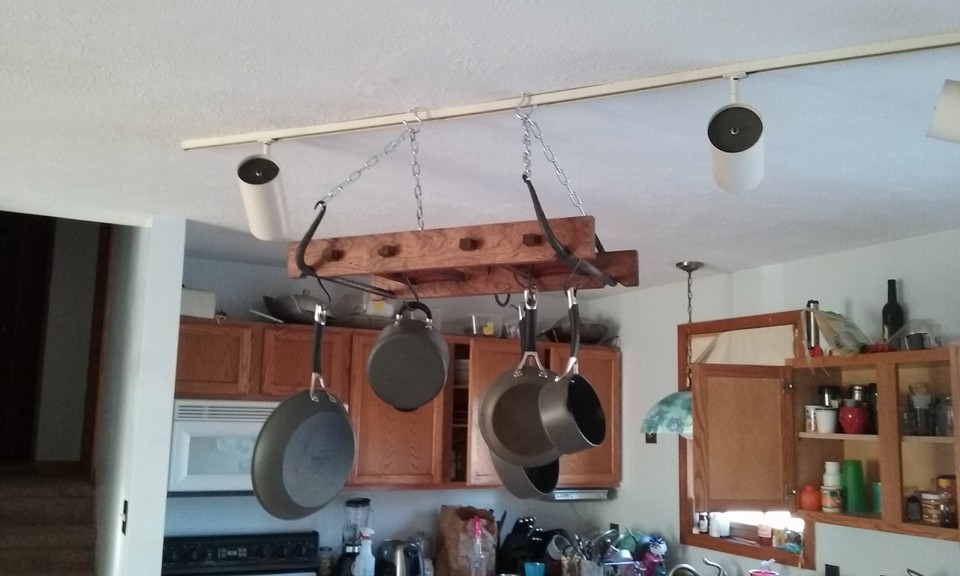
Since the weather has been quite spring-like the past few weeks in my neck of the woods, my wife has had me focused on the Honey-Do list. Unfortunately, most of the list does not involve firing up the forge. BUT.... I did manage to get a little forging time in with the pot rack that she asked me to make. The wood is all reclaimed from pallets and some other scrap I had lying around, and the brackets I formed from some 1" round stock I seem to have an abundance of. Nothing fancy, but it was nice to fire up the forge again, and I think it came out pretty nice. I made a few s hooks in different sizes, to fit over different sections of the rack, and then just used some extra chain I had lying around to hang it. The new chain really stands out from the overall rustic look I was going for, so I might have to take the time to forge my own, but I might be able to get away with painting the existing one black. But that's a project for another day.
-
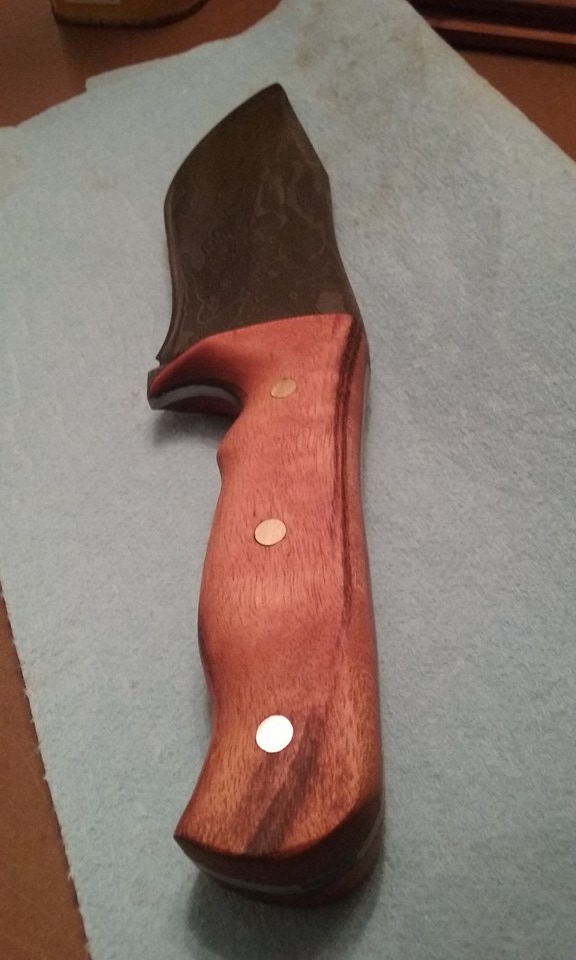
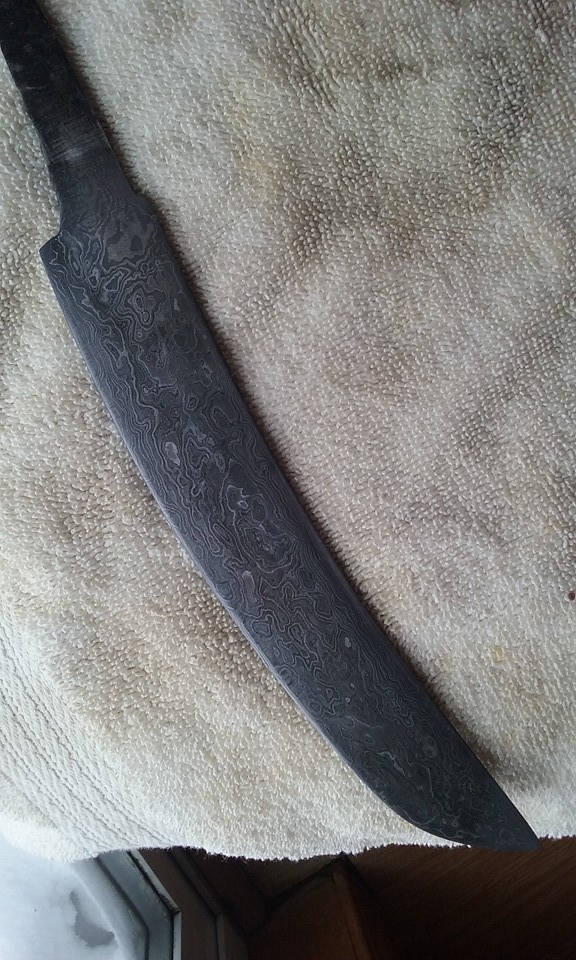
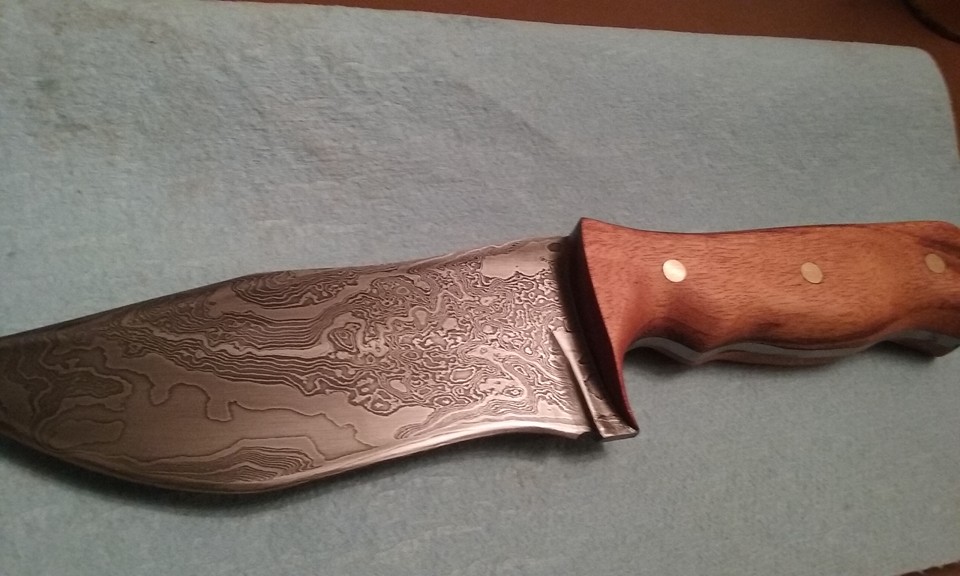
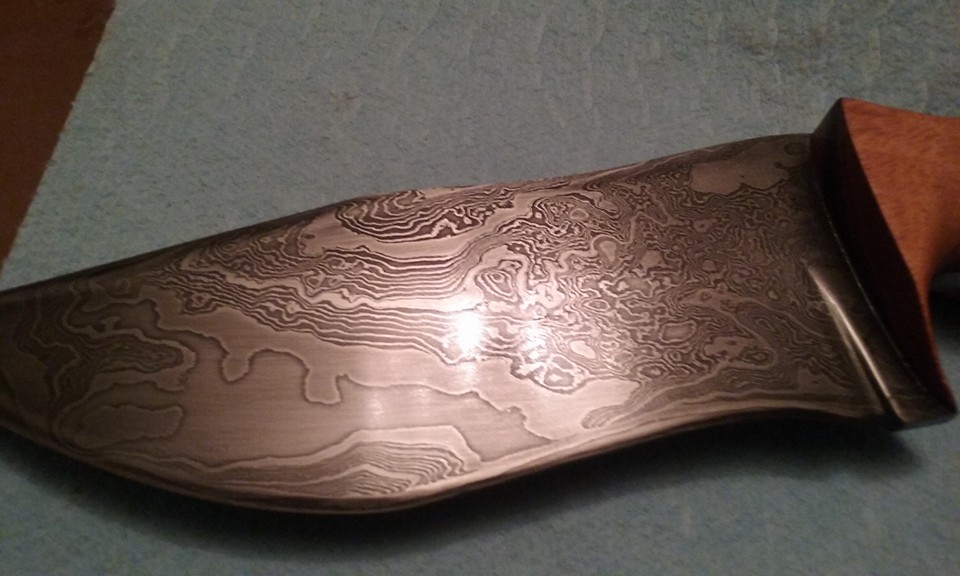
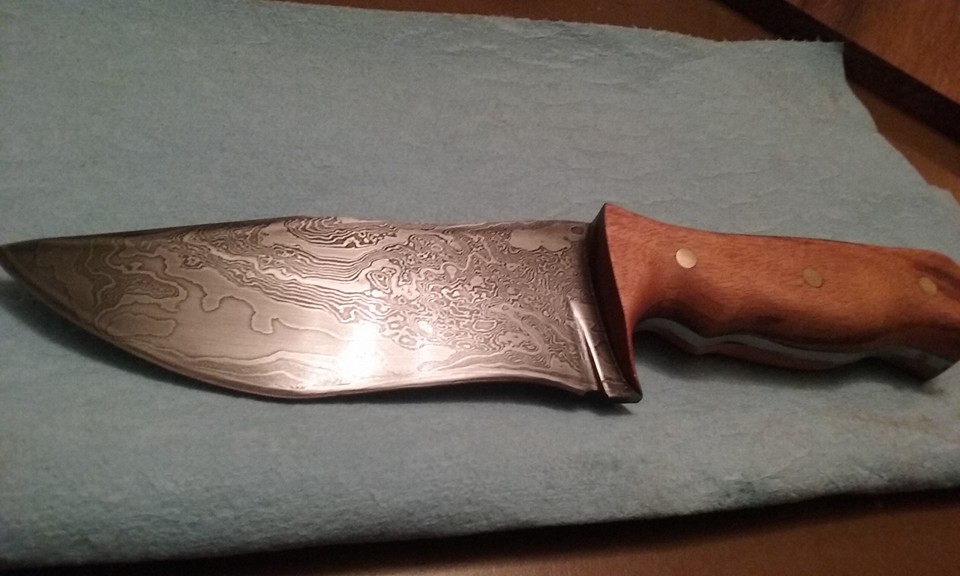
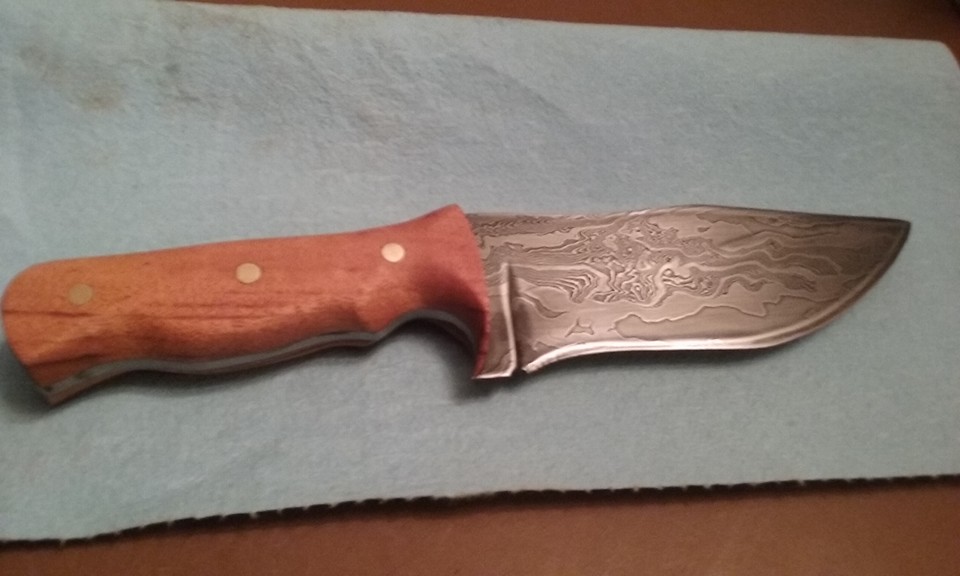
Been working on this one for my wife for Valentine's day. Blade length is 6 inches. Just something small to throw in her camping bag. This is the first blade I've made with the 1080 and 15n20 I got from Kelly. I've spent some time making coupons and working out the HT for this new steel, but it was time to get this one done. Its also the first knife I've made since I completed my 2x72 grinder. I can't believe what a difference that grinder made in the finish work. Its only my 6th knife overall, but am really happy with how this one is coming out.


-
That's actually a great idea. I haven't done a pineapple twist... in fact, had never even heard the term before reading about it on this forum, but since I'll be doing some practice pieces with the mild steel, I can try it a few times and bring him an example. Thanks for the idea, Jim.
-
Thanks for all the input. We spoke abut it all today, and he would like as much of it hand forged as possible, so I'm going to give it a go. We agreed on a price and he asked me to just get it as close as I can with forging it, but he definitely doesn't want a machined piece. I've got some 3/4 round stock mild steel, so I might play around with that for a night or two before I actually start on his. He would prefer that I hot punch the holes in the handle too... not quite sure how to tackle that either. I'm thinking I'll punch them while the billet is still square, and the just drift them all to size after I round it up. However it turns out, it will be a fun undertaking. He's covering the cost of the stock (plus a decent mark up), the coal, and the sanding belts, and then we agreed on a price to include my time... So no matter how much time it takes, I think I'm still coming out ahead... it might not work out to much per hour, but since I'd be forging some project during that time anyways, I figure I might as well take on the challenge. My wife's incense holder can wait a few days. LOL
-
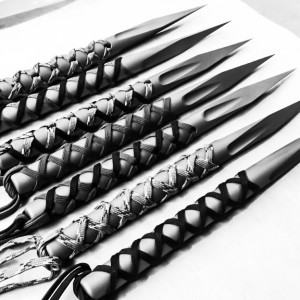
After showing some of my early knives around, a coworker asked me to make him one of these spikes in damasacus. Pretty stoked that I got a paid job, but not exactly sure how to tackle what he wants. Its not like any knife I've made so far. On the surface, it looks pretty easy.. its just a spike... but not quite sure of the best way to get the blood groove in there. It looks like its only on one side, and my first thought is to just use a fuller, but I was also thinking it might be easier, and come out cleaner if I just make the billet, then drill it off center and cut the angles, rather than forging them. I guess either would work, but not sure which will give me a cleaner end result. Its going to be in 1080 & 15n20 and I'm thinking a nice tight twist would look pretty cool going down the spike. The ones in the picture are titanium.
-
I just wanted to give some props to the company I ordered the grinder wheels from. I got them from a company called Oregon Blade Maker. The price was good and I figured it was worth taking a shot. So now that everything is up and running, I have to say the wheels are great, but I had a problem with the bearings in the tracking wheel. I was getting a nasty whine, and the wheel was getting pretty warm, compared to the two platen wheels. When they arrived in the mail, I spun them in my fingers, just because that's what guys do when they get new toys, and I did notice a hesitation in that wheel but thought it just needed a little break in period. After getting some time one the grinder though, the hesitation is getting worse. Bearings are cheap, and available locally, so I figured, no big deal, I'll just pick some up in town, but I needed the right size and since I was at work and couldn't measure them, I just dropped Oregon Blade Makers and email, explaining what happened and just asked for the size of the bearings so I could get the correct ones. Within five minutes, they had responded. That alone gave them major points in my book, since it can take days for businesses to get to me, even the local mom and pop shops. The person that responded apologized for the bad bearing, gave me some advice about attaching it to my grinder, and informed me that they had already put a couple of new bearings in the mail to me, even though I hadn't asked for them to replace them. That, my friends, is what customer service is all about. I wanted to give the guys/gals at Oregon Blade Makers a shout out on here, because I think the customer service was perfect.
-
Are there more Traverse City folks on here? I would love to get know everyone. I'd love to see your shop too. I have no idea the best way to even have things set up. Right now, everything is just scattered around my garage where I could find room. Would love to see how a good shop is set up and maybe get a pointer or two... I'll bring the beer.
-
interesting.... so my assumptions have bit me in the booty once again.... I never did consider the nickel.
-
Thanks Justin. I'm sort of taking it one day at a time as far as where I'm going with this, but if I ever get to the point where I am making knives worth selling, then I agree a press becomes a necessity... I've already started softening up my wife for the inevitable day where I tell her, "Oh, by the way, I spent $3500 for a press... should be here next week" In reality, I'll probably build one for less than half the cost, but so far, what I'm turning out make great gifts, letter openers, and wall hangers, so I haven't really spent much time thinking that far ahead. We'll see where this adventure takes me.
-
This might seem like an odd question, but maybe not... Since I'm still so new to this, I'm dealing with a couple of things that I'm just curious about and was hoping someone with more knowledge and experience might be able to answer. First, since my start in knife making a few months ago, I have only been doing damascus blades. Its really the only thing that ever interested me about knives, so its the only thing I've been focused on. When I started, I was using a lot of scrap jeep parts... mainly leaf springs, but then I've used some old files, mower blades, and few other things from the scrap pile while I was teaching myself how to forge weld. I finally progressed to the point where I think I'm turning out some decent "looking" blades, so time to move on to quality steel. Over the holidays, I ordered some 1080 and 15n20 from Kelly Cupples, and last night I decided to break it open and start on my next project, a small bowie knife for my wife's camping bag. I'm also doing a small billet to make some small coupons and a tiny blade or two to test my HT process since I've never tried heat treating 1080 and 15n20... but all this was happening while I was working on the billet for my wife's knife. Once the billet was ready, I started like I always do, heating it, fluxing it, getting it up to welding temp, etc... The welds on this billet went super smooth... much easier than the scrap I had been playing around with... but then when I started drawing it out to get to the first fold, it was like nothing I have encountered yet in my limited forging experience. The overall size of the billet was actually a little smaller than I usually start with, so I thought it might even be a little easier to start than normal, but moving that metal seemed to take a lot more effort than I was expecting. So my question is, is this a common experience? Does the higher carbon content really make it that much more difficult, or is this all in my imagination? The only reason I could come up with... I also just got in some IR3 welding goggles, since all of my forge time is after work, in the dark, and running my forge at welding temps was really causing my eyes to go a little haywire. I don't stare in to the thing, but even just glancing in there to peek at the billets would give me the lingering spots and totally destroy any hope of adjusting my eyes to the darker corner where my anvil is. The goggles sure helped with that, but it took some time to figure out the best way to use them for myself. I started with just putting them on, and leaving them on. They darkened everything, but I wasn't tripping over anything, and could still see the anvil reasonably well. The problem was, I was having a very hard time judging the temperature of the billet. At one point, after the first hammer hit, I was convinced it wasn't hot enough, so I just took off the goggles, but everything hot... the billet, the forge, the flames, all looked a strange orange color. My eyes had adjusted to the green lenses, so it was going to take a few minutes for them readjust to seeing things normally... but right then, I still couldn't judge how hot the billet was, because everything hot had the same color. Eventually, I went back to my regular safety glasses, and then just kind of held the goggle between my eyes and the forge, whenever I had to look, and then would pull the billet out real quick to get a look at it without the goggles. Once I started doing it that way, it got easier to judge temps, and drawing out seemed to go a little quicker, but I was still having to hit that billet with everything I could to make it move like I had gotten to used to with the billets made from scrap. I did manage to get it to 48 layers before calling it a night, but as I sit here at work, contemplating everything, I can't decide if it was all in my imagination, if I was trying to work it to cold because of the goggles, or if 1080 is really that much tougher to forge than the 5160 or whatever alloy my usual leaf springs are made of.
-
I'm right there with ya... as soon as my wife found out I was thinking about building a forge, my "honey-do" list exploded.
-

Passing on to Future Generations
HEAP of JEEP replied to rthibeau's topic in Blacksmithing, General Discussion
I'm brand new to this, but live in the same town, and even though I've only been smithing for a few months, I've already met a few teenagers who are quite interested in learning. I know one of them fairly well... single mom who struggles to make ends meet, dad split when he was young, is a drunk, and doesn't have much to do with him at all... not saying he should be considered, but just pointing out that there are kids in Northern Michigan who would love to learn, and probably more than handful who would cherish any equipment they could get their hands on and call their own. XXXX I've been scraping together everything I have, and I cherish each and every piece I own... from my brake drum forge to my chipped up, craigslist find, Vulcan anvil. Since I'm still so new, I haven't felt like I was in position to show any of them much beyond offering to let them come and watch me bang on some hot metal, but maybe you could take one or two under your wing and let them see some true talent, and learn a few things. Then, who knows, maybe one of them will be deserving. please watch your language and read the Tos for this site before posting again. -
Why does real life have to get in the way so often. Even now, I am sitting at work, thinking about the design of the camp knife my wife asked me to make her for her camping bag. I started on the billet for it last night, but now this ridiculous thing called, "Making a living" is getting in the way of all my fun!
-
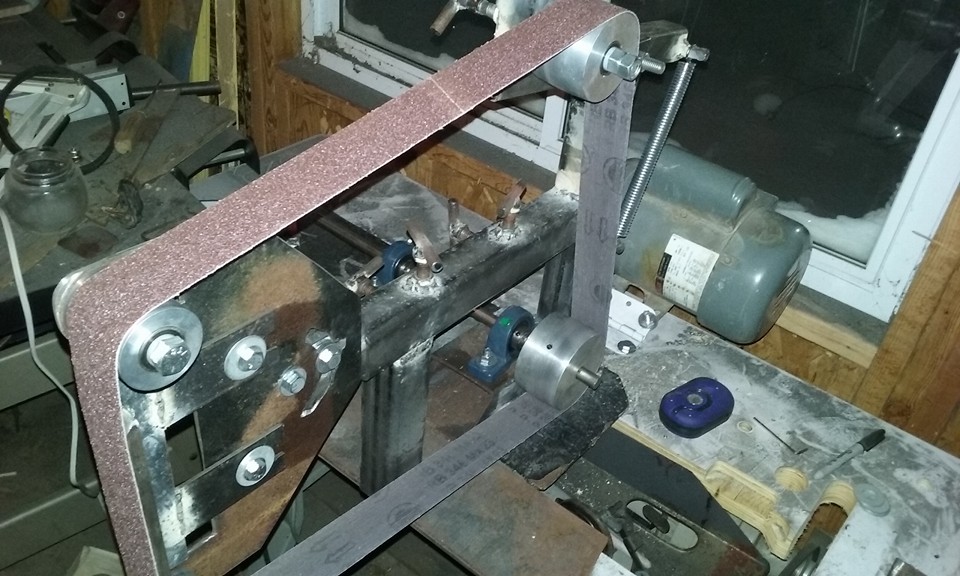
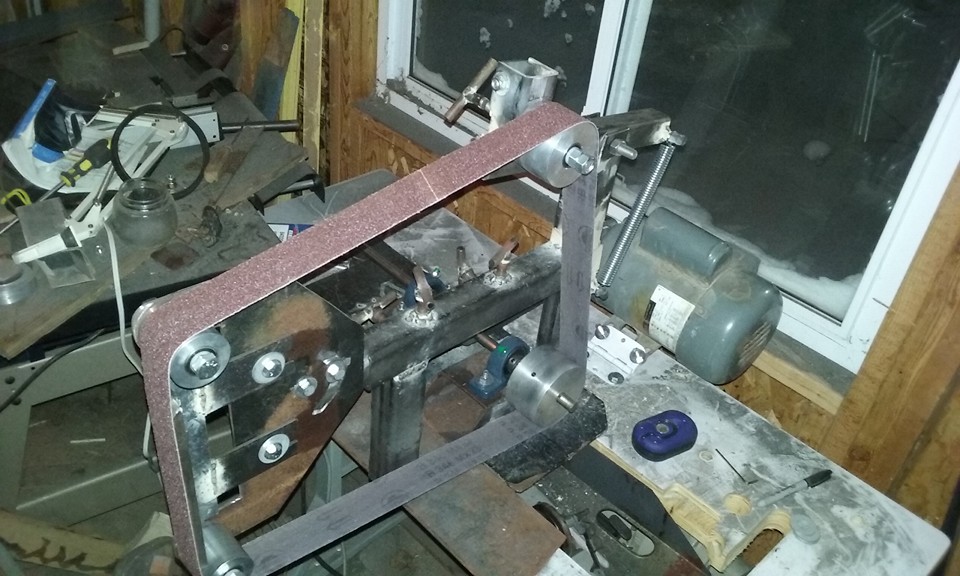
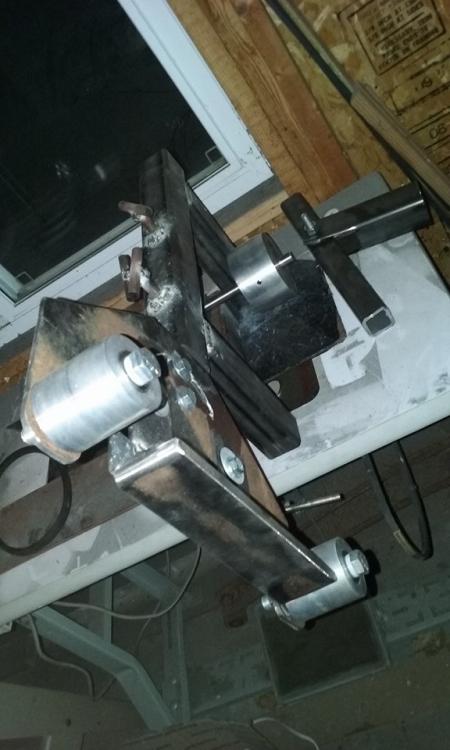
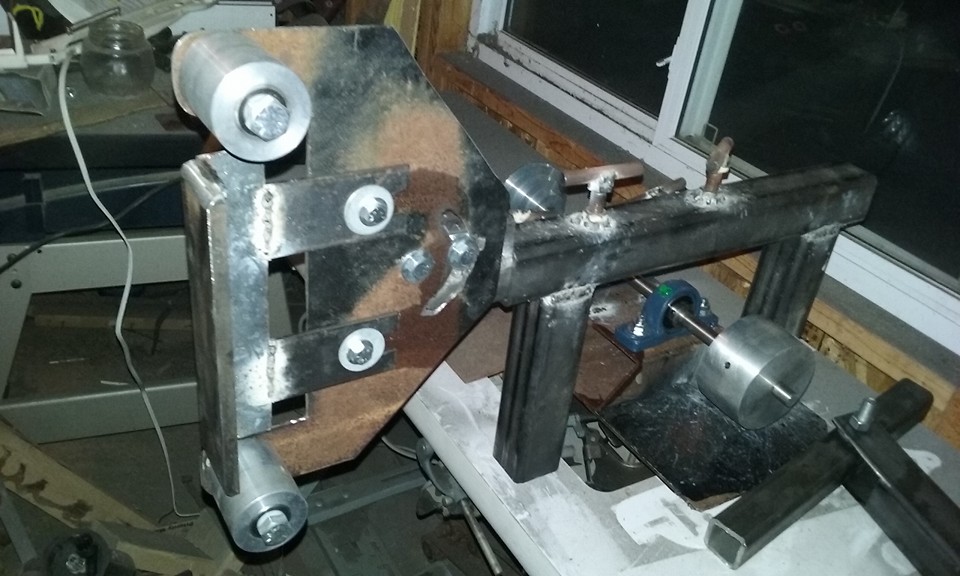
Got her up and running tonight. Had to double nut all of the wheels because they kept coming loose while it was running. Also had to use some washers as shims in a couple of areas to get everything lined up just right, but its tracking pretty good. On the fastest speed, the 3/4 hp motor does pretty good. It will need to be upgraded at some point, but its already a ton better than the 2x36 bench grinder attachment I've been using. Its to cold to anything more on it tonight, but after it warms up, I'll give it a coat of paint and make it look a little nicer, but for now, this project is done and its time to get back to forging.
-
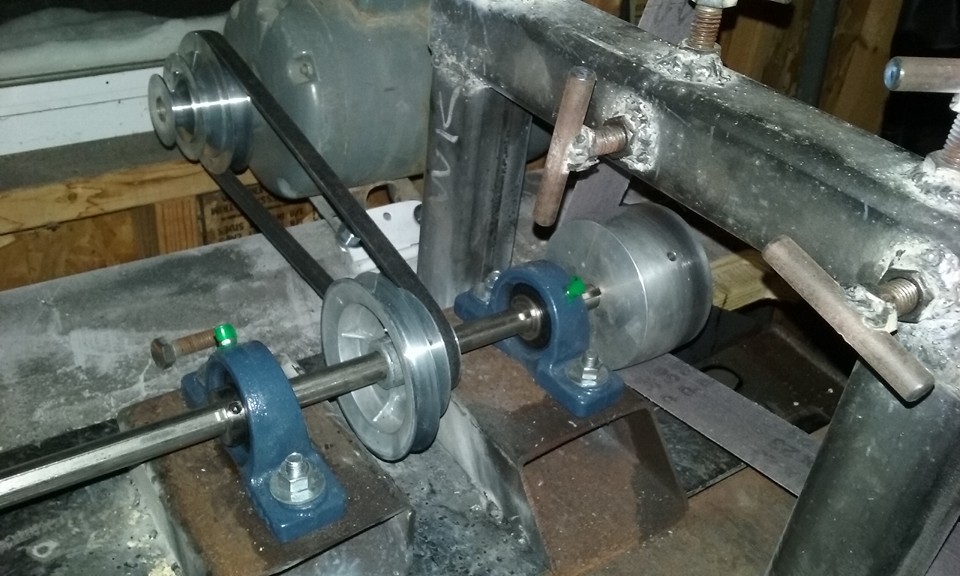
Hi Jim, glad to meet a fellow northern Michigander. Following a bit of your advice, and since everything was just tacked in place and easy to move, I did separate the two blocks and put the pulley between them, then moved the whole assembly over so the drive wheel is about an inch from the block. I forgot to get pictures before leaving for work, but besides adding a third block, which I have to order, it seemed logical to me... of course, I'm making this whole thing up as I go along, so "logic" might not be the proper term. I got the tension arm and tracking wheel in place, and with just turning it by hand, it looks like it should track fairly well, right off the bat, but I won't really know until I have the motor hooked up. I had the motor hooked up last night, but then the failed logic hit. In my head, I had it all planned out, the motor mounts worked just as I had intended. I'm using an old industrial sewing machine table to mount it on. I haven't used the machine in years, so figured I'd just remove the head of the machine and use the table rather than let it keep wasting space. I got the motor wired up to the control box that came with the table, and lo and behold, it was running the wrong direction. No worries, just swap the leads... no joy. Then, clear as day, and something I had never noticed, even though its was printed right there on the motor.... "non-reversible" So had to move the motor to the back and turn it around... a little on-the-fly designing, a little more cutting, drilling, and grinding, and I'm ready to mount it up in its new location, only to find out that the v-belt I have is now a good 4" to short for the new design and with how it is built, there is no way to make it work without tearing it apart and redesigning the whole thing. Thankfully I'm picking up an alternator for one of my Jeeps today, and the parts store has the proper belt in the proper size. If I can get the garage warm enough to actually work out there tonight, there is a good chance I should have this up and running this evening after work. If I had really thought this through, I should have dropped the old sewing machine motor from underneath the table (too small to power the grinder), and hooked up the motor I am using. Then I could have run the belt up from underneath to the pulley, and used the foot pedal/clutch assembly from the sewing machine to control the speed of the grinder. Oh well, maybe that's an upgrade for a nice warm summer day. Its hard to concentrate and stay motivated when its only 11 degrees in the garage. My brake drum forge table is on wheels so I can just wheel it out of the garage, but I would sure love to build some kind of chimney/vent system to be able to fire it up inside. That would warm things up in a hurry.
-
So my teenage daughter asked me to make her a samurai sword... Gotta love the young people. Since there are no swords in my future, and she doesn't even have to slightest clue what to do with a katana, I decided to just make her a katana shaped something. While I was waiting for my steel order to come in from Kelly Cupples, I just decided to have some fun and weld up whatever I could find lying around. I wasn't actually planning to make this when I started... I just wanted to get some more practice in with my forge welding, but everything was welding up good, so I just kept going until I decided to give it some shape. Figured I'd do my best to give it a katana "look" and then my daughter can hang it on her wall and tell her friends how cool her dad is. Blade length is 9". Steel is a mix of old leaf springs, an old file, part of a lawn mower blade, and whatever else I happened to lay my hands on. Came out at 132 layers, and then did it san mai style, drawing it out and wrapping it around a 5160 core. It will never see any use, but figured I'd practice that too. I haven't really been to worried about the fit and finish on this one, but its still coming out kind of cool, especially for a teenager's decoration.

-
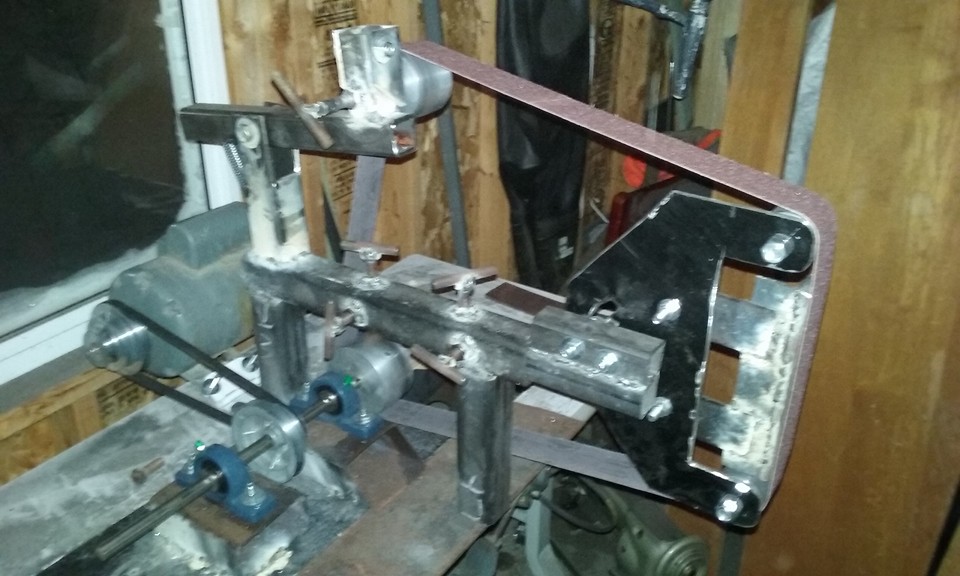
I've been working on this grinder for a while. Its not quite done yet, but its starting to look like something... something like a heap of grinder to go with my heap of a Jeep. Just been piecing it together with a lot of scrap I have lying around. I did buy the wheels, pillow blocks, and step pulleys, but everything else is from whatever I could scrounge. I only have a 3/4 HP motor for it, but I'll eventually upgrade that... again, its just what I have lying around that has any chance of working for now. Since I've been using salvaged steel, I only have a total of about $200 in to it. Hopefully it will work okay. I'm not a machinist, so I was quite surprised it actually is coming out square.

-
I work in Traverse City, but live in a little berg called Kingsley, about 20 miles south of T.C.
-
Greetings from Northern Michigan. I'm still to much of a newb myself to offer any helpful advice , but had say hi to fellow Michigander.
-
Basics video series
HEAP of JEEP replied to Everything Mac's topic in Blacksmithing, General Discussion
Just subscribed. Great info for us newbs. Thanks for taking the time to make the videos and sharing your knowledge.