forgemaster
Members
-
Joined
-
Last visited
Everything posted by forgemaster
-
We normally put our hammers on a large monolithic cast block of concrete. All our hammers bar one are 2 piece. The anvils are set in a recess cast into the block with a thickness of conveyor belt under them. We then secure the anvil in the recess with wooden wedges/keys fitted into the gap between the edge of the anvil foot and the concrete. These are normally driven into place with either a sledge hammer or a modified jack hammer. We use no reo bar in the foundation just cast a big block of concrete as dense as we can get it. If you have to use an immersion vibrator try to use it sparingly as this causes seperation of the concrete and the mix water. The hold down bolts are Tee ended bolts fitted into fabricated pockets which are positioned into the concrete as it is being poured. We normally have a plate fabricated removeable formwork for the anvil recess which has provisions for aligning the bolt pockets to the recess. The reason for the pockets is to allow lateral movement and the bolts to be removable as we have had them break off level with the concrete when they have been cast solid in the foundation in our early days. When cast solid in the concrete I have found there is not enough flex in the top of the bolt to accomodate any movement of the hammer as it is working. Now if they break off, and we cant get the tee head out, the void at the bottom of the pocket is deep enough to allow the broken head to fall down with enough room for a new head to be inserted. The hammer its self is then pulled down to the foundation with a layer of thick conveyor belt under it to take into consideration any unevenness of the concrete, as getting the top surface of the concrete flat and true is not one of my good points. We have had hammers located such as this for about 12 years now doing fairly heavy commercial work 5 day a week with no problems so far. Cheers Phil
-
No solenoid valves, no flame failure device, and after taking it apart no jets of any sort. The gas pipe comes directly into a mixing valve which is adjustable. We have adjusted the gas pressure to allow the furnace to run with full blower flow and the gas tap fully on. Goes like a charm. Only problem now is the workshop sounds like there is a jet engine in here, the oil furnace just has a low rumbling roar, this has like a higher whining sound, along with a roar. Tafe Colleges all over NSW used to have these furnaces and not all tafes would have had natural gas piped in. (As not all towns in NSW have town gas supply) so it is logical to assume that they were made to accept both types of gas. The furnaces were used by metal fab students to heat a disk of plate to hot press a dished end for a pressure vessel exercise which they then had to fabricate. Tafe management obviously decided that this exercise was not of any use to industry so the presses have all gone as have the furnaces. Thanks for everyone help on this. Phil
-
We just have the pins in the swages loose enough so that the top half can move easily. If I use 24mm dia round bar for the pins I'll drill a 1" hole for the pins , that sort of clearance. We dont use a spring. To put a job in the swages we'll open them up by hand and sit them open by allowing them to sit cockeyed on the pins, (as shown in one of the photos) place our job in them, give a light tap or wriggle the job and they'll fall down shut. The pins are retained in the bottom swages by deeply countersinking the hole then plug welding the end of the pin in the countersink. I'll try to draw our set up over the next week and post it Frosty. Sorry Nakedanvil, hammer envy is a scourge. I have just brought another 5 cwt massey from an auction in Sydney along with a Massey power press. My wife is really starting to get worried, am I like a smoker who just can't say no, "phil theres a hammer here you may be interested in". "Oh ok I'll buy it". Moony and I may be having a competition here. Moony just does'nt realise it yet. Phil
-
Thanks guys for all your assistance. Flashed the furnace up this arvo on LPG, just put a 3 phase plug on the blower to see if it would run. It was a goer, so connected up the gas and put in the flare, we had to set the pressure regulator back to about 5 psi to get the furnace to run with all valves full open. It ran up to about 1200 deg C in about 1 hour which is about what I expected for a furnace of that size that has sat outside for 3 or 4 years in the weather. It lit up OK with very little mucking about then I tweaked some of the settings as suggested by Nakedanvil to get a efficient combustion. Will give it a whirl with a couple of real jobs tomorrow, and take some photos as well if I can remember. Very happy forgemaster tonight Thanks everyone Phil
-
Nakedanvil yes the swages are on pins, known in Oz a german pin dies, I have no idea where the german originates from. Yes a 5 cwt is a bit small for that job but you can only use what you have got, and I've found that what ever you have you always end up taking on something too big, a mate of mine works a 40 cwt massey, even he says, "we'll get it near on dripping, get it out, bash hell out of it for 5 minutes, nah its too cold, it's stopped moving, put it back for another heat!" When I was an apprentice it was all too many men, a man to drive the crane, a man to drive the hammer, a smith to hang off the tongs, a monkey to hold the pad. We have cut that down to 2 men, the hammer driver holds the pendant for the crane and drives the hammer as well. The pads are held by the pad holder (named the Holgate after the monkey who held the pads when I was an apprentice) and the smith still swings off the tongs. From 4 mens wages to 2 for the same job, just a bit of clever thinking. Phil Added a photo for interest of the hammer I served my time on. 20cwt massey(1 ton). Started forging under this hammer at 17 years of age (2nd year apprentice) until about 23 years old. Yes it was already on that lean in 1982, is still leaning like that now. Still in use but not working anything like we used to work it. (And yes Johnny Holgate is still on the left side of the picture still doing what he was doing in 1982 when I was 17)
-
This is our press, finally got around to taking photos details are, 400 ton capacity, 18" dia ram x 24" of stoke, 2 x 5" dia actuator or kicker rams, 3500 PSI pump pressure. Control is from the console to the side. By removing to bottom die (easily done as it just sits in there) we can have 48" of daylight (ie we can put in a job 1200mm long to press (upsett)). Biggest we have forged so far under it was 12" dia 4140. Phil Forgot to rotate the photos, Oh well.
-
The pad holder holds the stopper pads. It is a flick in or out arrangement. there is a handle on the flick out arrangement to prevent hands needing to go under the dies. Yes nakedanvil it is a massey, only a 5cwt though. Phil
-
Finally got around to taking some photos of our pad and swage holders
-
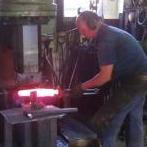
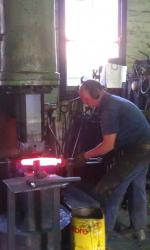
Having a table plate around the bottom die like that is just like having a work bench with a power hammer in the middle of it. As we work you can slide tools off and on the die without having to lift them up and down, it is also useful for doing the kind of work that we are shown doing here as you can easily keep the forging up under the hammer without it getting thrown out onto the floor. It also allows us to get the job out to one side to pinch the forging better allowing the hammer to work a little bit at a time rather than trying to forge it all in one go. Phil
-
Hi LC Good to see another aussie here. I started my apprenticeship over in Bellingen at P&B Fox Engineering back in 1982. Do you know any of the blokes from the Artist Blacksmiths Assoc who live up your way, one of them lives in Belligen, can't remember his name of the top of my head, another lives in Eungai, down past Macksville. If you know them tell them Phil from Newcastle said G'day. If you don't know them seek them out, they'll assist you I'm sure. Also the AABA has their workshop down at Timbertown Wauchope, they are arranging a big gathering later on around 17th July I think. Phil
-
No Brand on it probly made in bulk to supply the tech colleges all around the state, all had pretty much the same thing. Asked gas supply people, they looked and said,"wow thats a really big furnace, we don't know. Heres a bloke you should ring." Rang the bloke, same reaction. Nakedanvil you're correct, I don't see any "jets" as such. It is all manual control. Adjustment on the air, adjustment on the gas. Have no fear all, I have a current copy of the relevant Australian Standard for fired furnaces and heating apparatus. It will all be done to Standards. Thanks for the help guys Phil
-
I have been given a gas furnace in pretty good condition from our local TAFE college. It has a blower installed on it and was set to run on natural piped gas. We normally run our big furnaces on oil but we do have a bulk LPG tank for running our little furnace that we use on our 2cwt hammer. The little furnace is a venturi style 2 burner setup using fairly high pressure LPG. My question is has anyone had any experience in conversion of natural to LPG, ie will I have to change jets, mixers, and recomended or suggested gas pressures to use. Basically I was going to put a plug and cord on the blower, plug it in, connect the LPG to the furnace, put in a lighting flare and see if it will light. I can reduce to LPG to what ever pressure is needed. The furnace internal dimensions are about 12" wide x 18" long x about 10" high. The burner comes in from the top of the combustion space. Ta Phil
-
Hey Dale Sorry to hear about your job. Its pretty quiet up here too, this time last year we were using about 3 to 4 tonne of steel a month mainly 4140 and 1045 now we are barely using 1 ton month. I figured that as we were mainly forging stuff such as gear blanks for locomotive gearboxes, driveshaft pinions for electric passenger trains etc and people still have to get to work and frieght trains still have to run, that we would be reasonably OK but it seems that all our customers were forward ordering and they have now cut back to only oredring what they need, or the competetion is sharpening their pencils quicker than me, (althought I have heard that they are only working a 30 hour week, and they have some really big gear ("2 ton massey" etc,)), which means they'll get hungry for work and start to price closer. Hope it comes good for you soon. Phil
-
Hey Nakedanvil A hollow punch eh, never seen or heard of it before, we'll use a hollow drift to drift a hole after punching. Will have to give a hollow punch a go. How does it go removing the bit from inside the punch does it come out easy or is it like pulling teeth. When we take the press weight off the punch the cloud of smoke and flame will belch out about 4 foot around the press, puts the wind up anyone standing around and not expecting it. Heaps of fun. What are you making your punches out of, we have been using EN36A of late, to heat treat we get them to about a good orange and just chuck it in the water tub, get it out and use it. They last pretty good so long as you keep quenching it out. Phil
-
Punching, we punch a fair bit to make solid rings, 3" dia punch thru 6" of 4140 in one go. We drive the punch in about 1/2" then knock it out with a hand hammer, put about a handfull of crushed coal slack in the hole, punch back on top and then go. We have to stand well back as it is like a firecracker going off. When we get to the bottom and lift the press off the punch a great cloud of flame and smoke come up the side of the punch, then we just lift the punch out of the hole and turn the job over and blob the hole from the other side. The coal you see goes in the hole to creat gas to stop the punch from sticking. Phil
-
We will normally quench 4140 above 3" thick in water from 870 deg C then temper to 600 degC to achieve between 277-311 HBN. Below 3" thick we use oil, one of the problems with 4140 in oil is getting suffient depth of hardness, usually you will get a skin hardness but not core hardness. I have had fairly bad results quenching 4140 in water when we have made blades chisels etc (cracking, etc). When tempering 4140 it is advised to stay out of the impact brittleness zone (245 deg C to 475 deg C) as tempering 4140 in this range can cause fair degrees of brittleness. It is normally recomended to temper either above or below these ranges. This is not a problem encountered with 1045 so I suppose that may be a plus for 1045 in a small workshop. Phil
-
After heat treating many chisels this is my 2 cents worth. If you use the colour method, be sure that you don't have the bit of the tool still out of the oil too hot, ie orange, as when you quench the end you will make that bit that was orange almost glass hard, unless as suggested you quench a fair distance back which gives a longer temper running time and allows the back to cool down more. This also as stated allows the colours to space themselves out more and it makes it easier to judge when to quench the colours. Move the chisel around and up and down as you quench (only need 10 to 15mm of up and down) this keeps the chisel in cooler quench medium and helps to prevent a quench crack occuring at the liquid line. After heat treating the cutting end we will heat the striking end to a dull red and then bury it in sand or lime or rake together a pile of dirt on the floor (another benefit to having a dirt floor) and bury the heated striking end in that to try to achive a annealled end. Our commercial way of heat treating chisels when you have a number of chisels to make is to forge, grind, normalise then using the oxy heat approx 50mm of the blade to a cherry red and quench right out in oil, remove from the oil, then we burn off the remaining quenching oil still adhereing to the chisel blade with the oxy torch, just until it stops flaring, (oil will flash at about 380 deg) hence the burning off of the oil, it provides an indicator of the temperature reached with the torch. This method is I have found a nearly fool proof method of training apprentices (we have trained a fair few now) to heat treat chisels that are to be sold to customers (who want their tools to work and be heat treated properly). Running the colours is fine with experience but I have found that my above points have to be taken into account. Namely Be careful with the heat remaining in the back of the tool, not to hot. Be mindful of quenching long enough to allow the colours to space out, Also the heat at which the tool is first quenched can vary with the amount of background light in the workshop, which is why traditionally forges have been not overly brightly lit workshops. I always advise my blokes that I would prefer a chisel to dull over or wear out then snap. Better a little to soft and you have to reheat treat then to have a breakage. Cheers N good luck Phil
-
We actually do get down into the minuses here but only on a few days each year. Not like you blokes up in the northern hemishere, months of snow n ice. I just could'nt resist seeing if I got a bite from somewhere that gets really cold, and it worked. Some times it gets so cold here that the flame in the furnace freezes and we can't turn the furnace off to go home. Now I'm really starting to spread the bull. Phil
-
Even in Aussie we have freezing problems with LPG, we used to manifold 2 45KG bottles together, but even then they would freeze when getting low. The problem is too fast a draw off rate for the amount of gas, creates an isothermic reation. My solution was to install 3 100KG tanks outside, result cheaper gas, no freezing, still have to go through our first winter with the new set up, it can get very cold in Kurri Kurri, almost down to 15 degrees C in winter, so we'll see how that goes. My solution to you would be get a bigger bottle or mainfold 2 or more together.
-
Heat treatment tip Most quenching oils will flare at around 380 deg C use,this for an easy tempering guide. After quenching in oil reheat your job either on top of your fire or with an oxy torch or in a hot but turned off furnace until you see the oil still on your piece begin to flash or flicker to flame. Burn off all traces of the oil and you will have tempered your job, to about 380 to 400 deg C. Technical name is flaring or flashing. Good for cold chisels cold sets etc, (will only work for steels quenched in oil, water will not flash like oil :-) ) Phil
-
We are using an 18 inch dia main ram with 2 x 5 " dia kicker/acuator/retactor rams. Pump motor HP is about 40 horses, gives us about 3100psi of pressure. This calculates out to 400 tons capacity (give or take a few ton). This will forge 12" square alloy steel at about 1000 to 1200 deg C with ease, have not reached its capacity for forging yet. The kicker rams move the main ram up and down with no load at fairly high speed, its only when the kicker rams start to load up that oil starts to enter into the main ram. The main ram is connected to a pre fill tank via a pilot operated non return valve, so as when the press ram is being returned hydraulic pressure holds the valve open and allow the oil in the main ram to return to the prefill tank. The prefill tank has an overflow pipw to the main Hyd resevior. When the main ram is pulled down with no load on it by the kicker rams the oil is sucked into the main ram via the non return valve. Once the kickers start to load up a pressure regulating valve opens to also put oil coming from the pump into the main ram. If anyone is interested I can post some pictures Cheers Phil
-
What do you reckon its made of. I would be supprised if it had enough carbon to take a temper. Those sort of things are normally a good quality mild steel. Phil
-
Hi Cindy There is a bloke that lives out at Hickeys Creek/Torooka on the bellbrook road who is a member of ABANSW, pretty good smith too. I have a feeling that he also gives classes and lessons, if I can remember his name I'll post it, its on the tip of my tongue. Yes I have some local Macleay knowledge (went to school in Kempsey). Phil
-
Threaded rod would be to soft to use to make a set of swages from. Not meaning to make the swages from the threaded rod as such but using the rod to stamp the impression in the swages. If you could make the thread from something else that has some hardness to it yes. We have a set of swages that we use for making a thread form called rope thread, it's used on the end of drill rods. Basically a big rounded thread resembling rope. Forge the rod to size, swage it in plain swages oversize, then carefully one blow at a time run the end in the rope form swages, winding out and in as you give careful single blows. Old bolts, when Sydney Powerhouse museum pulled down one of their oldest beam engines for overhaul they threw all the nuts and bolts into a drum as they dissassembled it. When it came time to reassemble it they found that bolt A would only thread into nut A and so on, but they had neglected to number all the nuts to bolts, it took a couple of weeks of sitting on the floor with a big pile of nuts n bolts till they had it all sorted. Phil
-
Why not buy round its cheaper and readily available. You have a power hammer. Forge it to square any size you require, within reason of course. Phil