mcraigl
-
Posts
518 -
Joined
-
Last visited
Content Type
Profiles
Forums
Articles
Gallery
Downloads
Events
Everything posted by mcraigl
-
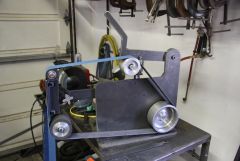
From the album: 2x72 belt grinder
-
Strantor, Some bladesmiths claim that the micro serrations created on the edge of the knife from the exact process you described actually make the blades cut BETTER, than a mono steel blade. They are generally such minor variations that you can't see them, the blade "looks" like mono-steel at the edge where it's sharpened.
-
Chad, Wouldn't it be absolutely hilarious after all I said above and all the money I've invested if my grinder don't work? I HAVE a vertical mill, that will very precisely drill and tap the holes, but even at that, there's a bunch of 'em on the KMG style. My mill is a manual one, if it was a CNC setup, then getting everything right is a little bit easier. My hope is to eliminate 95% of the holes that have to be precise with my design. There will still be some that have to be right, just not as many. Too bad you spent soo much time on fabrication to not have it work out for you. I will post pics once I start actually fabricating parts.
-
I'm currently in the design/build process for my 2x72 belt grinder. I didn't care for the jackshaft/belt arrangement on the KMG, just seems like two extra bearings to wear out/ or vibrate. So... I bought my tracking wheel, and a 2" and a 4" inch contact wheels from Beaumont, and a 6" drive wheel with a 7/8" bore from Bader. My unit will be a hightly hybridized cross between the two. I like the quick change tooling arm of the kmg, but like the simpler/solid plate construction of the BIII. I've got the thing pretty much drawn up in CAD, and once I spend a little time and a few beers with Mike HR going over the design to make sure I didn't miss anything I'll be emailing the file to the waterjet guy to have him cut out parts for me. I'll post pix etc. once I get things rolling of my build. I can tell you, I'm not really saving a lot of money considering I'm just about a grand into this thing already and that's just buying wheels, a motor, and a vfd. Haven't cut out a single part or started fabbing a single thing yet. But I'll have the satisfaction of having a custom belt grinder with the features I wanted. I personally think that Chad is paying way too much for what he's getting. The KMG is in my opinion a somewhat dated design. No reason to spend that kind of labor on precision drilling and tapping of holes when a much simpler design that does all the same things can be done a LOT faster/cheaper/better with other techniques and a few minor design changes. My .02 cents.
-
Sabre, It's pretty easy to make a rivit making jig for the vise. Take two pieces of metal, clamp them together with a couple of thicknesses of card stock between them, then drilll a 1/4" hole down the center of the card stock/metal. Make some sort of arrangement to hold them in allignment and so they'll stay in the vise like a spring swage, and a couple of locating pins. Then it'll clamp your 1/4" rod real nice without deforming it, and you can make rivets quite easy.
-
Well, at least I got some work done at work.... And after talking to Mike-HR, I think Craigslist hits will go down significantly...
-
Mark, I just love how "we" get volunteered... Egads... I haven't even made my own set of chisels yet. Still haven't decided what to make them out of... S7, S2, H13... I have some H13 so maybe I should make them out of that, but seems like Darrel preffered S1 or S2. Anyway, it'll be good to see the gang in Weaverville. Mike-hr, we (read, you and me) better get crackin' on practicing some hinges! I do have that really nice bottle of Tequilla that you brought me from Mexico. Maybe that would stand in for a bottle of single malt?
-
Or just zip 'em off with a slitter wheel, and chamfer the cut edge on the belt grinder...
-
Where to place an idler pulley
mcraigl replied to territorialmillworks's topic in Machinery General Discussions
Not sure if it matters or not, but seems that on most of the rigs I've seen that were designed for use with a line shaft, if the idler pulley serves as the clutch, then it is part of the machine, and so a "constant" distance from the driven wheel, but the distance to the drive wheel could be anything, depending upon how high the lineshaft was mounted. It seems that those arrangements usually have the idler on the driven side of the driven wheel?? Seems that if the idler was "just" an idler it wouldn't matter too much. Take with a big grain of salt as I don't own anything driven from a lineshaft, and haven't seen as many such machines as others around here. I did help set up one old power hammer that used an idler as the "clutch" and we set it up as I described and it works like a champ for what it's worth. -
Split cross/thunderbird prototype
mcraigl replied to Flaming S Forge's topic in Blacksmithing, General Discussion
Size the opening so that it will open a bottle of beer. Looks to me like the one on the left is almost there already! -
So..............What did Santa bring?
mcraigl replied to larrynjr's topic in Blacksmithing, General Discussion
Frosty, Would you please post pictures of your Plow? I've been dieing to see how you plow 540,000,000 acres in two hours. It must be one bad to the bone machine!!! -
Oh, heck yes I'd call that art.
-
So..............What did Santa bring?
mcraigl replied to larrynjr's topic in Blacksmithing, General Discussion
Nothing smith related, but I did get a new 52" flatscreen. Now I can actually read the text and see the football score and tell how much time is left, etc... Been watching a 19" for 17 years... Got to spend the day with the wife and three youngest kids watching it snow, and watching movies on the new TV. Was missing my oldest son who is currently deployed to the gulf (Bahrain). We got him for 10 days around thanksgiving, so that was good, but now we won't see him 'til late Jan. of 2010. -
Steve, My stock tank heater has a cage built around the element as a standoff to protect the bucket/critter from getting melted.
-
I recently ran airlines in my shop using 1/2" black iron. Pretty much as Ptree suggested, except I don't currently have a supplemental reciever tank. My compressor is in a tool shed behind the shop. I ran the iron pipe down the wall of the shed, underground to the shop, back up the wall and through it at about 5' from the floor. I put in a "t" vertically at that point with a Mudleg, or dripleg going down, and the filter/lubricator/regulator on the leg going up that feeds the main running around the shop at the top of the wall. the mains slope down as they go away from that vertical "feeder leg", and have a drip leg at each end also. Shop is heated, so I was hoping to get away with the one drain at the point of entry (cold air hitting warm pipe), and one drip leg at each end of the main as opposed to one at each outlet. I guess we'll see in due time.
-
Fred, they're real beauties. Tell me how you attached the copper but caps or pommels if you will. Love them.
-
Fastenall does indeed have O1 for sure. I just bought a 3/8" x 36" round from them for just under $6.
-
Keeping Guillotine Dies Cool
mcraigl replied to Blacksmith Jim's topic in Blacksmithing, General Discussion
John, I don't think you're wasting your time at all. Makes them a bit more durable, and not a lot of effort compared to grinding/machining new dies. -
Also if you etch deep enough to create some topography you can hot blue the blade, then send/polish and it will really make the nickel layer "POP" as the kids say.
-
If none of that works out for you, go see your local waterjet guy with a chunk of 1 1/2" plate and tell him what you want. Take a 6 pack and show up at 4:30 on a friday and you might just get it for free! Usually works for me anyway.
-
Are you right or left handed? Do you already have a preference for which way to point the horn? I'm right handed and like most (not all) right handed smiths I prefer my hord to face to the left as I address the anvil. I think Ian gave some sage advice / things to ponder. Given all that, here's my 2 cents. It appears to me that your anvil was used to sharpen plow shares, at least as I've been told by several old timers that have seen my peter wright that the "offside" is slumped like yours that is what commonly caused the offside to look like that. I would take a flap disc on an angle grinder and just clean up the offside vertical face to restore the offside edge to a "nearly" 90 deg. angle. I would then use the said flappy wheel to clean up the nearside where it's been chipped on the edge. I would just remove the roughness/cracked/fractured area by radiusing it. I'd probably hit that nick in the horn real quick just to take the rag off it. That's it. I'd mount that sucker on a stump and go to town on it. If you later decide you can't stand the largish radius created on the nearside edge go ahead and follow the bp on how to properly do the repair. you were going to have to grind all the "mung" out anyway before you welded so you've not costed yourself one little penny by doing it now. Also, if the machinist type in you is crying for a "flat" face, make sure you run it upside down 'til the base is parallel with the face before you touch the face! They are rarely parallel. Good luck and let us know what you decide to do and show us the results!
-
Did you try clear lacquer?
-
Bear's Head DVD available from Darryl Nelson
mcraigl replied to Mark Aspery's topic in Blacksmithing, General Discussion
Howdy Mark, Darryl didn't show us how to do the Lynx when we were there a couple of months ago. Bummer... How's the book coming? You going to be at Weaverville this year? Well, have a good one mate. See you later. Mike Limb -
-
-
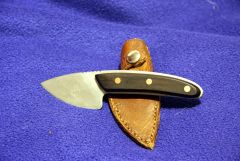
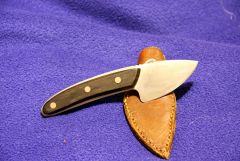
From the album: Skinner
Chainsaw chain skinner with Ebony scales and Copper rivets