mcraigl
-
Posts
518 -
Joined
-
Last visited
Content Type
Profiles
Forums
Articles
Gallery
Downloads
Events
Everything posted by mcraigl
-
Thanks Dave. I'll give it another go with just c-clamps. You Britts have all the coolest tools, I've never run across a single G-cramp here in the states! Just kidding. I do have a large bottle of CA so that's where I'll go with the final sanding/polishing. Darn. That means I'm 3 or 4 days minimum out from finishing this knife. I really want to put an edge to this thing and see how it works. Oh well, I need to get some finer grit 2x72 belts for final polish anyway. Might as well do it right.
-
Ok. Stan etal. I followed the directions from british blades. I bought new denim 'cause I was too lazy to decide which jeans to demo. Plus it was probably easier to cut the strips. I didn't wash it, and now thing maybe I should have? Anyway, I used the bondo polyester resin shown on the demo. I had Mike-hr help me, I gloved up and appplied succesive strips while he used a chip brush to apply the resin. We got a stack about 1 1/2" high, then put it in the hydraulic press and squished it 'til cured. It didn't work out so well. I'm wondering if we used too much pressure. I sawed a couple of slabs out of it and last night went to start sanding/shaping and noticed the material delaminating a little bit. Also, you can't really polish or sand this stuff, it's too fuzzy. any idears for me? Should I try again with only c-clamps? lots of resin oozed out, so I think we had plenty in there, just maybe squished too much out? I just finished a santuko blade from O-1 and was hoping to use some denim micarta and copper rivets for a somewhat dishwasher safe handle. Ideas? Help?
-
Bill, I see the source of your issues... You're missing the door on your ash dump. 75% of your air blast is going out the bottom of your forge. Unless it's an optical illusion, in the 5th picture of your last post with pix. At the bottom of the tuyere, there's a small cylindrical piece on the bottom of the pipe. That would be for a pivot bolt that holds a piece of flat steel over the bottom of the tube such that it can be pivoted out of the way once in a while to dump the ashes that fall through the clinker breaker. You just need to cut a piece of 1/4" steel in a egg'ish shape, drill a hole through the end for an appropriate bolt then bolt it to the tuyere somewhat loosely. Mine has another extension opposite the pivot hole where I mounted a little bit of rod so I don't have to get down on my hands and knees to dump it. I'll send you a pic of mine if you need it. Let me know. I'm kind of stoked about that little observation 'cause I think you should be getting a nice fire out of that forge. I would also probably clean the fire pot out real good ( like rinsed with water, or blown with air), and then patch the irregularities betweent he bricks with some sort of refractory cement or clay just to smooth up the sides of the firepot which I think will make managing your fire just a bit easier. Let us know how it turns out OK.
-
OK, my .02. A couple of things. First notice that both of the butchering tools that Mark shows in the picture have a radiused edge on them. Second, and I know it's there even though you can't tell from the picture. When you make your monkey tool, chamfer the mouth of the hole that tenon goes through. Just a bit. You can do it with a bob punch, or with a countersink in a drill. You don't want a sharp corner here either. A couple of other things to think about. Are you working the steel too cold? Are you getting the work done on the tenon with as few heats as possible? Overworking the steel and working it too cold are both sure ways to propogate cold shuts/cracks especially at a square corner (which is why you want a radius on your butcher and a chamfer/radius on your monkey tool).
-
T2G, Just used a Brooks last weekend for a few minutes. John West, a Welsh blacksmith who now lives and works in San Jose, Ca. was a demonstrator at the hammer-in I went to, and that's what he uses. I've seen him demo a number of times and it was always on a Brooks. Maybe it's 'cause it's made in England and he's nostalgic? But I doubt it, he's a no-nonsense guy and wouldn't be using it if it wasn't an excellent tool. I didn't use it long enough to get a solid impression, I was actually trying out a Brent Bailey hammer on it, so there were two variables the hammer and the anvil. I was impressed with both. The Peddinghaus anvils now marketed by Ridgid that were mentioned above are excellent "new" anvils and I have a ton of time on one of them. That's what my mentor has and uses. In fact he won it in a raffle right here on Iforgeiron if I remember correctly. Though I haven't used one of Jymm's anvils I've heard good thing about them. I've also tried out a couple of Nimba anvils and they too are very nice. Good luck, I wish I had the money for a new shop anvil!
-
I bought a handful of drops of 1/2" round 4340 that vary from 4 to 6" long at a hammer in a couple of years ago. I've made a pile of small punches, chisels, fullers, etc. out of them that I use for animal heads. They're short, so I made a pair of tongs that holds them well and has a built in tong-ring. You'll have to experiment with the heat treat. I don't think they're hard enough for a knife even with "proper" heat treating. I couldn't get them very hard in the oil quench that I normally use for 4140 and ended up going with a water quench / triple temper sequency to get the ends hard enough to stand up to use. The nickel content may have something to do with that? They're the only punches/chisels I have that aren't at least a little bit rusty so there is an up-side.
-
"belt sander" is a rather broad term. What kind of machine do you want to build, and what equipment and expertise do you have available to you? If you have a waterjet shop nearby I have a cad file that they can cut parts from, but you'll need to weld a couple of parts, then countersink, ream, and tap a bunch of holes. My design is set up for a "C" face motor with a 7/8" shaft. It could be modified to fit any motor though. My file is NOT what I'd call a blue print though. It's not dimensioned, and has no instructions. It's just a cut file to be given to a machine shop.
-
You don't need a grill over the clinker breaker, that would sort of defeat it's purpose wouldn't it? I don't have one and have never seen one set up with a grill over the clinker breaker. I do agree that "coal" shouldn't be sitting against the clinker breaker though. My point is that it should be coke by the time it's made it to the center of the fire.
-
Paraphrased From a Welder User's Manual: Considerations About Welding And The Effects Of Low Frequency Electric And Magnetic Fields Welding current, as it flows through welding cables, will cause electromagneticfields. There has been and still is some concern about such fields. However, after examining more than 500 studies spanning 17 years of research, a special blue ribbon committee of the National Research Council concluded that: “The body of evidence, in the committee’s judgment, has not demonstrated that exposure to powerfrequency electric and magnetic fields is a human-health hazard.” However, studies are still going forth and evidence continues to be examined. Until the final conclusions of the research are reached, you may wish to minimize your exposure to electromagnetic fields when welding or cutting. To reduce magnetic fields in the workplace, use the following procedures: 1. Keep cables close together by twisting or taping them. 2. Arrange cables to one side and away from the operator. 3. Do not coil or drape cables around your body. 4. Keep welding power source and cables as far away from operator as practical. 5. Connect work clamp to workpiece as close to the weld as possible. About Pacemakers: Pacemaker wearers consult your doctor first. If cleared by your doctor, then following the above procedures is recommended.
-
It's cheaper than the insowool or kaowool. Will make your forge hotter and save you on gas.
-
Bill, Have you been to a demo or club meeting and watched someone knowledgeable manage a coal fire? If not, I highly recommend it. I would also highly recommend having a similar person come to your place and run your forge for a while. They might be able to pick up on some of the quirks of your particular forge and explain to you what it needs and/or what they're doing to make it work. Your grandfather invested a significant amount of time into building that forge. He "may" not have known what he was doing, or how to get his forge going, but somehow I doubt it. That's a beautiful looking forge in my opinion and I'd be inclined to do a fair amount of experimenting before I started taking it apart or making significant changes. It's a little hard to tell from the pictures, but without being there and trying it, I think I could get along fine with your forge. Several things have been suggested and all are probably valid suggestions. My first suggestion to you is to comletely clean the firepot out. Let us see what it looks like with nothing in it. Next suggestion would be to examine the tuyere carefully and make sure it's getting all the air (Ie. make sure there's no leaks in the airline). Looks to me like you got a triangular clinker breaker, that's the kind I like best. My firepot is not nearly as wide as yours, but actually deeper. The happy part of this is that it's easier to get a neutral flame than in a shallow fire. You can prevent the fire from getting too big with the judicious use of water and a sprinkler can. Another thing that can happen is that as the fire settles there's not much pore space for the blast air to rise up through. Take your poker, insert along the surface of the fire pot and give the fire a "lift" once in a while to help the air blast get through. Avoid breaking your coke into too small pieces. Rather than starting the fire with a big piece of coal directly over the tuyere, save a good sized chunk of coke from the previous forging session and use that. Build your fire with coke, push the green cole in from the side 'til it cokes up, then bring it into the active part of your fire. Let us know how it goes.
-
MMM..... Massage, beer, and Korean Ribs.... Frosty, you better come for a visit!
-
They're not safe. Much like any of the stuff we do, they are inherintly dangerous. No distractions, keeping the work hot, using stout/well fitting tongs, and being aware of the pinch points and using common sense will go a long ways towards keeping you out of harms way though.
-
Wood chisel with socket style handel
mcraigl replied to joseph's topic in Chisels, Gouges, Scissors, etc
Mark, You up to showing me how to do that next week? I've been thinking on this too. ML -
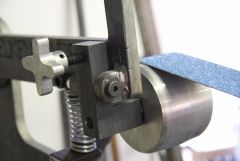
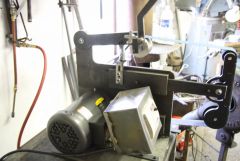
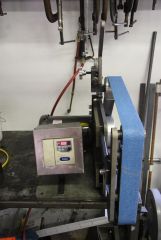
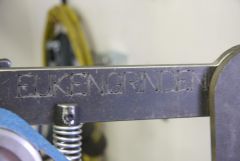
Yes, I couldn't find a box I liked so I just fabbed one up out of 22ga. sheetmetal. You do see wire nuts in the picture, I took it before I buttoned everything up. I didn't want to close it all up until I had made sure the motor was going to spin the correct direction in case I had to switch some wires around. It's all buttoned up now though. You just may have me beat on the frankengrinder. If you look closely, you'll see that this one's name was etched into the tracking/tension arm by the waterjet shop. In my best german accent, Fukengrinden is it's name. I've run into numerous little "issues" along the path on this build and have been updating the cad drawing as I go, so when I go to build another one, it should be a piece of cake. I've got a feeling we'll be building one for Mike-hr before too long so I should get a chance to put that statement to the test. We'll see. Or maybe I'll build a few to sell? who knows. Anyway, just glad to have it operational. Hopefully tonight I'll get the workrest done, then tommorow night I'll be able to forge a blade or two and do some grinding on it. That'll be exciting!!!
-
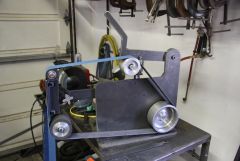
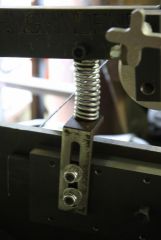
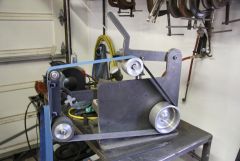
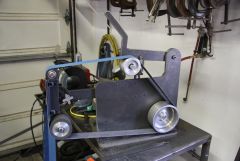
Well, My 2x72 belt grinder build is nearing completion. I still need to make a work rest, that will probably happen tommorow evening. I'm all booked up with a blue and gold banquet this evening, and maybe blueprints if I get home early enough (doubtful). Anyway, y'all can look at the pix and let me know what you think. I had all the parts that were feasible cut out by the waterjet guys. Fab'd the rest. Mike-hr did the welding for me. I had them cut all the bolt holes a little undersized and then I just reamed them with the appropriate drill bit depending on whether they were a clearance hole, or getting tapped. I'm estimating the weight at around 200lbs, and she just sits there and purrs. The bearing on the small contact wheel gets warm after 15 minutes of grinding, not sure why other than it's really turning fast. This was not a cheap build. I was far too impatient to wait 'til I could scrounge stuff. I hunted for a cheaper motor for a while, but finally just ordered a brand new one. It's a 2hp, 3ph Baldor with a 7/8" shaft. I ordered the drive wheel from Joseph Bader since they use a direct drive system and bore their wheels 7/8". I talked to Rob at Beaumont, and it would've been cost prohibitive to have him rework his CNC program to build it. I did order the tracking and contact wheels from him. I websurfed 'til I was satisfied that I had found the most economical (cheapest) VFD and ordered it. All in all, I'm just about a grand into this grinder, but for the features and build quality I've got I think it's still way cheaper than buying a commercially built one. Plus, I get the satisfaction of having built it myself. I did all the design work in AutoCAD, and once I was satisfied with a part, I was able to email the DXF file to the waterjet shop and pick it up after work. A very fun build that has occupied me for about the last month. Cheers, ML
-
-
-
From the album: 2x72 belt grinder
-
From the album: 2x72 belt grinder
-
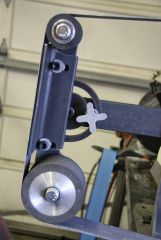
Platen and contact wheels / adjustment arrangement
mcraigl posted a gallery image in Members Gallery
From the album: 2x72 belt grinder
-
From the album: 2x72 belt grinder
-
VFD, and yes, I will straighten the box up a little bit.
mcraigl posted a gallery image in Members Gallery
From the album: 2x72 belt grinder
-
From the album: 2x72 belt grinder
-
From the album: 2x72 belt grinder
-
From the album: 2x72 belt grinder