pjh66
Members
-
Joined
-
Last visited
Everything posted by pjh66
-
easiest way I know is fabricate a square hole with flat bar weld together machine the outside round to a size like 1 3/4" drill hole of that size punch in weld top & bottom
-
I agree with others that you may need to lift your fire pot up a bit to get the level of the pot right. Also if it was mine I would be putting some support brace across under the cutouts as wit heat & use it will bend. If you are concerned about the table thickness you can put some flat bar on its edge across under it in a couple of places.
-
For what you intend to do with them I would look into a slot drill or centre cutting end mill. I gather you are only going about 1 - 3 mm deep so a normal drill bit sharpened flat will not give the finish that you seem to want. You will need to use them in a ridged machine to be able to use them properly like a mill drill unit. Most small drill press units will have to much movement in the spindle for proper use. Have fun hope to see some posted results of what you come up with.
-
hi Ned Im bit further west of you at Minden There is a group that meet twice a month in Brisbane also know of someone in Ipswich that has just started doing courses again. Let me know if you need any more info. Have fun with the addiction
-
Hi TJ what I do for my hadie hole is to fabricate it from plate to form the square hole, then machine the outside of it to suit a drill size that I use to drill through the anvil so it is a hammer in fit, prep & weld top & bottom. I have fabricated all of my anvils & they are great even if I say so my self. Peter
-
Be good to see more small groups around
-
G'day Ausfire, If you get to do a course with Terry at the Cobb & Co you will enjoy yourself. And I need heaps of help with spelling :-))
-
G'day Jimmyjames Im about 45 min down the hill from you towards ipswich. If you want to drive a bit there is a club that meets at Pinkenba. Might even be able to team up a day here with you some day. Send me a message some time if interested.
-
for a cheap fix of the hole buy a masonry drill bit & resharpen the carbide brazed in bit to the geometry of a normal drill bit ( for hard steels 135 deg to 140 deg angle and thin the web) flood with coolant to keep it down at the tip of the drill bit. Make sure the job is secure on the drill press table so you can keep the deep up on it. DON'T forget to use good PPE. I have drilled out broken taps & drill bits with this method. Biggest problem I have seen when people drill harden & or material that work hardens is they let the cutting tool rub. the heat generated by the friction of it rubbing will harden the spot almost instantly. For you problem I would try to drill from the other side & drill back through. Just a few tips hope it helps. A lot of good points in other posts also. Have fun with your build.
-
From my limited understanding "whale oil" has a very high flash point. I have used what I was told was whale oil once. It was at a place that had it from about 50 yrs ago. It was very fine, smooth, and oily ( I know that sounds funny). This same tub of oil has been used at this place for a long time from what we were told. You can purchase oils designed for heat treating purpose now without trying to find whale oil. I bout a 20 litre drum of heat treating oil for about AUD$ 70.00 which was lasting well until my son knocked the drum over.
-
Hi this is one I made, might give you some ideas. 1" hardy hole couple of different pricket holes
-
Looks good to me. The swing arms my need a bit of padding or some rounding to make the edges bit more comfy for your legs. But well done
-
I have seen a old blacksmith that does this to all his hammers He said they last for ages like this. I haven't tried it yet myself but have used his. I have heard of using "sifaflex" to fit hammer handles as well. I think the rubber helps fill any gaps and take up any shrinkage and expansion that happens with the timber.
-
The Cobb & Co museum in Toowoomba is another place to see smithing done at times
-
G'day Lance. The group had a club day Yesterday (Sat 2/11/13) About 2 weeks time they will have another 1. If you are interested PM me and I will get the club contact number for you.
-
-
the idea was from some I saw on the net but worked it out with what I had. No doesn't do a true single blow but can do a single blow if you work the control right
-
great views mate
-
Ram is a 2" air ram I made the Hammer/ head shaft is about 20Kg a piece of 2 1/2" square 4140. Powered by a 14cf air compressor at 100psi through 3/8 air lines. would like to put a reservoir tank next to it and run 3/4" lines from tank to hammer. Any other questions please ask. Peter
-
Hi I am just posting a couple of pic of my Air Hammer that I made. I still have to change the die system. Going to make a dovetail system top & bottom to change dies simple & quick. Originally it had to much bounce until I added the 4" shaft with a foot plate to the ground directly under the anvil. It is sitting on about 6" of road base. I haven't worked out how many hits / minute. Stroke can be adjusted, ball valve on the side can be used to slow it down on finer work. Depending how hard you stand on the foot lever switch will depend on how hard it hits. Question and comments welcome. Please ignore my mess got to clean up when I get time.
-
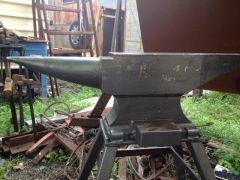
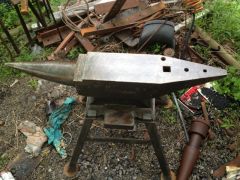
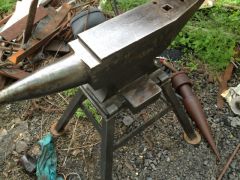
Oxy cutter, 9" Angle grinder, mill face cutter, mag base drill & welder. Thanks for the comments. Ended up about 56 - 58 rockwell.
-
Angled die grinders a good also your can get 2" & 3" sanding pads for a die grinder and the angle die grinders can get in around things better then a straight 1. Just a thought for what to buy. I have both types & use them for different applications.
-
Thought I would post some pics of my anvil I made in mid 2012. Let me know what you all think. http://www.iforgeiron.com/gallery/image/37493-125kg-anvil-1/ http://www.iforgeiron.com/gallery/image/37494-125kg-anvil-2/ http://www.iforgeiron.com/gallery/image/37495-125kg-anvil-4/ http://www.iforgeiron.com/gallery/image/37496-125kg-anvil-5/ Don't mind the junk in the back ground. Peter
-
-
Looking good, Can't wait to see it finished. Just a tip for your drawing. When I print a drawing out that I want to use to compare my work with, I glue it onto a piece of thin sheet metal then cut it out with tinsnips, centre punch any reference lines on it. That way I don't have to worry about it burning or blowing away. Then you can put a hole through it & hang it up to use again.