
pjh66
-
Posts
127 -
Joined
-
Last visited
Content Type
Profiles
Forums
Articles
Gallery
Downloads
Events
Everything posted by pjh66
-
Ed - the total wieght of it is 750g (26oz) Balance point is about 70mm in front of the handle. You dont need a lot of effot to swing it arcs nice with little effot. Bigfootnampa - as you have said with the blade soft enough to work in the field can help. Where we were there was a lot of rock & the blade on the other guys machete ended up with a lot of nicks & dings from them. I am hopeing with the harden & temper I have will let me to be able to fix these problems in the field. If it was much harder I would be concered with breakage. I enjoy all of your comments guys, & dont get me wrong, I am not disageeing with you only further explaining my reasoning for what I have done.
-
Thank you guys for the comments. I love constructive comments on any of my work. The temper I did was so I could resharpen in the field with a file or stone. As I was not sure on what the material was I did a small sample piece to test. At 210C temper a file only scated on it so had to go a bit more. Now it is at the point where a file will cut but not by much. Bigfootnampa- as you would have seen I have a hole for a lanyard at the but of the handle "but" I love you idea of the lanyard near the blade. I will work out how to set 1 up on there. Dave Budd- I have used billhooks before in clearing & it is partly what influanced my design. (I am sure there are others out there like this Im not that clever lol) Again thank you all for your comments.
-
great Idea looks good mind if I use some of your ideas?
-
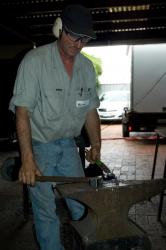
A couple of weekends ago I went on a hiking camp. It was through thick scrub with a lot of lantana (couldn’t crawl through it). We had to cut our way through it for about 5 Km... Luckily someone had a machete with them. So this is my design that I came up with from use of farm items for clearing & that weekend. This is forged down from a piece of leaf spring (don’t know what from) that was 60mm wide x 8mm thick. Set down tang 25mmx 8mmx 125mm long. Finished blade is 350mm long. 45mm wide at the handle x 7mm thick tapered down to 5mm thick about 100mm from the handle. Blade stays 5mm thick from there. Widest part of the blade is 60mm. I normalised it in the forge several times through the process and once before hardening. Heated to non magnetic & oil hardened. Tempered twice to about 350C & allowed to air cool. Fuller groves were because I just felt like doing them. Lanyard hole is fitted with 3/8 Hyd feed line tube flared both sides. Edge near the handle is hollow ground changing to a flat grind further forward. I have left the finish rather rough because it is for rough work. Feel free to tell me what you think of the style & my process this is my first large forged blade (only done 1 small blade knife before & a small camp axe (hawk))
-
Gloves ? Glasses? Do people actually skip them?
pjh66 replied to Robert Simmons's topic in Personal Protection Equipment
I do agree that people need to think about safety for them selves. I believe in being "very" aware of your suroundings & what is happening in them. PPEs are a must in or chosen work/hobby. I do metal work full time & blacksmith for a hobby. I build items for earthmoving equipment. Aprons can be usful BUT I would not recommenduseing a apron when on a lathe. It can easaliy get caught in the lead screws. Gloves are the same problem as they can get caught in machinery. People need to learn what can happen & use items as needed. 1 of the leasted used items I see is hearing protection (me included). I have seen people talking about UV protection glasses but if you check with high temps as in forge welding it is infarred that does the eye damage not the UV & most safety glasses that I know of don't protect against infared. I avoid glove as they can get caugt & the other problem which I have seen happen is hot metal going down in them which you cant get out quickly. There is not enough time to post all of the imformation here about safety in our field but the most important thing that I can think of is to use your "brain". Think about what might happen. Make sure of your suroundings. Be prepared if something does go wrong. -
MOST practical type of forge!!!
pjh66 replied to Alec.S's topic in Blacksmithing, General Discussion
Winning bid 162 pound Interesting unit. Not for heavy full time work but for quick repiar jobs looks ok -
Projects & advice for a new guy
pjh66 replied to Harold's topic in Blacksmithing, General Discussion
I totaly agree with all of the above Another book I like is The general blacksmith by Malcolm Paine Dont know if you can get it where you are though. It goes through from forge design, how to light your forge, tapers, making your on tools ect. I would (& have & still do ) try to find some weekend coursesfor basic blacksmith work. A mentor is great if you can get 1 remember them helping you goes both ways. Help out by offering to clean there workshop & off side for them when you can you can learn a lot by watching them. Have fun with the insanity of blacksmithing -
Thanks for the coments Guys It worked a treat over last weekend Cutting hardwood stakes for garden & pruning some old dead native bushes to get to the roots to dig out. Handle is about 3" too short so will have to change it (only about 13" at the moment)
-
Looking good Tim. I find it fun making items that are to be usful tools Nothing wrong with makeing mistakes if you learn by them. You just learn what not to do. As they say practise makes perfect (I know I need heaps of it )
-
This is my first attempt at forgeing a hand camp axe. I wanted a small axe to be able to cut wood, & to be able to hammer in pegs. It had to be light for hike camping but strong & be able to take a good impact blow. It is forged from a piece of S7 tool steel 1 1/4" Dia x 4" Long. Finished size is Hammer face 1 1/8" sq x 1 1/4" from edge of handle. Bit of axe is 3/4" thick near handle x 1" wide Length is 3 1/2" x 2 5/8" wide at edge. A file will just work the edge of the blade. Tried it aganist some 1/4" mild steel (mild steel lost) with no sign of chiping or edge roll. So I guess I will see how it goes. Here are a few pics. Let me know what you all think.
-
Thanks for showing your axe ptree. I love the look of it nice lines & finish. How is the balance for useing it to hammer or cut? This is along the line of style I have been thinking of as a camp axe for hiking. Be able to hammer in pegs & cutting wood & light enough for hike camping. Looks great
-
Is there an affordable Pyrometer?
pjh66 replied to DC712001's topic in Heat Treating, general discussion
Pro High Temperature Non-Contact Thermometer - Jaycar Electronics This is the 1 that I bought for myself was cheaper then but everything keeps going up. I am sure you can find simular close to you. -
This angle depends on what material you are drilling. Personaly I think a good bench / pedastal grinder & a good eye with a steel rule & a couple of made up gages. I can hand sharpen on a grinder consistently from 5mm to 50mm drill bits & drill at 0.1mm of drill diameter. I can also make them drill over size if I need to.
-
Horizontal bandsaw vs. power hacksaw
pjh66 replied to matt87's topic in Saws, bandsaws, hack saws, etc
A band saw is more eficent in cutting as it is continuos & dosnt pull the swarf back into the cut it also uses "all of the blade". Power hacksaw cut less then 50% of the running time & usaly only uses half of the blade. But like most things it comes down to what you can afford. And if either 1 is set up with the right blade for the work can run well. IMHO -
I think one of the best way to keep a head on a handle is to fit it right to start with. I have had 1 of my hammers stay to gether for quite a while with out any wedges in it (hadnt got round to it got interupted when fitting it & forgot about it) I see people trying to drive the handle into the head aganist somthing. The best way I have found is tap it lightly in like that then hold the end of the handle with head hanging down in the air hammer the end of the handle which will pull the head up thight on the handle.
-
try a lanolin base lub like Inox puts a light coat that dosnt gum up like grease can protects the steel easy to reapliy when needed. I use it for hyd parts that are being stored which have to stay rust free. here in sth east Queensland Aust steel in a shed will rustwith out getting it wet (high humidity high heat) The trouble I have found with greased threads is that bits for steel & grim stick to it easily & gums up the workings. Warning for you watch out for zinc base paints as zinc is a heavy metal & heat can cause it to burn.(you wouldnt burn gal would you but zinc is as bad)
-
You might check that it is not a decanter tank that is when you turn the valve on liquid comes out & not just gas. If you are getting liquid through the line it will not burn properly.
-
This is my first attempt at making a knife. Forged from a piece of 440c S/S. After hardening & tempering the blade I was able to cut through a paint tin & still shave the hair from my arm.Handle is hardwod dont know what type. Blade finished at 5" long 1" wide & about 1/8" thick. I made it as a basic camping knife. It does still have some fine grinding marks in it but not as bad as the pic makes out.( got to get some fine belts before I try any more)
-
How old is your boy? Good to see the youg giving it a go
-
Hi to all you aussies out there & adopted aussies Jump on & say Hi to us all
-
Hi squarenail DONT get rid of anything yet (wait until you know for sure what you want or you may regret getting rid of it) Start looking for other people around your area who do blacksmithing check out the blueprints here & the gallerys for ideas. youtubes has some videos of blacksmithing might help you also but just enjoy the pleasure of heating steel till it glows & shape it how you want it
-
This handy little book I have found to be very useful. It may not be a blacksmith book but I think it is a lot of help to anyone working with steel. In its is imformation for threads, hole fits, harderning & tempering steel, properties for different types of steel. EMI Supply : Engineers Black Book - USA Edition - The engineers quick reference manual [EBB-USA] - $29.99 This is a link for some more imformation. Imformation in it is easy to find.
-
Hi handy little book that you can get from bolt shops called "Engineers Black Book 2nd edition" It show different angles, lip clearance, for different types of material the 2nd edition comes with a drill point sharpening gauge. book has heaps of handy imformation. There is a trouble shooting section also. See how you go
-
Hi Carl welcome. There are some interesting things here ( & people ) I am just up the road from you at Minden so will have to stay in touch. I might get to catch up with you in the chat room some night.