

Crazy Ivan
-
Posts
830 -
Joined
-
Last visited
Content Type
Profiles
Forums
Articles
Gallery
Downloads
Events
Everything posted by Crazy Ivan
-
 Oh, and on the topic of anvil care, From the looks of the pictures you posted, just use it and it will thank you for it. General use will make the face shine up and smooth out. In my opinion, that weld on the waist is ugly (especially with that huge weld crator and spatter) maybe spruce it up a bit if you desire but all in all it looks perfectly useable the way it is now. Linseed oil couldnt hurt an the body though. -Crazy Ivan
 -
Just an fyi on majestic forge, I have been running the 2 burner knife maker forge from them for a while and while it has never let me down, the fire brick it comes with is quite the heat hog. I am considering making a 2nd forge with kaowool insulation instead of just hard firebrick as you have to run higher pressure to keep the heat up. In the long run it would save some money on LP. Not saying do not get Majestic, just suggesting you look at other optiuons. Chilli forge, while expensive can save money in the long run because from what I hear they run on 2-5 psi for normal forging. Diamondback forge would be a slot in between majestic and chilli forge. Food for thought. -Crazy Ivan
-
That is some impressive work you got there! I especially like that helmet. Good luck getting yourself set up and welcome to the forum! -Crazy Ivan
-
Lat time i filled my 2 40lb tanks it was an extra 15 bucks. Not too bad but I wasn't happy about it. -Crazy Ivan
-
I finally got around to joining! About time haha. -Crazy Ivan
-
Anyone ever see or use one of these?
Crazy Ivan replied to Chestnut Forge's topic in Solid Fuel Forges
I have seen those on ebay. There is a model that is longer, but the length is adjustable because the bricks come out freely and there is a back plate that is on sliders as well as adjustable airflow down the tuyer . It looks like an innovative design, however, I don't have any experience using charcoal so I cant really speak to its functionality. -Crazy Ivan -
Well done David!
-
Life is good. What did you do today
Crazy Ivan replied to Jim Coke's topic in Blacksmithing, General Discussion
FINALLY got some time and began prepping for a sculpture commision of Pluto and Persephone. Gathered up all the steel I will be using and gave it all a "mental dry run" for how I will go about fabricating it. I will have some progress tomorrow on the build. Pics will be posted as it progresses in my "An intense commission" thread. Very exited the ball got rolling on this finally. Deadline is the 1st day of spring. -Crazy Ivan -
New Anvil, help with ID?
Crazy Ivan replied to Derek C.'s topic in Anvils, Swage Blocks, and Mandrels
You are right that it is a 171 lb Peter Wright. A nice one at that! Get forgin! -Crazy Ivan -
This forum will be an excellent resource for you because many members on here create some very useful (and inexpensive) tools rather then buying them! Whats better is that they post pictures and blueprints on how they built them! Get comfortable, Grab a snack and a drink and dive in. Lots of knowledge to take in. Welcome! -Crazy Ivan
-
I am gonna play devils advocate here for a second and say that with all the redundant questions, when I search for answers on this forum, they tend to help me find multiple solutions to my questions (different smiths answering the same question get loads of answers). Everything gets archived here and that is great. Though I do completely understand the frustration with seeing the same questions over and over (I try to check this page every day for new content). It does show a serious lack of diligence prior to asking questions but on the flip side, the redundancy does tend to serve me well when I go searching. So as I don't quite get why people wont search before asking (other then sheer laziness) it has helped me in getting multitudes of good answers when I search. That being said, and seeing the company mainly posting on this specific thread, I for one learn from and greatly appreciate honest opinion and critique and I welcome all (good or bad) on anything I post from any one of you. No whining comes from me if you have criticism on my posts (other then grammer haha). The only way WE can advance is with honest critique! -Crazy Ivan
-
Depends entirely on the intended application! Don't use a splitting maul to cut carrots and don't use a chefs knife to chop down a cherry tree. If you want to do both, try a khukri haha. -Crazy Ivan
-
New mounting bracket for my Trenton
Crazy Ivan replied to Crazy Ivan's topic in Anvils, Swage Blocks, and Mandrels
Thanks. The ring was never a real problem, it was faint but now even more quiet with this mounting bracket. One day I will likely use some silicone under it to make it completely ring free. It sure would be a bear to try and walk off with! I would guess stump included it weighs around 350 lbs (128 lb anvil). My favorite thing is how easy it is for me to disassemble for moving (2 screws per anchor) but still allows zero movement while attached. I highly recommend this method for anyone trying to find an easy way to firmly mount their anvil and be able to move it as needed. If someone were using a metal anvil stand instead of a stump the screws can be swapped out for some bolts instead. -Crazy Ivan -
Making a hand forged item food safe
Crazy Ivan replied to doogie87's topic in Blacksmithing, General Discussion
If you type in the word "food safe" in the search bar at the top right of your screen, you get 82 results so I think there is plenty of info here for you. For food safe, I typically clean the steel thoroughly and hot oil it with food safe oil (canola, sunflower etc). Lots of topics up on here about that though so I suggest reading through some of them. You might even learn other things incidentally. If using mild steel, you will have to constantly clean and oil the implement to prevent bacteria growth and rusting. -Crazy Ivan -
While I was working today, I noticed my anvil shifting slightly and was not having it. Put the project down an took the old anvil mounts off. I saw something like this before so I gave it a go. Really happy with how solid it is and it even reduced the ring more then the last mount I had. http://www.iforgeiron.com/gallery/image/38005-anvil-cleats/ http://www.iforgeiron.com/gallery/image/38004-anvil-cleats/ Its made from some scrap plate I had kickin around and four 1/2" rounds. Put the anvil down on top of the plate and traced each side out with soapstone, cut each side out with an oxy-acetylene torch, marked and drilled my holes, put the anvil back on the stump and screwed the plates in keeping them tight to the anvil, removed the anvil, welded the bars in place and put the anvil back, heated with an OA torch and bent the rods to fit. It only took about 30 minutes for the whole thing. -Crazy Ivan
-
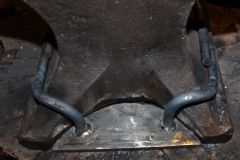 Some scrap plate and 1/2" round I made up for an easily removable hold down.
© anti-copyright :)
-
 Some scrap plate and 1/2" round I made up for an easily removable hold down.
© anti-copyright :)
-
Don't you wish you could be the artist's blacksmith?
Crazy Ivan replied to VaughnT's topic in Everything Else
Photo number three is me. I posed for 12 hours so the artist could get it right. I started out not as fit as the finished portrait but as you can imagine, I caught some "swell" from holding my 30# hammers like that for so long. My welding shield is not painted though...that was some artistic license I guess. At least he got the scars right...hahaha (oh and my dreads are not that epic) If you are looking for tips on how to be generally awesome, PM me :D -Crazy Ivan -
I have not used a jewelers saw on this, only files and only on aluminum (stainless being much tougher). I can imagine having trouble with the saw on irregular shapes which is why i went the file route. Never broke a file doing that but as I said, I don't do much in the way of bladesmithing (though I am starting to get more and more interested). -Crazy Ivan
-
I don't think you got carried away. I think you made a tool that will outlast you! -Crazy Ivan
-
I have thought of that before (very briefly) and I dont think it would leave a very desirable result. Chances are the fit will be sloppy and you would have to spend time with a file anyways. Also I have notices a slight difference in coloring of the steel when polishing over a welded area (the weld tends to be darker). I am in no way a very qualified bladesmith, so I am sure others here can give you more options, but I don't think welding over mild steel is a good one at all. The drilling and filing method does not take as long as you might think and it is the only way I have seen it done personally. -Crazy Ivan
-
Drill it out as much as possible, then follow with a jewlers file to make it a slot. -Crazy Ivan
-
The size tanks you are using are the problem by the sound of it. You are pulling more gas then the tank can produce. You could either get a 40+ lb tank so that does not happen (I run 40 lbers on a 2 burner forge all day with no problems) or you could put your tanks in a bucket of warm water to keep the liquid from feezing so quickly. I can't really speak on the 2 tank option as I have never tried it, but ultimately I think upgrading tank size would be in your best interest in the long run. -Crazy Ivan
-
Too hot in the shop; how do you stay cool?
Crazy Ivan replied to 78sharpshooter's topic in Blacksmithing, General Discussion
I feel like this is a very backhanded post...its snowing here right now....Okay, envying your problem aside <_< , Judging from the picture, your shop may stay a bit cooler if you moved the forge over next to the doors instead of radiating heat off the walls, past you, then out the doors. Unless that is where it is already (just guessing from where the light appears to be coming in from). -Crazy Ivan -
Bring 10 and 20 dollar bills because if you offer $100, it looks better as 10-tens or 5-twenties compared to 1-one hundred dollar bill (seeing more bills seems to look more appealing to an apprehensive seller). With things like tools, explain how they are still used and not especially valuable just because they are old (especially with anvils, some people think they are made out of gold). On the point of you seeing post vises on ebay in the $100 range, (and they can be found fairly cheap) that may not be a good example to use in bartering because everyone knows with shipping costs, you will have to pay another $50-$100 so you will be paying $150-$200 at the end of the day anyways. If that and everything else listed above does not work, plan-B... -Crazy Ivan