patrick
Members
-
Joined
-
Last visited
Everything posted by patrick
-
I got one from yupu222 yesterday. Also looks like a scam.
-
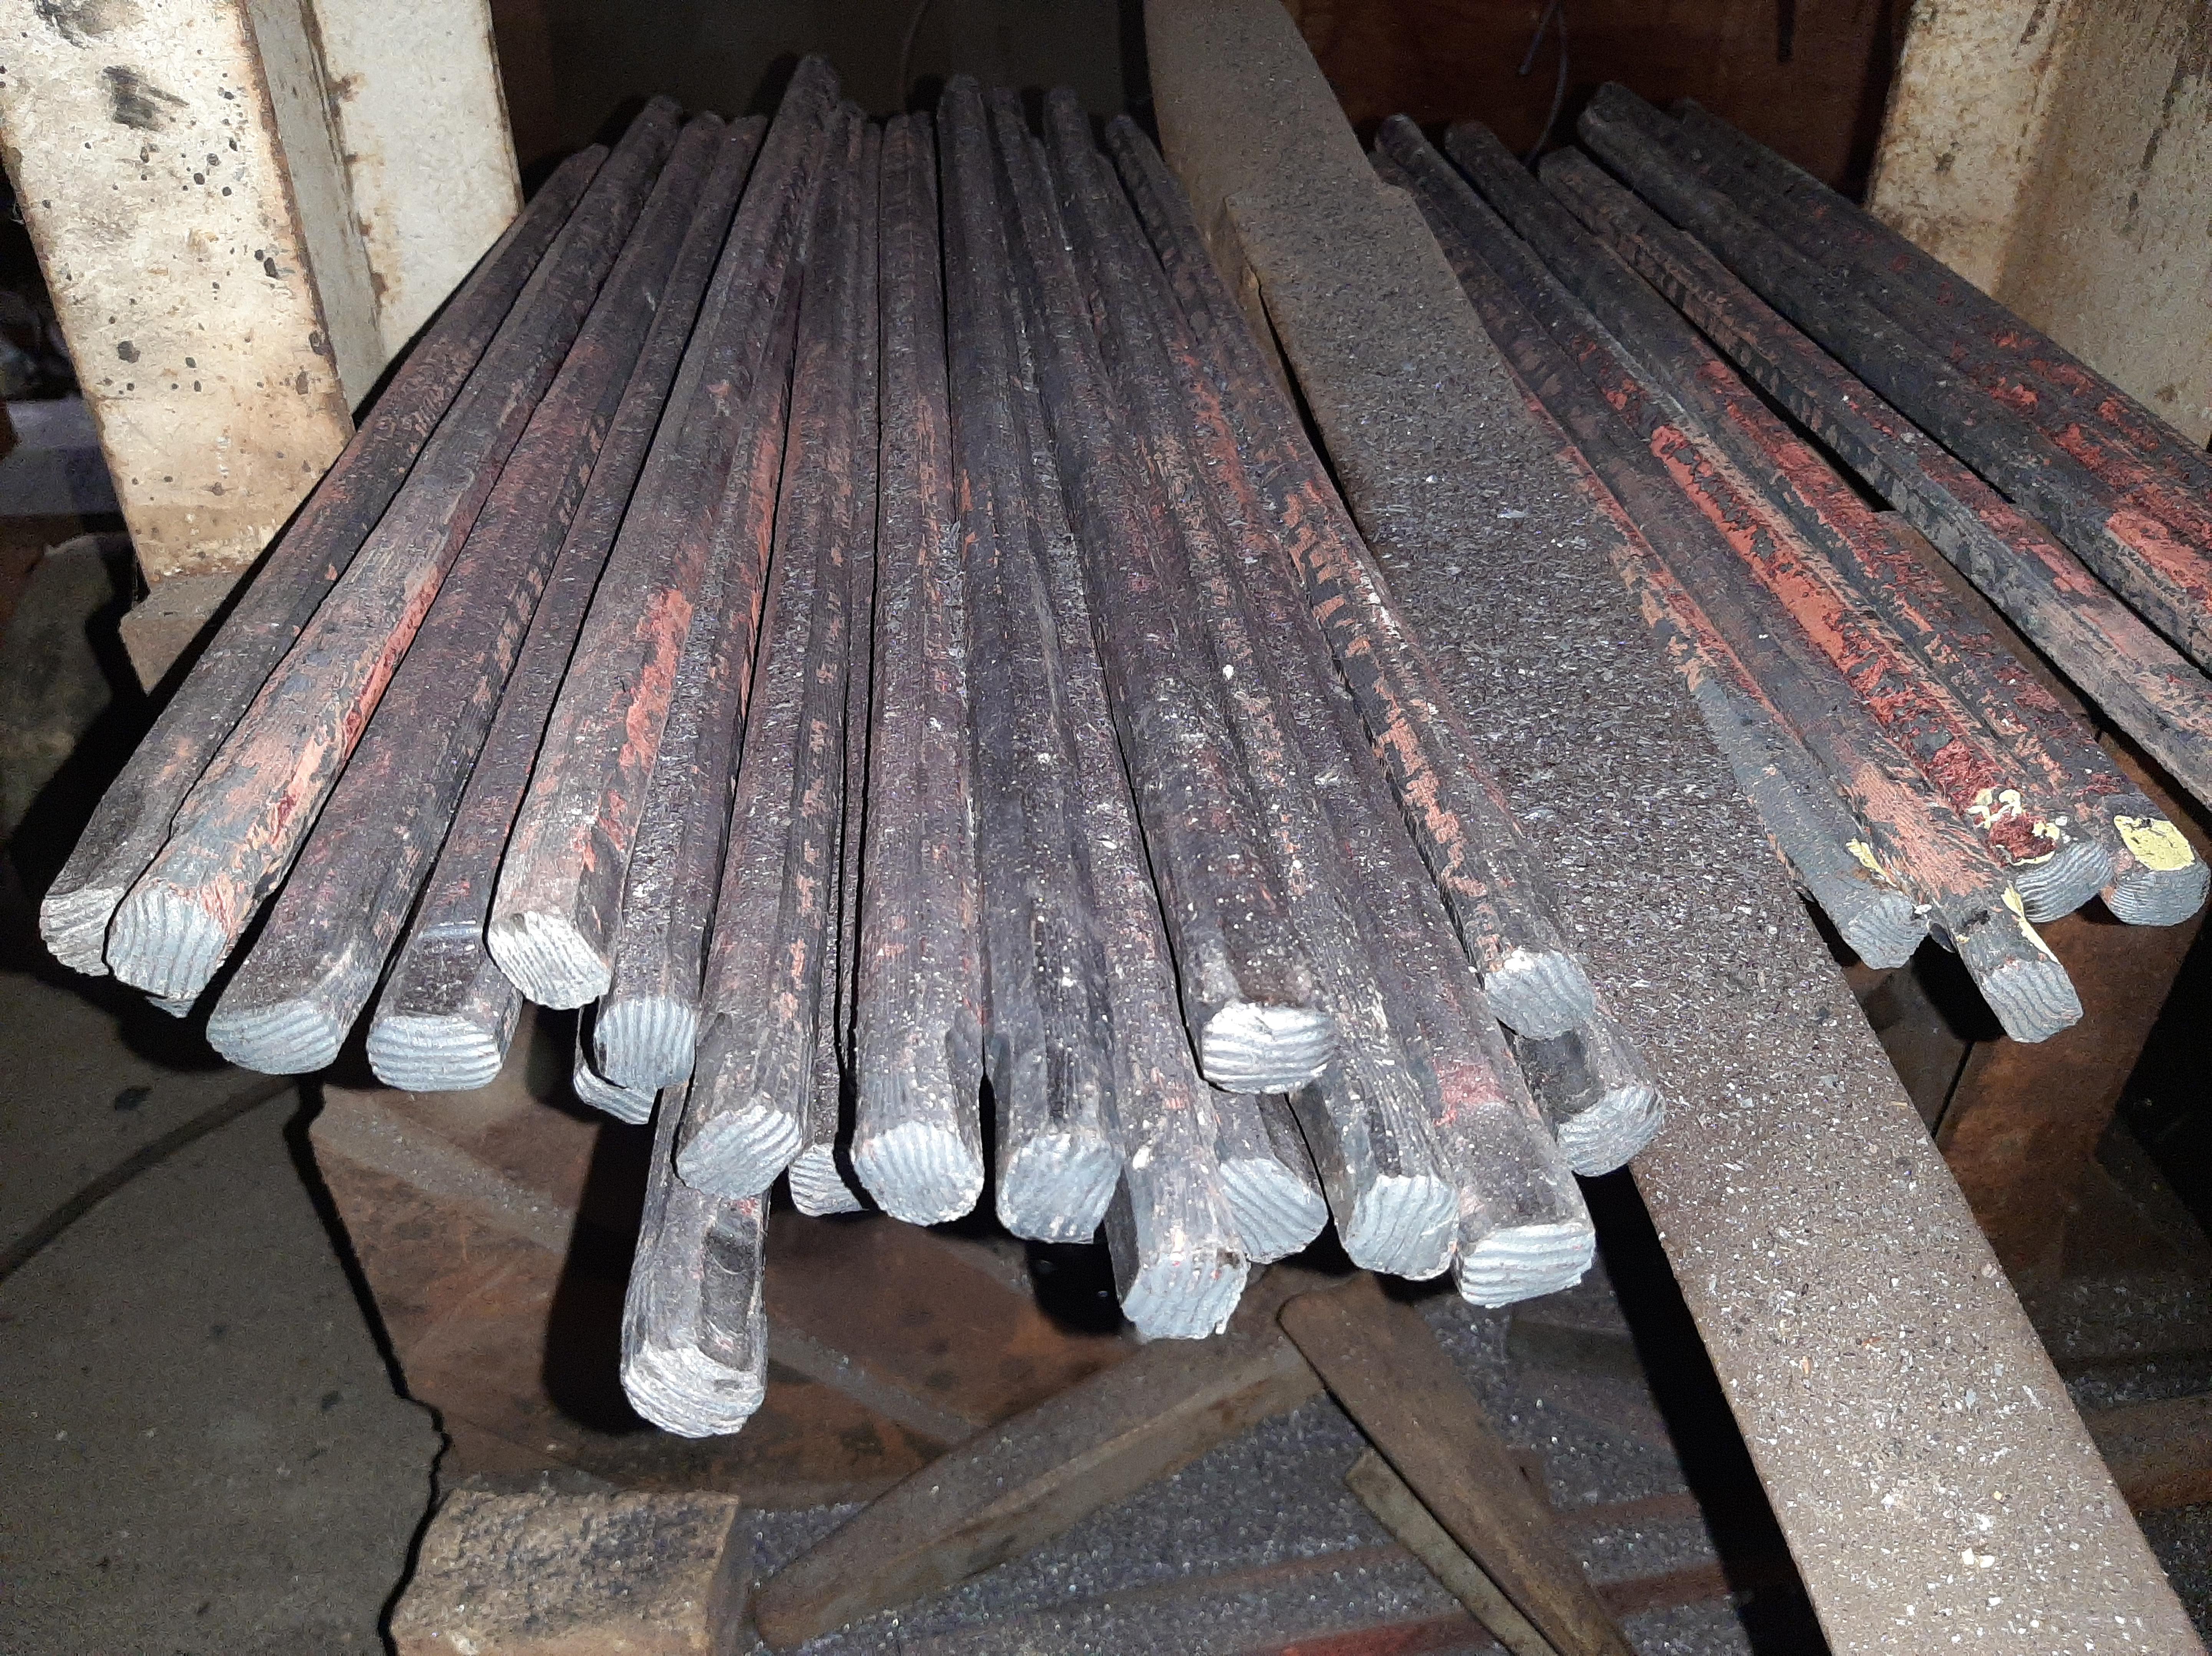
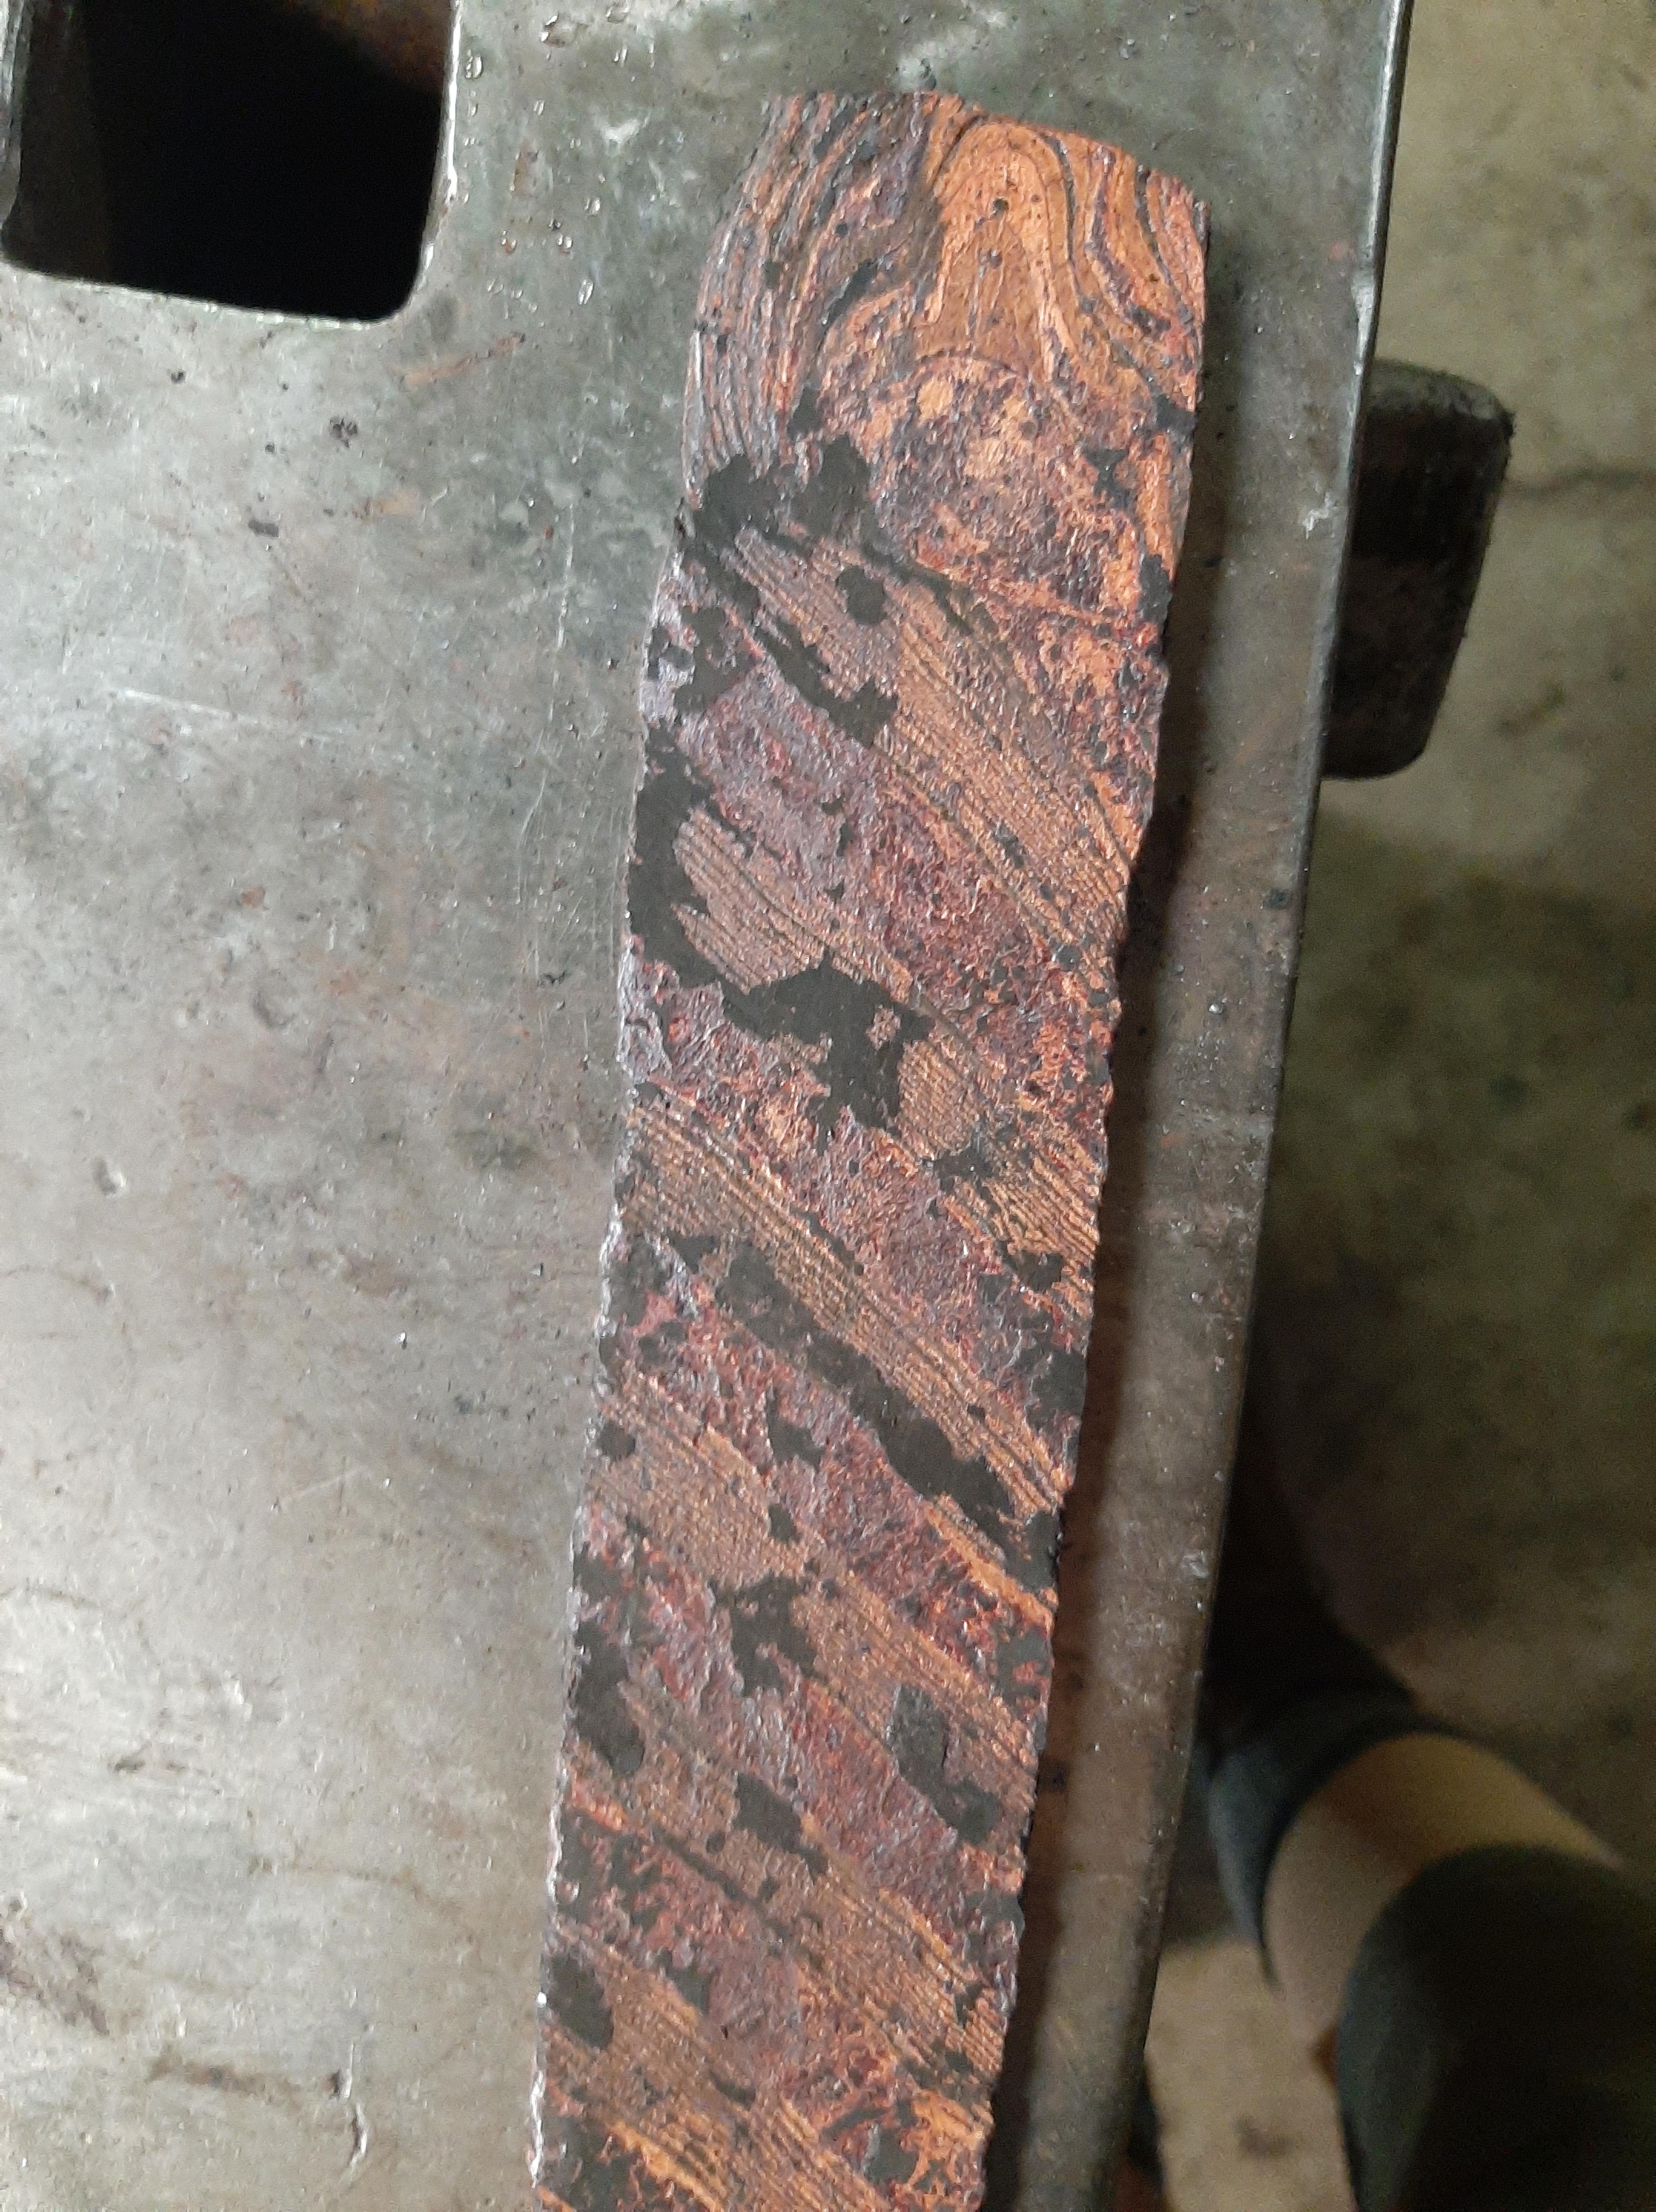
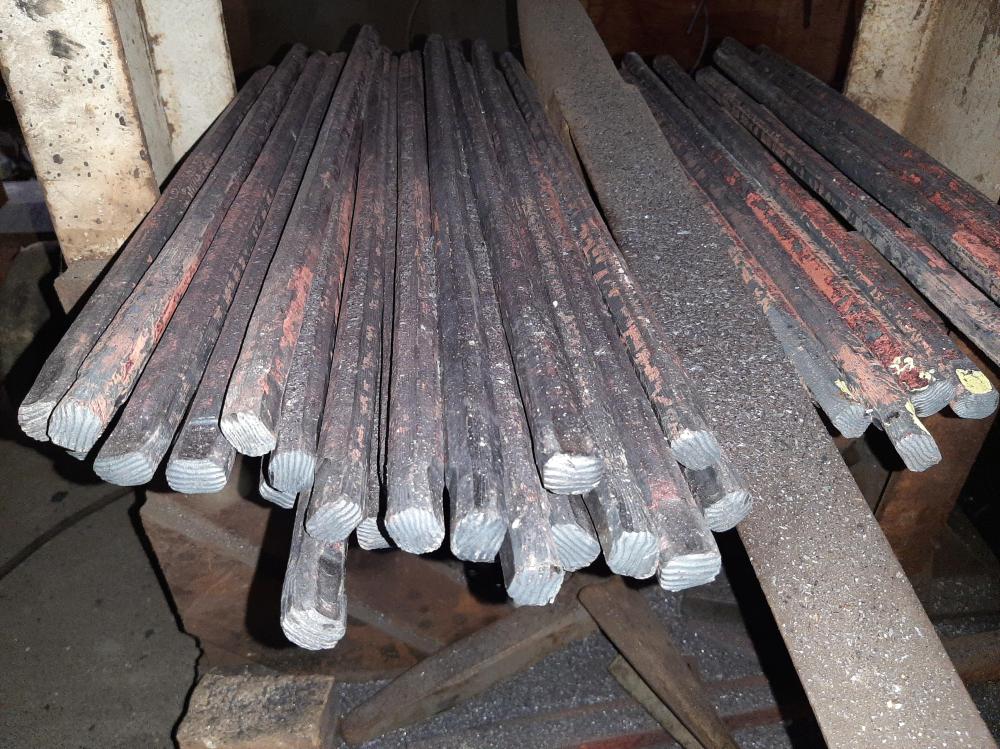
Frosty- The mokume I forge is all bonded by Mike Sakmar, who is using the methods described in the book "Mokume Gane in the small Shop" by Steve Midgett. A digital copy of that book is available free on Mr. Midgett's website. There are several methods used in the book. The method used for the billets I work with is to clean the pieces to be bonded in a strong acid, rinse in a solvent like acetone, then layer up the billet. From the point of cleaning onward the pieces are handled with gloves to avoid getting any finger print oils or other contamination on them. Once the stack is complete, it is wrapped in stainless heat treat foil. It is has been many years since I've visited the shop where this happens and I don't have pictures of this part of process, hence the reference to the book above. If I remember correctly, I think a small amount of charcoal may be added to the foil package to serve as an oxygen consumer, but I don't recall for sure. Once the billets are wrapped in stainless foil, they are clamped between flat steel plates with bolts at the corners. They are put into electric kilns and heated to the desired temperature for a time commensurate with the size of the billet, but usually an hour or two. Bonding temps are picked based on the alloys used, but will be a little bit below the melting temp of the alloy with the lowest melting temp in the billet. After the bonding cycle is done, the billets are removed, clamped in a vise and the bolts removed. The foil wrap is ground or machined away leaving the billet sides smooth. That is what I get. (picture below). My forging is done almost exclusively with flat dies, and all under my 300 # Bradley. Sizes I make are dictated by my customer, (Mike Sakmar) who owns the material and pays me to covert it to his desired sizes. Common sizes are 0.230x01.675 flat (twist before flattening) and a variety of octagon sizes. Occasionally there will be some larger flat cross sections like 5/8 x 2 1/2. Most material is twisted to generate the pattern. When some other pattern like raindrop or ladder is desired, I forge to a specified flat bar size, send the metal back to Mike who machines in the desired pattern with a ball end mill, then it is sent back to me for forging to final thickness. I've been doing this work for probably 16 years or more and most of that time the twisting has been done by hand. A few years back I did add a twisting machine to the shop, which is simply a very old (line shaft driven) pipe threader modified to take the flattened end of an octagon in the "chuck end" of the machine. Mike does sell his material to anyone, though many of his customers are from the knife making and fidget spinner community. You can google him to find his website. Because these are copper alloys, there is no need for a hammer as big as mine, it's just what I have. I will say though that I much prefer a hammer to a press. Presses are much slower than hammers and though they'd work fine for the initial break down of the billets, they pull heat out of the work too fast for effective forging of the thin flat bar and plate often make and they are just too slow for drawing out small cross sections. The 0.230 x 1.375 flat size I usually forge to 3/4" octagon before twisting, but I do that using die bites that are about 1/2" long. That is a LOT of strokes and most presses a just not that fast. Most of the success or failure associated with forging mokume is not in the tooling but in how you USE the tooling. As mentioned, almost everything I'm doing is with flat dies, but how big a die bite you take and how hard you hit the metal changes as the job progresses and if you don't do that right you will end up splitting the billets apart. Describing that detail is pretty hard in text, but the approach is not that different from what you'd used when forging very slaggy wrought iron.



-
You can cut and rebond mokume billets without flux. In fact flux generally is not used. The cut and rebond technique is not common but I did do some "graph paper" pattern mokume a few years ago and it did work. There was lots of material loss with that approach because of all the cuts, but a feather patter would not be too bad in that regard. I think it would actually look pretty cool once you worked out the right layer count and thickness.
-
I have forged thousands of pounds of mokume in the last 15 years, usually starting with blocks much bigger than what you are working on. the key to successful mokume is keeping the surfaces clean prior to bonding. If you do that, then run a bonding cycle that is effective, meaning long enough and hot enough for the materials in your billet, you should have very good success. As you work the billet, take time to grind out layer separations and cracks. When twisting, I always forge to an octagon first, then twist, then forge to final size and shape. This minimizes the risk of getting corners that tear apart or form laps during later forging. I don't do much cold work. You can do a little bit, but brass and nickel silver (which are common elements in the billets I'm forging) do work harden fairly quickly so if you were going to do much cold work you'd need to anneal frequently.
-
I have not read the referenced article but based on the assessments you've provided it doesn't sound that good. There is evidence for the use of steel going back to the times referenced though. There is a two volume set by V.F. Buchwald that discusses the ancient use of iron and steel in Europe and traces the historical development of that technology. In those books, he details the use of steel found in fasteners used to too join the stone blocks that were used to build the Parthenon. He also points out that Homer gives a description of quench hardening. Homer's works are not quite as old as 900 BC, but the setting (The Trojan War) is roughly 1250 BC. In the book of Proverbs, Solomon writes that "iron sharpens iron" which I take to mean a file sharpening something else. It could be a different technique, but if he was referring to a file then you have another piece of literary evidence from about 900 BC pointing to a knowledge of quench hardening steel.
-
Hi DaniH-You've raised an interesting question and I may be able to help a little bit. In the US, stainless grades, especially those that are austenitic, are mostly made starting with scrap stainless steel that has a composition close to that desired in the final product. Because the starting material is already loaded with chrome and nickel, special techniques are used to remove what little carbon is in the melt charge. It will be MUCH less that what is in your pig iron. The methods used are either Argon Oxygen Decarburization (AOD) or Vacuum Oxygen Decarburization (VOD). Both methods are used because they substantially limit the amount of chrome that is lost to oxidation. If the conventional methods of removing carbon by blowing oxygen into the liquid metal under normal atmospheric conditions are used, a great deal of chromium is lost and that is very expensive. If you are starting with conventional pig iron you will not have much chromium in it, but it will be high in carbon. You could used an oxygen blow to get rid of the carbon, but getting the chromium into that melt gets to be a challenge. Adding pure chromium to liquid pure iron is pretty hard because the melting temp of the chromium is a good bit higher than the iron. In conventional steel making this problem is solved by adding something called ferro chrome to the bath. That is a very high chromium, iron carbon alloy. For steels other than the austenitic stainless grades, this method works well because the carbon in the ferro chrome is not so high as to cause a problem. Lots of steel has carbon over 0.10%, in fact quite a bit more. But to successfully make austenitic stainless (316L) you have to get the carbon down below 0.08%. It is getting that low carbon without loosing a substantial portion of the chromium that is so hard. You can do it, you just loose a lot of chrome and that makes for a very expensive heat of steel. This difficulty in getting rid of carbon is one of the reasons that the martensitic stainless grades, which do have some carbon, were the first to made commercially. It took a bit longer to develop the technology to get rid the carbon. In your original question you asked if you could add something to a 70Kg melt to get rid of the carbon without blowing in oxygen. The answer is YES! Historically, mill scale, forge scale or other sources of iron oxide where added to furnaces for the purpose of reducing carbon. This was done as part of the puddling process used to make wrought iron and was also used in the open hearth steel making process, which has some similarities to the puddling process. this will not help you get the chromium and nickel into the iron, but it will help you get the carbon out. Here in the west we no longer add mill scale to the pig iron as part of steel making because so much of our steel is make by remelting scrap via electric arc melting. In that process it is more cost effective and faster to just blow oxygen into the liquid steel, but for your situation this may be a workable solution to your carbon issue. Good luck.
-
Hey Guys- I know I'm a bit late to this conversation but I thought I'd add a little bit. The spark test actually was used for differentiation of more than just carbon until fairly recent times. I have a copy of the spark testing training manual that was used at Inland steel and it very clearly shows and discusses how to distinguish the spark characteristics of elements like molybdenum and chromium. The training required to get that good was extensive. The manual was given to me by a former salesman who represented the successor to Inland Steel. I asked why that technique was still in use since laboratory methods that are much better have been in place for a long time. He said the method was used with a hand grinder by inspectors checking bundles of bars as the left the mill. The goal was to quickly hit the ends of the bars in the bundle and confirm different steel grades had not been mixed in the bundle. Up until fairly recent times there was no other method fast enough to keep up with production in a steel mill setting. Within the last 10 years or so portable X-ray analysis tools have replaced the spark testing method for this application. Interestingly, the most common laboratory method, optical emission spectroscopy, is really just an advanced version of the spark test. In this method an electric arc is struck between a steel sample and a tungsten electrode in an environment flooded with argon. Special optics and software analysis the colors in the light and determine the percentages of each of the elements present in the steel. The use of the traditional spark testing technique to sort steel by carbon content is one of the earliest tests. By 1916 this was a well established test and is discussed, with illustrations, in the book Heat Treatment of Tool Steel by Harry Brearly. The image shared by the original poster does not have a lot of spark features shown. I agree that pictures zoomed out with more of the spark showing, especially the burst if there is one, would be helpful. Assuming there actually are no bursts then I'd guess this to be something like a high speed steel rather than 01, but I don't think there is enough info to say for sure.
-
I'm an active member of ASTM and user of their specificaitons. Not only do they have specifications by application, such as the music wire , bearings and rail road applications but within a given standard their are often several, sometimes many, different grades. For example, Specification A350 has several different grades with substantially different compositions. We work with A350 LF2 and LF6. Those names have no connection to the composition, they are just generic labels so you have to look up the spec to see what the compositions are for each of those materials.
-
All- i have an anvil in need of repair. Before people jump on me about need for the repair or my abilities to execute this kind of welding, please know I've done this on numerous occasions in the past and I'm well aware of when and when not to do this kind of work. In this case, the anvil in question is definitely in need of repair. My go-to rod for hard facing has been a Hobart product-Hardalloy 58, which was recommended by them years ago specifically for this application. However, I can no longer find this rod. It is a self hardening rod that does not crack or cross check provided the layers thickness is limited to 2 passes. It appears to be similar to tool steel grade H-12. I have found similar products by Weld Mold and Core-Met. I have also seen many people refer to Robb Gunther's method using Stoody 2110/1105. The 2110 product is described as work hardening grade that, after work hardening, will have the hardness i'm looking for. However, my experience with other work hardening alloys has been that they really need a lot of pounding to bring the hardness up. I'd rather not have to do a bunch of cold work to the weld deposit to get it to harden. I'm curious what experience this group has had with the Gunther method or even using 2110 by itself. Thanks in advance.
-
I'm not of the rules regarding public posting of specific vendors. If you send me a PM I can put you in touch with sources for mokume blocks, bars etc.
-
Your questions about hardness and heat treatment of these dies are addressed in some other threads. But seeing the pics you've shared I have real concerns about cracking in the corner of the dovetail during quenching. I had that happen to similar dies I made from 4340. I suggest you use a ball end mill of at least 1/2 diameter to create a bigger radius in that corner. If you can go bigger, like 5/8 or 3/4, I'd do that. these dies are designed for load bearing on the bottom of the die, not the shoulders, so if you have to take a little off that shoulder to improve the corner radius it will not hurt die performance.
-
15N20 etc are not specific designations by one company but are the designations used in many of the European countries. 17CrNiMo6 is another example, but there are hundreds, just like in the SAE system. Many times there are equivalents from one system to another and sometimes not. Each system make sense in its own way, but they are all different. Japan has a different system as does China. There is also something called the Unified Number System. In that system, most of the familar SAE designations are prefixed by the letter G and given a couple of extra digits at the end. For example, 1095 is G1095x. In this system Tool steels all start with T, stainless with S, copper with C, titanium and other refractory metals with R. Each system has strengths and weaknesses. I like the SAE system because that is what I learned first and am most familiar with, but I"m sure someone from Europe would say the same about their system.
-
Generally speaking it is going to be tough to get 4340 up to HRC 60. The maximum as-quenched hardness of any steel is a function of the carbon content (barring the very highly allowed cutlery and high speed steel types). It typically takes about 0.57% carbon to hit HRC 60. More carbon above that value will not give you higher hardness, but it does give increased wear resistance which is why cutlery grades have carbon close too or sometimes exceeding 1% carbon. For steels in the 0.405 carbon ranges, max hardness is going to be in the mid 50s HRC. Usually, the parts will be tempered, so working hardness will be somewhat, or maybe a lot, less than this. Flame hardening is a technique using a torch to locally heat the surface. Typically a quench nozzle or spray follows close behind the torch tip. The goal is to create a hardened surface layer while keeping the interior of the part at a lower hardness for better toughness. For the power hammer dies that were discussed in another thread, I would suggest a through hardened part rather than a surface hardened one. With the use of special coatings or other treatments such as carburizing and nitriding, it is possible to achieve surface hardness of HRC 60 or above, but I can't think of an application in the blacksmith shop that would benefit from this. This type of hardness is used for gears and bearings in high wear applications or shafting subjected to a lot of sliding wear. In the blacksmith shop, the hardest tools usually will be power hammer dies, anvil faces and hand hammer faces. These should all be made with hardness closer to the low 50 HRC range to reduce the chances of brittle failure.
-
45-50 HRC is a good hardness for a power hammer die and 4340 is fine material for that application. Your original post in this thread does have some errors though. Normalizing is done at temperatures in the 1600-1700 f range. Those you gave were for high temperature tempering. they will not have the same effect as the higher temperature range. When it comes to heat treatment, especially of critical tools like power hammer dies, control of the heat treat process really is extremely important to getting the outcome you need. Uniformity of temperature during heating, sufficient volume of quench fluid etc all must be considered. Here are the recommended temperatures for your project: 1. Normalize at 1600 F. Air Cool. 2. Austenitize at 1550 F. Oil Quench. 3. Temper in the range of 600-700 F for a final hardness of 45-50 HRC You will want a minimum of 10 gallons of oil. you will need to agitate the part vigorously during the quench. Paying a commercial heat treater to process these dies to your specification will be much cheaper than buying a furnace with the proper controller needed to properly heat treat these dies. of course, if you have other projects planned for that kind of furnace, you could justify the cost that way.
-
I'll give you the metallurgy perspective: All the grades will perform equally well. They will all get hard enough for a hand hammer. The choice really comes down to what you can get and what resources you have for heat treatment. If you are buying new steel, 4330 will be the most expensive. 1045 will probably be the cheapest. 1045 is probably the lest likely to crack in hammer-section sizes and should be water quenched. They will all respond about the same to tempering. I'd suggest 450-475 F for 30 minutes per inch of maximum thickness. For a typical 2-3 pound hammer 1-2 hours should be fine. I would be sure to temper as soon as you are done with the quench. I would avoid stamping a makers mark in if you are going to heat the entire hammer to the critical temperature and quench. If you are able to heat just the faces (both at the same time) and quench then you could stamp in a region that will not be above critical. I have seen cracks originate in these kinds of stamps after quenching on numerous occasions.
-
Many grades are sold "hot rolled" which may or may not be fully soft. 4340 is not really a tool steel by industrial standards, but it is quite hardenable. Most likely that grade would be sold either in the fully annealed condition or the pre-hardened condition. In this condition the material has been quenched and tempered, but the tempering temperature used is high enough to get something like 30 HRc. 4140 can also be found in this condition. These two grades are most often NOT used at very high hardness. Rather a lower hardness/higher toughness is desired. At HRc 30, the material is hard enough for many applications but can still be machined. Other tool steels like 01, A2, D2, M2 etc are normally sold in the fully annealed condition because they are used at much high hardness and machining them at such a high hardness is very difficult and time consuming.
-
Steel faced wrought iron tools were the norm until large scale steel production made steel cheap enough to use for the entire tool. This did not happen until Bessemer steel making (initially 1856 but it really took off a few years later) followed shortly thereafter by the Open Hearth steel making process. The high carbon steels made by the blister/shear and crucible process persisted in industry until the early 1900s because crucible steel making was capable of delivering a higher quality product than the other two method and because high carbon steels (which was what crucible methods were used to make) was not used in such high volumes as the non-tooling grades. When electric arc steel making was introduced in 1906 (US) that began to take the place of the crucible process. From an anvil making perspective we see Hay Budden switching from wrought iron with a steel face to full steel anvils in the early 1900s (I think around 1910 but I'd have to verify that). If I recall correctly , Trenton never made that switch and continued to make anvils into the middle part of the 1900s. You definitely start to see descriptions of the type of steel to use for hand tools in the old blacksmithing reference books in the early 1900s, but when companies like Heller or Champion started using all steel tools, I don't know. I don't know if they ever made wrought iron/steel composite tools. I do have a couple of hammers that were made that way, but there are no makers marks. Where you find this method of construction most prominently is actually in wood working tools such as axes, planes and chisels. Once steel became cheap enough to use for the entire tool, those tool makes made the same kind of switch that the other tool makers did. Interestingly, composite tool construction is still common in high end wood working tools made in Japan and by some other custom tool producers.
-
The hy alloys (hy stands for high yield strength) are readily forged. We forge them all the time, usually for ship building as noted above. To hit yield strengths of 80 or 100 ksi, tempering temps in the 1100 to 1200 or so range are used. You can get them harder if you use a lower temp, but they are never going to get hard enough for good edge retention, the carbon is to low. Nickel is about 3.5 % and chrome is a bit over 1% so they would be a bright element in damascus. The hy grades are used in very thick plate sections, sometimes 9 inches or more so it is possible to get big chunks if you need that. A203E is used as pipeline steel. I have only ever seen it in thin plate sections like 3/8 inch. It too has enough nickel to make a bright layer in billets. I dont think it has much else in it and it is also a low carbon grade so not good for edges.
-
This is an interesting discussion. From an engineering point of view, the ball bearing rebound test as done by blacksmiths is really a hardness test. it is a variation on the old Shore Scleroscope hardness test that was essentially the same thing but with a graduated column to contain the ball and allow for quantification of the rebound height. A more modern version of this kind of test is a Leeb hardness test which measures the return height of a spring loaded pin that is "shot" against the test item. There are ASTM standards for both of these tests, though I am not aware of the Sclerosocpe test being used much anymore. I first encountered the ball bearing test on anvils probably 20+ years ago when I read about it on another forum hosted by Jock Dempsey. Assuming blocks of equal mass and different hardness, the rebound of any of these test methods will be higher for the higher hardness block. When you use the ball bearing test at a blacksmithing event to "test" an anvil, you are really just getting a feel for the hardness of the anvil surface. This does not account for variations in geometry (heel vs center of mass for example), the fact that a blacksmiths hammer is much heavier than the ball bearing used in the test or that the hammer is accelerated by the smith and has a much greater velocity and momentum than the ball bearing. Plus, each smith will have a somewhat different swing, hammer grip, hammer weight, shape etc. In addition to these variables, there are variables associated with the workpiece itself (material, temperature, yield strength at that temperature, thickness/height, etc.) that will also influence the user experience. The ball bearing test was proposed as away to eliminate these sources of variation when comparing anvils to each other, but it does not really give you a good idea about the user experience. If the question is narrowed from "does rebound of an anvil matter" to "does hardness of an anvil matter" then you can begin to factor in some of the experiential observations that have already been shared. Clearly, excellent work can be done on both hard and soft anvils. Anvil mass and distribution of that mass can matter, assuming the anvil is not anchored to some larger mass. Chambersburg Engineering published data on a study of the effect of anvil mass for closed die forging hammers and concluded that an anvil to ram weight of 20:1 gave the best performance, meaning that ratio transferred the most energy from the ram into the workpiece. larger anvil to ram ratios did not result in increased efficiency. This was for steam hammers with the steam used to accelerate the ram against the anvil. Of course, a hard anvil will last longer than an soft one, but assuming you only pound on hot steel, the anvil hardness is unlikely to make much difference to the deformation experienced by the workpiece. The one benefit I can see besides longevity to a hard anvil, and where rebound could matter, is if you are a blacksmith that likes to keep a hammering rhythm by tapping the anvil when you are not striking the workpiece. In that specific case, the anvil rebound (hardness plus geometry effects) will tend to throw the hammer back up, minimizing the effort required to lift the hammer for another blow. All of the above assume hot working. If you are doing cold work, things may be different. The article linked by wirerabbit is quite good, though pretty math intensive.
-
Some of those old references show bottom tools strapped down to flat anvils. In those cases there was no shank on the tool or square hole in the anvil. Instead little horns or hooks were forged on the side of the tool. Iron straps fit the hooks and those passed under the heel/horn of the anvil and were held in place with wedges. I dont know when this technique was first used but you can find very old examples of collard work where the collar stock could have been made using a bottom swage held this way.
-
George-Depth of work hardening is directly related to how far into the item deformation has penetrated. I did an experiment a year ago where I annealed 3/4 square bars of different steel grades, then forged them at room temp under one of my big power hammers. In the case of a pure iron specimen, I was able to forge it cold into a thin sheet, so in that example the work hardening effect penetrates the full thickness of the final part. But in general, the effect is limited to surfaces unless you have a way to induce deformation through the whole cross section. That usually requires massive rolling mills or other very large metal working equipment. Interestingly, if you are considering something like a knife blade, that could be work hardened through the full cross section along the edge and could be made quite hard without heat treatment. this is true of more than just iron. In fact there is a high likelihood this technique was used to improve the strength and hardness of bronze age weapons and tools. Latticino-you are absolutely right that DI and steel are two very different classes of material. Both are iron based, but DI and some of the other forms of cast iron have so much carbon that some of it exists as graphite. This is not true of any but a very few steels. Ductile iron, especially when properly heat treated, will have properties comparable to many steels, so in that sense it could be a good substitute, but definitely not the same material and is should not be called steel. Cast Steel is in fact just steel that has been cast to shape instead of being forged. Most of the anvils made today are genuine cast steel. There are some ductile iron anvils on the market. A foundry local to me made one as a trial that I got to use. It was not heat treated and was definitely softer than a properly heat treated steel anvil, but it was a perfectly serviceable tool. Had the alloy been adjusted a bit and it been heat treated I think it would have made a very good anvil. As for the work hardening in old anvils, yes I'm sure that there is some, especially when you see evidence of mushrooming or sway back, but generally I'd say that unless you use the anvil primarily for cold work, such as in the case of a sawyers anvil, the amount of cold work is really pretty minimal. the hot steel is doing the plastic deformation, not the anvil or hammer. Remember, the anvil face has to be soft enough to yield plastically. Even in the sawyers anvil example, if the face is hard enough, the hammer/work piece will just bounce off without inducing plastic deformation. If that is not happening, you are not really getting the cold work I'm describing. I've looked at lots of metal under the microscope and you can see deformation and its effects on individual grains. dislocations are not seen without the aid of exceptionally high magnification, much higher than you can get with a conventional microscope. Something like a tunneling electron microscope is needed. An excellent example of work hardening on a common item is rail road rails. Those are soft enough that they do plasticly deform on the surface. Over time, that hardened layer will spall off, leaving a pitted or flaked surface. Eventually such rails have to be replaced.
-
I should probably start a separate thread just on work hardening as that is a topic that does not seem to be well understood. There are at least two kinds of work hardening. The first is based on the idea that a crystal of metal can be deformed resulting in "misalignments" of the atoms within the crystal. These are called "dislocations" by metallurgists because the structure of the crystal has been dislocated relative to its most stable arrangement. Note that this is not the same as the change in structure we get via the transformation from austenite to martensite. This is simply taking the crystals we have at room temp and deforming them. The dislocations are happening at the atomic scale so it is possible to get a very large number of them into one crystal, but the more we have, the harder it is to get more created. This results in an increase in the actual metal hardness and is what we see as "work hardening". The second method also involves plastic deformation, but some metals will transform to martensite with sufficient plastic deformation. This is what we usually think of when dealing with very high manganese (10% or more) steels. These steels are often used in cast components for railroad and mining applications and especially for hard surfacing welding overlays. It is these alloys that are often recommended for anvil repair. The questions of work hardening a ductile iron anvil falls into the first category. for that method of work hardening to be effective you have to be able to plastically deform the anvil face. With out that, there really won't be much in the way of increased hardness. However, ductile iron can be heat treated to fairly high harnesses. if that is done, then not only do you not have to rely on work hardening, but you really can't get much work hardening anyway. for example, if you start with a heat treated hardness of HRc 50, you are unlikely to be able to deform the anvil face sufficiently to get any increase in hardness, especially if you are mostly hitting hot metal. When we see tools like hammers and anvils fail by spalling or chipping, that is not usually evidence of work hardening but failure by some other mechanism. Personally, I don't like to rely on work hardening as a method of hoping my anvil face will get harder over time. The only way that is really going to be effective is if you take a big sledge and intentionally beat on the anvil face. that will work, but it is very hard to get a smooth uniform finish and that increased hardness region is not very thick so you run the risk of grinding it off. My preference is to heat treat tools to the desired working hardness. You might be wondering why we don't get work hardening when we are forging. We are in fact getting the same crystal misalignments forming, but the high temperatures used in forging provide enough thermal energy to that those misalignments are "reset" automatically, usually by brand new grains of austenite be nucleated. We don't see that happening during forging because it is very fast. It can happen during forging or during re-heating so we don't really experience the "work hardening" effect during hot forging.
-
I really love how this thread had changed subjects several time. Kind of amazing how we went from low cost quenching to microstructures and now to word origins.
-
Frosty-I don't actually know the answer to your question about the pyrites. That's getting more in the field of mineralogy and geology that metallurgy. That would have been an excellent question for Thomas, who most likely would have know the answer to that one off the top of his head.
-
George- the earliest folks to look at metals under a microscope (Harold Sorby in July 1863) started by initially looking at rock and minerals, the metorites and finally metals. You might recognize that when I talk about the structures in steel I use terms like "pearlite" "ferrite" "austenite" etc. Those "ite" endings were chosen by the early metallurgists because the structures they were seeing did in fact resemble those of rocks and minerals and the "ite" nomeclature was already well established in that part of the scientific community so they just adopted it for metals. Several of the structure names we use in metallurgy "Martensite", "Austenite" and some others are named after specific people, just as is done in other branches of science.