

mesquiteforge
-
Posts
36 -
Joined
-
Last visited
Content Type
Profiles
Forums
Articles
Gallery
Downloads
Events
Everything posted by mesquiteforge
-
What weird animals have been in your shop
mesquiteforge replied to Glenn's topic in Blacksmithing, General Discussion
Just built my new shop and I have a roadrunner that likes to pick up bugs that had been attracted to the lights from the previous night...he poked his head in the shop today-he may have liked my choice in music-but he's kinda fun to have around...along with a bunch of deer(whitetail and axis), a few foxes, opossums, raccoons, porcupines, skunks and a infinite supply of scorpions and redheaded centipedes.. -
Making a hand forged item food safe
mesquiteforge replied to doogie87's topic in Blacksmithing, General Discussion
I have always used a light coat of food safe mineral oil applied to warm/hot stock. Vegetable based oils can get rancid if not used for a period of time and cause off flavors in the food in some cases. The mineral oil I use is made to treat cutting boards and butcher blocks. -
Awesome start!!! I have the running gear from a late 1800's Deere Wagon that was used on a local ranch. I have plans to do a similar project and build a chuckwagon...just trying to find the time and energy to make it happen. I'm looking forward to seeing your project through to completion.. Keep up the good work!!
-
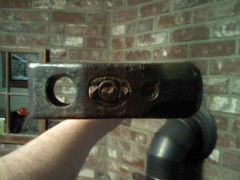 I have a similar hammer with a straight peen, was told by several folks that it is a lineman's hammer, used to twist in threaded step bars into wooden line poles.. the steps have an "L" bent into the end that keep the lineman's feet from slipping off-the hammer's hole fits over this "L" and is used to thread the bar into the pole...
 -
Your leather apron?
mesquiteforge replied to Bill in Oregon's topic in Blacksmithing, General Discussion
I found a cordura(nylon) farriers apron with leather patches on the thighs a few years ago. I bought it on ebay from user "rjshoeing", in Waller, Texas. It was under $60-70. I have tried full bib aprons and it is just too blasted hot here in South Texas to wear a full leather apron. For most light forging I just rough it out in my jeans or Carhardts. -
I go with the idea of painting all of my equipment in the same colors. When you go to hammer-ins it makes it easier to see whose stuff is what when it comes time to pack up and leave. I painted my forge red and black(Krylon Crimson Red and High Heat Black) and paint the handles of my tongs, hammers, turning tools, etc. red. I have a Champion Blower on a Buffalo Forge. I have no clue what the original colors were, but generally think that they would have been the basic colors-black, red, green, blue-like the first cars.
-
Galvanized, zinc, fumes, and milk
mesquiteforge replied to Woody's topic in Zinc, galvanized, and coatings
I took a lot of Agriculture Mechanics classes as electives in high school. I had been around welding my whole life, but never had any experience with galvanized. My instructor gave me a pile of pipe and asked me to make him some gates. I could weld like the wind blows-especially with the brand new Miller MIG welder and auto darkening helmet. I was welding in the back corner of the shop in an area that was not ventilated. I built six 16 foot gates and two 12 foot gates in about a hour and a half of work. I was in great physical shape at that point in my life. In fact, I had to travel that evening to an out of town basketball game-about 3 hours from home-on a school bus. Less than 2-3 hours after welding, I felt dizzy and nauseous. By the time the basketball game was over I could barely stand up. I had trouble breathing, felt like I had a D8 dozer parked on my chest, and felt like I could throw up any second. Symptoms were almost flu like. Every joint in my body ached. After riding on the darn school bus all night and fighting the urge to hurl- I finally did throw up when we got back home about 1 a.m. I continued to be sick all night and well into the weekend. I can tell you from experience, this is one mistake that I will never make again. It does not matter what type of metal/material you are heating, cutting, grinding or welding-you must operate in a WELL VENTILATED AREA and if at all possible avoid using highly hazardous materials to construct projects. In this day and age there are great resources for respirators(especially if operating in a confined area) and venting devices (simplest of which is a box fan). If you are required by your job duties to work with these materials-then in many instances your employer is required to supply or compensate you for proper PPE. OSHA/ANSI have standards covering this topic in great depth. When handling a gun-always treat it as if it is loaded-so when welding treat every metal and consumable as if it will kill you with one whiff. As with many other topics-Prevention is the best medicine.....Sorry for being long winded-but this one hits close to home for me! -
All I know is that I know nothing
mesquiteforge replied to Archie Zietman's topic in Blacksmithing, General Discussion
Hell-Advice is why I am here....I consider myself to be a sponge-floating around where ever I can and soaking up as much knowledge as possible. You never, ever, stop learning. In this craft-you can glean ideas from the most unlikely places. I am relatively young-a lot of people my age talk too much and do not realize what great amounts of knowledge surround them. Welcome any advice-regardless of how it comes to you. -
Westin La Cantera-the only hotel I have ever been lost in...It is a really nice place-but built like a maze. My previous employer had company parties there several times per year. I am not a golfer, but I drove a golf cart around the course-pretty incredible stuff. It may be too cold in January, but they have one hell of a resort type pool too. Probably the nicest hotel in San Antonio. Have fun and safe travels.
-
William Bastas Forging Hammers
mesquiteforge replied to Falconer's topic in Blacksmithing, General Discussion
There are a few of the members of Balcones Forge in Central Texas that have acquired them through William Bastas over the years. I had the pleasure of using one at a Houston Area Blacksmith Assn. Fall Forgefest. It was a very well balanced and well thought out hammer that belonged to the President of the Balcones Forge group(Rudy). I did not have my Hofi at the time so it was hard to compare after use. Both have their merits and are somewhat similar in design. The piened end of the hammer head is more tapered on the Bastas hammer and is easier to get into nooks and crannies when doing delicate work. Great hammer-congrats on owning one-kind of like a "Holy Grail" of blacksmithing hammers.:cool: -
Dimensions of a small shop
mesquiteforge replied to WannabeSmith's topic in Blacksmithing, General Discussion
I have been planning a small shop for some time. My plan-which may work for you-is to build the shed on strong enough timbers to support the entire structure without relying on the strength of the walls. Then the walls will be hinged on top to allow them to be pushed open-giving you and extra 7-9 feet in each direction when the walls are propped up and you are working. When you are done, pull everything inside, drop the walls and it's secure against the elements and theft. In my climate, the open walls provides plenty of ventilation too. My brother-in-law built a hunting cabin similar to this idea and it works really well. If I can get some pics, I will do so, but it could be a while..... -
Klein Tool's Lineman's Canvas Buckets are great for hammers, tongs, punches, chisels, etc. Copyrighted photos replaced by a link
-
Dutch Oven Lid Lifter
mesquiteforge replied to mesquiteforge's topic in Blacksmithing, General Discussion
Use the idea-that is why I posted it. "A blind hog finds an acorn every now and then"-as do I find a decent idea now and then. I have gained so much from this community that I do not mind giving some of my ideas. I am reluctant at times to post-for fear of being too arrogant....Please don't ever take my posts as arrogant as I am the least arrogant person I have ever met...haha:) -
I do not know all of the science behind how they work, but I wear one of these ace wraps on my hammer arm (fore arm). My interpretation of how it works is that it keeps the blood in your arm from moving back and forth as you swing your arm. If you keep good blood flow in your arm and prevent a lot of the blood from escaping into your upper arm then you can end the day with minimal pain. The pic of the wrap is the one I use. The other pic is one in use by the man that told me about them-Dave Koenig of the Houston Area Blacksmith Association. A combination of all of the above techniques, ergonomics, and equipment should give you some relief.
-
I had a batchelor party to go to last weekend and the honored friend is a big-time outdoor cook. He uses dutch ovens a lot and wanted a lid lifter. He gave me a shed deer horn/antler to use as a handle. Well, as usual, I procrastinated until about an hour before I had to leave to go to the party. I fired up the forge and bent some 3/8 round into the following. The hook grabs the loop on the lid and the triangle bottom acts as the counter to keep the lid from rocking and dropping ashes on the food. I looked around on the internet and even went to Academy to see how the Lodge brand lifter looked. Most have a cross bar welded on as a counter-lever. I did not have time to forge weld one on and my welding machine was 60 miles away at the time-so I had to get a bit creative. I was too "wobbley" by the time we actually hooked it up to a dutch oven to take a pic of the lifter in use, but it did work really well.
-
Thanks for the generosity. I have several wooden handles that should fit the blower-from various corn shellers and hand cranked grinders that are out of service. I have just been too lazy to replace them. If I have the time to work-I want it to be at the forge and not on the forge. When it becomes too much of a pain, I'll take the time. I do not have a lathe, but have been looking at some Shopsmith lathes on Craigslist. I will have to try the drill press thing-I never thought of that-I could make a mesquite handle for Mesquite Forge. That would be nifty!:cool:
-
My fire tools and a few turning tools too. Left to right: knotted handle for a new fire poker(not yet tapered), turning/scrolling fork, monkey wrench, ladle for water, fire poker, spoon(great for getting coal out of fire pot when done forging), shovel, and fire rake. Nothing fancy-just the bare necessities.;)
-
Congratulations on the awesome find! I live in Corpus Christi,TX-so I feel your pain with finding any "authentic" blacksmithing tools that are still in serviceable shape. The New England states and the Upper Midwest-where a lot of these tools were originally made-seem to have an abundance of available tools. The rest of us have to rely on either getting lucky, paying the freight companies to deliver our internet finds from far away or-as in your case-spending a premium for local finds. Happy forging.:)
-
What to use a harrow disk for..?
mesquiteforge replied to Michael's topic in Blacksmithing, General Discussion
Growing up as a farm/ranch kid-I have piles of these discs. From fajita or carne guisada cookers to nut and bolt bins they have a lot of uses. I took five of them, used one as a base, welded a piece of 2-3/8" pipe to it, cut out the centers of the other four and turned them dished side up and welded them every 8"-1' on to the pipe. It makes a great organizer for nuts and bolts, cotter pins and keys etc. It is at my parent's shop so I don't have pics. The pic below shows one as a base for a grinder stand that is topped with a piece of railroad plate for a nice heavy work station. Note: the second pic is not my work-I "liberated" the pic for explanatory purposes and to show the camp cooker use. If you can score a Rome Disc 30-36" you can really build some heavy duty stuff! -
Thanks Curly George. I take a lot of pride in my forge-being it belonged to my grandfather. He was not a blacksmith-but a rancher who used it to hot fit horseshoes and bend metal for various projects. When I acquired the forge there was no blower around-so I had to buy one and get creative to avoid the frustration of battling with a blower that would get knocked over or wobble every time I turned the handle. I need a new handle on the blower(wood is cracked), but thanks to zip ties I have survived the ordeal. PS-the red paint makes it all fit together a lot better-haha.:D
-
I was mating a Champion Blower to a Buffalo Forge when I encountered this issue. I had a stand with my blower, but had the grief of dealing with a stand that wobbled. I took two pieces of flat bar and bent them around the blower pipe and attached them to the bolt that the blower would normally mount to the stand with. I torched and ground the end to look a bit more like it was made as part of the original equipment. On the back side the bar goes from the blower mount bolt back to the forge tub and is attached with a machine screw or nut&bolt. It appears your blower has bolts where the handle attaches-you can remove the existing bolts, replace with longer ones that will reach throught the blower, handle and flat stock used to make a bracket. For a blower pipe I used a aluminum clothes dryer duct. It is flexible and heat resistant. It does not look bad either-in my opinion. See pic.:cool:
-
RR tie plate - suggestions?
mesquiteforge replied to steponmebbbboom's topic in Blacksmithing, General Discussion
The tie plates do make good work surfaces, I, like previous others, welded one to a 6" piece of 2_3/8" drill pipe. The 2_3/8" fits inside a 3" pipe that is about 4' tall and is welded to a disc(for a base). The tie plate is then a swivel base for my 8" bench grinder. It swivels, but can be stopped by placing a lynch pin through the two pipes. It gives you plenty of room to maneauver large work pieces around the grinding wheels. The cord can be run through the spike hole and through the base to keep it out of the way. I was lucky enough to find a really large plate for this. I could see that smaller ones would work too. I am always looking for a place to store extra hammers too-so I added on a piece of bar stock to allow for hanging hammers on the plate. Outside of the shop, I keep a tie plate in the bed of my truck for a jacking base. Sometimes I catch myself in areas with soft ground and these plates give your car jack, bottle jack or hi-lift jack more surface area to allow your jacking operation to go as intended. -
As in my signature I have a sign hanging inside my shop over the door that reads: "The early bird gets the worm, but the second mouse gets the cheese". Interpret it as you will. Other greats: The road to success is crowded, the extra mile is lonely. Anything in life worth having-is worth working for. -Andrew Carnegie. Logic will take you from A to B, imagination will take you everywhere.-Einstien May you be in Heaven a half hour before the devil even knows your there-Irish Toast. Eagles may soar, but weasels don't get sucked into jet engines. If you need credit to buy a beer, you don't need a beer-you need a job.;)
-
Here are some turners that I have forged. These things are like gold down here. I have donated a few to benefit auctions that have sold for $100+. Generally, I sell them for 20-45 depending upon the design. I dreamed up the twisted handle out of boredom one day. Fuller and scroll one end and taper the other, double over the bar stock and twist the two side by side, then put any twist on the shaft and the pigtail on the tapered turner end. I made eighteen of these in one night(8pm-1am) before Christmas last year to fill orders and for gifts. Some of the more simple handle designs are the biggest sellers. I have no shortage of deer horn/antler for handles and have found that by threading the stock and tapping the horn and then a few drops of epoxy make for a lifetime "weld"-otherwise the turning motion of the utensil will loosen the handle. Anyone else have a better "mousetrap" for attaching a antler/bone/wood handle to a metal utensil?? I am eager to hear easier methods... Dutchmancreek- your basket handle is awesome! Great work.
-
Show us your portable forge for re-enacting event / demos
mesquiteforge replied to Sam Falzone's topic in Solid Fuel Forges
A few pics of my forge set up from a HABA Spring Roundup 07. Buffalo Forge with hood made by my grandfather, Champion Blower, Paragon 127#Anvil, Columbian 5"Vise, and about 1200lbs of other assorted "toolage". Everyone hates to see me show up-cause then they have to help me unload..I need to get my act together and get more portable.:o