FieryFurnace
-
Posts
2,106 -
Joined
-
Last visited
Content Type
Profiles
Forums
Articles
Gallery
Downloads
Events
Everything posted by FieryFurnace
-
Looks great! This is something I've been wanting to do for a while, but don't have the tooling or man-power to make it practical. I'd like to know how long it took ya if you don't mind sharing. I'm not crazy about the proportions and the rounded troughs but that's just my preference. Awesome piece. Can't wait to see the finished product!
-
Just a reminder that Chase Saxton and I are hosting a Blacksmith Hammer-In at his shop in Scottsville Kentucky THIS Saturday. (March 16th 2013) Email Chase at kyblacksmith@gmail.com for info and directions!
-
32-inch pointy thing completely successfull fail
FieryFurnace replied to FieryFurnace's topic in Swordsmithing
Just an el-cheapo swage block from ebay and a spring steel hand held top fuller. -
Art guild notification!
FieryFurnace replied to FieryFurnace's topic in Blacksmithing, General Discussion
Sorry 'bout that Wayne! Ours is the 16th as well. -
32-inch pointy thing completely successfull fail
FieryFurnace replied to FieryFurnace's topic in Swordsmithing
This is the heat treating "forge." Hook up a blower and it works like a charm. -
Art guild notification!
FieryFurnace replied to FieryFurnace's topic in Blacksmithing, General Discussion
Thanks guys! Wayne and Jonathan: Are you guys coming to the hammer in we're hosting in Scottsville at the end of the month? Tenn Clif: If you live in Tennessee or Kentucky you should consider coming to the hammer in too. PM me with your email addresses if you're interested in coming. I believe the date is March 23rd. -
32-inch pointy thing completely successfull fail
FieryFurnace replied to FieryFurnace's topic in Swordsmithing
Neat trick! Thanks! I'm working on a much shorter blade in my spare time, but it will be a few days before I can get to heat treating. We'll see! -
32-inch pointy thing completely successfull fail
FieryFurnace replied to FieryFurnace's topic in Swordsmithing
I did normalize three times prior to heat treating. -
That shovel is awesome! What size stock?
-
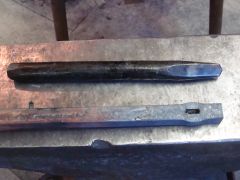
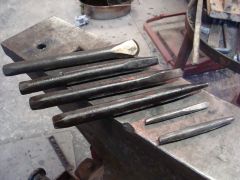
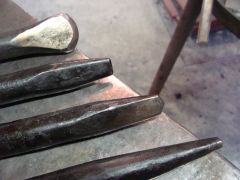
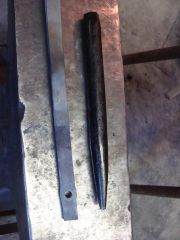
OK so I like small swords. (not like little swords......small-swords) So I forged out a long pointy thing with a v-shape blade. It turned out really nice. About a 31-inch blade, shaped like angle iron, (instead of a solid hollow ground triangle,) It had a full tang and I was very pleased. With a bit of polishing it looked really good. The blade and full tang weighed about 16-ounces. (1-pound) So it was ready for hardening. I set up a make shift, wood fired, sword forge (4 concrete blocks, pipe with holes, and air source all laid on the ground outside of the shop. I heated the blade to an even temperature all of the way down (very even, I was particular,) and quenched in oil (leaf spring material.) You all know what's coming. It came out warped. It warped in the direction of the inside of the V of the blade, not the other way. I hoped this could be straightened after tempering. So I re-polished and tempered. I used the open wood fire coals to temper, running the blade well above the fire back and forth until I got an even dark bronze all of the way down. I then tried using a rubber hammer over a hollow in my burn stump to straighten the blade. I wish I'd had the camera on record because you could have heard the steel laugh at me. This called for more extreme measures like over the hardy hole on the anvil. All to no avail. Next was the post vise, flexing the blade. I tried flexing from several points, and ended up busting the end. I should have done a second temper or ran the first one a bit farther. However, the blade flexed something like 45 degrees before busting, and it returned true every time before it busted. So the bummer is it broke. However, I couldn't be more pleased with the actual blade and the uniformity of the temper and the amount of flex I achieved. Here are some pics. I've got other work that will be keeping me busy but I hope to start my next blade in the afternoons. I will continue to use scrappy spring as I have it available. My steel yard sells new 5160 and I can get drops of round stock from them as well. Thoughts, critiques, suggestions welcome!
-
Little high for striking. Maybe about 30 inches to the top. I like it for general work. I never do any striking in a vise anyway, so it's at a good regular working height. It's the same vise as Brian has.
-
Art guild notification!
FieryFurnace replied to FieryFurnace's topic in Blacksmithing, General Discussion
thanks guys! -
Relationships between daggers and sword blades
FieryFurnace replied to FieryFurnace's topic in Swordsmithing
how do I pull up old chat sessions? -
Once again here, as all of my very few sword posts have been, I'm just probing for basic info. I'm not a blade smith of any type and I do not pretend that just because I can forge a scroll or a leaf, that I can forge a broadsword capable of battle. My last post was in relations to the "small sword," a triangle blade gentleman's sword. I've really gone and done it now. I've forged a 30 inch V-shaped blade (more like an epee than a slightly hollow solid triangle small sword blade.) It has turned out fairly decent. It's good and straight in all planes and just needs to be polished up. It's probably got more of the heft of a rapier than a small-sword, but once again, I'm not a blade smith. So anyway, here is the question. I did a bit of reading on warping during the hardening process. There were a couple of posts that had some of the info I wanted. However I do have a question. Before I harden the blade and risk warping, I thought about using some of the same metal to forge a similar dagger. If I forge a short 12-inch or so dagger with a blade shape the same as the sword, will it behave the same as the longer blade in the heat treating process? Maybe that is too vague of a question and if it is I am sorry! Thanks, Dave
-
Hi there! I'm Dave Custer Fiery Furnace Forge Blacksmith LLC. Chase Saxton (trip on here) is my striker for doing the hammers! Harold, Chase is doing the handle jobs in his shop. We agreed that it would be better to leave the handles a bit on the bulky side so that folks could trim them down however they liked. Thanks so much for the wonderful comments. I'm glad you guys are pleased with your investments and Chase and I really appreciate your support. I know for me personally it's a real honor to have been able to spend time under Brian and with the Young Smiths 2012 adventure, to gain the experience to produce the tools I am able to now. It's a real honor as well to know that the tools that I've made are used and appreciated by others. Hammer on!
-
Here is my 6.25-inch Columbian post vise finally mounted. I bought it back at ABANA 2012 and the only reason I was able to get it was two men at the conference offered to arrange and cover all shipping details and cost. I am certainly very grateful to them for their kindness which I will endeavor to deserve. The stand will evolve with time to include a lip around the table as well as hammer/tool holders. I also hope to add an upsetting shelf. This is a great addition to the shop and will be put to good use directly!
-
I am pleased to announce that Dave Custer and Fiery Furnace Forge Blacksmith LLC has officially been accepted into the Kentucky Guild of Artists and Craftsmen. I submitted five pieces to be juried. I received the juror's comments and checklist in my acceptance letter. I received a high rating in every technique, finish, and design category except one. ("High rating" meaning it was checked as a "strong point" instead of "develop further.") The one was brazing and as I did not submit any brazed pieces, that category simply received a N/A. (not applicable) I also received several hand written comments. All of them praised my level of detail and attention to finish and technique. One comment suggested the handle on my hammer be larger towards the back more like store bought handles, but I suppose that is more a personal preference. (I like my handle straight in profile all of the way down.) Once again, I would like to thank all of you guys for the support you've given me thus far in all of my endeavors. This forum has played a large roll in getting me to where I am now and in reaching this milestone. You guys are great! It is an honor to be a part of this forum! Thanks! Here are pics of the five pieces I submitted.
-
The shape is in the drift not the punch. The v-shaped eye punch Brian and the rest of us use, is made by cutting the tip off of a piece of steel so that you get a cone point. Taper it round to a bit smaller than the width you want the punch to be at the end, then flatten. (I usually do a 3/8-round taper if I want to end up with a 1/2-inch punch.) You'll want a bit larger for making hammers. If you have a striker, this punch needs to be made from 1-inch material and punched for a handle. Handled top tools aren't wedged in so the eye is tapered only from the bottom, not hour-glass shaped like the hammers. If you are working alone, just do a big hand-held punch. 3/4-inch stock should work fine. The cone tip gives you the V-shape and you pretty much just have to grind the angle bevel. http://www.iforgeiron.com/gallery/image/36872-v-shaped-slitting-chisel/
-
Need help with Split Cross Dimensions
FieryFurnace replied to Chris Covington's topic in Problem Solving
Adjust proportionally from my BP, draw it on paper or a layout table, THEN adjust according to what is pleasing to the eye. Always, always, ALWAYS, do the final adjusting according to what looks right, because most people aren't going to look at it with a taper measure, they're going to look at it with their eyes. I've never had a call to do any larger ones, but judging from general experience of how steel works, the cuts for the diamond in the center should remain the same proportionally as you upscale stock size. Best of luck and PLEASE, PLEASE, PLEASE, post pictures when you are done! -
Neat! I see mine and Trip's! Second from left!
-
-
-
-
-