

Steve Sells
-
Posts
9,163 -
Joined
-
Last visited
Content Type
Profiles
Forums
Articles
Gallery
Downloads
Events
Posts posted by Steve Sells
-
-
IForgeIron Blueprints Copyright 2002 - 2011 IFORGEIRON,
All rights reserved BP0364 Flower Hanger by Glenn Conner

We all have those flowers with the plastic hook attached to the rim of the pot.

To dress the flower pot up a bit, I made the following jig.

Cut a short piece of pipe and weld it to a plate.

Weld ends on the pipe, in this case for support and to keep the pipe from deforming in use.

Weld a short piece of 1/2 inch round to the end of a piece of 3/8 x 1 inch flat bar


It should fit into the pipe with a little room on either side.

Find the center of a piece of 1/4 inchround bar and place it across the jig.
A couple of whacks of the hammer and you have a bump in the rod.

Not a deep bump, but just enough to catch an S hook.

The smaller circle was bent cold. It is the proper size to fit around the pot but under the lip of the pot giving it full support. The larger circle was bent cold and welded to the smaller circle.

Just slip the pot into the holder and hand it with an S hook. Much more attractive than the cheap plastic hook.
-
BP0361 Drill Press Table Tool
by Glenn Conner

We all have a wooden block that looks like this. If not get one.

The wooden block supports the back side of the work while you drill and as the bit breaks through and beyond, keeps the drill from damaging the drill press plate.

You can use a scrap piece of channel to do the same thing.

It will support the work being drilled and

When you break through and finish the hole, keep the drill from damaging the drill press work plate.
-
IForgeIron Blueprints
Copyright 2002 - 2011 IFORGEIRON, All rights reserved
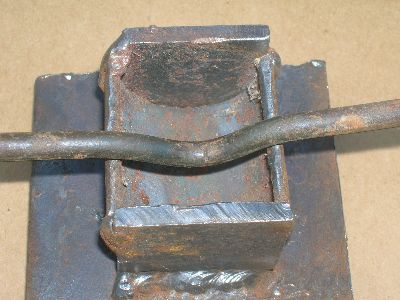
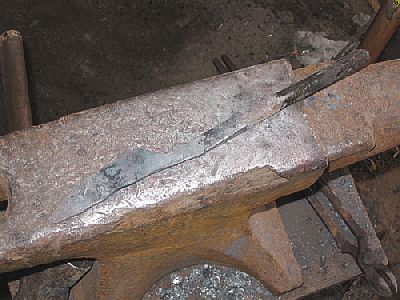
BP0359 Anvil Bender
by Glenn Conner
This Blueprint is done HOT only to show those new to blacksmithing that you do not need all the fancy tools, the power saws, the metal workers, the plasma cutters to get the job done. Fact is, this Blueprint can be done without electric power.
I do recommend a good pair of gloves, ear protection, safety glasses and an assistant only to hold things. Get someone that like blacksmithing as this can get scary to "normal people".
Ok, gloves on, ear protection on (or in) safety glasses on, and you on the left - the sneekers need to be steel toed sneekers. Face shields in the DOWN position and let's get started.

Find a piece of metal from your resources pile about the same size as the face of your anvil.

The L section of this piece is about right.

Put it in the fire and get it a high red in color.

Take your chisel and cut the section you need from the parent stock.
This may take a couple of heats but that is ok. Yes that is the Rail Road track being used as an anvil. You think I am going to do this on my Peter Wright ??

See it can be done.

Drift a hole into the plate. This is 1/4 inch plate steel only because it was handy.

Drift holes for both the hardie hole and prichel hole. The 3/4 inch round stock fits into the hardie hole, and 3/8 inch round fits the prichel hole but that is only because it is my anvil.

It should just drop into place. Insert the cold round stock into the hot plate steel and you should get a good shrink fit. Tack weld this on the under side if you need to. Or use a center punch and punch near the edge of the hold making the metal tight against the round bar.

To bend, brace against one pin and pull against the other. Remember that you have two different size pins to work with on the same tool.

You can use a piece of pipe to expand the capabilities of the anvil bender.

Or get fancy and make a whole set of attachments. Oh I hear the rush to the forge to build one on these. But hold on, we are not finished just yet.

With a simple bending die (read that as a pulley) you can now use the anvil bender to bend pipe

Just choose the die to fit the pipe you need to bend. And different size pulleys 'er dies will give you a different radius for the bends.
-
IForgeIron Blueprints
Copyright 2002 - 2011 IFORGEIRON, All rights reserved
BP0357 Quick Fire Shovel
by Glenn Conner
This quick fire shovel is not a permanent item at the forge. Take the time to make a proper shovel and use it.

The fire is in need of cleaning and you can not locate the shovel you SHOULD have at the forge.

The tongs and a piece of thin tin will do in a pinch.

Grasp the thin tin in the tongs .....

-
IForgeIron Blueprints
Copyright 2002 - 2011 IFORGEIRON, All rights reserved
BP0356 Shop Magnets
by Glenn Conner

The project is finished and it is time to clean up a bit. Those drill shavings are razor sharp and are not something you want to pick up with your fingers for fear of being cut or embedding a sliver of metal into your flesh.

This is where the magnet comes in handy. Only thing is that the slivers will now be attached to the magnet and even more difficult to remove.

From an earlier Blueprint, take the storage container and place the magnet in that or any other plastic container.

Once you pick up the metal shavings, just hold the container over the trash can and remove the magnet. This will drop the metal shavings into the trash can.

Or, a fellow could get a plastic bag from the kitchen

Put the magnet into the bag
And collect the metal shavings. This was one pass with the magnet. More passes will collect even the small shavings.

Now that you have them collected, what to do?

Turn the bag inside out trapping the metal shavings inside the bag. Tie the top of the bag into a knot and throw the whole thing away.
-
IForgeIron Blueprints
Copyright 2002 - 2011 IFORGEIRON, All rights reserved
BP0355 Heat Treating With Clay to Form a Hamon Line
by Oakwood Forge aka Jens Butler
There has been allot of talk lately about hamon lines and heat treating with clay, so here is how I do it.

I start with a blade that has been ground to 220grit or draw-filed with a second cut file. Make sure the edge is not too thin. I like mine to be about as thick as a dime or about 0.050 inches thick.

Cover the entire blade with a thin skim coat of your chosen clay and allow it to dry. I am using “Satanite“ a commercial high temp refectory cement. I have mixed this with some powdered charcoal and water to a consistency of cake frosting.

Use a clamp or vice to hold the blade by the tang and apply a thicker layer of clay to flats of the blade in a pattern pleasing to your eye. What ever pattern you use on one side should be closely copied on the other side to reduce chances of warping. I use a small wooden spatula and paint brushes to apply the clay.

I use my high tech three dollar tempering oven to force dry the clay. It’s an old toaster oven purchased at a second hand store. I leave the tray in the bottom to help even out the heat.

At this point I start the forge and double check that my quench tank is up to temperature. I use a candy thermometer to do this. My quench tank is just a big stainless steel pot with a lid. To pre-heat it I use one of those electric hot plates. I pre-heated the oil to about 160 degrees this time. This is also the perfect time to pre-heat the tempering oven to.
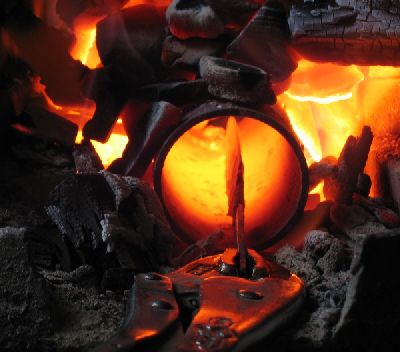
To do my heat treating I use a steel pipe buried in the coals to give the blade a more even temp. I move the blade back and forth slowly until it comes up to critical temp.
Double check this with a magnet if you are not sure. At critical temperature ferrite and cementite transform to austenite. Austenite is non magnetic by nature so you can verify that this transformation has occurred by dangling a magnet on a string close to your forge. A blade passed close to the magnet will either make it swing or not affect it. If you pulled the blade out to check the temp, return it to the fire and bring it back up to temp. Prepare to quench, make sure there is nothing in the way to trip over like a dropped hammer or the dog. Remember you have only about 2 seconds from the time the blade leaves the fire to get it fully submerged in the oil. I quench tip first, plunging the blade straight down then move the blade up and down in the oil. I keep it in the oil for a few minuets than immediately transfer it to the pre-heated toaster oven to bake for 1 hour at 375 degrees F.

Next comes the fun part, un-wrapping the package. Once the blade cools to room temp I scrape the remaining clay off the blade with a putty knife. Then wash and de-grease the blade, brake cleaner, Simple Green or engine degreaser works well. I then use water stones and wet/dry sandpaper and to work the blade into its finished shape. At 220 grit you should be able to see the hamon line . Here is the blade at 400 grit after a quick vinegar etch. The details of the hamon show up better at finer grits. I have been sanding on this one quite a bit since I took this picture. I’ll post a photo when it is complete.

-
IForgeIron Blueprints
Copyright 2002 - 2011 IFORGEIRON, All rights reserved
BP0354 Grinder
Gerald Franklin

This is my take on a shop built belt grinder (2”X72”) inspired by the one done by Hollis Wooldridge (See IFI Blueprint 215). The base mount is a piece of scrap 10” channel and the upright is 2”X4”X ¼” tubing. The 2hp motor is wired for 220v. The contact wheel is an 8” caster and the idler pulley is a pair of salvaged 1” wide bearings scrounged from a local electric motor re-build shop. Total cost was about $110, which includes a new motor and electrical materials. The pivot bolt for the idler pulley arm is just visible below the edge of the idler pulley. The little white tray below the contact wheel is a plastic kitchenware storage tray filled with water to catch the swarf from the belt.

This is a close-up of the idler pulley (bearings). They are 1” wide and ganged in a pair to accommodate a 2” belt. The ID of the bearing is metric so a piece of 2” tubing was split so it would give enough spring for the bearings to press on. The piece of strap above the bearings is a spark shield that is removable so that I can use the radius of the idler pulley as a small contact wheel if needed. You can also see the mounting bolt for the angle iron platen below the idler pulley. The red spring is from the scrap bucket. It provides tension by raising the idler pulley against the belt.

This is a close-up of the 8” caster contact wheel and the work rest.

This is the drive pulley. I machined it from aluminum stock. The pulley is 4” in diameter and 2” wide (actually 2.125) with a 1 degree crown. This drive pulley is the only part that requires anything close to exotic in terms of tools, that is, if you call an engine lathe “exotic”. The little plastic water tray is held in place with small finishing nails so it doesn’t vibrate out of position.

Close-up of the removable spark shield, the ganged bearings (idler pulley), tracking adjustment, and platten. The tracking adjustment (painted white for your viewing pleasure) is a ½” bolt welded to the upright. The nut is moved to provide the right amount of tension against the idler pulley arm. I lined things up pretty well during assembly, so didn’t need much of a tracking apparatus. In fact, I used this thing for several months without any tracking adjustment at all. Individual belts track a little differently though, so some sort of tracking is nice to have. The platten mount is simply another bolt welded to the upright. The platten is 2” angle iron. When it wears out, it can be replaced from the same scrap pile that the original one came from. The 1” round tubing coming from behind the upright is the handle that takes tension off the idler pulley arm while changing belts.

Close-up of the contact wheel and work rest without a belt mounted. Also note that the switch is mounted out of the way of moving parts. -
IForgeIron Blueprints
Copyright 2002 - 2011 IFORGEIRON, All rights reserved
BP0353 Flower Hanger Dimple
by Glenn Conner
The earlier Blueprint on making a plant hanger dimple was a good idea but ... I got an email from one viewer that I was doing it the hard way. No use making a jig for something you already had the equipment that would make the dimple much easier.
This is the beauty of the Blueprint system of information, show us your way.

Make a tool. The first thing handy was a Rail Road Spike.

Just cut the point off the end and dress the edges a bit.

Using your new tool, place the stock over the hardie hole and

Form the dimple. Ok it has square corners and a flat, not a good dimple but a dimple

If you dress the end of the tool to remove the sharp corners

And to form a round edge

It will work better.

No more flat surface.

With the air chisel in sight, maybe the "V" shape would work

Yes, makes a dandy dimple

The second hit makes it a little deeper.

Compare flat, round and "V" shaped tools and the dimples they produce.

But this is still too complicated, why not just open the jaws of the vise
and with a piece of round bar, make a dimple.

And a fine dimple it is too.

Left to right. round bar, square end tool, round end tool, and "V" end tool. The choice is yours.
-
IForgeIron Blueprints
Copyright 2002 - 2011 IFORGEIRON, All rights reserved
BP0352 Chisels Reconditioned
by Richsironworks, Glenn Conner

Garages are often rough on tools. The mechanic often asks me to make tools for him because he knows they will work.
He was going to throw these chisels away when I delivered the replacements as they were beyond hope and not able to be used any more.

It is difficult to convince folks that tools need maintained. The end of a chisel is mushroomed and the metal is splitting. When this cracked section breaks off, it becomes shrapnel.
Chisels sometimes get abused. The working end of chisels should be sharpened as needed.
Yes, a blacksmith CAN take this tool that is no longer useful and make it work again. But how do you hold a 6" chisel once it gets hot? Thanks to Rick of Rick's Iron Works, and his suggestion for welding on handles instead of using tongs. We were able to safely hold the chisel while it was being reconditioned.
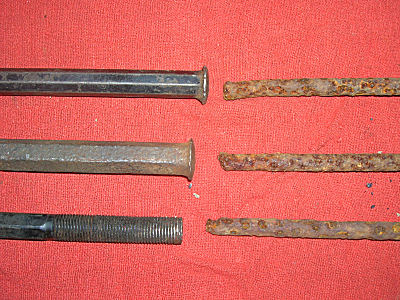

Yes, just weld a handle onto the end of the chisel - perfect fit and no tongs needed. Usually flat bar is nice because of the rectangular shape, but this time it was 20 year old rusty rebar. Handle length was 16", 18" and 24" only because that was what was handy. A half a piece of 6011 rod was found under the work table and used. This is not a perfect weld that has to pass an x-ray, it just has to stick the handle to the stock.

Heat and beat, and then temper the metal. You can see the temporal colors. Next, dress the ends on a grinder.

The rebar provided a good handle, but the poor welds between greasy metal on one side and rusty rebar on the other just broke apart when stressed.

The mushrooming and the welds are removed as the ends are dressed.

The working ends are ground to the finished shape. Paint or coat with oil and you have reconditioned chisels that work as good or better than new ones.
-
IForgeIron Blueprints
Copyright 2002 - 2011 IFORGEIRON, All rights reserved
BP0351 Alternative Spoon Making Helper
by Irnsrgn
Some may not have swage blocks with spoon molds in them and still wish to make spoons.

Start by making a chain link in the traditional way or use any way you want.

After the link is done, deform it into the shape of spoon you want.

Weld some sort of shank onto one side of the deformed link to drop in the hardy hole of your anvil, and using a round faced hammer, forge it to the shape desired.

After you get the shape you want, take a nice red heat and using a can pretty full of water, spot cool the bottom of the depression quickly.

Quickly lay the spoon upside down on the anvil face and tap on the cooled bottom to flatten edges of the spoon.
You can make any number of these spoon jigs of different sizes to suit your needs. they are quick and easy to make. -
IForgeIron Blueprints
Copyright 2002 - 2011 IFORGEIRON, All rights reserved
BP0349 Twisting Wrench
by Oakwood aka Jens Butler

This old style adjustable wrench has no teeth to mark up your work and can be had at antique stores, flea markets or ebay for a couple of dollars in most cases. Just weld on a piece of bar stock an you have an excellent twisting tool.
-
IForgeIron Blueprints
Copyright 2002 - 2011 IFORGEIRON, All rights reserved
BP0348 Monkey Tools
by Irnsrgn aka Jr. Strasil
An Old Fashioned Monkey Trap is nothing more than a hollowed out Coconut with a hole in one end and a means of fastening it to an immovable object at the other end, A treat is placed in the cavity and a monkey sticks his hand in and grabs the treat. The Monkey is not smart enough to let the treat go and his fist is too large to remove from the trap and he is caught. I assume Monkey Tools got their name from this type of affair.
What is a Monkey Tool?

A Monkey Tool is a Tool that slips over a tenon on ironwork to square up the shoulder where the tenon meets the Main Body of the piece being worked. It is used mainly on pickets for gates and also where mortise and tenon joinery is used on other things. Monkey Tools are usually round or square. The square shoulder at the base of the tenon is this drawing is what the tool is used for.

This picture shows an Old Style Monkey tool which are harder to make than the New Improved styles, and simple ones can be made with a minimum of tools and no forging. Old style Monkey Tools had an opening in the side to let steam and gases out and to facilitate driving the tenon out if it became stuck.

This picture shows a bottom and top view of the ones I make that I call the New Improved style. They have what is called wire handles to make them easier to hold and work with. I have 3 sizes, 1/4 inch round, 3/8 inch round, and 1/2 inch round. 1/4 and 3/8 shown.

This is a drawing of how it is made. Using a piece of round or square of a material with at least .30% carbon, cut a piece about 2.5 inches long and making sure one end is square, drill the size tenon hole you want all the way thru, using a larger drill bit, counter bore the top side 3/4inch deep, round the top striking surface off and then countersink it a little ways. Finally smooth the bottom or working end up nicely. You can twist on a wire handle as I did or just weld a light handle onto one side.

Monkey Tools for round tenons are easy to make, but tools for square and other odd shapes are relatively easy to make this way. First cut off a square piece of flat stock no thinner than 1/2 inch thick and mark the center of it as shown. Second drill a hole of the approximate size in the center and file to size for the particular size and shape of tenon you will be working with.

Now cut a piece of either square or round heavy wall tubing about 2.5 inches long and weld to the part you made already, then cut a stub piece of shaft 1/2 or 3/4 inch long, drill a hole in the center of it and weld to the top as shown in the drawing, a light rod handle can be welded to the side for ease of use and handling.
See you can Monkey around and still have a tool you can use. -
IForgeIron Blueprints
Copyright 2002 - 2011 IFORGEIRON, All rights reserved
BP0347 Vise Adjustor
by Mike Hr

Here's a piece of flat bar clamped in the vise. Notice the handle at 12:00 and 6:00.

This is a plate I cut that sits on the screw between the vise jaw and the round washer. I measured how much the vise closes in a quarter turn, and made the plate that thick.

Here's the same piece clamped in the vise. Now the handle is at 9:00 and 3:00. Occasionally I want the handle to be in a different orientation to be more convienient to use. -
IForgeIron Blueprints
Copyright 2002 - 2011 IFORGEIRON, All rights reserved
BP0304 Making a Knife
by Dennis hl
This same techniques could be used to make a period knife or something similar.

This is where I started, a piece of scrap spring steel from the pile. I cut the pointy end on the right off. The area I'm working with is about 1/2" by 3/8" by about six or so inches long.

I roughed in the general shape on the anvil. Don't worry too much about making the end into a sharp point.

Begin drawing out the blade on the face of the anvil. Do not make it too thin, we'll take care of that later. Draw it out and shape it, but try not to thin it out beyond an 1/8" or so.
Here we're working out the general shape of the handle, again do not thin it out too much. Keep it to a little better than an 1/8" or so.

When you get the basic length of the handle in mind, cut it off. Give yourself a little extra, you can always trim it off later.

Continue to work out the shape of the handle, working it to about an 1/8." You may find that the blade wants to curl on you, flatten it out while you still have a bit of red heat in it. Do not flatten it while at a black heat, I've found that doing so stresses the metal and you'll have to work it out when you normalize it, more on that later.

The back of the blade my develop a bit of a "sway" back. You can straighten it out by giving it a bit of focused heat...

...and then gently tapping down on the blade's edge with the hammer lightly driving the "sway" back down against the face of the anvil.

Eventually you will end up with the basic, roughed out blade.

Nothing special. A simple pair of pliers, a ball peen hammer, and a pair of tongs. You saw the cut off tool already (above).

The are the three files I used to shape the blade. The bastard file is for general shaping and rough filing, the round was used to clean up the transition from the blade to the handle, and the small fine file will be used to clean up the surface and the edge.

Here's the knife filed to shape. Next we'll clean up the front and back by draw filing.

Clamp the knife to a sturdy surface in an area that'll give you a lot of freedom of movement. The clamp holding the blade down is a knuckle buster, push it back so it's laying flat against the bar (you'll hit your knuckles once and never forget to do this again).

Next clean off as much of the slag that built up on the surface while forging the blade. I use a worn piece of 120 grit wet/dry sand paper.

Now we'll start to draw file the blade. We left the blade a bit thick to allow a some room to clean up the surface. Draw filing is easy once you get it you may wish to practice on some scrap iron before working your blade. Place the file perpendicular to the blade and with a bit of pressure push it up the blade. This takes a bit of practice to get the proper rhythm down. The resulting filings will look a bit like steel wool. Keep at it until to file the blade smooth.

All cleaned up and now ready to rough in the cutting edge. Use your bastard file to do this, the fine file will be used to clean it up after we normalize the blade.

As you rough in the cutting edge don't forget to blend it in with the rest of the blade. The pencil lines are a visual representation of this.

Here's the blade prior to normalizing. I've pre-drilled the holes before normalization. I do so at this stage, just because, if you wait until after you harden the blade you'll burn up a lot of drill bits http://forums.armourarchive.org/phpBB2/images/smiles/icon_smile.gif In the next few updates we'll normalize the blade, clean it up, quench and polish, and make the handle. Stay tuned. -
when you select a BP in that section, it does bring up the BP but its at at the bottom of the page after the articles listings, confusing I know.. It took me a while to notice that myself, that is why I am trying to move them into the forum properly
-
they are not really in the forum, there are in a separate section called Articles and I cant find out how to transfer them from one to the other, I am working on it
-
I have to figure out how to get them in one place, Glenn had his own way of doing things that I am still sifting through. Some are in a forum listing as Blueprints the others are under Pages, eventually I will get them all under blueprints , bear with me I know they are a bit of a mess still, I have more to get posted again as well, keep checking back there
-
Sorry it took so long, we had to wait for the updates, and the January update had a bug so we had to un-do that and wait for the March fix before we could make the changes
-
Finally, most of the old Blueprints are back, and we started a new sub forum for Historic Ironwork
If you find any of these posts scattered in other forum sections please use the report tag it so we can relocate it to the new place
-
We just finished the latest of the updates that took us offline for a few hours. Hopefully this is it for a while. Let us know if anything wonky is going on now
thanks
IFI Staff
-
I first met Glenn in the chat room at Anvilfire many years ago. when he was still Ntech and I was using Kyoto. I got drug over here shortly after, after a year or so Glenn talked me into actually joining (I don't join much just hang out)
On the other front I grew up a few miles north of Foundryguy in Muskegon, I should pop in and meet him face to face some time when I am up there visiting relatives
-
I am surprise you didn't make a silver and bronze Habaki for it, thanks for re posting
-
I went to see what was added to your website since I was last by there, Love the silver/gray sword listed above that one, but wife would kill me for spending that on someone elses blade for myself... great work as always Jim If the silver doesn't sell, can you leave it to me in your willl ?
Can you post a pic of that one here also to show people why I am excited about that one?
-
Have you made regular damascus before? Do you have experience with Extremely toxic flux? How do you expect the steels to show differences without etching? Or are you just worried about etched topography?
try starting D2 and 304 and then 304 and 440C
BP0365 Flux Applicator
in BP 300 Series
Posted
IForgeIron Blueprints Copyright 2002 - 2011 IFORGEIRON,
All rights reserved BP0365 Flux Applicator by Bill Epps, Irnsrgn
This is a quick container to hold your flux and apply just what is needed to the metal being welded.
Just drill 3 holes in the cap of a water bottle, fill the bottle with flux and squeeze or shake to apply.
If you have different flavors of flux, you can color code them.