

mudbugone
-
Posts
191 -
Joined
-
Last visited
Content Type
Profiles
Forums
Articles
Gallery
Downloads
Events
Everything posted by mudbugone
-
Great looking small Helve with an interesting spring arrangement. Looks to be in Super condition too...Great find. I won't say anything about hair on one condition.... Take some pictures of the mechanisim that operates the hammer and post them. The entire assembly sure looks more heavy duty than necessary,but I assume that's why it's still around. There may have been several different dies originally and perhaps you got a mismatched set... there seems to be a lot of options going on with that setup between the top & bottom dies. You need the operators manual.... Enjoy the new tool it sure is a dandy...
-
Hathorn's Helve Hammer
mudbugone replied to maltesehunter's topic in Power Hammers, Treadle Hammers, Olivers
Found another example of a Hathorn Helve in the gallery mis-labled as a Hawkeye Helve... http://www.iforgeiron.com/gallery/image/17571-hawkeye-helve/ -
 I think you'll find this is a Hathorn Helve Hammer not a Hawkeye. Both are great looking hammers & small.
 -
Tried stick welding many years ago,but never could get the hood - eye- electrode thing down very well...gave it up as not my thing. Fast forward 35 years and finding myself wanting to build & fabricate things and getting frustrated looking for someone with the time & inclination to help with "MY" projects. Went out and bought a Plasma Cutter and a Welder and an Auto-Darkening hood (the defining piece in MHO) and now several years later own probably 8-10 various welders and a couple of plasma cutters and I'm still trying to figure out HOW in the world I could have done without a welder for so long. I'm not that great,but by george I've got most any type welder needed to get the job done. I bought an 8 pound DC inverter last year... first a Forney & later a Harbor Freight one because I couldn't believe an 8# welder could do the job.... I was WRONG... I love these little inverter welders. One is for Tig (my next ability to try) now,but they both function far better than I could have imagined. I find I use one of them for most any quick project I'm working on instead of draging out the $2000 Lincoln wire feed welder or starting the gas welder.... Don't get me wrong, I wouldn't advocate building a trailer using one of these small inverters,but for repairs and light fabrication they can't be beat. For anyone wanting to weld and not requiring a machine to build large critical structures one of these small inverter welders & an Auto-darkening hood ought to be affordable and usefull to most anyone. They work best with the very small welding electrodes,but they DO work..
-
Possible new anvil and repair?
mudbugone replied to Nicemibs's topic in Repairing and Modification to Anvils
Don't feel too bad...There had to be at least 2 nuts bidding on that damaged anvil to raise the price to that level ,even if it was a pretty large one. I'm surprised it went that high -
Possible new anvil and repair?
mudbugone replied to Nicemibs's topic in Repairing and Modification to Anvils
Here's the answer to your question should you purchase that anvil http://www.iforgeiron.com/page/index.html/_/blueprints/100-series/bp0101-anvil-repair-r330 I found this thread in the archives after much looking & asking and found it quite by accident while searching for something totally unrelated online. I can only assume this info has been lost to the members for some reason since I was never directed to it during many conversations about anvil repairs. If you can fix it it'll be expensive....So you better get it cheap. Unless there is an adventuresome soul bidding against you it might go cheap because of that damage. The rear portion still looks intact and the horn too...so there is enough anvil still left to use at some level ...just don't beat on that exposed section of the body you'll just inflict serious damage. It looks like it was just set aside once the face plate became detached...I've seen many that some fool continued to beat to death. Price ? It's your money.... Myself.. I buy whatever I want if I can afford it at the time and want it. Good Luck. -
Hathorn's Helve Hammer
mudbugone replied to maltesehunter's topic in Power Hammers, Treadle Hammers, Olivers
Another Hathorn with an antique engine attached... this must have been a common assembly since this is the third one I've found built this way... It's located here http://www.chucksimonian.com/process.htm for better picture resolution... -
Dang Son...You got serious on that baby... When you get some light in there the chimney details would be great... I ought to do something similar just because I've got piles of bricks & cinder blocks stacked behind the shop just setting there....LOL Super job...Enjoy the new addition to the shop..
-
Here you go.... http://www.ebay.com/itm/12-plush-Marvin-the-Martian-doll-good-condition-/251021097357?pt=LH_DefaultDomain_0&hash=item3a7205f98d Very cool one too... looks way better than the others listed and at $15 shipped a deal... LOL
-
For some reason I keep getting the vision of taping a Roman Candle to that roof rack rocket and lighting the fuse....
-
Hathorn's Helve Hammer
mudbugone replied to maltesehunter's topic in Power Hammers, Treadle Hammers, Olivers
Really bad youtube video ,but it is a Hathorn hammer in action... http://www.youtube.com/watch?v=Bo8t8dTAU4g -
Hathorn's Helve Hammer
mudbugone replied to maltesehunter's topic in Power Hammers, Treadle Hammers, Olivers
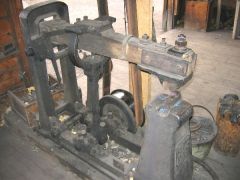
Well ...I've found at least two more of these Hathorn Helve Hammers .... this one is being used http://www.stevenrandallmanufacturing.com/about-us.php and the other looks like the fancy green one I posted earlier if it's not the same hammer. The link above shows a restored hammer that still has the adjuster in place. Many "Thanks" to Jake for information on these hammers. It should be very helpful in fabricating a clone of a similar helve hammer. The only complicated (and it's really not) portion might be the adjuster on the helve arm....and it could actually be eliminated ,but it's a cool addition to the hammer. All the examples I've seen actual photos of all have the adjuster as seen on the hammer that Jake originally posted.... The only example with the curved "slot" adjuster (thru the helve arm) is the original patent drawings & the advertisements.... I have no idea if they changed the design for some reason or if that modification was done by some previous owner. It seems unlikely that "all" the surviving examples would have the same modification though...so I assume the factory made this change to the original design. I assume the slot cut thru the helve may have weakened the helve arm and may have caused the arm to break so they changed the design to "fix" that issue... -
David... You might want to read this thread I found in the plans section http://www.iforgeiron.com/page/index.html/_/blueprints/100-series/bp0101-anvil-repair-r330 I can't believe no one else knew this existed in the archives. Pretty similar repair to your situation and it might help you in restoring your anvils...
-
Anvil Repair "on the cheap"
mudbugone replied to jmeineke's topic in Repairing and Modification to Anvils
The following link in the archives might have made this conversation a bit more detailed http://www.iforgeiron.com/page/index.html/_/blueprints/100-series/bp0101-anvil-repair-r330 I'm adding it to this thread now that I found it by accident because it not only describes a repair in great detail,but it includes photos of the step by step repair... From the description it sounds as if 7018 rods will fill the bad spots and the HF (filler) rods I have are similar to the ones used in that repair.... I should be able to restore my anvil using the described method with it's information. -
You sure you didn't give too much for it ? LOL...Great score ! Shouldn't be too difficult to fix things back up so it works again... I'm sure someone here has knowledge of that setup and they'll be able to give you some directions on hooking it up.
-
You're right... http://www.industrialmachinery.com/store/index.php?main_page=product_info&cPath=367_368_379&products_id=2536 and it probably weighs more than 500# too.. Considering what those things cost you might want to buy your buddy a steak dinner... LOL
-
Those blowers are rebuildable unless there is major damage...and neither of those looks damaged...
-
Looks like the table from an old "shaper" ...a lot of them got scrapped ,but someone saved that table. It also looks like it did service as a drill press table at some point. You might be able to use the slots to hold the vise with some bolts and the correct nut inserts.
-
Hathorn's Helve Hammer
mudbugone replied to maltesehunter's topic in Power Hammers, Treadle Hammers, Olivers
You're very welcome...hope it comes in handy with the restoration. ( I really like this hammer design!) Concerning the adjustment feature both your hammer and the one with the motor seem to have the same attachment for the spring. It looks like that plate is an open slotted plate. I'm only assuming the spring is mounted using a leather strap thru that mounting plate and if the adjuster arm was re-attached then the spring could be moved front to back about 6" to control the stroke. I'm sorta amazed there is so little info on that hammer including any shots of the crank assembly or the adjustment feature.. It's a shame since the design is so simple and could easily be replicated. Simpler than other similar designs anyway. Your pictures seem to be the most detailed I've been able to find... Please keep us in the loop as you restore that baby. I know I'd be very interested in how it works and how it was built in more detail. Thanks for making at least one reader drool...LOL -
Hathorn's Helve Hammer
mudbugone replied to maltesehunter's topic in Power Hammers, Treadle Hammers, Olivers
Jake..I thought you might enjoy this photo of a Hathorn driven by an old motor & belt drive... -
Friend Found "This" Any ideas?
mudbugone replied to Wesley Chambers's topic in Anvils, Swage Blocks, and Mandrels
COOL ! would be my first guess about what it is. Looks special built ,but not a cleat though I've never seen one that wasn't symetrical in shape... Nice piece. -
Various power hammers
mudbugone replied to mudbugone's topic in Power Hammers, Treadle Hammers, Olivers
In relation to a "tire" drive system... I have a tire/rim assembly as well as an axle shaft that it bolts to but it's a heavy duty industrial tire and is just plain heavy. It's about the same diameter as a "spare tire" just heavier ...it would act more like a huge flywheel than a "spare tire" Any thoughts about using such a heavy assembly as a drive system or would it even matter ? I don't know why I kept this thing except it's new and it fits the axle I had too. I've never seen another one and didn't know what it was for...maybe it's just been lurking waiting (15 years) for me to build some sort of contraption and use it... -
I had always heard about LG springs breaking..
mudbugone replied to KYBOY's topic in Power Hammers, Treadle Hammers, Olivers
Along these lines in a discussion about the coil springs look at the patent drawings from 1890 of the original DuPont assembly... (I'm assuming this pre-dates other power hammer designs ) In this original design the coil springs are encased in a tube which I think was to contain the coil should it fracture. Subsequent power hammer designs all seem to have failed to use that design...probably in an effort to circumvent patent infringements. Aren't most other power hammer designs from the early 20th century ? At that time I think patent rights were in effect for a period of 17 years and a lot of designs I've seen are dated 1907 (or later)...17 years from the original patent date of 1890. It should be easy enough to encase the coil inside a steel tube for safety such as the original design used. It sounds like adding a 'scatter shield' like 781 has should work as well also. -
Various power hammers
mudbugone replied to mudbugone's topic in Power Hammers, Treadle Hammers, Olivers
I found the patent drawings for the actual DuPont linkage... Anyone notice any difference between them and the Little Giant or any of the other various hammer linkages ? Notice the original drawing used a sleeve over the coil springs ....Safety design ? Later omitted from other hammers?. The original design looks as if the "arms" are leaf springs with the coil as a tension device to position the arms. -
Various power hammers
mudbugone replied to mudbugone's topic in Power Hammers, Treadle Hammers, Olivers
I'd rather the "tire" was rear mounted instead of as it is on most all the "tire type" hammers. There are several aspects of the assembly I don't care for,but that's just my opinion. There would be little difference in having the tire rear mounted and having the eccentric front mounted by using a shaft and bearings. Such a mounting would eliminate the rim welding and trying to figure out how to remove the tire if necessary. I think the tire hammer is a super design... of that there is no doubt.... Those are just my observations on it from other peoples discussions about building one.