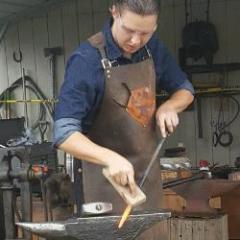
November 1, 201411 yr Hello! I've got a tough one for you folks. I've just purchased a 196lb peterwright anvil, and it is missing a large section of the steel face at the heel. Here it is Close up of the markings for your viewing pleasure Here is the damage, my issue is that it doesn't allow me to use the pritchel and hardie holes. I understand that even a good repair will not make them as good as new but I need something to work with. Top view So my questions include: -What method would you use to repair this? -What type of tool steel would be a good filler plate? -Can the hardie hole be made usable again (assuming I make a removable seat to relieve any stress from working with hardie tools)? What I was told by the gentleman I bought this from is to get a piece of "tool steel" (which is very vague as there are many types), add lead to the area and set the new piece into place. Then take welding rods of certain types and building up as needed. This is the article I have been basing my strategy on http://www.anvilmag.com/smith/anvilres.htm All work done at a reasonable local heat of something like 300 degrees F. What other options might I have? The good news is that this is otherwise a fantastic anvil, and if I must I also have a decent sized Vulcan that is in good shape and can cover my hardie tool needs. Any help is appreciated!
November 2, 201411 yr The article you are looking at regarding anvil repairs pretty much sums up the repair process. The big question is how much do you actually use the hardie and pritchel holes and would it be too inconvenient to use the Vulcan vs the risk of causing damage to the PW. I would work with the PW as it is cause it looks to be in great shape other than the missing section of plate.
November 2, 201411 yr Using lead to bed or solder a tool steel plate in the missing section, and then welding all around it is a joke. Adding a steel plate without the lead is nearly as bad. The build up methods in the article are not idle speculation, or amateur attempts, but professional advice.
November 2, 201411 yr I would absolutely repair this anvil if it were mine. I'd use the following approach: 1. Overlay the wrought iron with Hobart Hardalloy 38-two passes. This is NOT a hard face rod but a buildup rod. It should have a hardness of about 20-22 Rockwell C. This is needed to support the actual hardfacing layer since wrought iron is too soft by itself to do that job. 2. Preheat anvil to 400- 600 F and overlay Hardalloy 38 with Hardalloy 58. This is a hardface rod that should give you a hardness in the low 50 HRc. Weld no more than 2 passes. More than that will likely lead to cracks. If you do not pre-heat the anvil, expect the hard face and the existing face plate to crack. 3. Wrap in Kaowool or other insulating media and slow cool. 4. Grind to final size. I'd make graphite or copper plugs to fit the hardy and pritchel so you don't have to grind them open after welding.
November 2, 201411 yr Author The big question is how much do you actually use the hardie and pritchel holes and would it be too inconvenient to use the Vulcan vs the risk of causing damage to the PW. I would work with the PW as it is cause it looks to be in great shape other than the missing section of plate. Good point, and I had the idea of making an adjustable anvil base for the vulcan anyways. So it can be a designated punch/hardie mule until I need it for something else. So i'll probably do that for now until I make up my mind on repairing it. Having said that, Patrick are you suggesting that I weld up the entire missing section to the original height of the face, using mostly filler rod? Or am I mistaken. Sounds time consuming and I'd burn a ton of rods. The build up methods in the article are not idle speculation, or amateur attempts, but professional advice. That is exactly why I wanted to double check my sources! The fellow means well but it sounded strange to me.
November 2, 201411 yr using lead and welding next to it will produce lots of poisinous fumes, also supporing a plate on soft lead in the middle with hard weld round the edge is a sure way to break it. either build up or add a plate with a small spacer in the middle and then weld each side of the spacer till you reach the edges so the weld is over nearly all the area, tapping the plate on an anvil with make it easy to tell where it is not attached by the difference in sound, those places are bad
November 2, 201411 yr Even with cleaning, preheating, welding, chipping and wire brushing, a section that small should be finished before lunch. Doing the whole face might take all day, even for a skilled weldor. Final grinding would have to wait for a day to allow slow cooling. If building up a 4" by 4" pad in the flat position with a stick or MIG welder sounds like too much work for you at your present skill level, you might want to take a welding class at a local tech school. In week 1, my students build up a 6" x 6" pad many layers thick, until they get it right. After that, they get to do it over in horizontal, then vertical, and finally overhead. Most end up with a plate over an inch thick. Only then are they ready to take on joints.
November 2, 201411 yr Author Even with cleaning, preheating, welding, chipping and wire brushing, a section that small should be finished before lunch. Doing the whole face might take all day, even for a skilled weldor. Final grinding would have to wait for a day to allow slow cooling. If building up a 4" by 4" pad in the flat position with a stick or MIG welder sounds like too much work for you at your present skill level, you might want to take a welding class at a local tech school. In week 1, my students build up a 6" x 6" pad many layers thick, until they get it right. After that, they get to do it over in horizontal, then vertical, and finally overhead. Most end up with a plate over an inch thick. Only then are they ready to take on joints. Well John, I'm sure I could do it on any old plate, but on an anvil I'm just worried it might cause problems. You'd heat the entire anvil? Wouldn't the added heat from repeated passes also be in danger of cracking the face off of the rest of the anvil, or causing other problems considering it's on the heel which is rather thin? Or would you take the time to only do a few passes at once?
November 2, 201411 yr The danger of cracking off any additional face material is only there if it is cold. The thermal shock will cause cracking. That is why you preheat the entire anvil to 400F, and keep it that hot until you are done. You want a spring temper on an anvil face, so that temp will not do any harm. Localized heat in the heel may well be higher, I would recommend no more that 500F to 550F as an interpass temperature. (For those of you not used to the jargon, that means let it cool below that point 1" outside the weld zone before striking another arc.) If I was fixing torch gouges or edge chips with TIG, only then I would go very slow and not heat the whole anvil.
November 2, 201411 yr Author Thanks John, your reasoning is sound so I might try this soon. If I do get the right rods like in the article, will the repaired section be sturdy enough to do some light forging on? I like the heel because you can get some hard to reach areas on odd projects, so no major forging but for detail work it sounds like this repair will be just fine.
November 2, 201411 yr If you follow the directions in the article, and are capable of producing good welds, then that anvil will be as good as new, and ready for another hundred years of hard work.
November 3, 201411 yr Author You're a very helpful "Grumpy Old Guy" John! So would you mind if I pick you brain a bit more? How would you redo the edges? This one only needs very slight corrections, but if I'm already working on it the heel at that heat couldn't I just add some of the Stoody 1105 rods and build them up as well? (after grinding the edges smooth first, of course)
November 3, 201411 yr Grind back to clean, un-cracked metal at every chip in the edges, and yes, you can. Tilt the anvil at a 45 degree angle when you do the edges.
November 3, 201411 yr I wouldnt try to repair the edges. Obviously they are not like new but are in far better than average condition for an old anvil and now you will start to effect the hardness in the main body of the anvil where the heavy work is done. Search in the forum regarding edge repairs and you will find that the general concensus is to work with what you have. Radius the worst area for a nice rounded working edge and if you need the sharp 90 edge make a hardie tool for it. Its your anvil you can repair and use it anyway you want and your doing the right thing by researching and asking questions.I think most on the forum just dont want to see a nice PW get messed up from lack of knowledge or skill
November 3, 201411 yr Author Thanks guys. I think I'll leave the edges. Search in the forum regarding edge repairs and you will find that the general concensus is to work with what you have. Radius the worst area for a nice rounded working edge and if you need the sharp 90 edge make a hardie tool for it. This makes sense for almost all anvils, I've even been told the factories started rounding the edges on later anvils instead of leaving the 90. I can always make a hardie or specialized a piece of railroad rail for that. However, I do feel that welding up the heel would restore this thing to it's original glory. It hurts my brain to see such an awesome anvil left like this if it could be restored. So i'm curious Frozenforge, you've already said you'd leave it as is, but is that because you think the finished repair won't be done well (I'm a decent welder but don't have much experience), or that a repair done well isn't worth it?
November 3, 201411 yr Author Also wait, If building up a 4" by 4" pad in the flat position with a stick or MIG welder Could I use a MIG Welder for the build up and then finish the top layers with the rods? Or does using the MIG require special wire?
November 3, 201411 yr More that the risk of taking out the temper by repairing the edges wouldnt be worth it with edges that are not that bad. The heel would be worthy of repair. The only reason I recommended possibly waiting was for you to figure out how much you really needed and used that part of the anvil verses the effort and cost of materials to perform the repair. For this repair the buildup of different alloys is very important and finding these for a wirefeed can be difficult and very expensive. The last time I inquired about a spool of hardfacing wire it was only available in 10lb for over $150. You will probably need a minimum 250 amp welder for this as well. If you put your location in your profile you might find someone close by that could provide assistance. We always love pictures so if you do the repair take pictures!
November 3, 201411 yr If you know someone in the heavy equipment or agricultural equipment repair field, you might be able to get a deal on a partial roll of hardfacing wire. Buying a whole roll would probably cost as much as a new anvil. Hardfacing stick rod is usually available in smaller lots. Be advised that there are two types of hard facing: abrasion resistant versus impact resistance. What you want is impact resistant. Stoody has a nice online pdf catalog, and there are other brands as well.
November 3, 201411 yr Keep in mind not all "migs" are created equal. You are not going to be able to run hardfacing wire with a small 110v mig. Even "bigger" 220v 200 amp class migs won't usually do hardfacing wire. You need to be up in the heavier industrial class migs, either the top of the self contained mig machines that put out 250 amps or more, or the bigger industrial power sources and feeder combos.
November 3, 201411 yr One of my 100+ year old blacksmithing books reminds people that the first thing you do when you get a new anvil is to round the edges so they will not leave coldshuts in your work. Of course back then the anvil makers expected you to know what radii *you* prefer on edges and to dress them appropriately.... This mania for wanting to put sharp edges on anvils I believe is mainly due to ignorance, though some tasks do profit from a minimally rounded edge which as mentioned can be accomplished by a hardy tool.
November 8, 201411 yr Yes I was advocating that you build up the missing section of the anvil to match the section of the orginal face. It won't take you that long. I used the procoess I described to hard face an anvil with a face 9.75 x 20. I put two layers of Hardalloy 58 over that entire area using 3/16 rod. It took 7 hours of non stop work. Your repair will take a small fraction of that time as it looks like the area you're working with is less than 1/10 of the area I was working with. Besides, I don't think you want the last four inches to step back down. You'd loose some functionality if you didn't make it even with the rest of the face.
November 8, 201411 yr Kette I will JUMP in this again !! ** FIRST !!!! search for Rod Gunther anvil repair its in the anvil page somewhere !! & is the RIGHT way to re-weld PW anvils the rod used is Stoody 1105 ! & yea 10 lbs $70.00 aprox DO not use hard face rod it can chip = shrapnel or stainless rod - 6011 not a great Idea either but some do ? ON the cheap & a good repair for cost use 110-18 I us this on the step & horn also you could use it to build up the plat some then use #1105 as topper that avil is repairable just gone to alot of time to do ! right you're ? is how do I know this Info -- I have repaired over 60 + anvil this way ! with no problems you can ask any of the owners ! they will tell you so 8 of them are in smith school to teach new smiths that was 15 years ago I ck those anvils out ever year !! & there still in good shape :D ALL the Info you need on anvil repair good & bad is on the anvil page of this site GOOD luck STEVE'S Welding & Fab PS 7018 will work good enough I know anvils repaired that way there ok remember you're hitting HOT metal not cold
November 11, 201411 yr Author Considering this isn't the heavy forging face i'm repairing, I may not add any hard surface rods to the mix. I just need the holes, and even IF I damage them, I'll have the rods to repair them! I've heard stories of the shrapnel, which is why I didn't want to do this unless I knew I could do it correctly. My Vulcan anvil has the far face edge collapsing which is why I elected to get another to do the heavy work on, in fear of it chipping. Thanks for all the advice!
November 11, 201411 yr You can do it, Kette! I have confidence in you. And don't fret the hard-facing. It will definitely make the anvil better over the long-haul, but I don't think you'll be hurting any if you don't hard-face that portion. Cut up a firebrick to make a dam for the holes and get to welding.
November 11, 201411 yr Both the stoody and hobart products mentioned work very well for repairing anvils. An anvil face is over 50 hrc when new in most csses and at that hardness their is always some risk of chipping. When selecting a hard face rod for an anvil you need to understand what you're buying. Some rods are inteded for extreme wear resistance. Others go down soft and work harden under extreme load such as in crushers. Neither of these are really good for anvils. You need something that goes down hard but still has good toughness.
Join the conversation
You can post now and register later. If you have an account, sign in now to post with your account.