scrapartoz Posted January 1, 2014 Author Share Posted January 1, 2014 Ok folks now I get my wife to make me some round edged coloured glass discs to fit the rings I cut. first use a template (ring) mark with marker , score with glass cutter , break off scored sections with special pliers. Next ground off rough edges to make coloured round discs.(this is with an electric diamond impregnated wheel) SAFETY GLASSES are needed. do the same for clear glass to go on top of each coloured disc. next cook the things in a kiln to create lovely rolled edges and to melt the clear to the coloured glass. (leave this to the experts as there are set heating and cooling rates and times that if not followed will result in cracked glass or exploding in the kiln) next go mad with the silastic caulking gun and install the discs in the waiting rings.(then I try to get rid of the mess ) my wife has made made blue ,green,, brown and yellow to match certain parts of the peacock cheers Quote Link to comment Share on other sites More sharing options...
Steve Sells Posted January 1, 2014 Share Posted January 1, 2014 That is looking good. I like the colored glass inserts. Really makes it pop Quote Link to comment Share on other sites More sharing options...
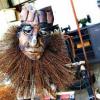
scrapartoz Posted January 3, 2014 Author Share Posted January 3, 2014 Thank you Steve. Yes the glass discs really work . I had 3 yellow ones on the back as real peacock have this colour in front of the fan BUT they stood out too much and overtook the beauty of the fan. So we are cooking up a few more blue ones today to replace them. Final photos in about 5 days. cheers.a below is the sequence for constructing a rotating base for the peacock. I used an old wood fired copper wash tub to cover the structural components. Quote Link to comment Share on other sites More sharing options...
Steve Sells Posted January 3, 2014 Share Posted January 3, 2014 not that I am known for good color choices.... but rather than the same blue, how about a teal, or another near blue, for the yellow's replacement, so it wont be so bright, yet still have some kind of color off set? Quote Link to comment Share on other sites More sharing options...
scrapartoz Posted January 3, 2014 Author Share Posted January 3, 2014 that's a good idea steve. however I have some green all ready in place on the back to' marry up' the colours of telephone insulators so by inserting blue in place of the yellow it will interweave the blue /green mix . thank you for the feedback.I also have put "Dichroic" glass on top of the comb and in the eyes looks very nice . pics in a few days cheers andrew Quote Link to comment Share on other sites More sharing options...
scrapartoz Posted January 4, 2014 Author Share Posted January 4, 2014 finished! Quote Link to comment Share on other sites More sharing options...
seldom (dick renker) Posted January 4, 2014 Share Posted January 4, 2014 andrew, i can see him shaking and struttin. well done dick Quote Link to comment Share on other sites More sharing options...
Dodge Posted January 4, 2014 Share Posted January 4, 2014 Scrapartoz, Beautiful! Thank you for sharing! Quote Link to comment Share on other sites More sharing options...
Dillon Sculpture Posted January 4, 2014 Share Posted January 4, 2014 Another great piece Andrew, I especially like the incorporation of the glass. Quote Link to comment Share on other sites More sharing options...
beth Posted January 4, 2014 Share Posted January 4, 2014 andrew its looking great! my favourite bits are the brushy bits round those lovely colours, and the bits on the very outer rim - i hope your pleased with him? Quote Link to comment Share on other sites More sharing options...
scrapartoz Posted January 5, 2014 Author Share Posted January 5, 2014 Thank you Dick, Dodge, Dillon and Beth , Yes this project was a bit different and I am happy with the result. One aspect that I did not anticipate was that when viewed from below, with the blue sky as a background , much of the Blue shades in the fan 'eyes' are lost .I had hoped to place the sculpture on a mound with the sky as a backdrop . now I will keep it in the garden. If I were to do this again I would select different tones that would not get lost in the sky. Thanks again folks . Now I gotta see if I can illuminate the sculpture with LED at a reasonable effort and cost as there is an art show I want to enter with a theme of : light. Quote Link to comment Share on other sites More sharing options...
beth Posted January 5, 2014 Share Posted January 5, 2014 excellent!!! i LOVE electric light on sculptures - please photograph it lit if you can - id love to see that :) ps blue shades would work well against an english sky......! Quote Link to comment Share on other sites More sharing options...
scrapartoz Posted January 6, 2014 Author Share Posted January 6, 2014 Ok beth , if I do light it up and take it to the show I will post some pics. that would be April? I think. Quote Link to comment Share on other sites More sharing options...
beth Posted January 6, 2014 Share Posted January 6, 2014 nice one andrew - thanks - and good luck with the show and whatever is next :) Quote Link to comment Share on other sites More sharing options...
coldironkilz Posted January 7, 2014 Share Posted January 7, 2014 Gotta tell ya, That's a great piece scrapartoz. Quote Link to comment Share on other sites More sharing options...
scrapartoz Posted January 7, 2014 Author Share Posted January 7, 2014 thank you Beth and Cold Ironkilz Quote Link to comment Share on other sites More sharing options...
Mudman Posted January 7, 2014 Share Posted January 7, 2014 That is amazing! Quote Link to comment Share on other sites More sharing options...
scrapartoz Posted January 8, 2014 Author Share Posted January 8, 2014 thanks mudman! Quote Link to comment Share on other sites More sharing options...
scrapartoz Posted January 20, 2014 Author Share Posted January 20, 2014 Well folks this is my first attempt at a YOUTUBE video of the peacock construction. My crappy satellite upload/download speed was so slow that ' you tube' would only accept this low quality resolution clip. Please tell me how (other than definition) I might improve the process. Do you guys think this is a better medium than posting lots of progress photos? cheers scrappy . PS excuse the lack of make up ( LOL )it was 45 degrees Celsius which is bloody hot ( 113Farenheight) Quote Link to comment Share on other sites More sharing options...
ausfire Posted February 2, 2014 Share Posted February 2, 2014 Andrew,This is absolutely amazing. You have just got everything so right. The glass adds vibrancy and colour. My scrap pile has so much of what you use - dozens of horse hames, old bar mower points, valves, insulator hooks (I always melt the lead off them) and so much more. Even your workshop looks like mine. I see the slag hammer on the floor - all arc welded??You (and your wife) must be very proud of the peacock. I like the curvature of the neck and his stately look.My wife is clever with glass too, (tiffany lamps, copper foiling, that sort of thing) but rarely have we combined the two art forms. You have provided food for thought, sir.Enjoyed your photo sequences very much. Thank you. Quote Link to comment Share on other sites More sharing options...
scrapartoz Posted February 3, 2014 Author Share Posted February 3, 2014 Thank you Ausfire , yes I only use arc welding as I don't have to clean the metal . MIG is no good unless clean, My process is very manic so I rush out to the boneyard and bring in 3 or 4 items have a quick look then on they go. I also noticed your scrap items . I was most impressed with your use of the elbow pieces in the arms of the kangaroo ......I have about 50 of those minimum till tillage tips and I have never been able to "place "them in a sculpture I was thinking maybe the toes of a BIG T-Rex?????? please keep posting your progress pics as we can all learn from each other. Quote Link to comment Share on other sites More sharing options...
ausfire Posted February 3, 2014 Share Posted February 3, 2014 Andrew, I posted a couple more pics of the kangaroo in the other thread.Those tillage tips would make good dinosaur feet. I have made the feet - just need the rest of the dinosaur. Speaking of T-rex, have a look at a BIG old Stilson wrench - I did a T-rex out of one of those. The head is just about already made. The back took some bending though. Quote Link to comment Share on other sites More sharing options...
scrapartoz Posted February 4, 2014 Author Share Posted February 4, 2014 Thanks Ausfire I had another look at your roo and I was wrong about the elbow bit. I recognised the chain hook off the horse hames? on the upper arm but I thought the lower elbow was one of those heavy min tillage tips. Your work is great . Looking forward to seeing more of your stuff . cheers n beeers! andrew Quote Link to comment Share on other sites More sharing options...
sfDuck Posted January 14, 2015 Share Posted January 14, 2015 Wow just WOW!!!! I think I love the sequence of building and your splannin more than the finished picture. Our scrap yards have nowhere near such a vast variety to choose from. I hope the price tag reflects the cost of buying all that scrap. Soon as all the snow is gone I'm out to my favorite scrap yard. I am Inspired ; what a high thanks a million!!!!! sfDuck Quote Link to comment Share on other sites More sharing options...
scrapartoz Posted January 31, 2015 Author Share Posted January 31, 2015 Thank you SF Duck . I think you will have to go to scrap yards in rural areas to get the "good stuff" modern shiny car parts don't appeal to me at all. Quote Link to comment Share on other sites More sharing options...
Recommended Posts
Join the conversation
You can post now and register later. If you have an account, sign in now to post with your account.