Shainarue
-
Posts
637 -
Joined
-
Last visited
Content Type
Profiles
Forums
Articles
Gallery
Downloads
Events
Everything posted by Shainarue
-

Tooling up for some upcoming projects
Shainarue replied to M.G.'s topic in Tools, general discussion
That's a real slick fleur de lis, M.G.! Frosty, would you use a veining chisel hot or cold? I think I know that the only difference is the angle on the working end but just curious which you prefer. -
What did you do in the shop today?
Shainarue replied to Mark Ling's topic in Blacksmithing, General Discussion
Billy, I've been working ahead. So far there's only been one virtual class and it covered safety, terminology, a few different hammer striking positions, and tapers. So I'm so deferring to the Mark Aspery videos for the lessons. If I had to guess though, I'd say as long as it's done in a manner to demonstrate your understanding and ability to forge weld, and the material is increased enough for the hook notch, then it's probably fine. I rewatched a few videos this afternoon, had an big aha moment, tried it again tonight and successfully did two in a row! Heres a pic of all 20 that I've done in the past 28 days. The two that I did tonight are on the far right. One square taper, one chisel taper. Both have 1-1/8" inner diameter and 1-3/4" tapers. So I've submitted those for review.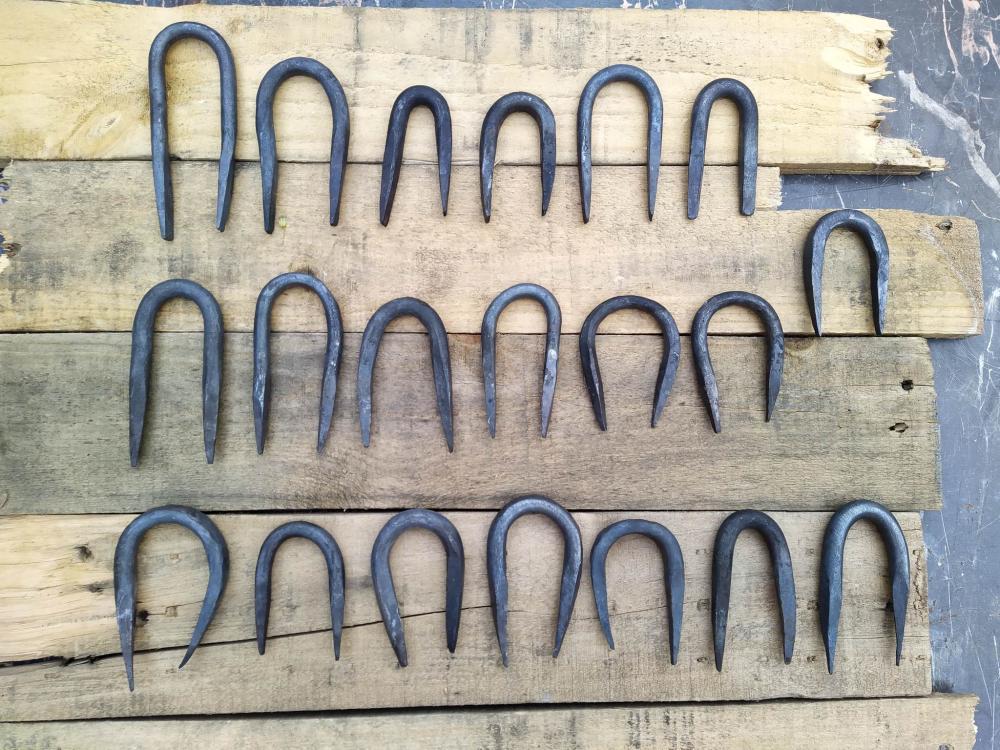
-
Show me your sales or demo booth
Shainarue replied to Glenn's topic in The Business Side of Blacksmithing
Your comment reminded me - it's a small thing but whenever I pull a business card out of my bag when I get home and the person has written a message on the back, it always makes me smile. So I highly recommend scribbling something on the back - even if it's just "Thanks!" or "You're Amazing!" or an incentive to purchase again might be to offer a discount off their next purchase if they show the card. Write these up and add these to the bags ahead of time so all you have to do at the event is grab a bag for the item. Then the 'purchase' cards are separate from the 'anyone' cards. If you don't go the sticker route mentioned by JHCC then you could stamp if your touchmark is easy enough to carve. Make a quick stamp by carving into a large eraser and then stamp your touchmark onto the handled paper bags. A rubber block carving kit is cheap enough - I just didn't know how much time you had or how much spending money you had. -
Show me your sales or demo booth
Shainarue replied to Glenn's topic in The Business Side of Blacksmithing
The one suggestion I have is to add levels so there's a variation of height and not just flat. This can be as simple as shoe boxes or stacks of books under the table cloth. I like the tan table covering. Really let's the metal pop. Also, I'd recommend props for as many pieces as possible so there's no wondering what something is - and also to draw attention. Like have a penannular brooch actually pinned into a scarf or something. An open (empty but weighted) bag of coffee for the coffee scoops. -
What did you do in the shop today?
Shainarue replied to Mark Ling's topic in Blacksmithing, General Discussion
Glad I could provide some inspiration Tommy! I also have the Controlled Hand Forging lessons printed and in a binder. I thought I'd start on those after the ABANA Level 1. Figured they'd be good for in between projects or such. Gewoon, that's a nice leaf. Another beauty, Chad! No pics because time got away from me and when I checked the time it was 10pm! So I scrambled to get everything put up and will resume tomorrow. Fought with staples again tonight. I might have to buy yet ANOTHER 8 ft of 3/8 bar but I WILL get this! One of the reasons I signed up for the ABANA course was to push myself to focus on technique and consistency rather than just good enough. I would have given up on these staples probably 5 staples in if I had done the course on my own (I've probably done 20 or so in the past month). But since I have a coach to submit my work to - and since I've paid for the course - I am much more intent on getting it right. And not just getting it right one time so I can submit it. I want to be able to do it consistently. My square tapers (from round bar) are getting MUCH faster and smooth though! -
Roaring River is BEAUTIFUL! My wife & I did a marathon of sorts of all the Missouri State parks back in 2017 with our elderly dog, Max. It was October so we didn't float but we did explore on foot.
-
Congrats Billy! I also really liked the dragon one of yours. It looked like the Jormungandr symbol - which I considered trying after seeing yours because I was sure my nephew would know its meaning and appreciate it. In the end I decided maybe I shouldn't try to be so ambitious with my first ever bottle opener, lol! Yours is saved in my inspiration folder though
-
What did you do in the shop today?
Shainarue replied to Mark Ling's topic in Blacksmithing, General Discussion
I received the response from my coach regarding the 5 tapers I submitted (as well as the S-hook and leaf) In regards to the tapers: "[...] and think over all you've done a great job! I would like to see your tapers come down to an even finer point at the very tip. [...]" and then basically asked a few technique questions to make sure I understood the basics of the skills. The only one he wants me to re-submit is the diamond taper. Needs to be sharp and also only one angle to the sides - as mine had two angles (how my brain envisioned a diamond, lol). He sent some chalk sketches of what he was expecting. So I'll be working on that this evening. I just wanted to update you since you asked. -
What did you do in the shop today?
Shainarue replied to Mark Ling's topic in Blacksmithing, General Discussion
Looks great, Chad! -
What did you do in the shop today?
Shainarue replied to Mark Ling's topic in Blacksmithing, General Discussion
BillyBones, I'm curious about your 3rd hand clamp thingy. Can you show more of it? I do have a pair of flat bits. First pair I ever made actually, using the EZ blueprint from this site. But previous leaf heads have snapped right off when I've held them to draw out the stem. But that was early on in my learning to do all this so maybe they had cold shuts or I was working it too cold. It was probably 1/4 or 5/16 rod on top of all that. Guess I could try it again. It's good to know that 20 heats on 1/2" is reasonable for a beginner. I'm not trying to be a speed queen. I just like challenges because they push me to get better. The drawing out looks good, isn't going crooked and I'm not leaving dents or chips off the side like I used to. My hammer control is MUCH improved, lol. So I figured it was reasonable to try to push for faster or figuring out something more efficient. As for the story board, just to clarify, that's not an ABANA story board. It's just from the Instagram of the person who happened to be instructing the first class. Each month will be a different instructor. I don't think they really care how it happens, as long as it's done to spec when indicated and you can reproduce the results. -
What did you do in the shop today?
Shainarue replied to Mark Ling's topic in Blacksmithing, General Discussion
They aren't watching me step by step so I think as long as it looks good then they assume I understand the technique. If I recall correctly, the leaf is to demonstrate understanding of taper, shoulder, spreading and drawing out. I'm going out right now to try one without squaring up first for the taper. -
What did you do in the shop today?
Shainarue replied to Mark Ling's topic in Blacksmithing, General Discussion
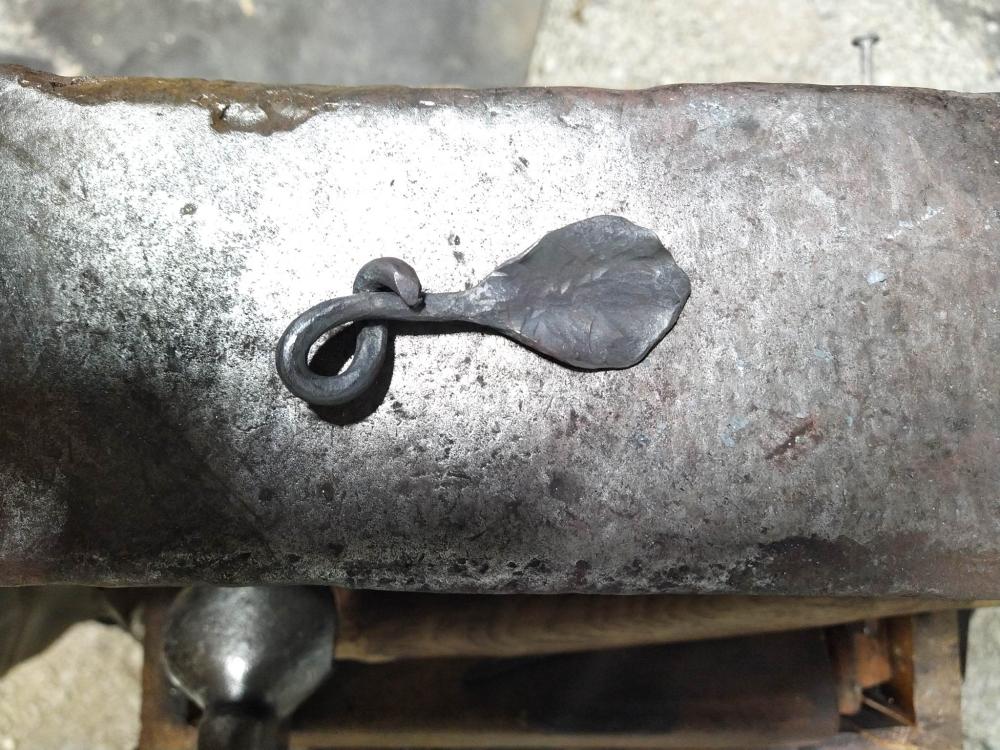
To answer your first question, the stock is 1/2". He started with square - which I would guess has a bit of an advantage to lower heats required. I'm using round, so I have to square it first. I'm also using a 2lb hammer. In regards to the challenge, I assumed it was intended for beginners as that's typically a project in beginners classes - and beginners (as I consider myself to be) typically require more heats to do even basic operations. Be that lack of technique or uncertainty or any other manner of reasons. Having watched plenty of other videos of people making leaves, of course I realized early on that they could be done in much less than 10 heats. But this is a good goal for me to strive for - since I'm already so far above that number. I figured I'd track my heats - and if I was at or below 10 then I'd just make my goal to be less than whatever I was doing. But it turned out that I was way above, lol. I kept the parent bar until the end because I don't have tongs that hold really well on the smaller stock (1/4" or less) and both of my bolt jaw tongs are for larger stock (1/2 & 3/4). So holding it from the leaf end wasn't an option and holding the drawn out stem wasn't ideal either. I made it work with what I had. Half face blows is what I mostly used to widen. Once I had a mostly defined shape, I switched to the cross pein along the anvil edge to try to simultaneously flare it more and give it a semblance of veining without needing to chisel. I'll try the horn for that part next time just to see - maybe it will work better for me. I think it worked fine the way I did it (other than the obvious few mis-hits where I landed a corner pein rather than full pein, lol) but I'm always open to trying other techniques. The hard blows I was referring to (not so much *hard* as just a full swing rather than half-swing) was specifically just for the drawing out. And maybe a few at the start of spreading. I'm including an image of the storyboard he provided with his instruction.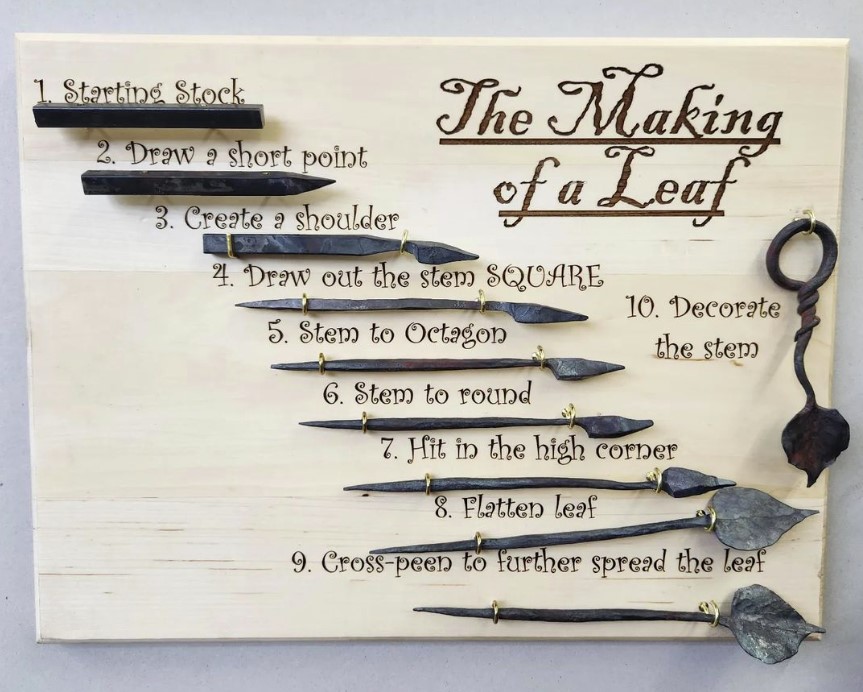
-
What did you do in the shop today?
Shainarue replied to Mark Ling's topic in Blacksmithing, General Discussion
Neil & Frosty, I've done the rope twist and other chiseled twists before - and for me it's not more simple (especially on these little fiddly pieces) but it is definitely more attractive! Squaring & twisting took me 2 heats (the twist should have had another heat, as evidenced with the uneven twist,lol). The chiseling alone would have taken me at least 4 heats, possibly more - just because I'm still so slow at it, lol I tracked my heats on the leaf because I had seen an Instagram post by the same person who instructed the first class. He had put out a challenge to create a wrapped leaf in less than 10 heats. This leaf took 20 heats - and 10 of those heats was just drawing out the stem square (then one heat to octagon and two heats to round). So I really need to work on getting more efficient in that department. I'll give Brian Brazeal's video another look - I remember he showed how to forge a tong blank in one heat, including drawing the reins. There are a ton of various methods for drawing out but I remember trying his in clay and thinking it was pretty efficient. Could also be I'm just not using full swings so I'm not moving as much metal as I could. I have a bad habit of that. I need a pre-recorded message that just plays in the shed every 5 minutes or so "Full Swings!" More practice is definitely on the way. I used up all my 5/16" stock practicing staples. I even bought an extra bar! Sheesh. So I'll pick up FOUR bars of that tonight - that oughta do it. Side note: Last summer both my anvil and forge were outside the shed. This is my first summer with the anvil inside the metal shed (forge still outside) and GOLLY GEE is it ever hot already! And it's not even summer yet! It was 80 degrees outside yesterday evening - and at least 10 degrees hotter than that in the shed. I never did get the foam sheets installed in the roof - that will be happening this weekend! Last night though, I just turned on a little fan and kept it on the top shelf - really close to the roof - to help circulate the air and that helped immensely. It was actually a little cooler in the shed for a short moment before the sun finally dipped down below the horizon! -
What did you do in the shop today?
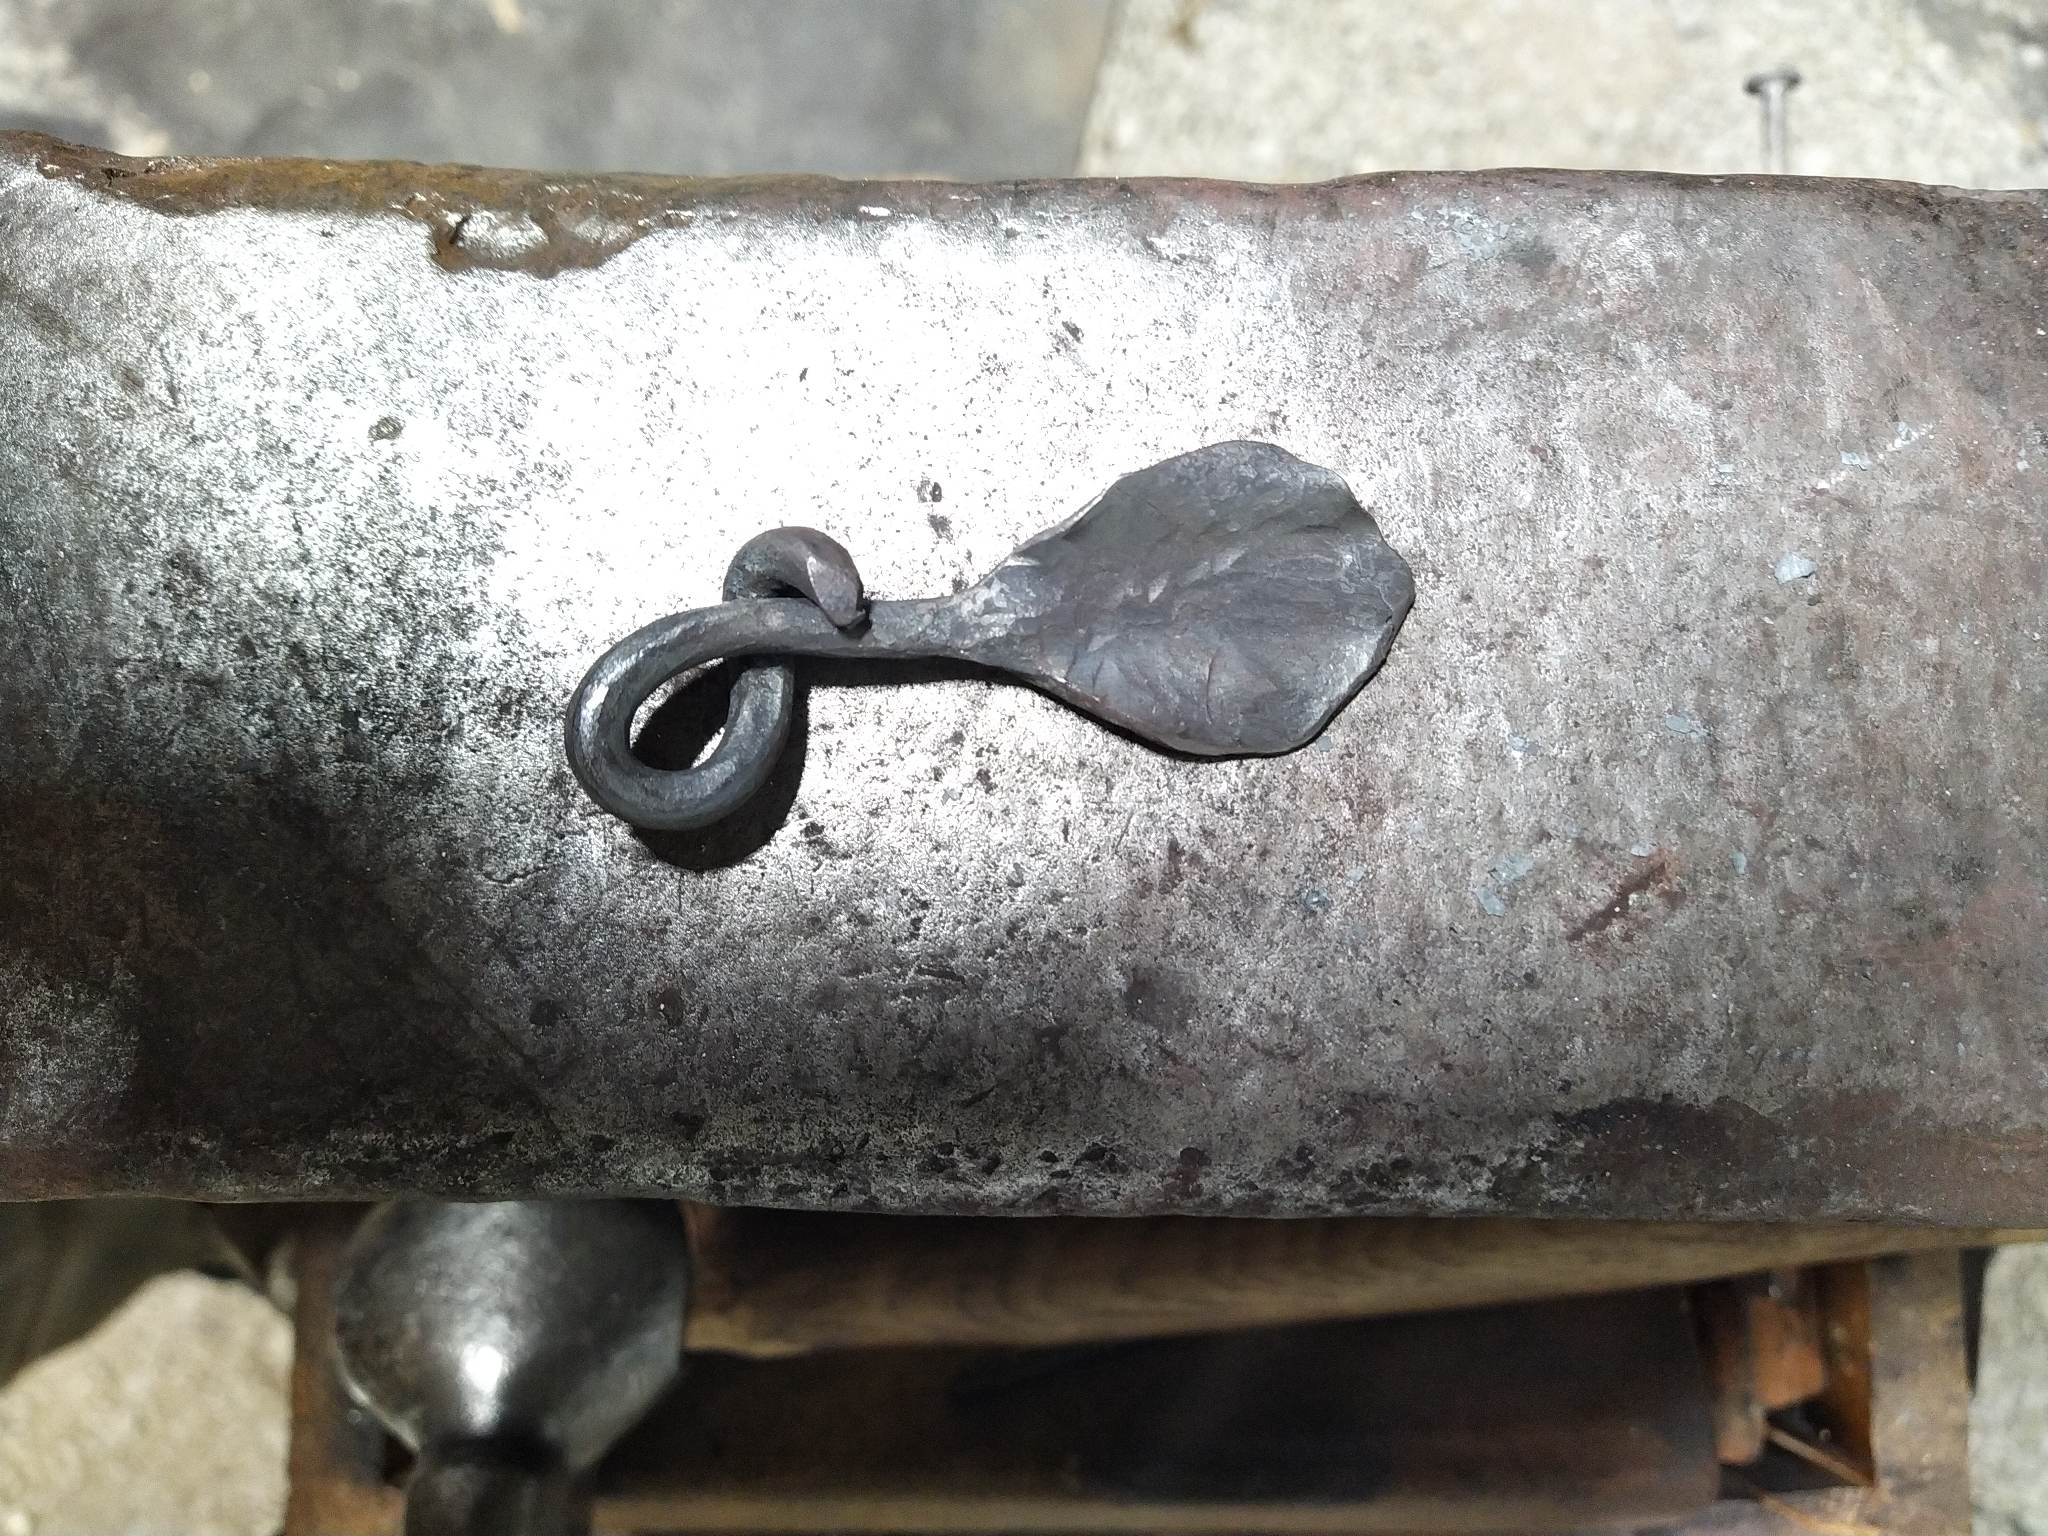
Shainarue replied to Mark Ling's topic in Blacksmithing, General Discussion
More ABANA NC stuff. Tonight I worked on S hooks and leaves. The evening started off not great with focus. I was making dumb mistakes. First S hook I started to hook the second side in the same direction as the first side... Oops... Straightened out and hooked it the other way. Then realized the curls I'd made weren't facing the same directions. One faced in and one faced out. I dropped it and moved on to the next one. Second hook I tried my first fishtail curl. That went okay and the first side of the hook looked good. Start the fishtail on the other side... And then realize I didn't rotate the piece so the fishtail is now perpendicular to the other. Oops... So I decided I'd just square the center and twist so it looked like an intentional design element but would also fix my error. Win! Leaf is a little fat but overall I was happy with it. No cracks, mostly equal sided, and I even got a bit if a center ridge and some waviness! The video shows off the leaf better but I included the pic as well for those who don't have the bandwidth to watch video. received_558864276352085.mp4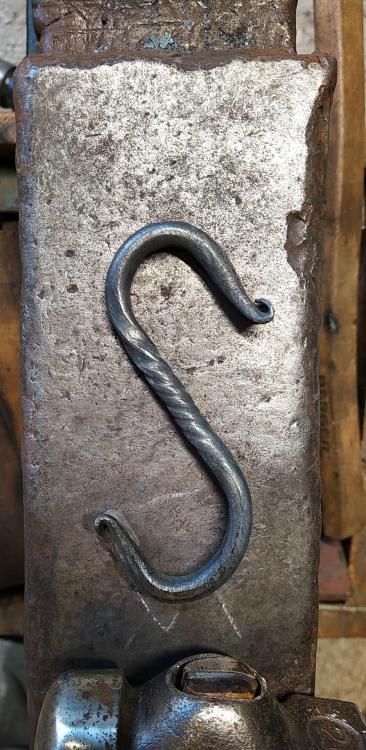
-
JLP Blacksmith Teaching Center.
Shainarue replied to jlpservicesinc's topic in Building, Designing a Shop
Yay for power! So now you lights, heat, and equipment. When do classes begin? -
What did you do in the shop today?
Shainarue replied to Mark Ling's topic in Blacksmithing, General Discussion
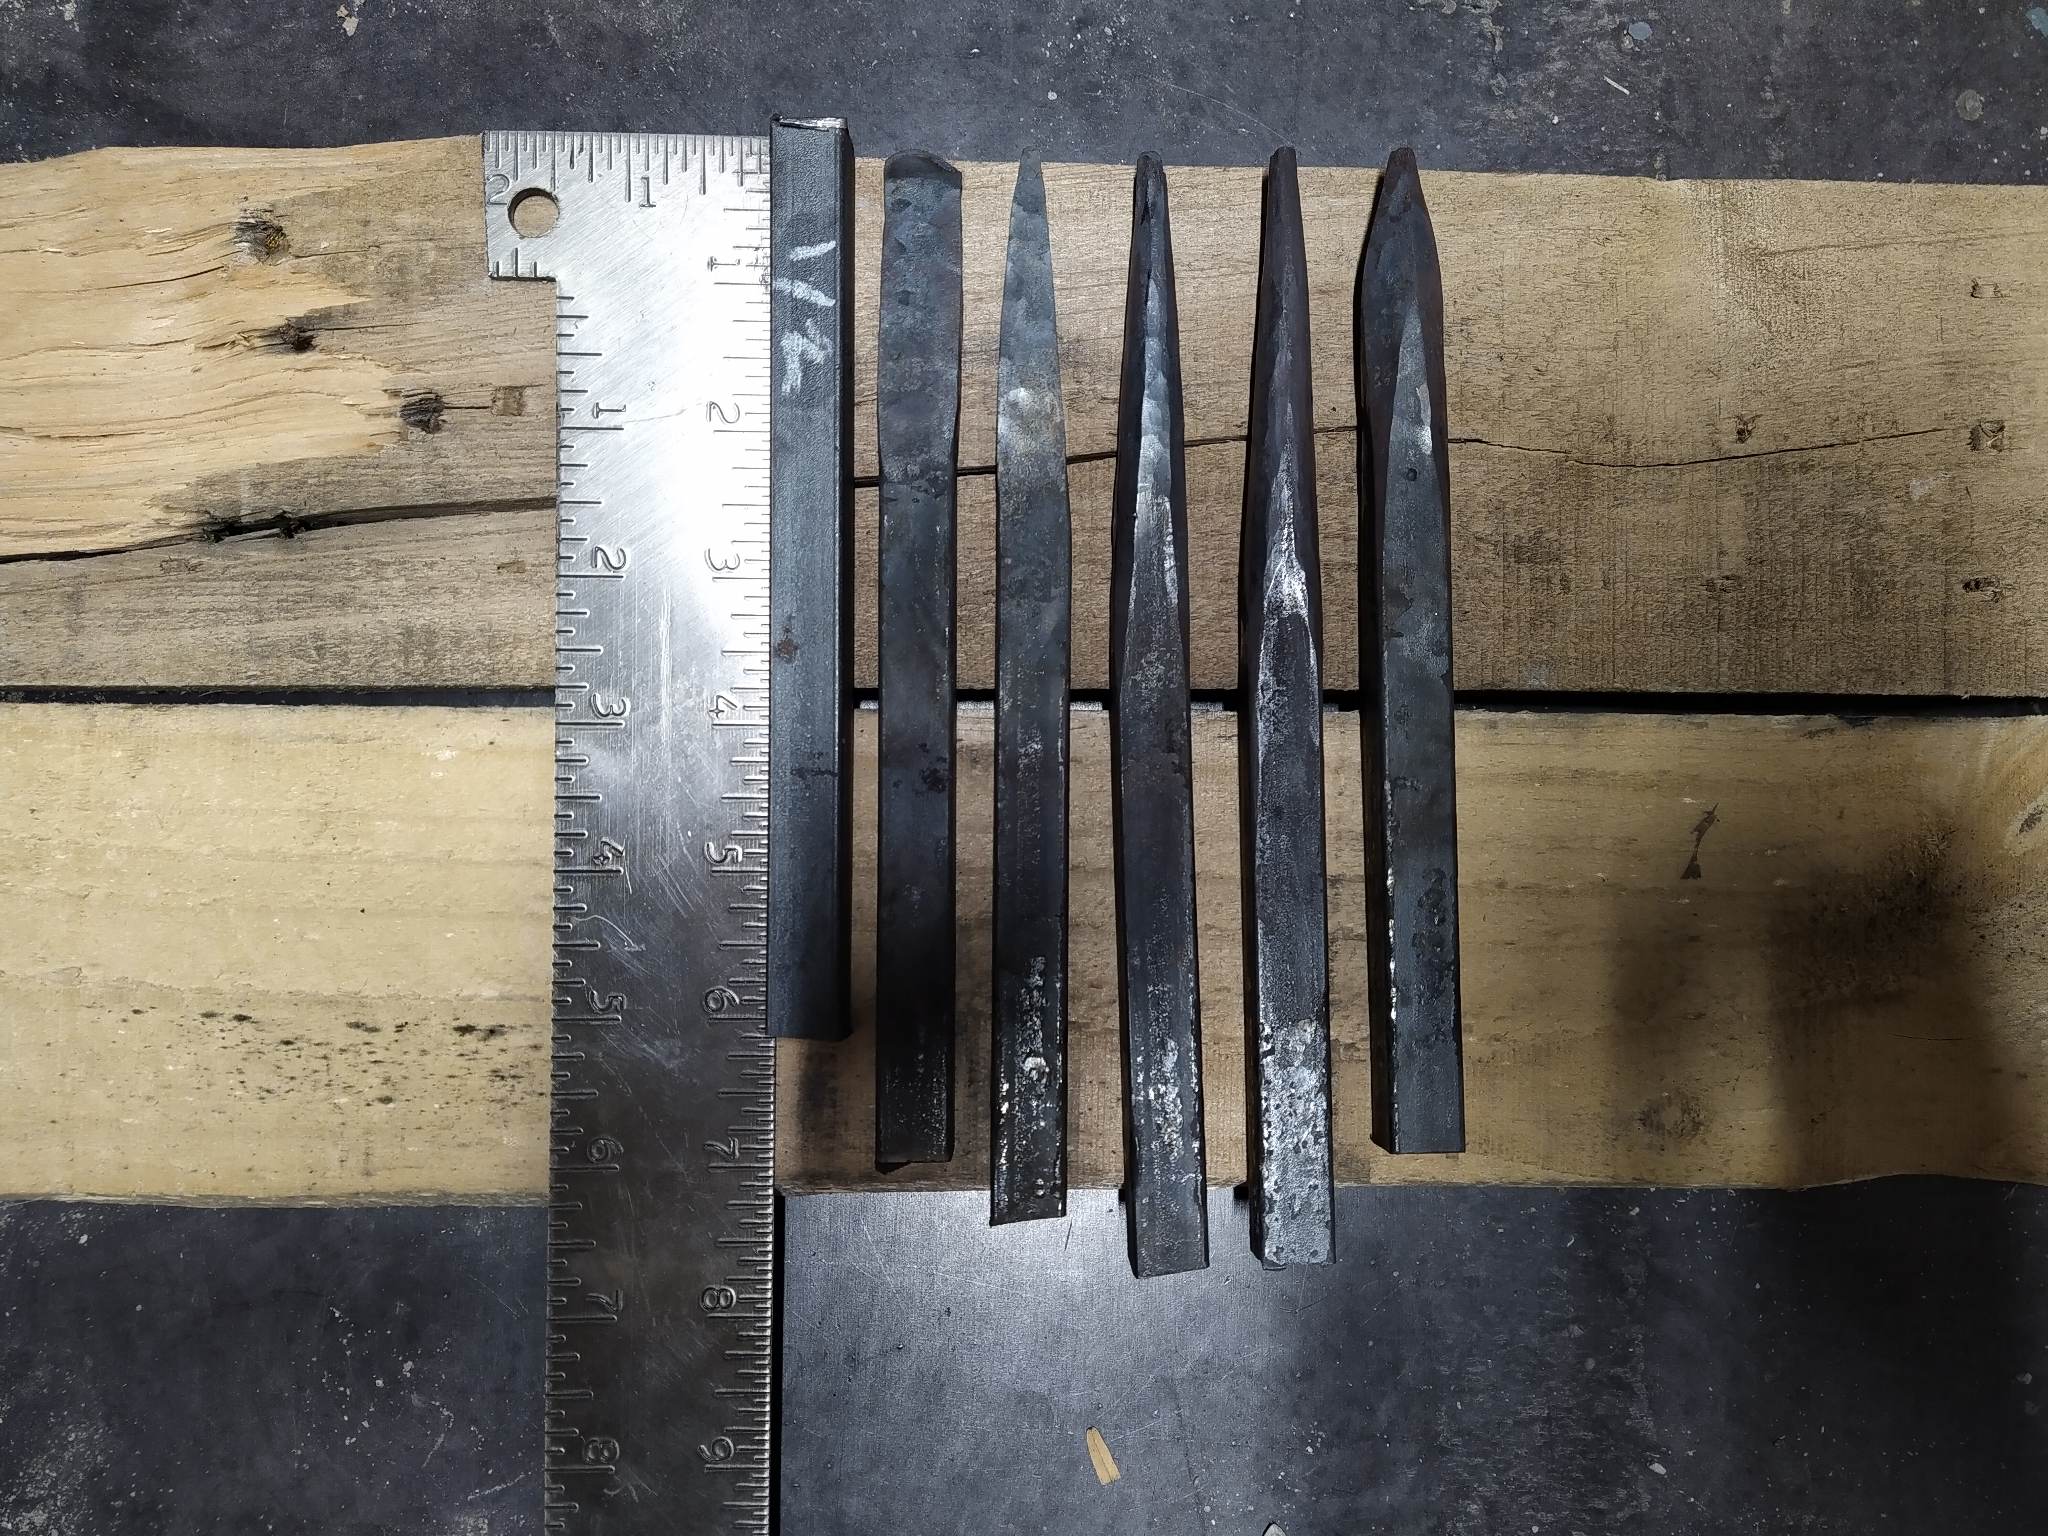
Tonight I worked on tapers for evaluation by my ABANA National Curriculum coach. From left to right: original bar, chisel taper, square taper, octagon taper, round taper, and diamond taper.
-
It does - but I have a similar memory (murder, not suicide) that took place inside an Aldi grocery store and yet I still shop there - so obviously I can't claim it's the memory that kept me from fishing, LOL!
-
What did you do in the shop today?
Shainarue replied to Mark Ling's topic in Blacksmithing, General Discussion
Those are going to be beautiful Chad. Looking forward to seeing them finished. Look kind of like the Cymbidium orchid but without the middle part ... I know there are many varieties of orchids though. My first step whenever trying to create a thing that exists in the world is to see if I can find a paper pattern for it. People make all sorts of things out of paper (especially flowers) and it looks like it would translate easily into sheet metal or forged metal. -
Our parents took us fishing a few times each summer when we were kids. I don't remember ever catching anything but my parents tell me I did. I took myself fishing only once as an adult - brought my little brother to fish at the Missouri River where we witnessed the aftermath of an apparent suicide before authorities had been notified. I'm not gonna pretend that it was that incident that stopped me from fishing - it wasn't - it just happens to be my last memory of going. My little brother is still a very active fisherman and he's gotten his daughter into it as well. Gee, most times she's dragging him out there rather than the other way around! Once in awhile, he'll take one of the nieces or nephews to try to get them into the hobby as well. It never really caught on with the rest of us siblings so he's it, lol. I should try to get up there and go with him sometime. He's got a few holes nearby his place that he frequents.
-
The 2nd from left and the one on the far right could be dual-function openers. The bottle opener, of course - and the flat tab can open can tabs!
-
I received an email awhile back from abana along with the materials & supplies lists. Maybe last month? I received another email today from the instructor for scheduling group coaching sessions between zoom lessons.
-
I will be! My instructor is Otto Engel. I think I'll only see you if you have the same instructor.
-
What did you do in the shop today?
Shainarue replied to Mark Ling's topic in Blacksmithing, General Discussion
Thanks Frosty. The bar with feet on both ends is 6" without the feet. I like your idea of three pivots as well. I'll add that to my notes! My friend said she wouldn't normally carry larger than a 6" pot so that's where I started with the size. -
What did you do in the shop today?
Shainarue replied to Mark Ling's topic in Blacksmithing, General Discussion
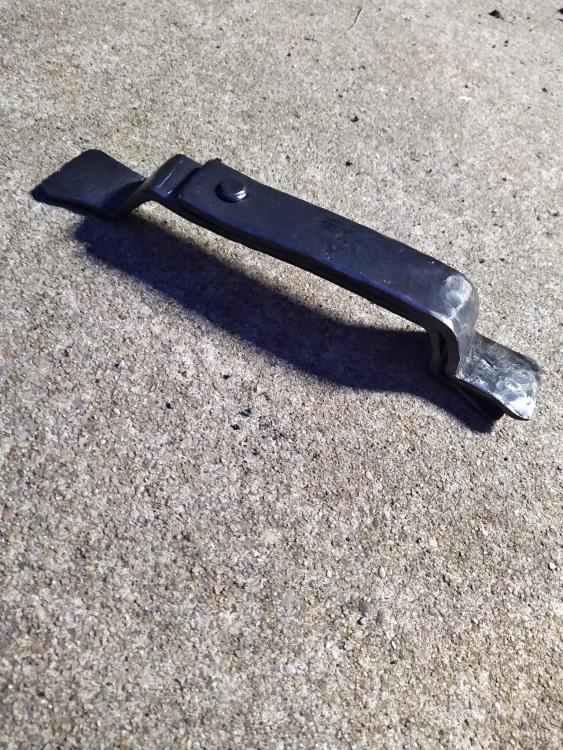
I like the adjustable trivet idea! Ik not checking for math though, my math skills are pretty atrocious, lol I made a backpacker's trivet for the trade item at this Saturday's local blacksmith meeting. It collapses into one piece for packing. If just heating/holding a small cup, then don't open it far. If heating/holding a skillet then open it all the way. I'd make a few changes if I did it again but I think it's pretty cool! received_3535037490061472.mp4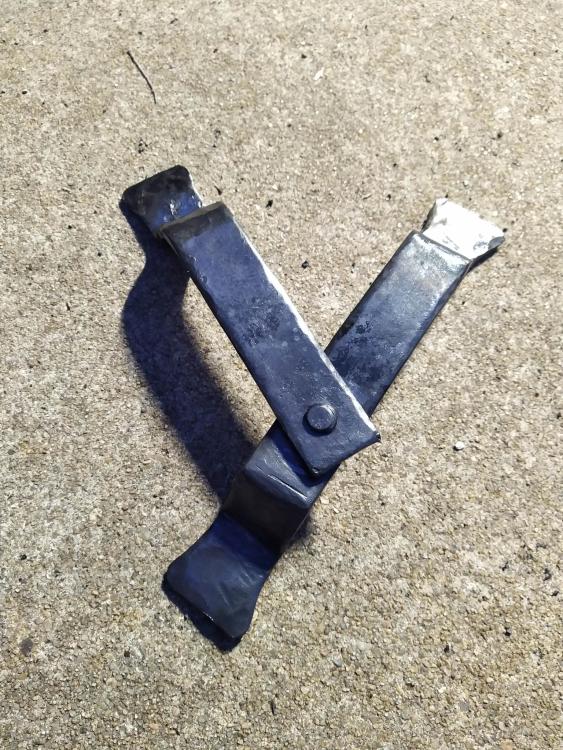
-
How long is "a while" though? lol - I feel like I'm in there at least once a month for some consumable bit or other. JHCC I'm totally jelly over that shelf! That's what Ashley wants in the basement to hold her fiber bins for dyeing. We've bought one so far. They're xxxxxxxx expensive!