twigg
-
Posts
205 -
Joined
-
Last visited
Content Type
Profiles
Forums
Articles
Gallery
Downloads
Events
Everything posted by twigg
-

A work from Alfred Habermann - How does it hold together
twigg replied to LeMarechal's topic in Historical Ironwork
LeMarechal, sorry I think I misunderstood the point of your calculations the first time around. I see what you mean now. I agree with Frosty that swaging/crimping the collars with a punch sounds most reasonable, and agrees with your first set of photos. Hard to tell if the welds shown in your second set of photos was part of the alignment process or a fix. -
A work from Alfred Habermann - How does it hold together
twigg replied to LeMarechal's topic in Historical Ironwork
1/64" is too much shrinkage for an interference fit. IIRC it only takes a few thousandths to get a snug fit with steel on steel. I don't know how this gate was assembled but I wouldn't call heat shrinking implausible. I've seen people hot fit bearings with a toaster oven. If anything a forge is probably overkill. I agree on the difficulty of alignment, but that problem applies to every method not just hot fitting. -
Sorry I've been meaning to get back to this thread. Wirerabbit, I just used a hardware store handle on my 16oz cross peen, I think the width of the wedge was about 1/8th" or so? It was loose after wooden wedge + linseed oil, so I sank a metal wedge at a 45 degree. It didn't split this time... yet. I think I've isolated the issue to my shaping of the insert. rustyanchor, I appreciate the offer, but I think I'm set. I hope your pines make it through! Rockstar, thank for all that info, it's very helpful. I think my current handles are flawed, but it's been too long since I've gotten to the forge, so I'm gonna use them while they last. I might fix my rounding hammer while I finish lining my forge. I think what rockstar was saying about eyes being asymmetrical was what made my 16oz cross peen handle loose this time. I think I flipped the orientation and it suddenly "shrunk". I'll pay more attention for the rounding hammer tomorrow.
-
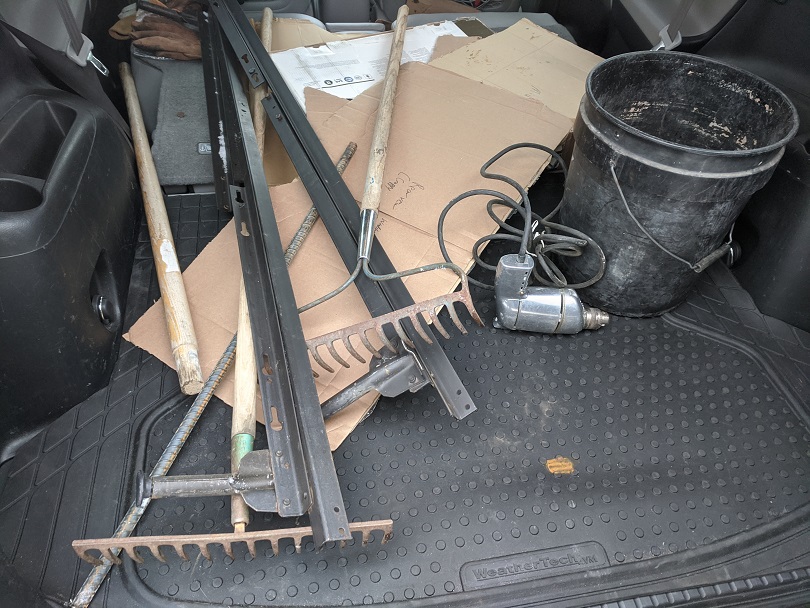
I ordered myself a bunch of goodies arriving soon. Got these from the scrapyard The drill has a broken trigger switch, and the internal spring has long since sproinged into the abyss so it sticks in the on position. Just for tinkering with. Rakes for tool hangers, per Thomas's suggestion. Bed frame for general construction. Haven't spark tested it yet, but good chance it could be quenchable. Some handle material (not for hammers), and a 5 gal.
-
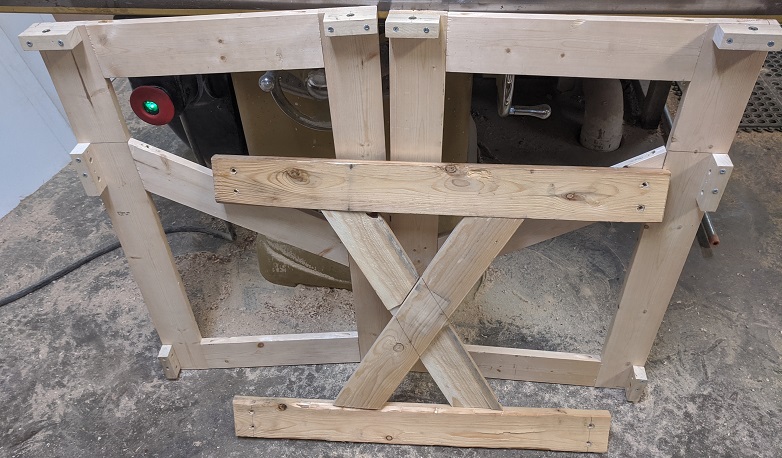
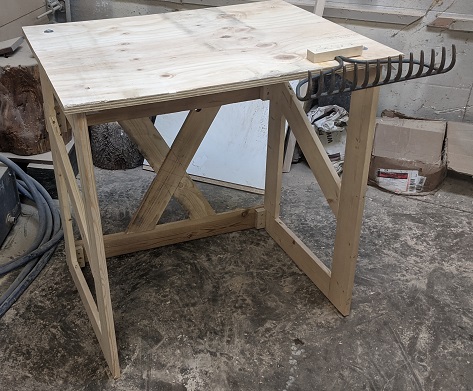
I got some building materials from a reuse place around here and finished the breakdown table. I threw on a garden rake head for a tongs rack (thanks Thomas!). I have some sheet metal and hard firebricks for insulating, airgaps, etc to go under the forge. New forge just needs a little more refractory to stiffen it up and some itc-100. Almost there. It's surprisingly sturdy when assembled. The sides alone can hold my weight. The back frame was a little fragile with only pocket screws so I added some wood gussets after these photos. Not very pretty but I think it'll be quite useful.

-
Thanks for the info rockstar! Next time I'm headed up north I'll definitely stop there. I already started my own build for this project. Should be finished later today.
-
That bench looks awesome. Those dolly's are gonna get a proper workout! Those narrow blocks in the video make me a little nervous though. The wood bench in the video is probably 20 times lighter than your steel bench. If all 200kg slip off and comes down on those steel feet, I can't imagine that'll do nice things to your shop floor. The weight might keep the bench stable when it's already up on the blocks, but it's the raising and lowering that seem a little sketchy to me. What's wrong with a pallet jack?
-
What did you do in the shop today?
twigg replied to Mark Ling's topic in Blacksmithing, General Discussion
Thomas, thanks for the tip! I could definitely use one of those for tin snips. I fitted a handle to a corkscrew I botched (it's a lefty tighty). Just a branch I found on the driveway. Other than that just lining the new forge and failing at woodworking.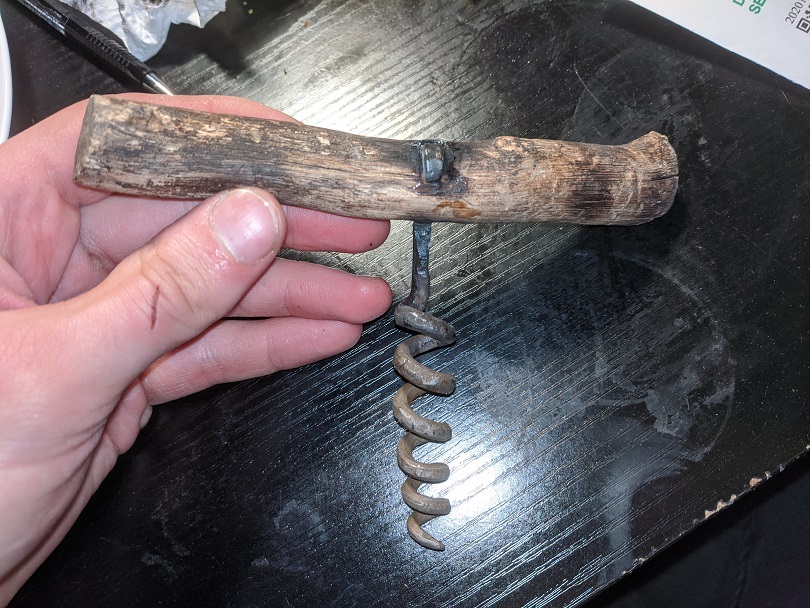
-
What did you do in the shop today?
twigg replied to Mark Ling's topic in Blacksmithing, General Discussion
Das, that sure looks like oak. Looks great! I love that sodablasted finish. Got all my stuff together and moved into storage. Most organized my tools have ever been. The devil on my shoulder is telling me to get more toolboxes I feel like I know how this story ends... Also plasma cut exhausts and drilled a burner hole in my new forge shell. Starting the insulation and refractory tomorrow. No forging til that's done.
-
Thanks for all the great ideas. I found a bunch of plywood sawdrops in my landlord's trash bin, benefits of sharing space. Once I get the green light from him I'm thinking of using the two sawhorses or sawhorse-like frames like Thomas was saying with a hinged tabletop like frosty was saying.
-
Opinions needed on what steel I may have here
twigg replied to Valeas's topic in Blacksmithing, General Discussion
Some of those rod drop offs look much less rusty than others. Did you check them with a magnet for stainless? -
Thanks Frosty! That helps a bunch Actually, 24" x 36" was the dimensions I was hoping for I just didn't know they were made in that size. I've only seen the 3' squares before. I hear you on the serving carts, but I've lugged awkward stuff up those stairs and nearly wiped out on ice a few times. I was thinking folding tables because with a handle they can be a one handed lift and that lets me hold a railing. I'll keep an eye out for one of those stainless folding tables with the local restaurants. The breakdown table sounds pretty appealing, but a folding table would be easier to store.
-
You've convinced me. Yeah I better revisit the What not to scrounge list. George, I vaguely remember hearing about Rocky Mountain Smiths. I haven't been reaching out to society much with covid and struggling with 2020 in general. Funnily enough I drove through Laramie last week. I'd be happy to visit once we get rid of the 'vid.
-
Yeah, I think they are chromed. Can the coating be removed with vinegar like for galvanized? I do hear you though. It started sinking in as I was writing. I hope I didn't get all excited over a couple paperweights.
-
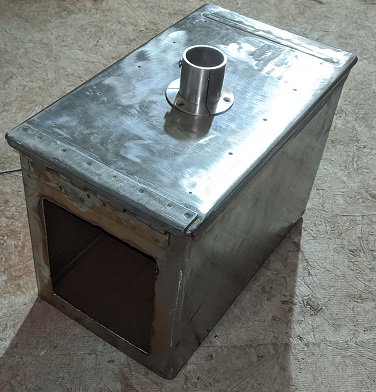
Hey all, I need some design/safety advice and a sanity check. I know the title sounds a little sketchy, so let me explain. I mooch shop space off my landlord. He's cool so long as I don't get in the way. I have a rail anvil on rectractable casters and a wire shelf on casters. My gas forge lives on the shelf on a bed of hard refractory bricks. The shelf is starting to get in the way and I want to move it into storage before it becomes an issue. For me, storage is up an outdoor spiral staircase. I weigh about 140. Point is, if I want to do away with the shelf I need to be able to move the new work surface up a spiral staircase in the dark. I'm planning to build a smaller gas forge out of a 50cal ammo box to accommodate that. I just need a work surface. Ideally, I'd like a 3' x 3' all steel folding table, but I doubt that exists on the consumer market and if I fabricate it I doubt it'll fold nicely (I forsee many pieces of sheet metal banana'd by my lack of welding skills). Next best thing would be one of those steel framed, synthetic material topped 3' x 3' tables, rip out the synthetic top and rivet or tack sheet metal on top (or perforated sheet for weight savings). The issue I see is safety. One good hip check and the forge and burner go all free willy. Even if I fasten the forge to the table top, the folding legs could still fail on being bumped. Do you have any suggestions here? Is there a better way?
-
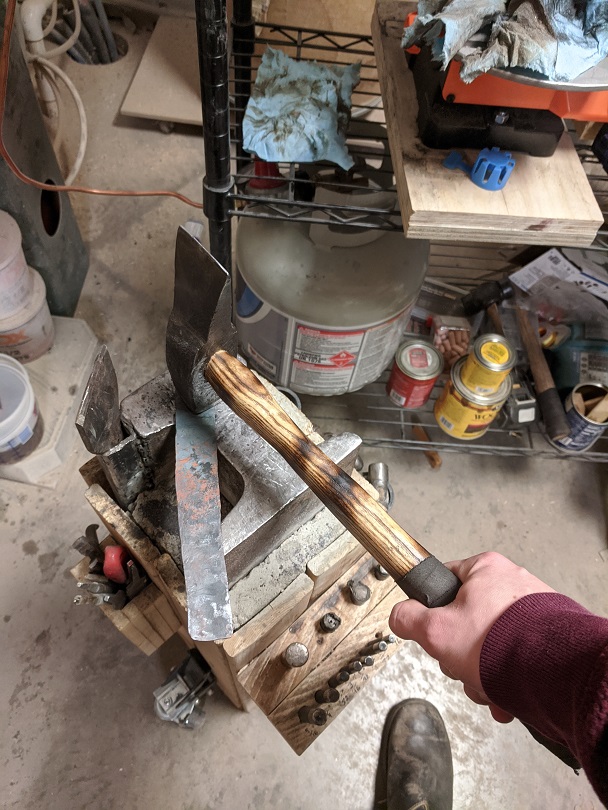
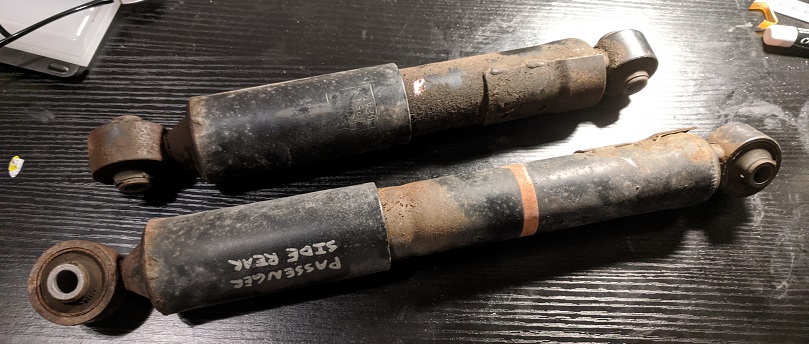
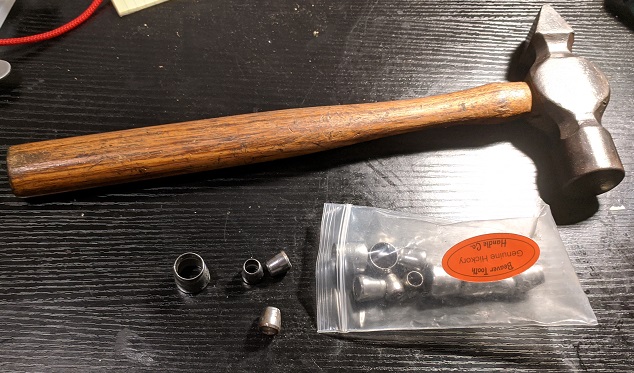
Back from my trip with some goodies. Someone riding in my car asked me "Why does your toyota rav4 drive like a chevy truck?". Turns out both rear struts failed (oops ). Got them replaced and kept the busted ones for projects. Specifically, hoping to use the rods inside as round stock and the exterior for flat stock. Just enough steel to mess around with I'm hoping, though it is a heck of a lot of hassle to get to it. I know not to try and heat these with the gas inside. I'm still brainstorming through the right way to disassemble these. Anyone know what ballpark pressure of nitrogen I can expect inside at room temperature? Can I drill a vent hole then cut an end off? The passenger side one sticks, it doesn't pull back if you extend it, so I think the oil leaked out. And mail call from while I was away: Got myself a secondhand 2lb cross peen with a larger radius peen for texturing big leaves. When I tried a leaf with my other cross peens I kept leaving narrow lines because the peens were very tightly radius'd when I was trying to make ripples. I'm excited about this hammer. It's a nice weight in my hands. Also got myself some round hammer wedges, at BillyBones and others' recommendation. The hammer rattled out of the box, so I put a wedge in, and the force required to sink a wedge pushed the handle out of the eye by 3/8". I'll have to file a sharper edge on them. Also disappointed they don't have the barbs. I think I done goofed up.
-
Lol! That's one I can fix
-
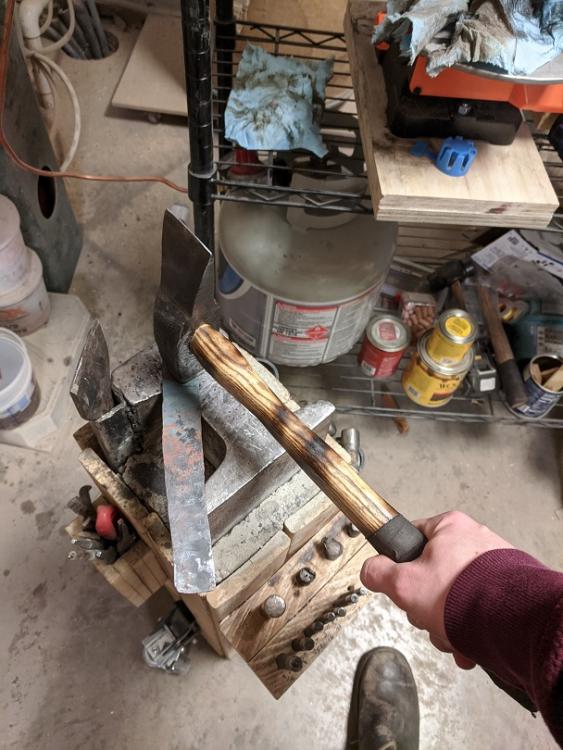
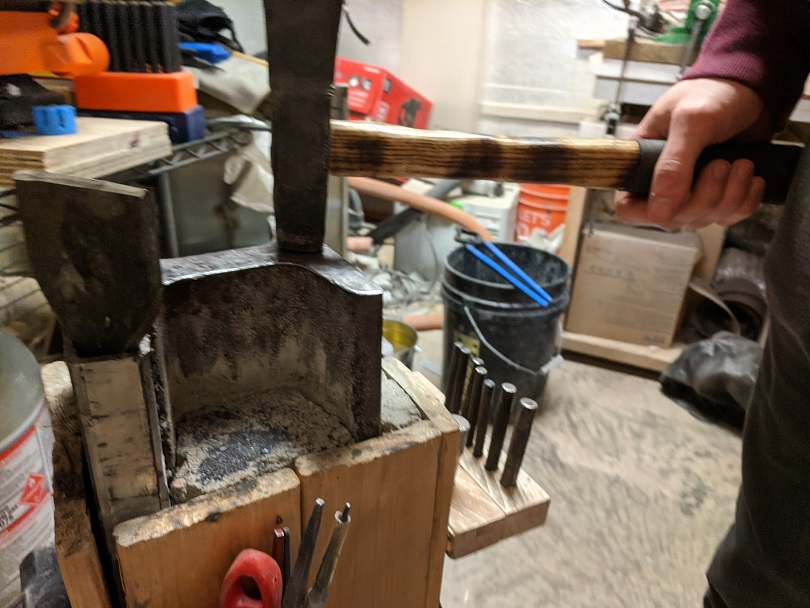
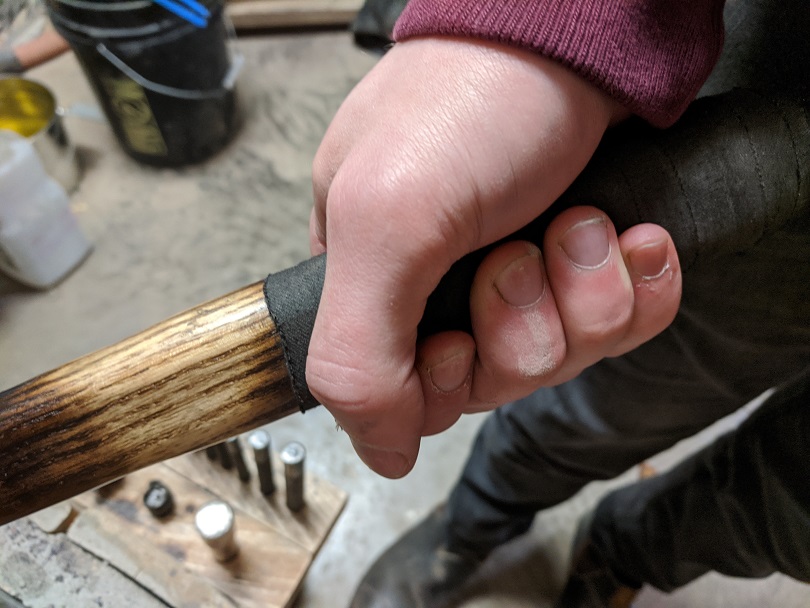
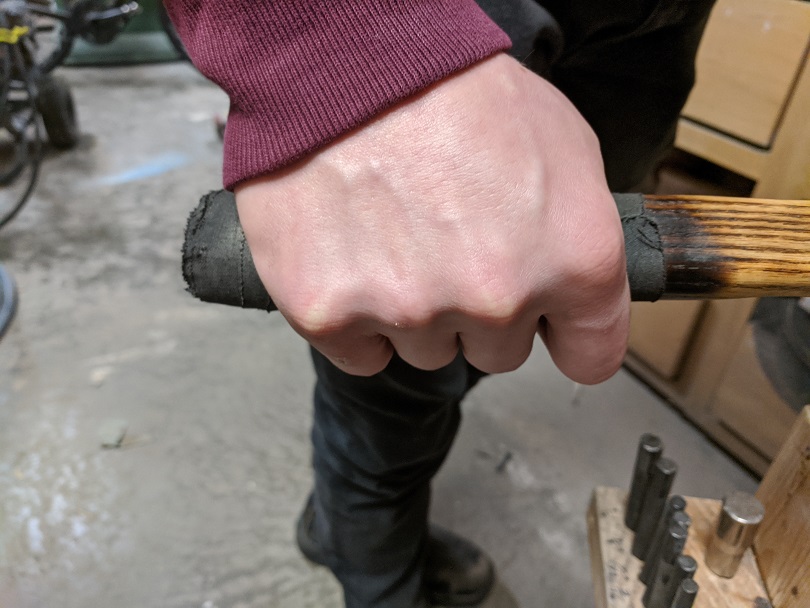
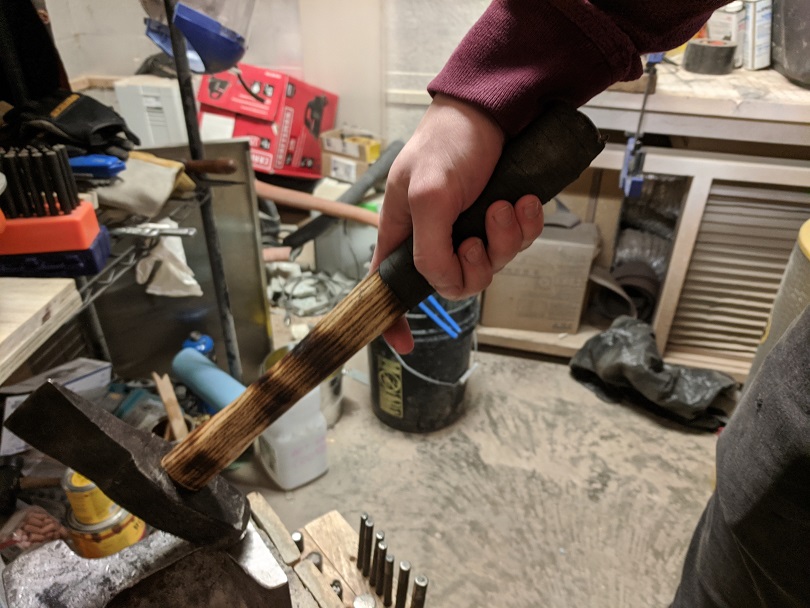
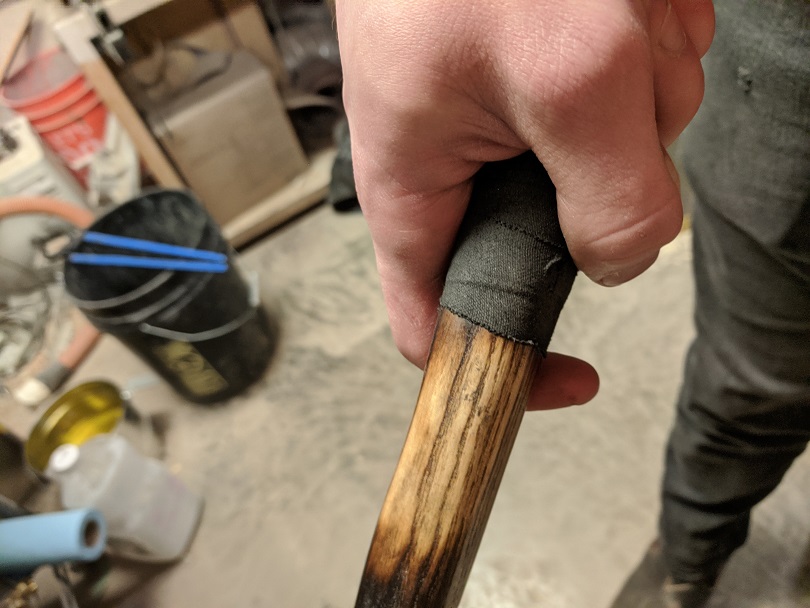
Just kidding, got time to a squeeze in a reaaal quick post. Most of what I did recently was kitchen knives. Included an unfinished blank with the next photo showing my basic grip (no tongs because one hand for the camera!). Side views of my grip: I change grips when raising (not swinging down, that has the same grip as above) a hammer that's more than 2lbs: Sorry I know that's a lot of uncropped photos. I resized them as quickly as I could. Going on a trip. The hammer used wasn't this hammer in the grip photos. The hammer I use 80% of the time is the rounding hammer I snapped. Same grip, but I don't change grips when lifting the rounding hammer.
-
I won't be able to follow up until mid next week, but I'll be sure to do so.
-
Glenn, I think you're right that I am rough on my hammers due to poor technique. I am actively working to improve my form. I can almost control a 2lb hammer these days without gripping it. But this hammer head was loose from the moment I put that handle on, so I think this was a case of poor assembly on my part rather than abuse. I will still follow your suggestion! BillyBones, it's possible but the last few weeks my swing been not bad accuracy-wise. I did let a friend use the hammer though, and he was all over the place. Snapped my punch rack off the anvil stand with a miss . Best I could do was keep him from putting hot steel down on my landlord's jointer. But one thing you said that I forgot to mention was that this hammer was loosey-goosey from the time I assembled it. It would creep up the eye insert by about 3/16" or so. I never fixed it because I got frustrated and wanted to move on. Whoops. Probably not a coincidence that the split started inside the eye. Frosty, I hear you loud and clear. With this handle broken, only one of my hammers still has a handle made out of that tamper, a 2.5lb hot-cut cross peen that doesn't see a whole lot of use. Once I get my hands on materials I'll pre-emptively replace that one too. Thanks for the info on sharp corners. I'll take the time to hit the inside corners with needle files going forward.
-
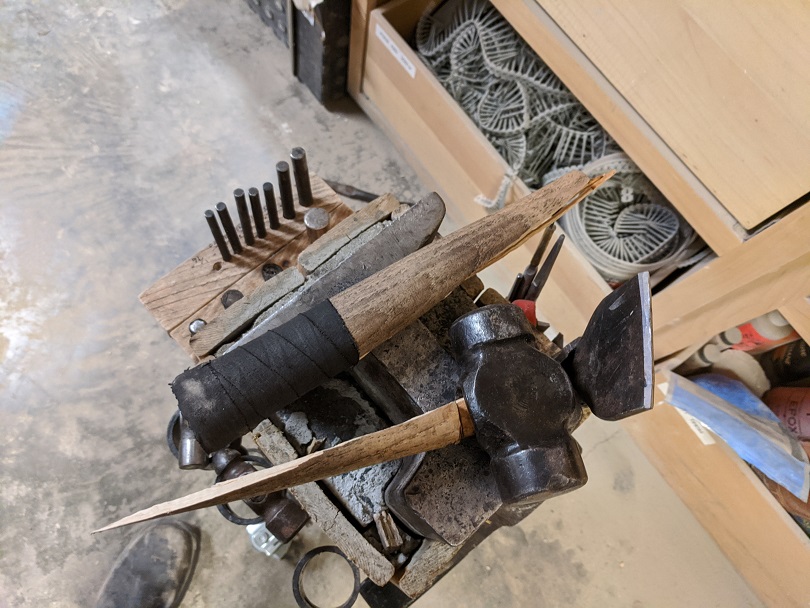
Guess what I broke this time! Another handle I made last year from the same concrete tamper! Who'da thunk! Cracked start all the way inside the eye, followed the grain, and split the handle. I may not be doing too well in the forging department but I'm getting really good at making wooden shivs Going to start seriously looking for material after Thanksgiving.
-
I'm familiar with the combustion risks for linseed oil soaked rags. Made that mistake once with lacquer thinner when I worked for a GC right out of high school. I was mostly bummed about oil finishing just because it takes forever and a half, no other reason. I did not know that about King Tut! That's pretty cool. Glenn and BillyBones, I'm really starting to appreciate the value in the time and hassle savings. Thank you both.
-
What did you do in the shop today?
twigg replied to Mark Ling's topic in Blacksmithing, General Discussion
That sunflower hanger looks really good. Corkscrew, take 2 over here. At least this time it's right tighty and there's no cracks. I'm gonna start again to get a more uniform twist and a more leaf-y leaf. Need more practice. I'd like to get the screw more uniform but I'm running out of tricks to do so. I've been using a chisel to try and pry the turns to the right spacing, but then I wind up with some turns steeper than others. I may just need to go at it with some good pliers this time.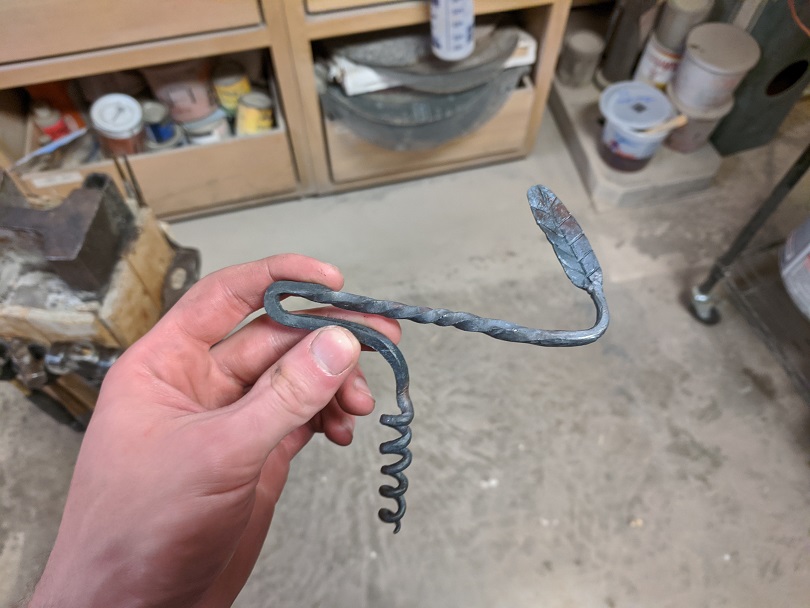
-
Thomas, I hadn't thought of it that way before. I'll definitely get in touch with the tree services folks. Thanks! What do you do as far as drying? Last thing I want is to feel a creepy crawly on my hammer hand I asked around and all the city's ash trees got taken out recently because the emerald ash borer came to town. If the city wasn't in shambles because of covid I would head to the municipal landfills and see what I could scrounge. Definitely something I'll keep an eye out for in the future. BillyBones, I keep hearing people highly recommend these round steel wedges but I can't find them at any of the local stores. I'm ordering a batch off the ebays for future use. Frosty, I've been leaving the transition pretty square, with about 1/16th to 1/8th-ish of a flat surface under the eye. Too much? Also, if the oil is to expand the wood, then that rules out any hope of a water-based, shellac, or lacquer process. Shucks. I'll probably end up buying a hickory board like you did unless I get lucky and find reclaimed materials. I got myself a hardware store handle, fit it up better on the sander, and used that today. The handle was pre-slotted, and they did a very sloppy job. I probably should have cut off the pre-shaped insert but too late now I put the wooden wedge in with glue. It's sitting in the linseed and mineral spirits now. Thanks all!
-
Thanks all for the replies, learned a bunch. So, from the sounds of things, I need to get my hands on some better materials, for starters. Irondragon, baseball bats were a great idea but I checked the old craigslist in my area and everyone's got aluminum bats, and I don't think there are going to be many yard sales what with 1 in 10 people having the rona around here. Maybe when it gets warmer I can try that. I do have an old maul, might chop that up if I have no better options. I checked my wood scraps and the only pieces I have big enough for handles are brittle hardwoods with flaws. I may just end up buying handles from the hardware store for now. If they last it'll be worth the money. Thomas, I'll be sure to look at the grain, thanks for the tip. To clarify, I'm looking for ones where the grain doesn't end on the side of the handle, right? I want it to go through from end to end, right? I would love to work with local wood but I live in an urban area. There's some wood I think I can legally salvage but not many opportunities overall. As far as construction, I think I'll take to heart what you're saying about glue and finishes, Glenn. I was hoping to avoid doing a true thorough oil finish (I have no patience haha), but I'm more sick of having to replace hammer handles now. That being said, there's no chance of a water based lacquer or shellac version of this treatment, is there? Also, what does submerging the hammer accomplish? Is it to let the oil mix seep into the joint in the eye? I'll hold off on the metal wedges until I need them, as many have suggested. To clarify, when you say make a slot with a little kerf, you mean to file in a little flare to the slot, right? As far as technique, I don't think I've ever abused this 16oz because I save it for gentle persuasion tasks, but I'll be extra careful.