twigg
-
Posts
205 -
Joined
-
Last visited
Content Type
Profiles
Forums
Articles
Gallery
Downloads
Events
Everything posted by twigg
-
You're probably right, the motor was probably over-spec'd for the job and never really pulled 16A. I guess I'm not used to seeing things overbuilt these days lol. Usually it's the other way around! That AC speed controller you mentioned won't work. Do you still have the treadmill's original controller circuit board? Even pictures of it would be helpful. I hate to say it but if it's brushless like you said, then it's a paper weight without the original controller. You could get a new motor easily for the cost of replacing that circuit. Even if it isn't working, repairing and/or modifying that board is your best bet. Building a new controller is possible I think, but you'd be in it for the adventure, not for the economics. If you are keen on doing it yourself, I might be able to help you out with parts or test equipment. At the jankiest end of possibilities, maybe if you had a golf cart motor controller lying around?? Maybe??? You'd still need the batteries or a big rectifier circuit.
-
I was in the midst of writing a response when I saw your post and now it's all out the window I got very confused seeing the 3750 RPMs until I read the DC part Dang, I would have loved to see the rest of the electronics in that treadmill. It seems to a dummy like me like the manufacturers did everything the hardest possible way! Rectification losses and speed control? Yikes. Power company's best friends. They must've had some monster MOSFETs in there somewhere for a honkin' boost converter! Just doing some maths here, there's no way that runs on a 120V / 15A household circuit. 150V at 16A? That *might* work on a dedicated 120V / 20A breaker. By my math, 150V * 16A = 20A * 120V, so it'd be real tight. Is that placard for just the motor or the whole treadmill? Cause if it's for just the motor, I'm even more confused, because when you add in the power lost in rectification and the power consumed by the speed controller, it goes over a 20A circuit breaker. I guess if you're hardcore and run too fast, you trip the breaker?? Lol talk about making the customer feel like a champ. Outrunning the power grid!
-

What did you do in the shop today?
twigg replied to Mark Ling's topic in Blacksmithing, General Discussion
JHCC, looking good! I like the switch box to keep out the dust. -
What did you do in the shop today?
twigg replied to Mark Ling's topic in Blacksmithing, General Discussion
Chimaera, I use the corners of my vertically-mounted rail anvil for bending and they only bummer is the low clearance for big parts. I hold the part against the side of the anvil and swing the hammer sideways into it. You can get any radius of curve bigger than or equal to the smallest radius of whatever you're hitting on. I made a hardy tool out of a bull pin, but I never wound up using it. Too wobbly. -
I feel like a bit of a dope that I didn't think of building a motor enclosure. Good idea Paul! I'd love to see what you come up with. I think in your case the stars are aligning towards a belt grinder or band saw. One other thing to check is whether or not that speed controller can handle 2.5hp of oomph. I don't think I've ever seen one that big for 120V-to-120V controllers.
-
Short version: if you copied the forge in that picture, you'd be fine 2ft away even with no board. How far you want the forge from the wall depends on how well the flame circulates before exhausting. In my helium tank forge you could safely put it 2 feet from a wall because it didn't leak flame much. In my horizontal ammo box forge, it made a piece of duct 1 ft away horizontally and 2.5ft away vertically too hot to touch because the flame doesn't "swirl" well inside the forge and just goes right out the door. After forge geometry what matters next most for flame "swirl" is burner angle. If you follow the approximate angle of that example pic, you'll be fine. That's very similar to my helium tank forge. Best tip I can give you is if you use a helium tank, when you cut the ends off take the time to keep your cut line straight. It'll worth the hassle when you go to reassemble. Ask me how I know As far as dimensions, I've never worked on a knife that was too big for a helium tank forge. My doors sucked so I had trouble getting curvy shapes in and out but I never ran into a size issue. With those hinged doors in the pic, that forge will feel roomy for knife making.
-
I'm gonna guess it's not totally enclosed since it came off an indoor appliance. Not ideal for a belt grinder. As far as a power hammer, I think you'd need a very large gear reduction to get the beats-per-minute to a reasonable level from 3500 RPM (to get it to 2 beats per second you'd need a reduction of 1:29). One of the people here who actually use/build power hammers should correct me if I'm wrong. I'm guessing that for power hammers most people would opt for a motor with more poles / lower speed. If I recall correctly, induction motors' torque drops off at low speed, so the speed controller you salvaged won't help you for a power hammer. That being said, maybe this motor is such overkill at 2.5 hp that you could find a happy middle ground with some electrical speed reduction and some mechanical speed reduction. I dunno! I was in your shoes a week ago or so with a motor I got from the scrapyard. After a week of sifting through belt grinder and power hammer build designs, it's still sitting on my shelf taking up space for the same two reasons: not enclosed and too fast. I like the bandsaw idea! With the variable speed control, if you built the frame stiff, you could cut wood or metal. Still not ideal because it's not enclosed from dust, but there's no way around that. I like the garden gnome artillery too. You just need a big flywheel and a dog clutch... Like a flywheel punch press but for sending gnomes at escape velocity! Edit: out of curiosity, how many input amps is the motor rated for? Just curious because my 1 HP, 3450 RPM motor is rated for 17.8A, which will (eventually) throw a 15A household breaker. Mine could just have a crudtastic power factor.
-
What did you do in the shop today?
twigg replied to Mark Ling's topic in Blacksmithing, General Discussion
Billy Bones, I swear every time I drive around Denver I have to go out of my lane to avoid a modified pickup parked on the side of the road. Forget the cars, you'd be diverting pedestrians! A little test to see who's paying attention and who's buried in their phone Finally got space to forge in tonight! I fixed up a corkscrew I done goofed. By "fixed up" I of course mean "made my mistakes look slightly more intentional". Wasn't happy about the twist but eh, next time. Started a set of coat hooks with a test piece, but I snapped the bracket off by mistake (I was holding the cold bracket with the tongs while drawing out the hook. D'oh!) Take #2 coming soon. Been reading about the physics of open die forging. I'm resuming graduate studies in a couple weeks, so just trying to clear out the cobwebs in the old noggin. I'll say I haven't gotten far but it's interesting to think about the importance of friction in the process. Never would've guessed.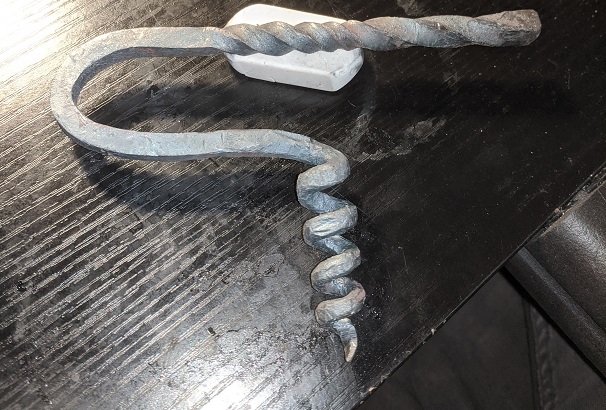
-
What did you do in the shop today?
twigg replied to Mark Ling's topic in Blacksmithing, General Discussion
Chimaera, I made an A2 center punch recently. It wasn't awful but it wasn't as easy to move as 1018 for me, and I did wind up with a long surface crack. Have you taken the scale off your chisel yet? The cracks could be waiting to surprise you. The air quench didn't get it very hard for me, but that may be because I'm at 5500ft elevation so the air has 20% less thermal mass (computer heat sinks, air-to-water heat exchangers, and the like have to be derated at elevation, so I assume the same applies to air quenching). I didn't have to temper the striking end because I limited the heat to the punch end. I'd do the quench with a torch if you have one. -
What did you do in the shop today?
twigg replied to Mark Ling's topic in Blacksmithing, General Discussion
That looks amazing, as per usual, Alexandr! I'm no framer/engineer, but that chandelier gives a new meaning to the phrase "point load" It's so awesome that all that weight can be supported by a structure that's more glass than load bearing materials. Pretty neat! -
What did you do in the shop today?
twigg replied to Mark Ling's topic in Blacksmithing, General Discussion
Fowlife, I love the butterfly! I see what you mean about the body. Nice work! Thomas, I hear on TEFCs. I was hoping that a buffer would be a little less abusive but I hear you. Doesn't help that all the grease oozed out one of the shielded bearings. Explains the noises I heard. I'll hang onto it for now, might try to fix or replace that bearing (just for learning sake, I know it's more time than the motor's worth). -
What did you do in the shop today?
twigg replied to Mark Ling's topic in Blacksmithing, General Discussion
Just kidding! The motor lives! I made one mistake in my wiring deductions last night and wired around the thermal switch on one pole. When I ran it, that pole overheated, threw the thermal switch, and kept going! Whoops! I wired it all right this time and it ran with no issues for a full minute. It's a nice little go-go-box: 1 HP 3450 RPM single phase dual voltage ODP by Century with a 5/8 shaft. Would've been perfect if the previous owner hadn't messed around with the wiring and thrown away the plate with the wiring diagram on it. Still debating what to actually use it for It'd be a shame to fill it with dust using it for a grinder. Might make a nice buffer instead. -
What did you do in the shop today?
twigg replied to Mark Ling's topic in Blacksmithing, General Discussion
I've got an awful sense of smell, so I don't bother sniff testing stuff. It's so bad I can't always tell a propane leak. Once I opened it up (before testing) I did see a little black on the enamel on one side of the rotor. -
What did you do in the shop today?
twigg replied to Mark Ling's topic in Blacksmithing, General Discussion
That trout looks really, really good for a two day build. Nice work! No dice today, still no room to forge in. Instead I took apart my 1x30 belt sander and converted the disk sander end to a buffer wheel with an improvised arbor. Going to test it out gingerly and see how well it works when I have something worth buffing. Unfortunately, I obliterated the drive wheel of the belt grinder during disassembly. Whoops. I'm not upset because I bought this thing for $70 hoping it would last 6 months, over 16 months ago now. Definitely got my money's worth. I might be able to turn a wood drive wheel on the wood lathe, but I'd also need the left-hand threaded screw that goes with it (also obliterated). Also tested a 1 HP single phase AC motor (120V/220V) from the scrapyard. I didn't get a motor out of it, but I did get a smoke machine! To the copper scrap pile it goes. Wasn't a total loss. I learned a bit figuring out the wiring with no diagram, just eyeballs and multimeter. (It did start, it just made some lite grinding noises and started smoking, then threw the thermal switch.) -
What did you do in the shop today?
twigg replied to Mark Ling's topic in Blacksmithing, General Discussion
I feel bad for whoever's TIG machine that was, Billy. The thought of seeing two folks *trying* to figure out how to use your expensive welder... He must've blown a fuse! Didn't see your fish before Das. It looks awesome! I can't believe it's a last minute project. Are the lips a weld bead? Frosty, I hear ya on durability. I was just working with the material I had lying around. That sheet came off a warming drawer oven I took with consent from a pizza place's dumpster. I used it as a welding surface for floor welding for a while and figured it made a good fit for this table. -
What did you do in the shop today?
twigg replied to Mark Ling's topic in Blacksmithing, General Discussion
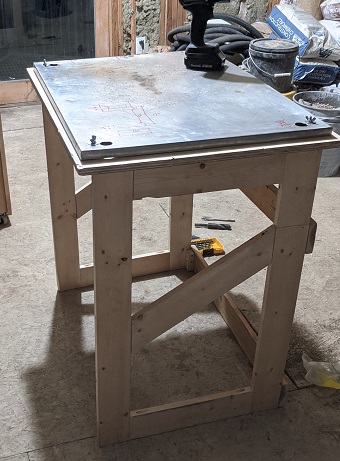
No room to set up the forge tonight in the borrowed space I work in. I spent the time upgrading my forging table, so it now requires less assembly and doubles as a poor man's welding table (welding on the floor last night was no fun!). I took off the rake-head tong rack because it was a little sketchy for something that has to be carried down stairs. It's not obvious from the photos, but that's not 1/2" thick steel plate, it's 3/32" thick sheet that's bent on the sides to 1/2". In other words, there's a 1/2" air gap between the steel top and the plywood underneath, for thermal insulation. The steel sheet never has to come off, so even if it goes the way of the potato chip it won't matter. The through holes that fasten the sheet to the plywood are countersunk on the bottom so it sits flush on the frame. Feeling pretty good about it!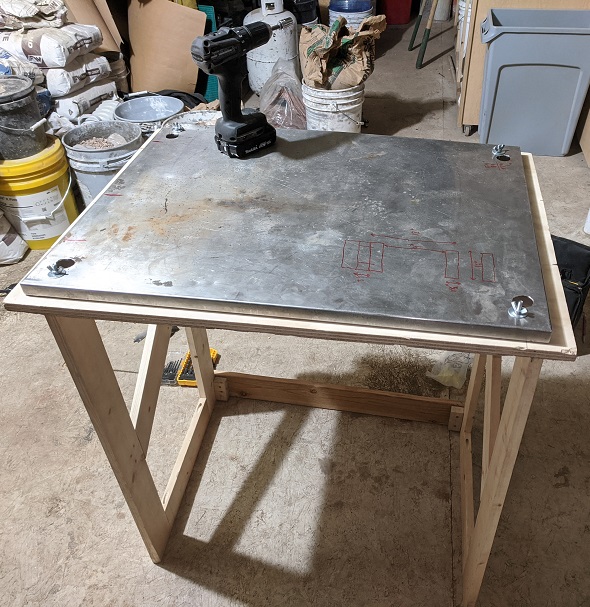
-
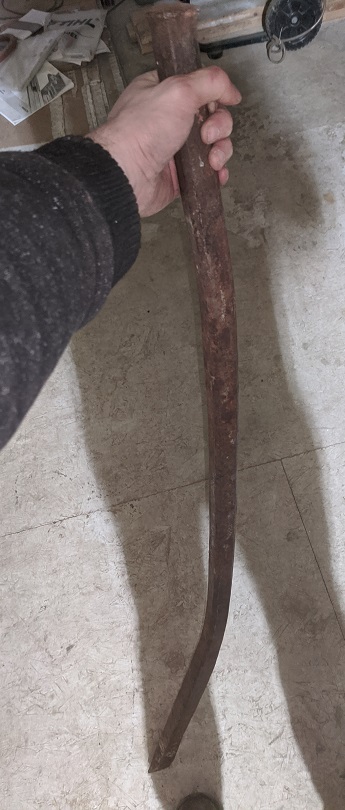
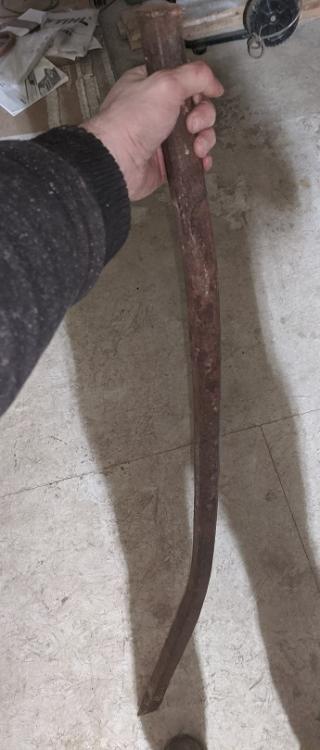
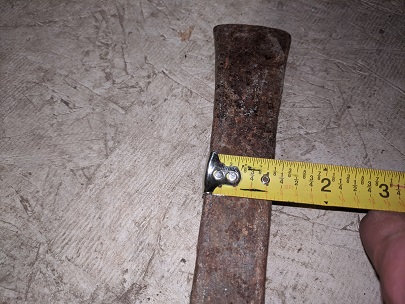
Awesome portfolio, shabumi! Your buddy is going places. JHCC, nice find! I had given up on FB marketplace because of the high asking prices compared to craigslist (at least in my area). I might have to be a little more patient. Today what followed me home is a mystery wrapped in an enigma. A 5' prybar, 1"x1" thick! (?) The special ergonomic edition for hard to reach places! What madman did this? More importantly, how?? My best guess is that someone wanted to tear down a really, REALLY sturdy post, used this prybar as a hook with chain on either end, and pulled with a truck, but the post won. Only reason I can come up with why it's bent the wrong way (you'd expect a prybar to be bent WITH the direction of the prying end, not opposite it!). If that's true, I really want to see the post that won against 1" square steel bar. On the bright side, I won't be shy for hardy tool stock for decades! I really wish I had access to a milling machine about now.
-
What did you do in the shop today?
twigg replied to Mark Ling's topic in Blacksmithing, General Discussion
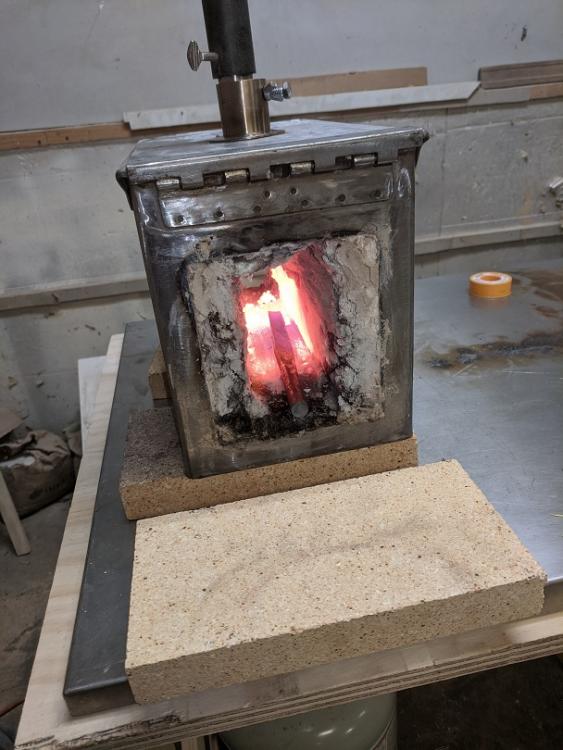
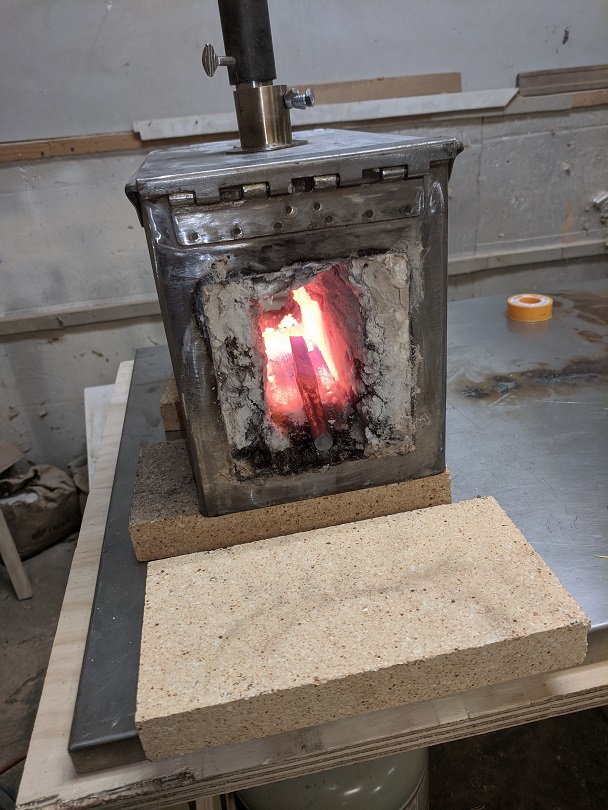
My new horizontal forge was threatening to roll off the table yesterday from the weight of the burner, so I welded some feet / brick holders for a wider base today. They also keep the refractory bricks I use as doors from falling off the table and being obliterated. Welds are real ugly but it passes a vigorous earthquake test. Only thing missing on this forge now is an emissive lining. Still putting the finishing touches on the gifts. Cutting it close!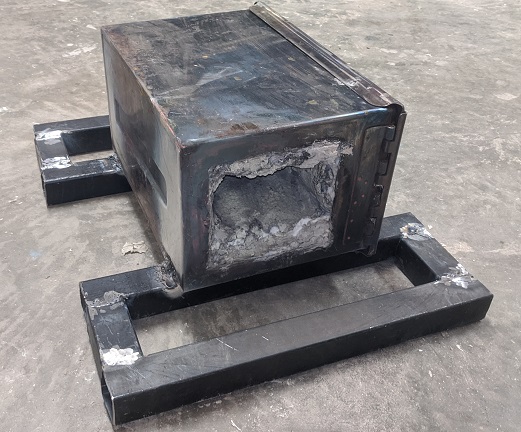
-
What did you do in the shop today?
twigg replied to Mark Ling's topic in Blacksmithing, General Discussion
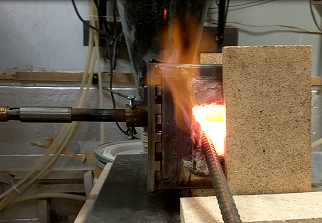
Finally got a real forging session in today. The fixes I did to the new forge's burner collar yesterday seems to have paid off. I also swapped from a 3/4" burner to a 1/2" burner. And last but not least I turned the forge on its side so now the burner is horizontal and the height is the short dimension. Rayleigh number something or other mumble mumble . Some combination of these fixes did the trick. Got the forge just hot enough to see some scale blister off the steel. Maybe after Christmas gifts are done I'll do an emissive coating. Mostly I just practiced getting my hammer control back today by banging some 1/2" rebar into 3/8" square stock. But I did finish forging an A2 center punch for a gift. A2 with barely yellow heat is not fun. I think I just have bad luck with the element chromium in general. I did manage to forge this punch nearly to shape though. Had some wobbles that had to be taken out on the angle grinder. I ran out of gas before the heat treat. Need to do some homework on A2 heat treating too. Air quenching might be complicated by elevation.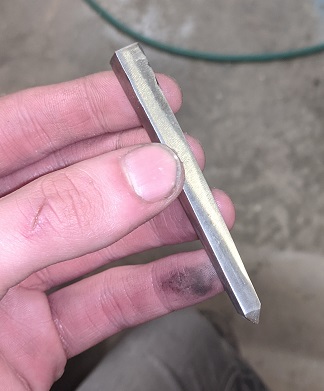
-
Just to clarify, the only reason I recommended moving your burner to the vertical was because in your drawing you had the brick floor on the bottom. If you work up a thick layer of refractory on the side wall opposite the burner port, then horizontal is better! Just make sure the propane line is out of hip-check range! As far as how much satanite you need for the side wall, I'm going to let one of the more experienced members give you that info. I did 1/2" on my last build but I haven't really stress tested it. It sounds like you used some real big pop rivets in high school. The 1/8" stainless pop rivets I use take 3 squeezes of my manual pop rivet gun, each squeeze about as much force as a manual stapler.
-
One other thing that stood out to me: the way you've angled the burner at a 45 you'll need extra satanite on the side wall opposite the burner port to protect it from the flame. Since you already included a firebrick floor in the design, I'd move the burner closer to vertical (at the expense of living with the chimney effect).
-
What's the designed width of the forge opening? Based on the scale of the drawing, it looks like 7" but also based on that scale the kaowool is only 1" thick. I think there's an inconsistency in the drawing. Do yourself a favor and use pop rivets instead of bolts, or use 2 nuts per bolt. Bolts loosen themselves when heated and cooled repeatedly (like the forge will be). The extra nut stretches the threads and locks it up. If you use pop rivets, just make sure you don't use aluminum pop rivets.
-
What did you do in the shop today?
twigg replied to Mark Ling's topic in Blacksmithing, General Discussion
Roger, looking good! Wasn't enough space in the shared shop to do any forging today, so I worked on fixing up my crudtacular new gas forge. I spent an hour or so drilling and tapping two 1/4"-20 tapped holes in the burner collar. The stainless kept work hardening on me. Eventually sacrificed a carbide burr breaking the hardened layer, switched to a twist drill bit and sat on the end of the cordless drill to bust through! Not a fun night, but it's done! -
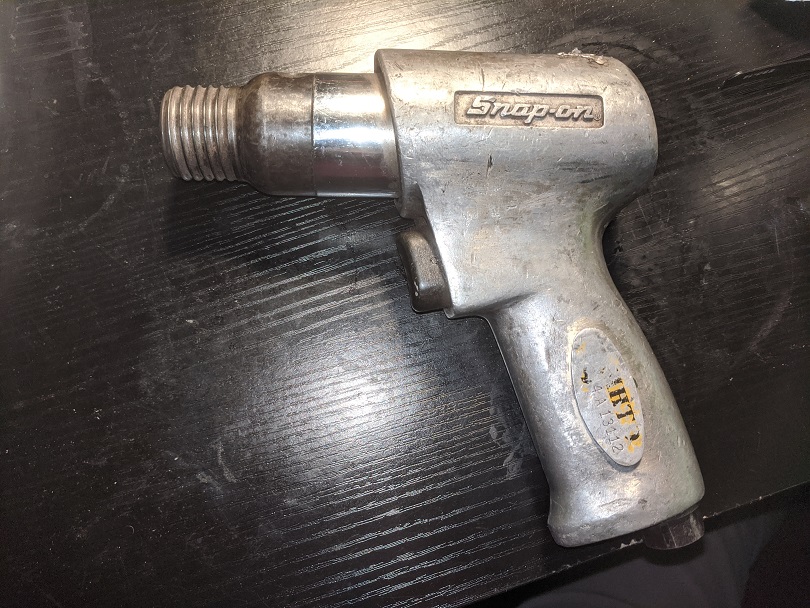
Mail call! Pint-sized percussive maintenance machine. This should be fun!
-
What did you do in the shop today?
twigg replied to Mark Ling's topic in Blacksmithing, General Discussion
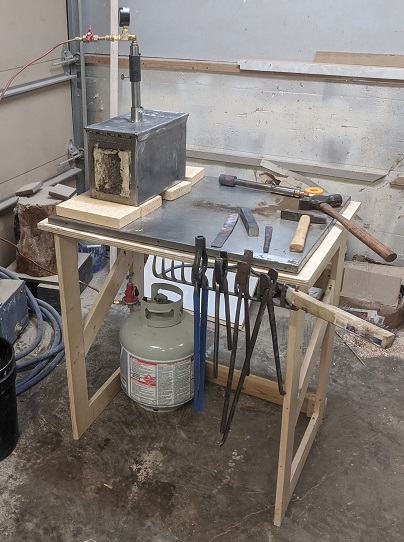
Went to line the inside of my new gas forge with itc-100, and found a solid itc-100 rock in the can. Life 1, me 0. I figured I might as well take the opportunity to fire it and see how it performs just gas-wise. Oof. Major disappointment. Definitely using my old forge to finish the Christmas gifts, if it doesn't fall apart on me. The good news is that the portable workbench I built is awesome and way sturdier that I needed it to be. Might be able to put a shop vice on it for light bending. Hammering would probably wreck it though. I factory deleted the cross in the back because it wasn't bearing much weight and made the system overconstrained, making assembly more of a hassle. Still rock solid.