twigg
-
Posts
205 -
Joined
-
Last visited
Content Type
Profiles
Forums
Articles
Gallery
Downloads
Events
Everything posted by twigg
-
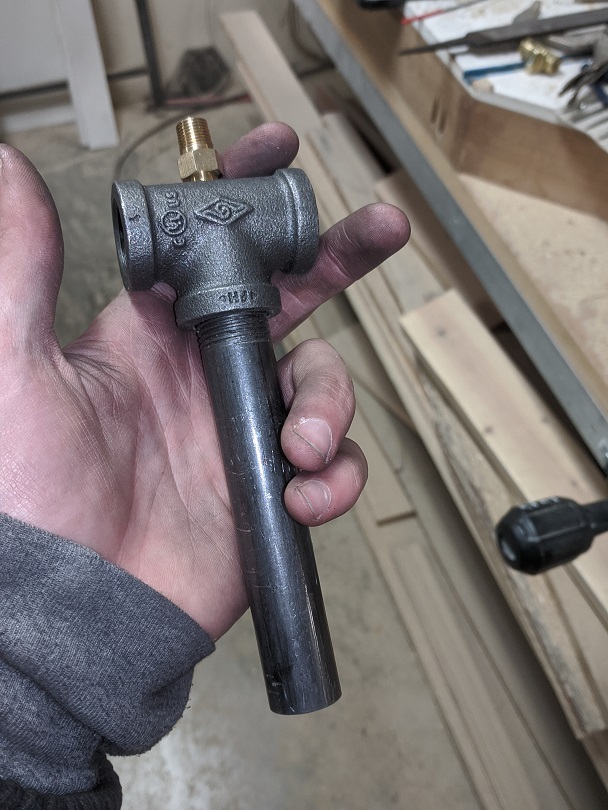
I've never seen a set with the tap drills and taps together like that, and now I'm really jealous lol! Normally I lose one of three things: the drill bit, the tap, or the tap chart! And yeah, those look like air hammer bits to me. I bought myself one last month but I need to fix the trigger valve. It's stuck in the "on" position. Not ideal!
-
Mikey, uh oh, does it not look like morgan thermal ceramics k26 IFB? That's what the seller said it was, and it was stamped "26" on the sides. Did I get bamboozled?
-
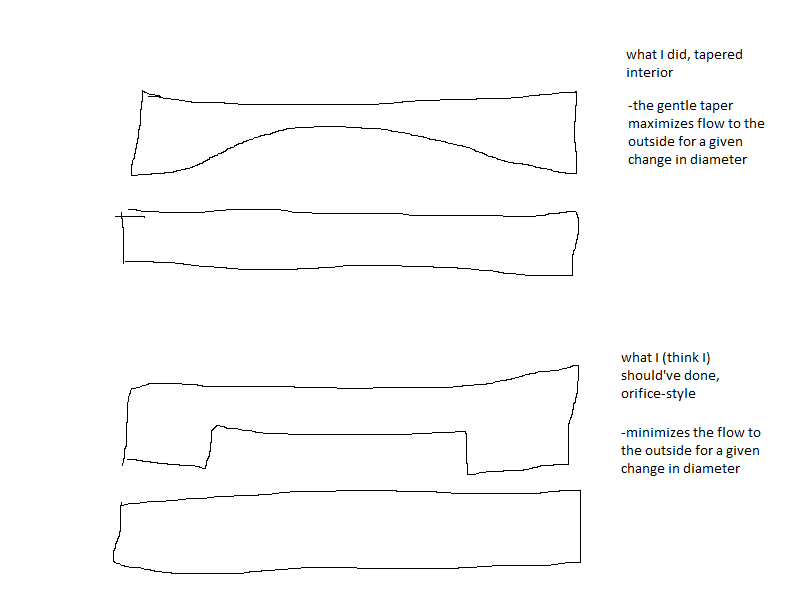
I was rethinking what you said, Tristan, and I think I missed the point when I shaped the belly last night. I feel like you meant that I put a hard 90* shoulder going from 1/4" wider on the inside to smaller on the exits. I feel like a hard orifice-like shoulder gives more drag on the dragon's breath than a tapered belly like I did last night. I did a silly little sketch if it's not clear in words. Going to update the interior shape on this tomorrow night.
-
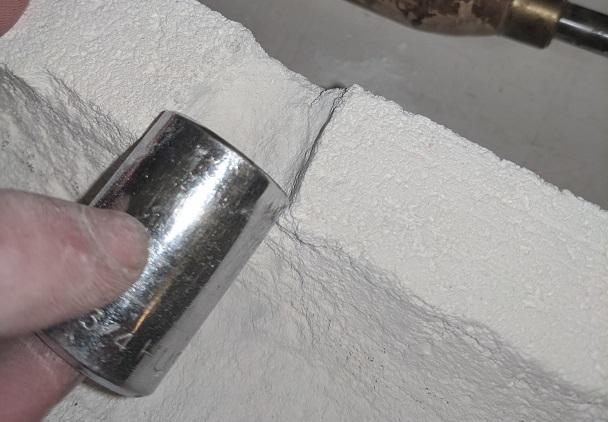
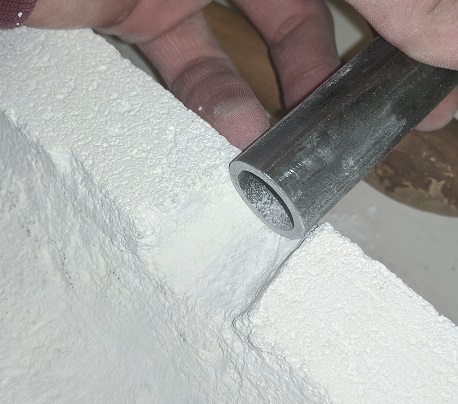
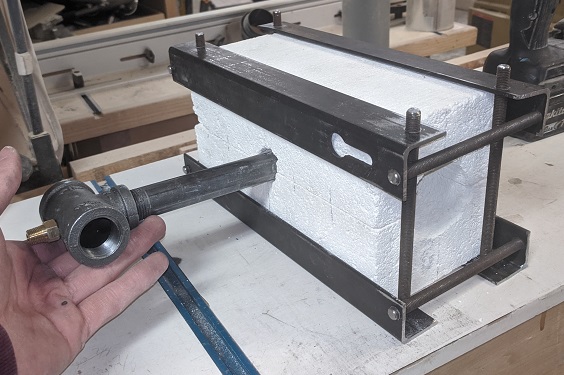
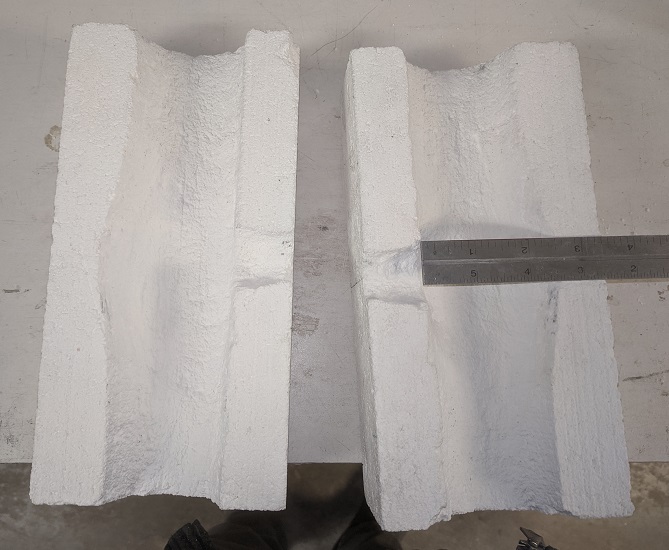
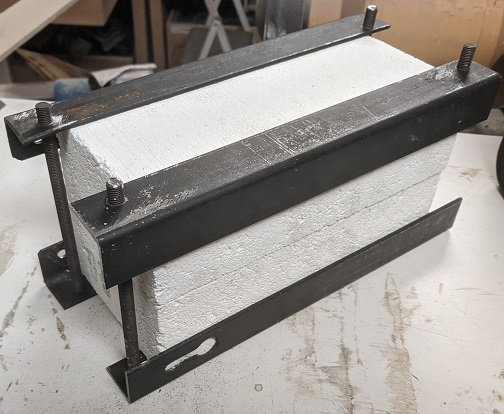
Alrighty, shaped the interior tonight and added horizontal threaded rod to the frame. Doing the interior was a lot easier than I thought it would be. I used a 2" hole saw (all I had on hand). I took "bites" with the hole saw, then switched to a 1/2" bit and drill holes into the remaining cylinder to weaken it, then used a screwdriver to break it apart. I had to chase the hole from the other end of the bricks to get it all the way through, so make sure to center the hole saw pilot bit. To make the burner flare, I started with a 3/4" drill bit, and filed it with a rat-tail file until I could fit the burner tube inside. Then I got myself a 3/4" socket with a 1" OD for a gauge. I filed a flare into the hole until I could fit the OD of the socket in the end of the flare (see pictures). Then I scraped out a taper to make the center of the forge have 1/4" wider walls (added a 1/2" to the ID), per Tristan's advice. I did this with dull woodworking chisels. I didn't scoop much out of the burner side so I wouldn't mess up the nozzle. Now the center has an ID of 2-1/2" and the openings have 2" IDs. The taper now runs a little flat because I didn't scoop out that side. I need to do a little more tweaking there. Here's the mock-up assembly: (there's just enough length on the horizontal rods to thread a nut on either side, I almost messed that up) And lastly I figured out a way to mount the burner with what I have lying around. I have some 18ga stainless sheet I can cut into pieces the size of the forge's outer dimensions, and pop rivet them to the angle iron. I have a flange I can pip rivet to the sheet. I just need to wait until I can throw sparks again. Unless anyone knows a way to cut 18ga SS without a grinder or access to a brake?
-

What did you do in the shop today?
twigg replied to Mark Ling's topic in Blacksmithing, General Discussion
Chimaera, for me, my landlord is just really cool. When he asks me to do something (move something of mine that's in his way, etc), I drop what I'm doing and get it done. I also try to leave things cleaner than when I start working. Most important is just reading the room. If he's having a bad day or seems stressed out, I'll hold off on my next project for a day or work at night after he's done. The other big thing like pnut said is keeping your footprint small. Right now my entire shop could fit in 4' x 6' of space, and I'm still trying to downsize. -
Horizontal all thread would definitely spice it up! (Sorry, I just couldn't help myself) I'll get on it. I hear you about getting forging, but I'm still waiting on the plistix to arrive, so I figure I might as well have some fun. Honestly, I'm enjoying the journey right now even if the hours I'm putting in are a little silly. You're right though, I have 4 bricks total and I can experiment. I like the spoon idea. Hope my landlord doesn't think I've lost it if he sees me sharpening a spoon... Ah, I already cut off the threads on the mixing tube, Mikey. That might've been a little premature on my part. I do still have extra shower rod flanges like I used on my rectangular forge. I think I can pop rivet one of those onto a piece of sheet metal and bolt that onto the angle iron. (I do have access to a mig welder, but all my spare sheet and the shower rod flange are stainless) I'll let you know what I come up with.
-
I hear you Mikey. I'm going with plistix, per your suggestion earlier in the thread. I'm still figuring out how to hole saw my way through the 9" length of the bricks without wrecking them, so I'm holding off on shaping the interior. The 3/4 x 1/2 tees are expected to arrive Tuesday I bought a lot of 10 thinking I had more experimentation to do. So tonight I did the basic frame. Dealing with the bedrail was uneventful. I got lucky and the bed rail was all mild steel (file bit right into it), so I was able to cut it with a hacksaw (still can't throw sparks). For those following the thread, bed frame often is carbon steel, or a mixed bag. A quick google search will show many a frustrated forum post about busted drill bits and saw blades wasted. Naturally, the 1/4-20 threaded rod I thought I had lying around turned out to be 5/16-24, so I had to online order hex nuts in that size. They too should be here Tuesday. Still thinking how I want to mount the burner.
-
Will do!
-
I'm sorry, Frosty. I don't know why I didn't process that I was supposed to remove the tee and leave the flange. Thanks for bearing with me! If we ever meet, I owe you several beers. I did a practice run on a 1/2 x 1/2 tee, and it's dead nuts on. I measure 0.008" offset from the flash. I'm measuring this by looking at the distance from the corners of the hex on the brass fitting from the flash with calipers and taking the difference, so I'm sure there's significant measurement error, but to me this is just a number for quality control. Frosty, I think a center drill would be counter productive. I did a dry run with a #2 center drill and found that I don't have enough feed to change from a center punch to a center drill without moving the table up, and then down again for the pilot drill. Yesterday I was only able to center punch drill because I removed the flange. Note to self: read Frosty's messages 3 times. Sleep on it. Read them 3 times more. Piece of advice to those following the thread: Clamp the ever-living muffins out of the floor flange (without messing up your drill table). Don't use locking clamps like I did, use c clamps like shown in Frosty's instructions. Build a jig if you have to. Same goes for tightening the nipple to the flange. When you drill your pilot hole, the drill will tighten the the tee into the nipple. When you go to remove the tee to center punch it, if you didn't use enough torque, the nipple will come out with the tee. You could probably restore alignment from there, but it's an unnecessary hassle. Just torque the nipple to the flange with a pipe wrench and vise. I only have one of those flex head pipe wrenches (I forget the name, start's with a "b"), and I didn't use my weight just pulling strength, and that wasn't really enough. The nipple started backing out on me. Pnut and tinkertim, I think it got lost back on the first page of this thread, but I was going to follow a bunch of people's advice to use a plistex coating as flame protection and IR emitter. I didn't include the thickness of the coating in the drawing because on the "consolidated notes" thread, it says "thick is counterproductive [for matrikote]" and to just paint it on. The only thing I didn't address is Frosty's concern that plistex does not bond well to smooth surfaces. I was hoping that the cut and scraped out interior surface would be rough enough that the plistix would have some purchase, but I honestly don't know. Tinkertim, so my coating needs to be thick enough to fill the open cells of the brick. Thanks for the info!
-
Thanks George! Yeah, I think the problem may be the casting seam itself deflecting the center punch. There's no way the center drill should have wandered out of the punch mark on its own. Maybe I was missing my punch mark but I couldn't tell because the punch mark was harder to see than the 25/64" pilot hole. If that's the case, then like you say, filing a flat is my only way to higher precision. I figure that if I'm off by 1/32nd (31 thou), that's about one jet orifice diameter worth of offset. Ideally I'd like to have my tolerances less than one orifice diameter, but I feel like I'll still get a non-junk burner with 1/32nd offset (experts, correct me if I'm wrong). At this point it's more a matter of principle than a necessity. On the flip side, I feel like once I figure this out, it'll help me in future endeavors (even if all it does is teach me the limits of this equipment). For anyone who does have high end machining tools, a more mechanically inclined family member suggested to me that a 4 flute center cutting square end mill will wander less than a drill bit on a curved surface. I'm not convinced it would help me because of the slop in my drill's chuck.
-
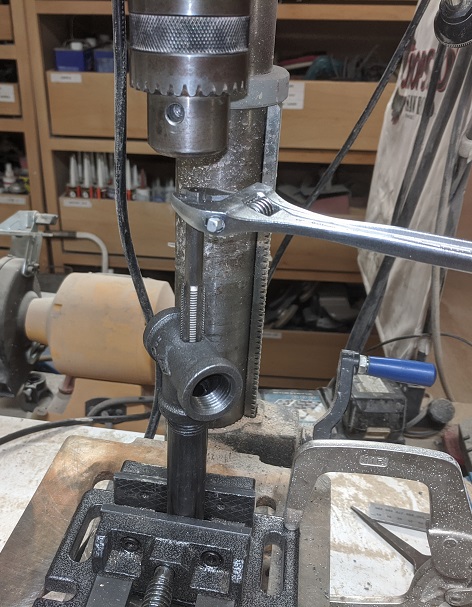
So tonight I tried using the floor flange instead of a vise, and using the drill press to center punch before drilling. First attempt was way off, 3/64" off the casting seam and 1/32" to the side. The initial center punch mark was in the correct place, the 25/64 jobber bit wandered off that mark. What I found was that the drill bit wobbled, I suspect because of slop in the chuck jaws. I'm guessing that my center punch mark wasn't deep enough to coax the drill bit, and it slid off the casting seam. It was initially aligned with the center punch mark when I started drilling. On the second attempt, I kept everything clamped up until center punching. After I made a little dent with the drill press, I took the flange off the drill table, so I could hammer a deeper center punch mark into it, so it would be comparable to the depth of the mark I had on last night's attempt. I then put it back on the drill press, and re-aligned the chuck with the center punch mark using the center punch in the chuck as a guide as Frosty suggested. I then thought it might help to center drill the hole, so I used a #1 center drill on it. I then drilled the pilot hole for the tap. After all this I missed the casting seam by 1/32nd, same as last night. That was my last 3/4 x 1/2 tee, so I'm settling on last night's tee until I can get some more tees. I promised concerned 3rd parties that I'd stop making trips to the hardware store with the new covid strains around, so I'll have to order more tees online and wait for them to ship to try and hit that elusive 1/64th tolerance. Just saying "elusive 1/64th" I feel like I'm the laughing stock of fabricators everywhere. That's alright, I boost other peoples' confidence. I'm useful! I think I could have a shot at hitting 1/64th with a spotting drill (don't currently own any but not too expensive). I'm thinking center punch a la Frosty method, re-align a la Frosty method, spot drill, pilot drill, tap. If a spotting drill can't convince this drill press to behave, then I think I'll be stuck at 1/32. In more exciting news! The bricks arrived today, and I've started drawing my plans for the interior and nozzle. Here's a sketch of a cutaway view at the dead center, where the inner diameter is widest (2-3/8"). To clarify, the inner diameter will taper down to 2-1/8" at the ends of the 9" length, per Tristan's instructions. I know some of the handwriting isn't easy to read so here's some of the major points. The end of the burner tube will rest flush with the wall of the firebrick. (That means this forge will absolutely need an external mount for the burner). The nozzle tapers from 27/32" (the OD of the mixer tube) to 1" over 1" length. That gives a rise/run of 1/12.8. I settled for that because the dimensions are easy to hit. Make the smallest ID just big enough for the tube to fit inside, and the largest ID 1" flat. I'm going to cut a wooden trapezoid to use as a go-no-go gauge. And for those who aren't familiar, this is the forge I'm attempting to recreate.
-
Thanks Tristan for the pointers! I'll definitely switch to 1/2 x 3/4. Didn't realize the 1/2" air intake was just out of convenience. I used to have access to a really nice metalworking lathe on campus before covid times (a mill too! those were the days). Now keycard access is tighter. I can use my landlord's wood lathe when he's not using it, but I didn't bother because I don't know what kind of accuracy to expect from the tailstock alignment, and I worry I'll chew up the chuck jaws holding a steel part under load. Bought myself a 1/4" prick punch and a fresh 1/4" center punch, and a 1/2" short nipple so I can use a floor flange now. Tristan, when you do get another chance to follow up, I'd be curious to know how you fit the hole saw through all 9" of brick. I'd definitely bottom out any of the drills I can think of. Did you chase it from both sides? Also, what did you use to scoop out the center? And lastly, what tool did you use to cut the flare into the brick?
-
Holy smokes Frosty. That's really helpful! The center punch trick with the drill press is a game changer. Thank you!!! And yeah, I'm going to remember to buy a 1/2" hex nipple today so I can use just the floor flange. I really don't trust my vise any more, but I can see why someone with a good vise like Tristan's would prefer it. Also yes, I see what you mean now about using the pilot drill bit shank as a gage. I'd been following the tap chart, and that seems to have worked fine. I like the idea of making a lock nut. I have some 3/16 plate lying around. If I run into any problems with the 1/4" flare fitting, the schedule 80 1/4" nipple is what I'll try next.
-
What did you do in the shop today?
twigg replied to Mark Ling's topic in Blacksmithing, General Discussion
Chimaera, I'm not bothered by the restriction. I'm just lucky I get to borrow space for what I pay to live here. I was just complaining to mess with you The chopsaw also throws sparks. Eventually the projects will move along and I'll get to throw sparks. Also, spoonfuls of tabasco? Yikes! I've got my first grad classes of the semester today so I'm breaking out the good tea. -
What did you do in the shop today?
twigg replied to Mark Ling's topic in Blacksmithing, General Discussion
My landlord has projects everywhere in the shop, so I'm stuck with a hacksaw cuz I can't throw sparks! -
Congrats JHCC! Looks like your work and planning paid off!
-
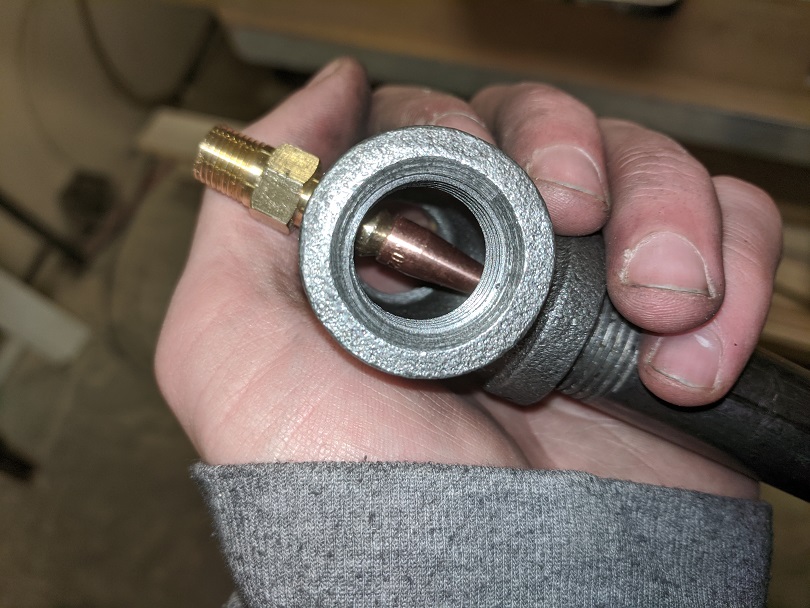
Alright, got a 3/4 x 1/2 tee ready. Pretty much hit the same tolerances as with my 1/2 x 1/2 attempt. Missed the casting seam by 1/32. I also cut off the flare on the flare fitting, shown above. Used a different jig to drill it out more: (Note: if I was smarter, I would've gotten a 1/2" hex nipple to use to affix the tee while I drilled that out instead of my terrible drill press vise) The back of the mig tip is now close enough to the back wall of the tee that I can cut the mig tip to roughly 1/4" away (Frosty's ratio) from the mixing tube (Note: I do not intend to leave the mig tip this long.) Now I'm waiting on the bricks so I can observe the flame and tune. Those are expected tomorrow. One thing has dawned on me tonight. If you're a master of patience and have nice scribe, punch, and drill bit, you could probably hit 1/64" with a benchtop drill press and cheap drill press vise like I use. If you want to get below 1/64 accuracy, I feel like you need a drill press vice with cross-feed (only need one axis for this task). Of course, a vise with a sloppy cross-feed is equally useless, perhaps worse. Using the flange seems to work pretty well, but I lack the tooling to measure how good the 90* angle is. (I couldn't tell you how much 1/32 or 1/64 will hurt burner performance. I leave that to the experts.) The next biggest barrier I think you'll run into is how sturdy the table on your drill press is. Mine flexes a little bit. Edit: one thing I've been doing but forgot to mention is that I've been consistently deburring and cleaning out chips from the inside of the brass fitting with compressed air. A brass chip can easily clog the mig tip.
-
Frosty I'm a bit confused what you mean by using the pilot drill as a go no go gage for the brass fitting. Are you saying there's a way to use the drill bit to gage how far the fitting will thread into the tapped hole? I could kind of see how you might be able to use a pipe tap to tell how far an NPT fitting will go in because they're tapered, but with a flare fitting the threads aren't tapered so I don't see how you could use a gage. I've got more tees and fittings to play with now. Now I've got both 3/4 x 1/2 and 1/2 x 1/2 tees. I forgot to buy a prick punch though. Shucks!
-
Andrew C, TP, and Frosty: you're right. Two things going on here, one is I left the MIG tip way too long and two is the flare fitting protrudes too deep into the tee. I plan on cutting the MIG tip to length once I have a nozzle so I can look at the flame and cut little by little. (My nozzle will be cut from the forge wall, per Tristan's instructions.) As far as the flare fitting being too deep, yeah I just noticed that. Since it's not under pressure, I'm going to back it out and use some red loctite. The trick will be keeping it centered. Frosty, I did order some 3/4 x 1/2 tees as well, they just haven't shown up yet. I figured I'd try both and compare, since Tristan had success with the 1/2 x 1/2. I hear what you're saying about more intake area = more induced air. To your point Frosty, one thing I'll say to anyone using a 1/4" flare to hold the MIG tip: tap the 7/16-20 hole as little as you can. The mig tip sticks out an extra 1/4" past the threads because of the flare. As you can see in my pictures, the back of the MIG tip is almost halfway down the tee. Sorry my process is so disorganized. I'm still figuring some things out as I go. I'll try and make a clean summary when I'm done. Edit: I just had a serious facepalm moment. I can just cut the 1/4" flare fitting shorter!! D'oh!!
-
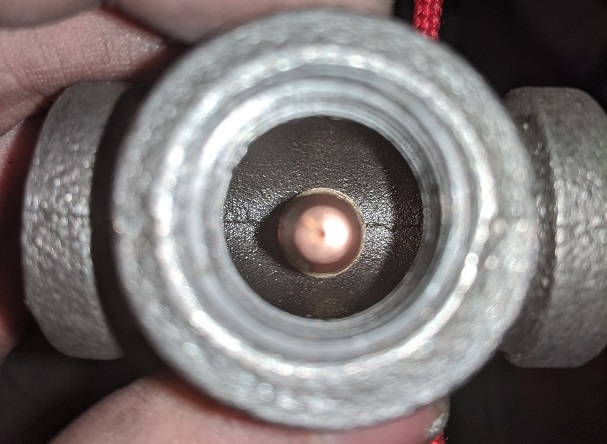
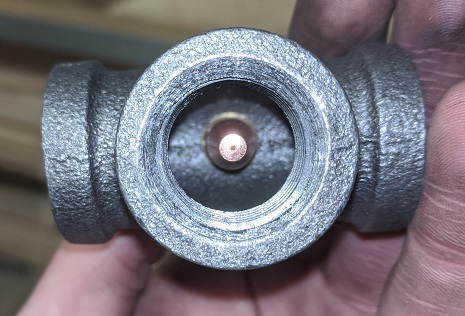
Alright, I built the 1/2" burner, but it's not tuned because I don't have a suitable nozzle. I followed 90% of Frosty's instructions, with some steps modified per teenylittlemetalguy's video. I was lucky that I had the foresight to buy two tees so I could have one do-over. The big difference between the two attempts was how I indicated the center of the tee. In the first attempt, I filed a flat on top of the tee, and used calipers to measure the distance to the edge to get the center. This didn't work well, because of the embossed writing on the sides of the tee. I ended up missing the casting seam by almost an 1/8th. The second time around I followed Frosty's original instructions of not filing a flat, and just center punching on the casting seam. With this technique, I missed the casting line by 1/32nd. I could've done better but my center punch slipped (it's a really bad center punch). I think if I had a third tee, I would use a needle flat to make a tiny flat on the casting seam near the center, but not all the way down to the tee itself. That would help the center punch not skiddadle off. The other dimension I missed was the length of the mixer tube. It came out to 4-7/16" instead of 4-1/2" after I hacksawed it and filed it even. If you're using a benchtop drill press like I was, try to use as little pressure as possible so the table doesn't flex. The main deviations from Frosty's document were the drill and tap sizes. I used a 1/8" MPT x 1/4" JIC flare fitting. So instead of using a 1/8" pipe tap, I used a 7/16-20 tap after drilling a 25/64 hole (I actually wound up having that bit). I had to drill the ID of the flare to 7/32, then tapped it to 1/4-20 (as in Frosty's document, but with 20 pitch instead of 28 pitch). The other major deviation was making the mixing tube 4-1/2" inches long instead of the 4" long that Frosty's ratios suggest. This is just because I'm trying to faithfully reproduce a working forge per teenylittlemetalguy's specifications. The other deviations I made were that I used an oversized nipple and cut one of the threaded ends off (as discussed in earlier replies). The point of this is so that the fuel-air mixture doesn't have to go through a slight converging taper on the ID of the threaded end. This was just something I remember from Mikey's burner instructions. The last added step I did (again, taken from Mikey's burner instructions) was to file out the welding seam from the inside of the mixing tube with a rat tail file. Attempt #1 (filing a flat before punching): Attempt #2 (no flat, just punching on the casting seam): My favorite tap wrench (sue me! ): Finished burner: P.S., I took photos at every step of the way tonight. If there are steps you'd like to see, let me know. Thanks for the clarification Mikey!

-
Just checking to make sure I understand, Mikey. With a smaller orifice, I can use a higher gas pressure because the pressure reduction will be greater, right? Also, there's something I've been wondering a long time, so I'm gonna take this chance to ask it. Isn't there diminishing returns on smaller orifices at some point? What little I know about fluid physics makes me think you'd hit Mach 1 at some orifice area, and then the pressure wouldn't drop any more. Do the orifice builds on this site even come close to that? Just got back from the hardware store. They were out of the 1/4" hex nipples, so I went with a 1/4" MPT x 1/4" flare adapter and bought myself a 7/16-20 plug tap, like teenylittlemetalguy does in his video. I don't think it really makes a difference, but just trying to be consistent. The drill size for 7/16-20 is 25/64". I probably don't have that exact size, so I'll round it to 10mm. Burner construction coming tonight.
-
Thanks Mikey. It comes from many hours of frustration lol After a little thought I changed my mind on welding. It doesn't make sense to have the weakest links in the frame be brittle. All thread it is per teenylittlemetalguy's and pnut's advice. Took me a little while for me to see the light. I'm putting an updated shopping list below. teenylittlemetalguy, I noticed in your video that you use a 1/4" flare for mounting the mig tip in. I don't have the 7/16-20 tap handy and am a little short on time, so I'm gonna just upgrade to 1/4" NPT which I have the tap for. Another edit for the shopping list. Also going to use a 1/2 x 1/2 x 1/2 tee like you suggested. Last thing, I was a little confused by your comment with the burner tips. Is there anything wrong with the ones I listed? They are 0.025" tips. Not trying to nitpick, just making sure I'm not missing something important. Also, a caveat to everyone following this thread. I live at 5500ft elevation. That means I get about 20% less mass per liter of air that gets pulled into the burner compared to folks running near sea level. Dunno how relevant it is (I know it'd affect the tuning, and my inner nerd says it must affect mixing dynamics too even if I have no idea how, Reynolds number mumble jumble), but there's my disclaimer. Shopping list, v1.1: Forge minus the burner: pack of 4 Morgan thermal ceramics, 9-1/2" (L) x 4-1/2" (W) x 2-1/2" (H), bought from Ebay (includes mortar for assembly and repair) a 5lb bucket of plistix, from the IFI store bed frame angle iron for a frame, gotten for a few bucks at the scrapyard at least 2ft of 1/4-20 all thread (I had it lying around from who knows where, but this is something you can get easily from a good hardware store, McMaster, Ebay, etc.) 8x 1/4-20 hex nuts Burner: 1/2" black iron pipe tee (1/2" all around) a 1/2" x 7" black iron pipe nipple (IIRC, 1/2" pipe nipples have about 1" threaded on either end, so to get a 4-1/2" burner tube you need at least a 6-1/2" nipple) 10 pack of KP2744-025T Lincoln Electric 0.025" mig contact tips (they're threaded 1/4-20 and about 1" long overall) 1/4" mpt x 1/4" mpt hex fitting, brass 1/2" pipe flange (for fixturing during drilling, per teenylittlemetalguy's video) Tools required: drill press & vise (doesn't need two axes like teenylittlemetalguy's but it sure is nice if you have it!) bastard file center punch (if you don't have a two-axis vise like teenylittlemetalguy) a good shop ruler 1/4-20 tap & tap wrench 7/32 or #7 drill bit 1/4" NPT pipe tap 7/16 drill bit 5/16 drill bit two adjustable wrenches (or one 7/16 wrench and one adjustable) paint brush 2-1/4" hole saw (dimension on teenylittlemetalguy's forge from old threads) hacksaw file tip set for cleaning mig tips carbide burrs (you can get a set for about $10) and some form of rotary tool (dremel, die grinder, etc, just watch the shaft dimensions) That's the basic list. At some point I will be adding a sheet metal exterior so I can mount a burner collar (not absolutely necessary, but it helps with my anxiety). Haven't worked out the exact dimensions for that yet, so consider it "coming soon"
-
Thanks teenylittlemetalguy! I picked out 6" so I can cut off the threads and have 4" from the end of the tee to the cut end. Just wanted to remove the internal taper on the downstream end. I'll adjust to make it 4.5". I'll definitely check out the video! Thanks for the info on belly out the ID at the center! Good stuff! Yeah I remember getting a few cracks last time I welded bed frame. But since there won't be much load in this frame I think it'll be alright. Going to preheat to take some stress out. Mikey, yeah I haven't had too many issues with bed rail even with a hand drill and a good bit. I use a carbide burr to take the edge off the hard spots and keep going. It's easier than hand drilling 300 series SS.
-
Pnut, yeah I was planning to weld. For anyone following along without a welder, 1/4-20 all thread is the way to go. Over-cut the angle iron so you have a place to drill through. Another possibility that I have next to no experience with is using the burner to silver braze the assembly together.
-
Well that sounds exciting lol! Yeah this sounds like overpressure.