
twigg
-
Posts
205 -
Joined
-
Last visited
Content Type
Profiles
Forums
Articles
Gallery
Downloads
Events
Everything posted by twigg
-
You're dangerous Mikey lol! Well, I already bought the parts for 1/4" burners and was planning on making a pair of them, just wanted to spend some time really getting to know the 3/8" ones first before I get carried away. One thing that I keep thinking is that if I try to get the flame to swirl, the 2-1/2" diameter of this forge's inner surface looks like a very tight curve for the flame to follow. Are there any known ratios for swirl geometry? Something like length of primary flame / inner diameter of forge? Ribbon burners are definitely on my very long term to-do list, but maybe not this semester, and I have a lot of IFI reading to do before then.
-
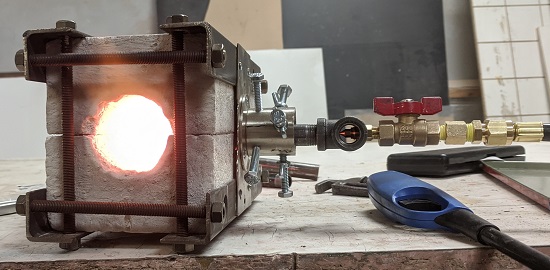
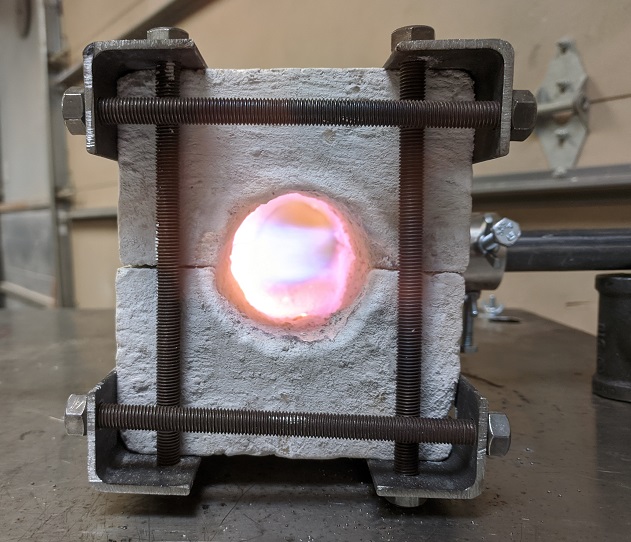
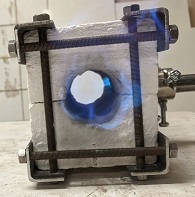
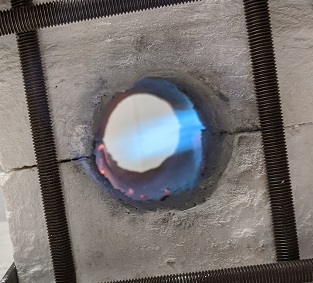
Back from round 2 of testing. Really let it get hot tonight, because I had more time before don't-wake-up-the-neighbors o'clock. At 2psi, it is plenty good for forging. At 5psi, it'll get a piece of 5/16" 1018 round stock to yellow heat (about 1" length to yellow heat), and at 7psi it'll get that same 5/16" rod to white hot (about 1" length to white heat). I'm pretty sure it would've melted the steel at 7psi if I let it be for a bit. I didn't want to find out while I had the forge sitting on my landlord's workbench As another measure of forge temperature, it is now hot enough that my dumb self stared into the forge for about 10s and then I couldn't see the workpiece on the anvil because I was seeing spots. Time for some goggles (or some brains!) Next step is definitely modiyfying the forge shape and coming up with some new nozzles. Still brainstorming, but I'm thinking of adding at least a 1" or 2.5" wide IFB in the middle to make it elliptical. I also made a second 3/8 burner to potentially add in (and tested it, it's as hot as the first but with a more stable flame envelope). I have no complaints about the current temperatures, but it's very concentrated in one spot. I figure if I get it to circulate more, I'll need more BTU/hr to get the same temperature over a large volume. This forge would stink at twists right now. Only other complaint is there's a lot of scale. Flame looks kind of lean. I didn't get to testing it with a larger orifice tonight.
-
Thanks Mikey! Turn it down as in less propane? I don't think I ever let the forge reach max temp last night. Hoping to do more testing tonight if time permits. I was also going to try a larger (1mm) 3d printer nozzle to try and slow the flame down, since I have no problems with getting enough induction. I take it if it looks like complete combustion in too small a space, then adding another 3/8 burner to even out the heat is not a great idea? Is that correct?
-
As posted in another thread, I did my first test of the 2 bricker with a 3/8 tee burner today. I learned mostly about the burner not the forge, but what I did see was that the 3/8 little dude was hot (I would guess wire color was white hot based on watching the corners where the lining had flaked off). The forge had a large thermal gradient down the long axis (not even red near the exhausts, yellow near the burner) and there was still a bunch of dragon's breath. I'm thinking the smaller burners are a step in the right direction, but I'm also going to need to move the burner port to get more circulation. Possibly go down to multiple smaller burners. The 3d printer nozzles are a smash hit. Thanks Mikey and others who posted about them!! I love being able to change orifice size as easy as changing socks.
-
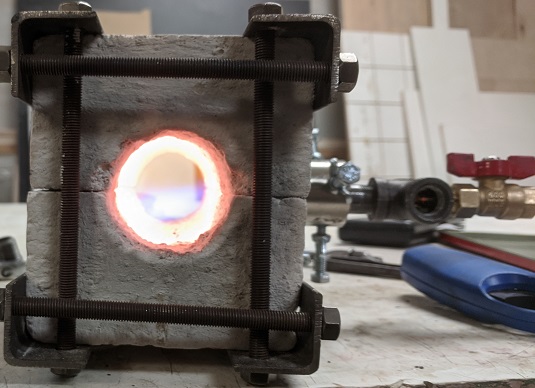
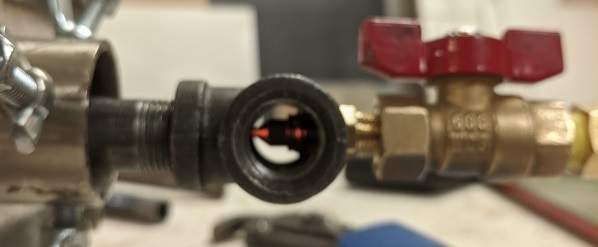
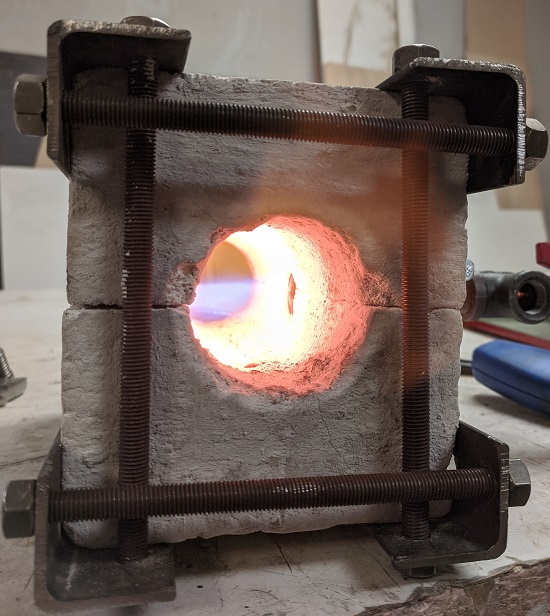
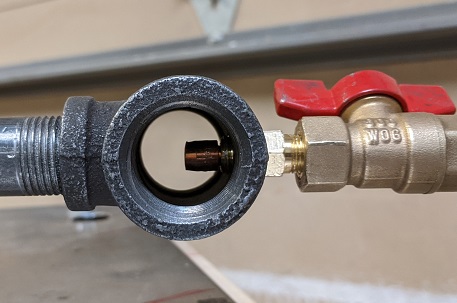
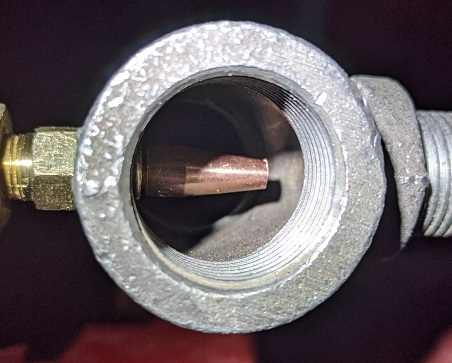
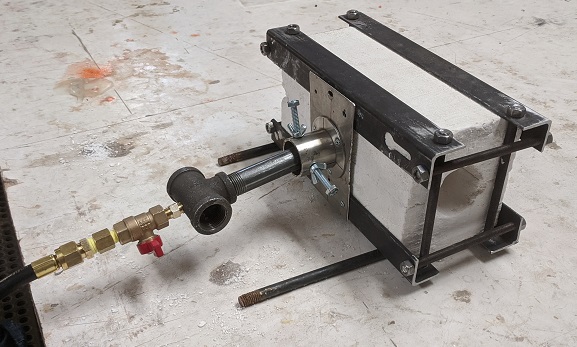
Note to mods: I will be making a separate post about the forge seen in these pictures on another thread, and there will be a lot of overlap between the two posts. I decided to make this its own thread because there seems to be interest in small burners, and it's easier to search like this. Tonight I made my first crack at a 3/8" Frosty tee for my ~45 cu. in. two-brick forge. I think there's more gains to be had, but it performed really well off the bat. All pictures taken at 2 psi, with the orifice positioned as shown in the 2nd picture, almost poking into the mixing tube. Parts: 3/8 x 3/8 black iron tee 1/8 NPT x 1/4 flare fitting adapter 0.8mm 3D printer tip (surprisingly large!) 3/8" x 3" black iron pipe nipple I'm not including the stainless coupling on this list because it ended up being useless even once I tapered the ID. The methods used are identical to Frosty's T burner instructions, except the tap is an M6x1mm for the 3d printer nozzles and I tapped the hole for the printer nozzle in the flare side of the adapter, because I use NPT 1/8" for all my burner connections. I suspect this is a very non-optimized burner because a 0.8mm 3d printer nozzle is just as big as a 0.025" mig tip (same as you'd use on a 1/2" burner). I struggled right off the bat with this little troublemaker inducing too much air. That's why the orifice is jammed so far forward in the pictures. What I can say is it's screaming hot as is. At 2 psi it brought the hottest part of the forge to a mid yellow and seemed ok to forge with (mid orange). I didn't have time to see how hot it would've gotten at 5psi, but it was definitely toasty. As you can see in the 4th picture, I had to put the end of the flame nozzle about flush with the lining of the forge to get the flame to be stable. Once the forge got hot, I was able to back out the nozzle. Other thing I would say was that my fabrication tolerances were a mess tonight, but the burner was still pretty hot. On the first picture, you can see the flame is lobsided by the tempering colors on the nozzle. On the video, you can see it doesn't have a stable envelope. Still more work to be done! Edit: I live at 5500ft. That means air here is on average 80% of the density you'd get at sea level. I do all my testing in a heated workshop at 70degF, so there's no air density fluctuation with temperature.

-
I like the mailbox suggestion and I think it would help pay your operating costs. Hear me out. If you put that sturdy a mailbox out, you're sure to find a few broken bats on your lawn. It's free material for hammer handles! In all seriousness though, I'm with Latticino on this one.
-
I read through the relevant IFI content just now and ordered some. The nozzles seem really convenient, but if I end up using them I'll probably end up forgoing the tee design and instead do something with a choke like a Mikey burner, so I can tune the fuel/air without shortening the nozzle like in a tee burner.
-
You underestimate my ADHD Mikey I got parts to do a 3/8 and a 1/4 tee burner. I bought extra long mixing tubes based on 671jungle's results (I know, different design, but I can always cut them shorter). I'm currently messing around with cutting external threads on mig tips so I can screw them directly in to a 3/8 tee for the 1/4 burner. Just experimenting to see what works. My kingdom for a lathe! Still waiting on the edm tubes.
-
Thank you for the info! The nose clip being finnicky makes sense. I eagerly await your cartridge adapter mod :)
-
I won't be throwing in the towel any time soon Frosty I appreciate it I decided to divide and conquer: I'm going to continue to try and make this forge work but also try making some smaller tee burners. I'll do a separate thread for those. I'm going to take Frosty's suggestion and go for a third brick in the middle. I'm also going to plug the existing burner hole with KOL 30 and move the burner port to run tangential to the longer side-wall of the ellipse. This will also make the nozzle 50% longer, which I think will help slow the flame down(?). Total forge volume will be 100 cu in with this change.
-
Lol thanks Frosty I just remembered I have that one 1/2 x 1/2 tee that drilled dead nuts center by sheer dumb luck. I guess the stars are aligning
-
Lol! You two are dangerous, putting ideas in my head like that... I dunno if I'll be even remotely successful but I'll give it a whirl, since I already bought some EDM tube and it sounds like a learning experience Does kastolite 30 bond well to IFB? I was thinking of plugging the current burner port with some kastolite, and drilling a new port directing the flame tangent to the "ceiling" of the forge.
-
Caught a break to post an update The mig tip was too loose. I left it finger tight before, once I tightened it slightly more with some pliers, the flame induced a lot more air and was louder. The tuning the position of the mig tip behaves a lot more like it should with this change. It was hard to get good pictures of the flame because the forge heats up too quick! I'm not satisfied yet, because with 3/8 to 1/4 stock I'm only getting a mid orange heat. The limit seems to be a stability issue (see video): https://youtu.be/Rrb_MD0euQg The flame seems to transition to a less-intense flame when the forge reaches a certain temperature. I'm able to change this by moving the end of the mixing tube further in or out of the forge port, but it's hard for me to tell which was is better. Based on what Frosty said earlier, it looks like I'm still having premature combustion problems. Edit: am I right to think the mixing tube is heating up and causing the early combustion? One thing I will say is that I wish I had made the burner parallel to the top face of the forge. I don't know how many times I have to repeat this mistake to realize it's never worth it pointing the flame straight at a wall.
-
What do you call a reverse "it followed me home?" It ran away from home? It left the nest? I had two of gas forges that only made me sadder looking at them. Got them out of the shop today to someone interested in starting jewelry work. I detailed to them everything wrong with the forges, and how hot I could get them, so I didn't feel like I was pushing junk on anyone. They also took a 3/4" burner I lost interest in. Also sold my flex shaft tool, because I hadn't touched it in over a year and it wasn't getting any less broken. Feels good! Now I just have to fight that itch to instantly spend the money on new mistakes...
-
Dual IFB ribbon burner gas forge with retractable rear wall
twigg replied to Lateralus's topic in Gas Forges
Lateralus, thank you for sharing a really cool build! Rookie question here. What is that sealant you used to seal the ribbon burner bricks to the steel manifolds? It looks like it did its job and then some surviving the temperatures and the backfire. Thanks! -
Sorry for the delay, life caught up with me. Swapping out the mig tip solved the sputtering issue. I must've done something bad to the first one because it seemed like it was never happy in any position relative to the mixing tube. I haven't finished fine-tuning with the new tip, but here's a clip of the flame. Sorry for the frantic/scatterbrained posting on this thread, Frosty. Things have been a little stressful on my end and sometimes I just forget to take a breath.
-
I hear ya, I'll keep the two apart in my brain from now on. Any thoughts why the jet started inducing when I held the mig tip inside the threaded hole for the fitting? I meant to take video, but I done goofed. Does it prefer to pull air from behind then from the sides?
-
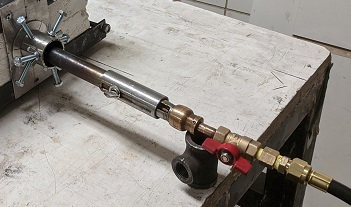
Picture / Video heavy! Sorry! Round two of testing today. Short and sweet of it is that a larger air intake doesn't help. Able to run the forge with my clapped out, loosey goosey Mikey burner. Got pictures and video for all you pyros. Here's the Frosty T with a 1" tee for extra air intake: final_600bad546c1af60044d22e02_494253(1).mp4 And here's with a (crudtastic build quality) Mikey burner: final_600baf78ca2770002ff300e0_25700(1).mp4 Other discoveries: -same thing happened when I held the mig tip in the threaded hole of the Frosty tee, I got a seemingly decent jet (I have no idea why this occurs for both 1" and 3/4" intakes! weird!) -seems like the 1/2" frosty tee needs a smaller orifice to operate normally at my altitude? would love to hear if anyone can confirm this. I recall in Mikey's book it says that a 0.023" mig tip is already a large orifice for a 1/2" burner -a 6 screw burner collar beats the heck out of a 3 screw collar I ordered some EDM tubing in the range 0.4mm-0.6mm. Not sure what I'm doing yet but one day I'd like to try a smaller burner. Maybe for a two-bricker 2.0! Bonus photo: the very sad Mikey burner (served me well, given the build quality) I'm gonna go sleep off the fabricating depression
-
I really like that updraft design Tristan. It would be a snag for me to copy it though because I'd need a new portable workbench to accommodate the updraft (I work on borrowed space, nothing can stay put after I'm done). I like the trusses! Mikey, I hear you haha. I'm still chewing on your advice on microburners on page 13. Current state of confusion: I have a working Mikey burner with the same size orifice, and I saw MT Hammer's YAPBF thread with a standard Frosty tee that appears to be inducing air properly with the standard ratios at 5800ft and ~1/2" from the mixing tube with a 0.035" contact tip. This makes me think something else is wrong and that the orifice is capable of inducing enough air but isn't for some reason. Going to start the tuning over with a fresh mig tip.
-
Leave the threaded rod stickout short and have an appropriate sized socket drill bit in a little bag pinned to the frame? That's what I do for my break-down workbench and it's really nice if you always have a cordless drill somewhere nearby.
-
What did you do in the shop today?
twigg replied to Mark Ling's topic in Blacksmithing, General Discussion
Michael, I love your forge buddy. I want to do one too, but I know if I did I'd start talking to it while I forge. -
MFA thesis work - Trevor Anderson
twigg replied to TrevorAndersonVisualArt's topic in Metal Sculpture & Carvings
I really enjoy seeing your work. It's both technically and conceptually inspiring. Thank you for sharing! -
Haha, sorry Mikey, I would've needed a third hand to take a picture while holding the mig tip at the right place. When it was screwed together, it was a very sad, low air low velocity flame because there was almost no induction. Same kinda flame I got on your burner with the choke almost fully closed. I'm currently thinking through the pro/cons of smaller orifice vs bigger intake
-
Alrighty, I found the shop empty today, so I went nuts trying to get stuff done. Long story short: still not done! I underestimated the effect of altitude. I triple checked that I was using a 0.023" MIG tip and 3/4 x 1/2 plumbing tee, but I just couldn't get a proper burner flame until I unscrewed the fitting and held the MIG tip orifice all the way inside the tapped hole where I mounted the fitting, at the back of the tee!! I guess I need either a smaller orifice or larger air inlets. If that doesn't work, I'll hook up my 1/2" Mikey burner instead (was hoping to retire it because the set screws have stripped and the accelerator got loose). I got the plistex coating on, and I held the burner at the right position for a few minutes to do a gentle first fire. At least that's done. I also could finally throw some sparks so I cut out a little piece of SS sheet to hold the burner collar. I just messed up my hole placement a little, so tomorrow I need to get it fastened to the other bed rail, so it doesn't potato-chip away and misalign the burner. For tonight I used a pipe clamp. (Note, I fixed the alignment of the burner before testing, I know it was crooked in this picture) One last practical consideration for anyone thinking about building a 2-brick forge: you need a way to either take the strain off the hose or keep the forge from rolling over.
-
Thanks all! Last of the materials should be arriving this week. Just going to fix up the taper then. And Mikey, out of curiosity, do you happen to know what's driving folks to spend the money on R&D for the 3100F IFBs? I'm definitely not trying to look a gift horse in the mouth I promise I'm just curious what industries have those needs. Materials science research?