
twigg
-
Posts
205 -
Joined
-
Last visited
Content Type
Profiles
Forums
Articles
Gallery
Downloads
Events
Everything posted by twigg
-
Yeah they ended up fine! It was terrible luck it happened to them because they're the most responsible with ppe out of everyone I know (even before). They eventually ended up using a faceshield with blown, filtered air as their go-to. It's like a faceshield on a hose with a belt where the blower and cartridges are mounted on the back. The belt is big enough it might even double as a lifting belt, not sure. It's a pretty neat device.
-
You're right AFB, it was a pair of safety glasses, not goggles.
-
Just wanted to add one thing about angle grinder PPE. If you use a half-face mask and goggles, you should wear a face shield. A family member got a chip in their eye after it ricocheted off their half mask and under their goggles. Needed surgery to get it out. At some point I remember reading similar stories on the web, but I couldn't tell you when/where. It's probably a rare occurrence, but even if the odds are low once you make enough sparks one of them is bound to do it.
-
You know Thomas, with all these puns you might leave a bad flavour in someone's mouth. All we're looking for is a quantum of consideration.
-
In grad school for experimental atomic physics, can confirm. If I ever make it through, that quote's going on my dissertation.
-
What did you do in the shop today?
twigg replied to Mark Ling's topic in Blacksmithing, General Discussion
I hear ya about stainless being a pain. I'm not looking forward to turning a stainless flame nozzle on the new lathe when I get it. -
What did you do in the shop today?
twigg replied to Mark Ling's topic in Blacksmithing, General Discussion
Congrats Billy Bones! I've been stuck out of the shop for a while as my landlord's had multiple delicate projects going on and I've been stuck grading papers for the courses I'm TAing. Got myself a little harbor freight air nibbler for cutting some 18ga stainless sheet as an outer shell for my two-brick forge (purely aesthetic). I wrecked the cutter after about 2 feet of cut. It was rated to 16ga sheet... 16ga aluminum sheet I guess? Welp, it was $23 so I can't complain. Also been doing more research on mini-lathes. Narrowed my choices down to taig or sherline micro lathes. Anything bigger is just too much risk on my body carrying it up and down stairs every time I want to use it. I'm thinking a new nibbler cutter would be a neat first project. -
The first flame pictures you took, did you use a smart phone camera? If so, I think the camera settings auto adjusted for the brightness of the forge wall. That may be why the flame looks so transparent in the forge but not in the open air test. If you have the time, try this: Get your girlfriend to help out. Have one person with their hand on the valve and ready to ignite the flame, and one person ready with the camera. Start with the forge fully cold (room temp!). One person hits the valve, one person gets the picture before the forge wall gets bright. Compare THAT picture to the open air test. Make sure the person holding the camera is ready to go as soon as the flame is lit, but not so close that they or the camera gets burnt. I'm a rookie here, so if Frosty or Mikey tell you I'm full of bologna, take their word over mine.
-
Oh no, what's an allergic feller like me to do! Guess I'll just wipe off these tears with all this saved money I have lying around Asa_walrus, just wanted to say nice work. Making a Mikey burner look pretty isn't easy. I know what you mean about the slots. Everything's going to plan, then you wobble off your lines a bit, and you have a really uneven edge, so you go back and take more material off to compensate and you end up with extra large slots. Just a quick tip, if there's ever a next time for ya: a 1/8"-shaft carbide burr on a dremel will let you remove material quickly without gouging the corners like what happened with your grinding disk. The dremels have juuust barely enough power to plunge the slot in this pipe, but don't let them crash into anything or the burr's shaft will get bent. Not saying you should re-do anything. It seems to be doing its job just fine More importantly, how on EARTH did you do that satanite coating on your coffee table while making so little mess??? That's really impressive! No newspapers or anything??
-
My initials are TWG, and I'm built like a twig. My name's Tanner, but if I made that my screen name, you'd think I was bragging about having leather working skills. Turns out I hate the smell and mess of leather. Life's got a sense of humor I guess
-
Dian, I was joking earlier. I can't tell if you were also joking, it's hard to figure people out over the webs! I have no idea if a de laval nozzle would actually be useful in a burner or not (but I suspect it would be counterproductive). That comment earlier was meant as banter. Sorry if I wasn't being clear. There are loads of good burner designs on IFI that will get a forge plenty hot and that are much simpler to fabricate than a de laval nozzle. The designs in Mikey's book are among them.
-
Lol Thomas Dian, if you're thinking of the equations for compressible flow, remember there's friction and probably turbulence in the nozzles / mig tips (especially the mig tips!). If no energy is lost to heat or eddies, then 2:1 pressure ratio would get you to Mach 1. I suspect the flows are highly compressible, but I wouldn't want to bet either way whether or not they get sonic (especially in the mig tips!). Maybe you can make a burner with a de Laval nozzle for an accelerator, huh? (That doesn't sound very useful, I'm just pulling your leg)
-
I hear ya NoDebt. I was leaning towards a newer machine because a lot of the recommended repairs and modifications to the old machines are over my head. Your advice helps, thanks! swedefiddle, I hear you, but I don't have a drill with a chuck big enough to turn the parts I listed. Not to mention, my drill press has about a 1/16" of quill slop at full extent when fully retracted. I shudder to think what might happen if I used it as a lathe for 1" OD parts. I like my front teeth Not to mention, the quill slop is probably this bad because I used that drill press to turn parts with a file in the past. That drill has suffered my antics for long enough
-
I'm evaluating whether getting a small lathe is a good decision for me or not. I've really enjoyed making mini burners, and one day I'd like to get into model steam engines. I have <10hrs of experience using a metal lathe before. My biggest constraint here is that I need to be able to carry this hypothetical lathe up and down a flight of stairs by myself. It's not negotiable for me right now. Here are the types of jobs I have in mind for a lathe: cutting an internal taper (1:12) on a piece of 3/4"(D) x 1-1/2"(L) schedule 40 stainless pipe drilling 25/64" holes in a malleable iron plumbing tee (at biggest, a 1/2" x 1/2" tee) turning ODs and IDs on various malleable iron and stainless burner parts, with ODs never exceeding 1-1/2" Does a lathe that small exist that's rigid enough to make those cuts? Does anyone have experience using a lathe in this size range? Some of the lathes I've considered so far include the Unimat SL DB 200, the Craftsman AA109, the Taig 8" lathe (with speed control, but no DRO), and the 8" Sherline lathe. Anyone used one of these or something similar before?
-
I forgot to measure my errors on this last run, but that could totally be why I got a leaner flame from the 1/4" air inlets than with the 3/8" air inlets. I'm limited by an annoying amount of quill slop in my drill press. If I'm careful to get the hole centered, I can still wind up with crooked threads because the spindle tilted when I chucked the tap. A real lathe would be nice, but I work on borrowed space and everything I own has to be portable. Time to re-read the southbend book before I make any decisions
-
Too much fun! I caught myself checking the price on old school mini lathes today so I could make fancy nozzles and sleeves. I need an intervention lol!
-
The reducing tees arrived today, and I tried a bunch of things. I tried varying the mixing tube length from 2" to 3", and I swapped back and forth between the 3/8 x 1/4 tee and a 1/4 x 1/4 tee. I also built a slightly better nozzle from spare parts. I found the 1/4"x1/4" tee made the leanest flame and also got the nozzle hotter than the 3/8 x 1/4 tee. I really couldn't tell you why the smaller air inlets gave a leaner flame. The 2" mixing tube length gives the best results. At least now I can't see any red in the tertiary flame with the lights on. I think that's an improvement. Also, the turn-down range is now below 1psi, whereas before it struggled below 4psi. Lastly, I mounted it up in my two brick forge (2-1/2" ID), and it swirled nicely with an angle: (skip to about 0:14 in the video, there was a malfunction with the dummy holding the camera) It doesn't get the forge as hot as my 3/8 burner at 7psi did, no matter how many psis of propane I put into the 1/4" burner. There's very very little dragon's breath though. Below 10 psi, there's only clear exhaust gas, no flame. I'd like it hotter though. I think two of these 1/4" burners could be the winning ticket for my two-bricker. I also need to do more experimentation with nozzles.
-
Was extraterrestial life the key to the perfect induction burner all along? Who knew! Frosty has a really good point: there are definitely experts out there who have done the hardcore math on induction burners. Contacting them would be the right way to get into CFD. I'm going to revise my words of caution: there is a lot of simulation software out there (COMSOL in particular) that gets marketed as being a one-size-fits-all solution to all your fluid flow mysteries. These software simulations tend to use approximate math that works 80% of the time ("k-epsilon" being the most common method). However, these methods are terribly inaccurate when round jets are involved (like the accelerating orifice in a jet ejector burner like Mikey's). The experts probably have a special vintage of secret sauce for this.
-
I haven't heard of anyone doing CFD on these forums and I've only done about 100 hours of that torture in past jobs, but I have spent too much time pointlessly thinking about modeling a burner. You may already know this, but I'd just say: don't just throw a k-epsilon model at the wall and expect it to stick. Read about the "round jet anomaly" first. I am told there are solutions to this problem using Lagrangian methods (Stephen Pope's book "Turbulent Flow"), but I haven't gotten around to reading about it. Then you'd have to adapt those methods for the case of two fluids at different densities. You may even have to adapt it to account for the compressibility of the propane flow in the accelerating orifice! YIKES! Edit: I should have lead with this, but the point is that CFD is just too darn hard to justify using it when there are so many smart folks with experience around here. Even if you didn't have their advice, you'd still be better off just guessing and testing prototypes than direct numerical simulation. The only good reason to invest the time is for personal satisfaction, and that I can relate to
-
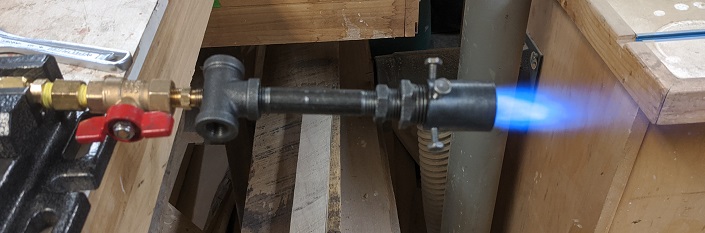
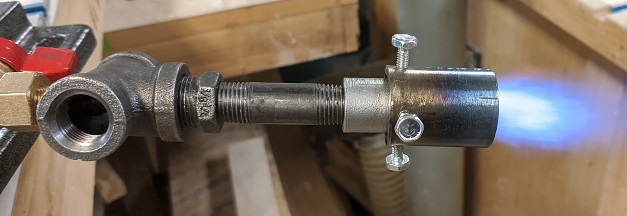
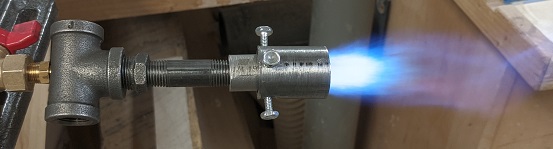
Took my first crack at 1/4" T burner. I'm still waiting on 3/8" x 1/4" reducing tees, so for this initial attempt I used a 3/8 x 3/8 tee and a 3/8 male x 1/4 female hex bushing. Parts: 3/8 x 3/8 black iron tee 0.6mm 3d printer nozzle (M6 x 1mm threads) 1/8" NPT x 1/4 flare fitting adapter 3/8 male x 1/4 female hex bushing 1/4 x 2 black iron pipe nipple 1/4" x 1/4" stainless coupling 1-1/2" cutoff section of 3/4" pipe 4 screws 8-32 As far as the instructions, it's pretty much a standard frosty T burner except it uses the 3d printer nozzle instead of a mig tip. After drilling and tapping the 1/4 flare end of the brass fitting, I file the tapered end off (same as in my 3/8" burner build). The one thing I will say is that I made sure to tighten the hex bushing into the tee until it sat flush with the inside surface of the tee. This is to imitate a 3/8 x 1/4 flare as closely as possible, for the "funnel" effect. The flare nozzle is pretty crude, it's just what I had on the fly. This was very much a kitchen-sink build. I center it using the 4 screws. And here's some pretty pictures for you pyros out there: I'm hoping some further improvements, starting with a true 3/8 x 1/4 tee will reduce the secondary flame and increase the heat.
-
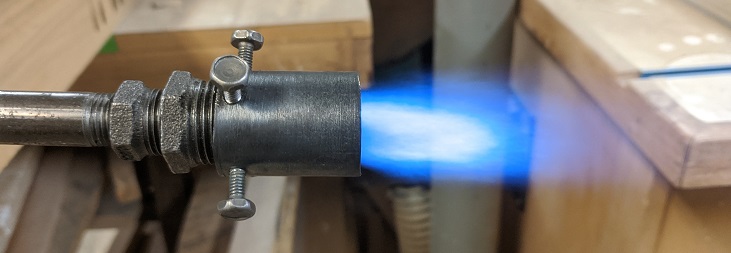
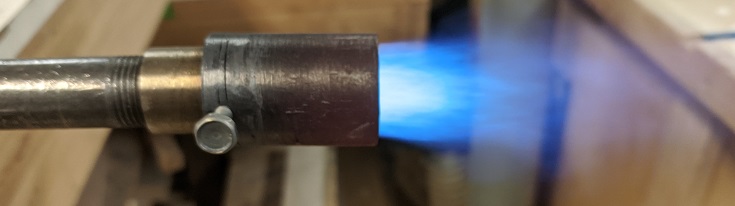
I made a nozzle and played around with some open-air testing, as well as testing different orifice sizes on the 3/8 burner. (I also made a kitchen-sink 1/4" burner, but I'm putting that in a separate thread for the sake of search-ability). Short version: yep, it's really friggin hot, even outside the forge with a crude step nozzle, and the turn down range goes below 0.5psi (measured at the tank, not at the accelerator!) So I found by happy convenience that I could take the stainless steel coupling I internally beveled and slide a length of 3/4" stainless pipe over it to make a very crude but effective step nozzle. The 3/4" pipe section was 1-1/2", and I put it 5/8" down the length of the stainless steel coupling (which was 1" long and had the same OD as a 1/2" pipe nipple). Took some tuning, but I was able to get the nozzle itself red hot. The placement of the 3/4" section relative to the fitting is critical. The other thing I noticed with this burner is that the turn down range extends crazy low. Below 0.5psi measured at the tank. The flame is most stable above 2psi, but it's still there. I have a feeling this is just a feature of 3D printer nozzles not having a long orifice like mig tips do (less length, lower friction, more flow per psi). https://youtu.be/nmbW6GNCQZQ
-
Came to the understanding that buying a reducing 3/8 x 1/4 tee online for a few extra bucks makes more sense than fabricating a tapered sleeve. Waiting on that to ship.
-
Ah sorry, by "fitting" I thought you meant the brass adapter. Now I understand you meant the tee itself. I'm still a little confused though. Does the sleeve go inside the mixing tube and extend just into the tee? Is it supposed to reduce the ID of the mixing tube? Thanks for bearing with me. I did start off with a 1/2 tee and a reducing hex bushing (because I didn't have a reducing 1/2" tee), but I went down to the 3/8 tee once I saw that it was inducing too much air.
-
Would center drilling a bevel in the inlet of the 3d printer nozzle do the same job as an internal sleeve?
-
What did you do in the shop today?
twigg replied to Mark Ling's topic in Blacksmithing, General Discussion
That's a fancy looking bottle opener!