
.jpg.edbb6330516fab333d4173f61cb57c82.jpg)
Benona blacksmith
-
Posts
331 -
Joined
-
Last visited
Content Type
Profiles
Forums
Articles
Gallery
Downloads
Events
Everything posted by Benona blacksmith
-
.thumb.jpg.04efa31b17e0217d84870be46a7a0461.jpg)
Help with ID on 280lb English anvil
Benona blacksmith replied to Mark Ling's topic in Anvils, Swage Blocks, and Mandrels
Many makers made this pattern so it's not limited to a Peter Wright. Look up Yorkshire pattern anvil and it should give you a good starting point for your search. -
anealing <split from another thread>
Benona blacksmith replied to Steve Sells's topic in Heat Treating, general discussion
Great idea splitting this up from the other thread and starting a new topic!!! Thank you Steve -
Making my own flux
Benona blacksmith replied to Benona blacksmith's topic in Fluxes used in blacksmithing
I have a friend that has a lot of trouble forge welding and is going to do a bunch of testing with 30/70 cast/borax mix and see if it helps with his success. -
anealing <split from another thread>
Benona blacksmith replied to Steve Sells's topic in Heat Treating, general discussion
You are right. I said nothing about alloys. Which makes my statement partly untrue and I apologize for that. -
anealing <split from another thread>
Benona blacksmith replied to Steve Sells's topic in Heat Treating, general discussion
It will work to a certain degree with simple 10xx series steel up to .8% carbon after that it will form lamellar sheets of carbide that will burn up drill bits and booger up files. It's not good for complex alloys -
Little Giant 50lb or Blu Max 110lb
Benona blacksmith replied to cdnaxe's topic in Power Hammers, Treadle Hammers, Olivers
I think if you plan on using tooling I would hunt for a self contained air hammer in the 88 lb + range. 88 lb is honestly a little small for using tooling but I get by with mine. The main problem with an 88 lb hammer for using tooling is how fast it runs. The bigger the self contained the slower they seem to run. I have my hammer on a VFD and slowing it down a little helps tremendously when using tooling. -
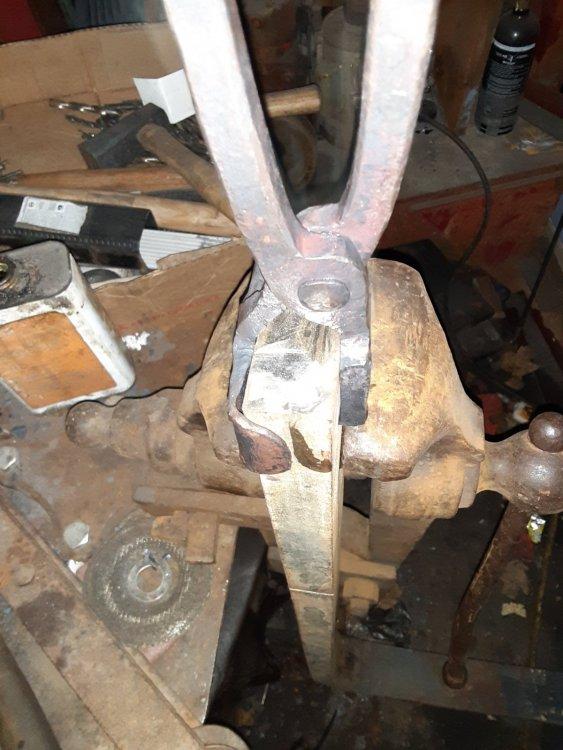
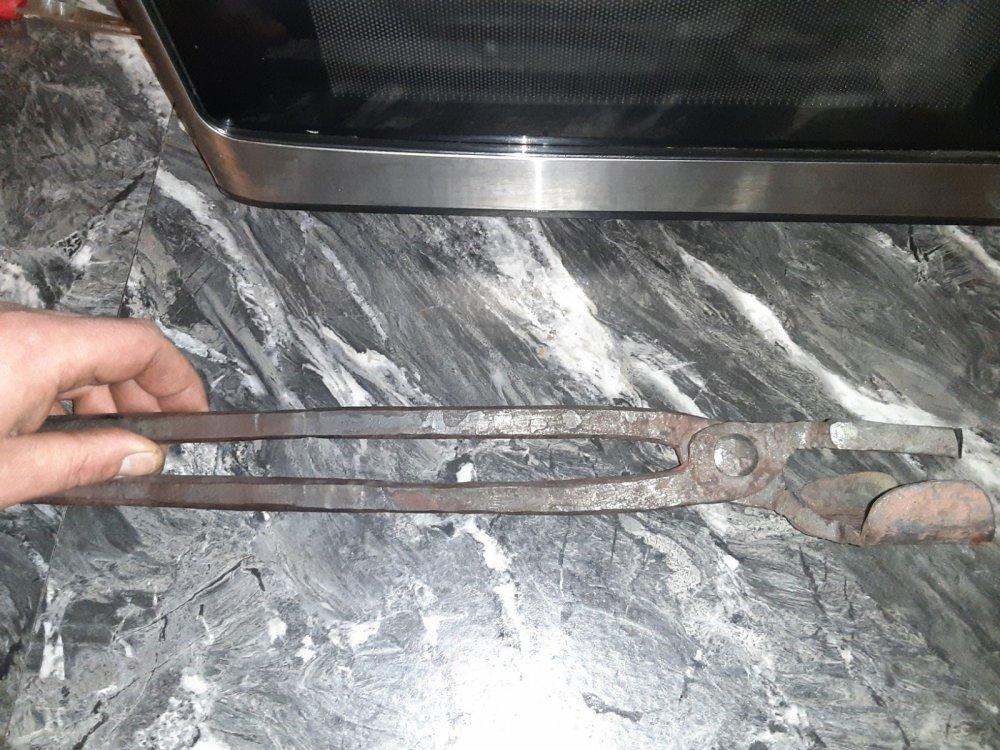
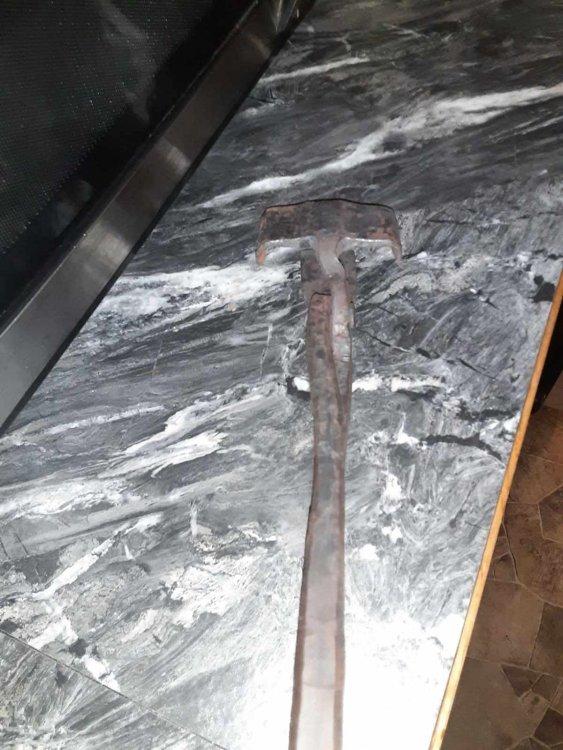
I couldn't find a set of tongs the size I needed so I forged some. These are made to hold 1 1/4 inch x 3 inches.
-
anealing <split from another thread>
Benona blacksmith replied to Steve Sells's topic in Heat Treating, general discussion
It doesn't work. If you want to anneal a certain steel look at the spec sheets and follow the directions just like you would if you are hardening the steel. You really need a controlled oven to do proper annealing. You can't get maximum softness by heating it up and letting it cool "slowly" in vermiculite. Save your time and just normalize the piece and go to the next step. -
Making my own flux
Benona blacksmith replied to Benona blacksmith's topic in Fluxes used in blacksmithing
I have talked to a metallurgist about this statement and it is simply not true. Yes there may be variations from one batch to another but in the same batch the alloys are well "mixed". Alloys cannot change from one part of a bar to another. Same goes for rebar. It's not as inconsistent as people make it out to be. Sure it's not the best material but it is consistent!!! This is one of myths just like "annealing" in vermiculite. As for the visible weld lines, a good soak will take care of it. Gary mulkey has demonstrated this in his Damascus. Other discussion split off and moved to Heat treating section, called Amealing -
Making my own flux
Benona blacksmith replied to Benona blacksmith's topic in Fluxes used in blacksmithing
It seems like 30% cast iron is about the right amount!!! Anything more than that you get too much molten cast iron spray. It really does lower the welding temps though!!! I welded wrought iron at an orange to low yellow heat where it would normally have to be at a yellowish white. It works like a charm and I will be using it for all my wrought iron welding. I will use normal borax for any Damascus I might make as I'm not sure of it leaving any traces if it in my finished billet. Though a good soak would probably wash out any traces of it and the carbon would migrate into the rest of the billet. -
Little Giant 50lb or Blu Max 110lb
Benona blacksmith replied to cdnaxe's topic in Power Hammers, Treadle Hammers, Olivers
I personally would buy the blu hands down no questions asked!!! -
His assessment is spot on. They are a medium quality!!! The pritchel is the worst part of the whole design. I did what is generally considered unlawful in the blacksmiths law book and ground about 1/2 inch around the pritchel hole and smoothed things out a bit because there is a slight drop from the face to the horn right where the pritchel is, just like on most Italian pattern anvils. But China failed on this aspect of the pattern. On a nimba and all others it is a smooth transition from face to horn and doesn't affect anything.
-
mixed results heat treating 1045
Benona blacksmith replied to hunterNDN's topic in Heat Treating, general discussion
There is a way to use the pipe in the forge and not be looking directly into any flame at all and the workpiece will be rising in temperature so you really wouldn't be looking directly at glowing metal for long. Just looking into a pipe but that isn't half as bad as looking directly in a fire. I have yet to do it to my heat treat pipe but..... The way I figured it if you torch a hole in a plate the diameter if the pipe and weld it to the end you put the workpiece in, it would act as a shield so you aren't looking directly into the flame. And like I said the workpiece would be on a rising heat and really doesn't hurt the eyes much until it gets really hot. And on top of it don't you stare at hot metal while at the anvil. I know I do!!! -
Mine was heat treated for sure. I got 90% rebound!!!!! And a file skates off the face but bites into the horn which tells me they were induction heat treated on the face and tail but not the horn. I know nobody wants to believe this but it is true. They are a good serviceable anvil!!! Im Not saying there isn't variations from one to the other but I have had 2 different ones. One 66 lb. And the other 110 lb. There is YouTube videos out showing the rebound clear as day 80-90%!!! I personally would put these anvils in a category above NC anvils.
-
They actually sent me a couple short videos of the manufacturing process. I didn't ask about the heat treatment though. Paul krzyszkowski was the first person to import these anvils to north America. You can get them all the way up to 300 Kg
-
I have talked to the factory rep in China and they are in fact c45 cast steel!
-
You have a Peter Wright anvil weight should be around 162 lbs. The "triangle thing" is called a hot cut hardie tool and should be able to be removed. As for an age the book anvils in America could tell you a rough date. It can be found at the library. If your local library doesn't have it they can get it on loan from another library.
-
Can you post pictures of the 30 kg "cast iron" anvil?
-
mixed results heat treating 1045
Benona blacksmith replied to hunterNDN's topic in Heat Treating, general discussion
Decalescence is the BEST way to judge critical temperature "De"as a prefix means "to be away from", or "without" and "calescence" means "to warm up" in Latin. So, "decalescence" means (roughly) "to be without warming up". Since energy is matter, and matter is energy; the steel will release light and heat energy When heated. When you heat the steel to a certain point, the steel begins to change its atomic arrangement. Such a change requires energy to accomplish, so the steel cannot emit its light energy, and heating may slow down. This creates a visible "shadow" in the steel that can be used as a waypoint in the normalization and hardening processes. What your looking for is when the steel darkens or forms a "shadow" at the temperature right before you would be ready to quench. You continue to heat the steel until the shadow brightens until it becomes the same color as the area just outside of the shadow. You want to heat as evenly as possible until the shadow is gone. Heat thicker areas first, and then move to thinner areas. I pull my blade in and out of my forge's hot spot to achieve even heat. Some use a pipe capped on one end inside of the forge to create an even heat. This phenomenon is best seen in low light conditions and is used for both normalization and hardening -
Hammer making class with Dan Moss and James Davis
Benona blacksmith replied to Benona blacksmith's topic in Hand Hammers
The class was a blast and I learned a lot and met some really good people! I was even going to take it again if they were going to hold another one but I guess they aren't doing it in 2020. I might work something out in the future to go to his shop on the other side of the pond for a class. -
Strange looking horn on a Swedish anvil
Benona blacksmith replied to Boneyjoe's topic in Anvils, Swage Blocks, and Mandrels
I still say the table looks to be all there. I don't see where it's been "ground down"? -
Power hammer build
Benona blacksmith replied to Ted Ewert's topic in Power Hammers, Treadle Hammers, Olivers
I don't mean to be a party pooper but my hammer would have blown that board apart in one swift blow!!! -
The one thing I like about a blu over a nimba is the face width. For the work "I" do I would benefit from the narrow face of the blu anvils.
-
They are not the Czech anvils. They are the same pattern but have very distinct differences.
-
You can get them all the way up to 300 kg