Donal Harris
-
Posts
970 -
Joined
-
Last visited
Content Type
Profiles
Forums
Articles
Gallery
Downloads
Events
Everything posted by Donal Harris
-

Tapering handle end of steak flipper
Donal Harris replied to Forgingforfun's topic in Blacksmithing, General Discussion
Post to YouTube and link it? -
Tapering handle end of steak flipper
Donal Harris replied to Forgingforfun's topic in Blacksmithing, General Discussion
I can’t get it to play. -
15kw Melting Capacity
Donal Harris replied to MaxThroughput's topic in Induction Heating, Oil forges, etc
I take it he abandoned his quest? -
Knifemaking 2.0 Advanced Studies
Donal Harris replied to Steve Sells's topic in Books, Printed Material
I received mine as well. I should have specified which one I wanted. I wanted the Intro book. Not your fault. It was mine. I will probably order the Intro book later this week. 2.0 is a great read though. -
Ring the anvil, light a candle or say a prayer...
Donal Harris replied to Irondragon Forge ClayWorks's topic in Prayer List
Staff at all three Norman Regional Facilities have been told to take shelter. Supposedly the Capital has been or may be hit. Seems like 2 maybe 3 on the ground in various spots. Sure wish I had TV about now. -
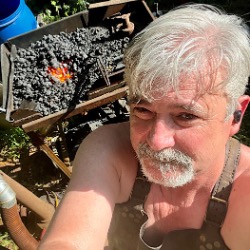
Why that one? If you want a hammer that costs over 100 USD, why not a Brian Brazeal style hammer from the Fiery Furnace Forge. I forget their names, but they are members here. As for me, I wasn’t sure if this would stick. I went the less expensive route. Left to right: 3lb Tractor Supply 19? USD, Irwin 2.5 lb from Lowe’s 20? USD, 48oz ball peen garage sale 50 cents, angle peen that I picked up for a quarter at a yard sale, another 3lb Tractor Supply cross peen 19? USD. The order of highest to lowest use flows left to right as well. The garage and yard sale hammers were just rusty old heads. The Irwin 2.5 lb cross peen had a composite handle that felt odd. The Tractor Supply hammer handles were too thin A neighbor has a lot of Osage Orange on his place. I got wood from one of the trees and cut the limbs to about 28 inch sections, split them, and put them up in a dry spot for a little over a year. i am still trying to find what feels like an ideal shape and thickness for me. At the moment I prefer the feel of the one second from the left
-
Ring the anvil, light a candle or say a prayer...
Donal Harris replied to Irondragon Forge ClayWorks's topic in Prayer List
I had to work the next morning, so I just curled up in bed with the wife and slept like a baby. -
I prefer dirt except dirt becomes mud when it rains (forge is outside). Soon it will be brick. Not for comfort. Strictly to satisfy the fire chief so I can get a permit to forge outside during burn bans. I would go with concrete, but the brick is free. Paver-base and sand isn’t but isn’t that expensive.
-
Spring Fuller (Or so I hope it will be)
Donal Harris replied to Donal Harris's topic in Tools, general discussion
Any suggestions on what to correct on the swage to make it more functional will be appreciated. -
Spring Fuller (Or so I hope it will be)
Donal Harris replied to Donal Harris's topic in Tools, general discussion
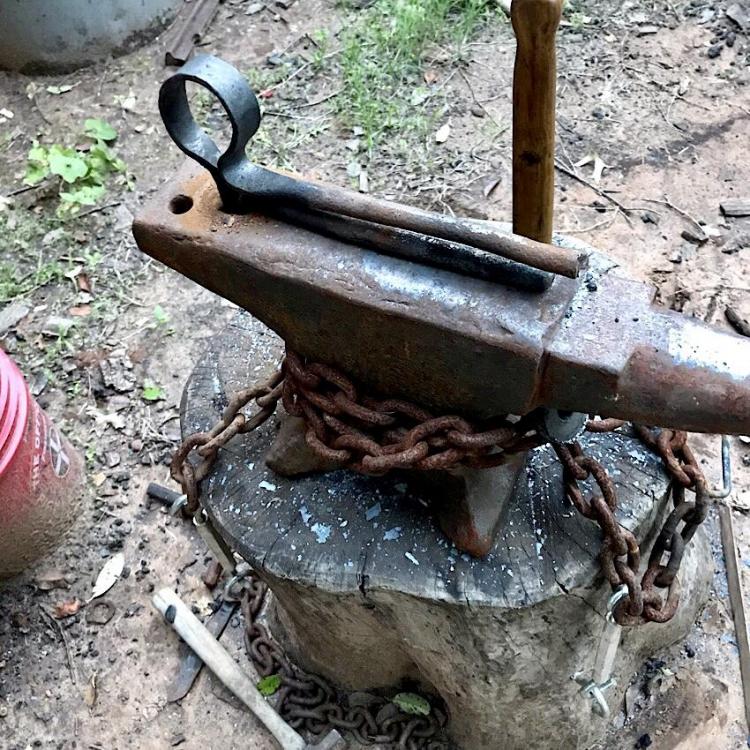
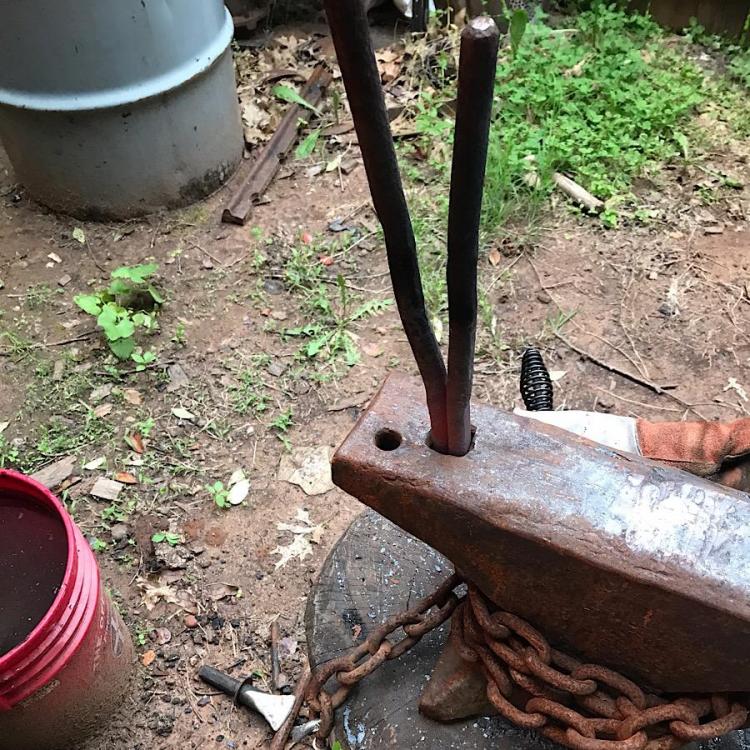
Very true. Plus now longer than I have been doing this I guess perfect is not to be expected. Tomorrow, if the weather allows, I will finish forming the hook ends on the others and finish prep on the steel plate these will all be riveted to. The ‘plate’ is actually a scrap piece of angle iron I flattened and drew out to the correct width. Edited to add a picture of the spring swage.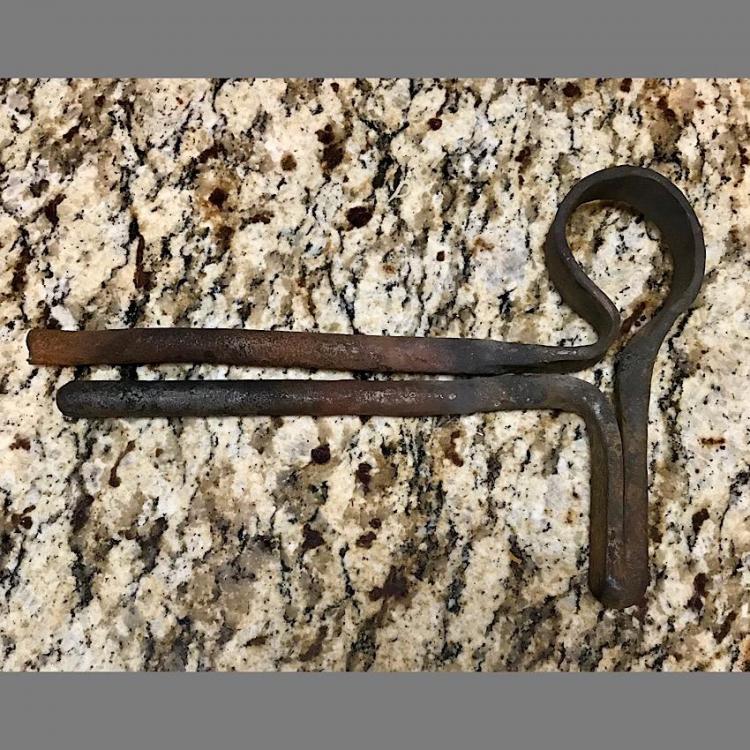
-
Spring Fuller (Or so I hope it will be)
Donal Harris replied to Donal Harris's topic in Tools, general discussion
Now that the small burn to my hand is healed and I can swing a hammer again, I finished it today after work. Or I should say finished it somewhat. It would have been easier to see if I had taken it out of the Hardy, but the shank is too small for the hole. It isn’t noticeable when you drop it in, but it pops around when you strike it. I think the geometry is off a bit as well. I gave it a go with one of the leaves. Snapped it clean off. I think I will leave the remaining hooks alone and call them good as they are. Next time I will just pay more attention to what I am doing if I try another coat/hat rack.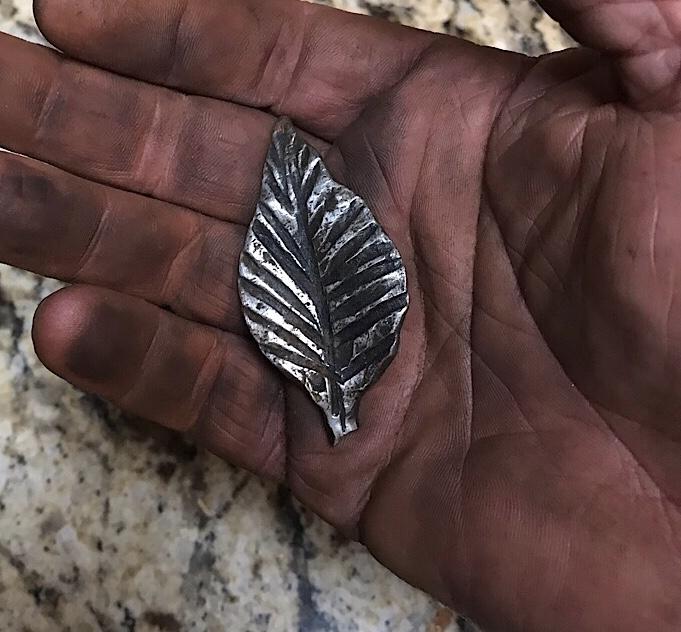
-
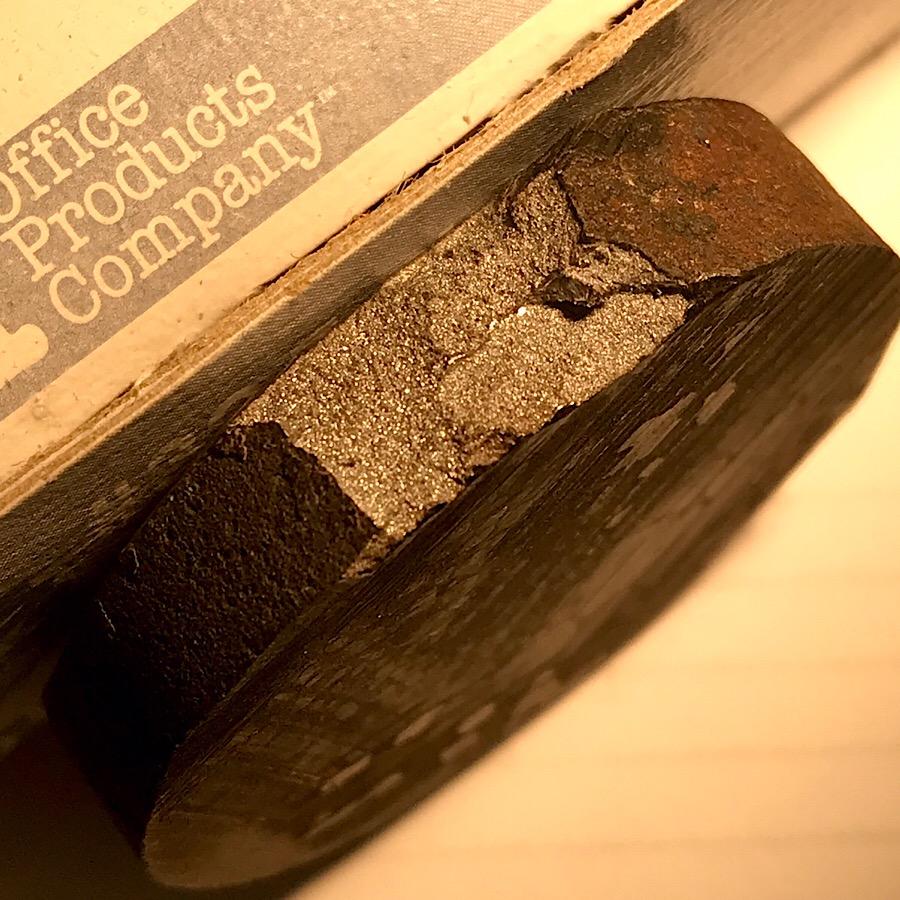
I am working on a coat/hat rack. I have had a heck of a time with the hooks. I couldn’t get the shoulders by the leaf and the hook symmetrical. My first thought was a guillotine tool, but while researching that here on IFI I saw a much easier answer, a spring fuller. Mine of the hooks that I need to fix is below, as is the start on the fuller. I have no ‘known’ steel for it. I assume it is sucker rod, because it was a home-built socket wrench of some sort, and folk around here use the stuff almost as much as they do baling wire, duct tape, and JB Weld. The rod is maybe 8 feet long and has proven to be very educational. While straightening it I forgot I had heated a section a few feet from where I was holding it. I can attest that grabbing a piece of black hot steel is for all practical purposes just as painful as grabbing red hot steel. As I progress further I will post pics. (Of the fuller. My hand hurts like heck, but the burn left no marks.) Edited to add: It was Michael’s post in the Guillotine Tool thread that gave me the idea, or more accurately, the design to follow.

-
I expect you would have better luck finding a Bigfoot answering the call. But I am curious about that. Can the blades be removed and reversed?
-
Cleaning up the mushroom seems to have been something most people didn’t do......or their grandkids kids didn’t. I rarely see a large struck tool in the wild that doesn’t look like this.
-
I am one of those who doesn’t quite understand how this is intended to work. Looks like a press with a little bitty wheel. I tried RV’ing once. We rented one and spent a week in and around Jefferson, Tx and Texarkana. It was great until the first time I had to fill the fuel tank.
-
Still nothing new?
-
Can Mystery Steel be ID’d by Density
Donal Harris replied to Donal Harris's topic in Blacksmithing, General Discussion
Clinical lab, as in a hospital. The only mass spec we have is a Bruker MALDI-TOF instrument used to identify microorganisms. After looking at this chart I found today online, I think I should be able to get reasonably close. There is some overlap, but I should be able to use other observable characteristics to rule a few out. It is not stainless for example, so I can exclude that section entirely. I have considered trying to find an engineering student at OU in need of a little cash to run a few tests for me in their labs. Density of steel chart at amesweb -
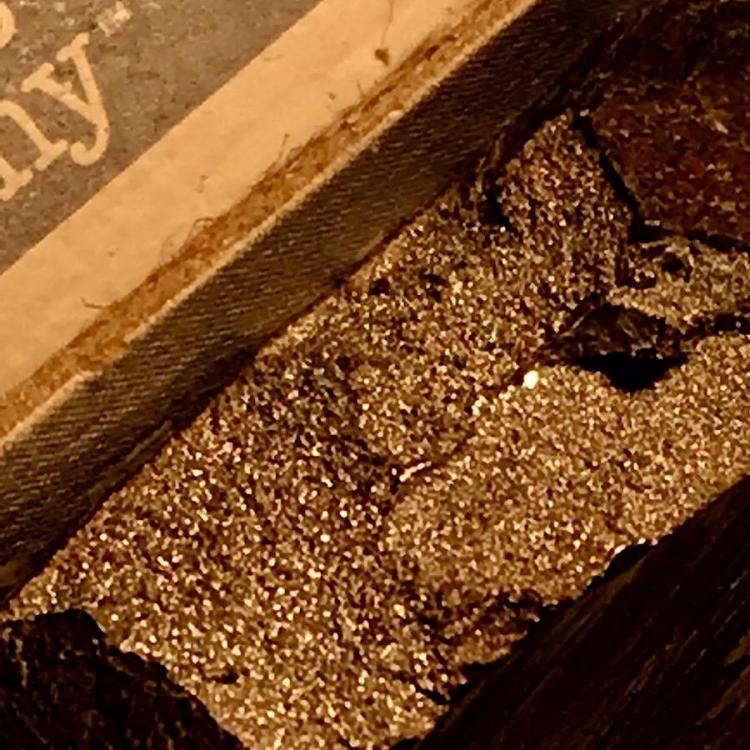
I have two 3 to 4 foot long pieces of 1.5” round stock of an unknown type of steel. I picked them up sometime last year at Nimmo’s, a salvage yard here in Purcell (now closed due to family illness). I spark tested them after I got them home and could see they contained carbon. I cut an inch off one of the bars to see if I could harden it. I was using a steel chop saw and it took a very long time to cut. I have never cut anything that thick before, but have quite a lot of experience with cutting angle, channel iron, and flat bar used to manufacture utility trailers and truck beds. Those cut like butter compared to this. It didn’t harden much at all when I quenched the piece in oil, but hardened very well in water. Chris, one of the guys who posts here and is also a Saltfork Craftsman member is interested in making a hammer, so I took one of the two rods and a very large tie rod end to give him his choice of one or the other. With Korney’s help, we cut of a slice of the rod, heated it and quenched it in water. Chris then put the slice in a vice and hit it with a hammer to see if it would break. It did. I’ve attached the pics. The grain structure looks very small. The slice itself feels unusually heavy, which brings me to the point of this post. Is it possible to get even remotely close to an ID based upon density? I work in a clinical lab so access to a certified scale and a graduated cylinder is not a problem. The density calculation itself is easy if you have that. The steel also feels ‘funny’, for lack of a better word, when sanding it by hand. It doesn’t sand easily but when sanded, the surface just looks great and has a wonderful feel to it. Lame description that doesn’t give any useful information, but it is the best I can do. I have always carried bits of wood, stone, or metal in my pockets to fiddle with when thinking or waiting. This little sliver of steel is very satisfying to carry. Any ideas on how I could identify what sort of steel it is? Are there labs that could ID it for me? Cost isn’t really a concern for me.

-
Getting the kids involved
Donal Harris replied to HammerHeart's topic in Blacksmithing, General Discussion
Actually my first thought was “How can I blame the cat for this?”, but I figured the boy would cave during interrogation by my wife and daughter. -
All the back out punches in the Google images seem to have straight sides, not tapered, and the punch ends seem longer. This tool appears to have been struck often as well. Google says you are not supposed to strike them with a hammer. Although I doubt many people actually follow that advice.
-
Just be sure you don’t end up sacrificing yourself to keep the neighbors happy. The sound must go somewhere. Have you spoken with your neighbors about it? You could be worried about something they don’t see as a problem.
-
Getting the kids involved
Donal Harris replied to HammerHeart's topic in Blacksmithing, General Discussion
This is a picture of my grandson. He was watching me from 10 feet away. I thought he was safe enough. I was wrong. Just about a half inch higher and we would been visiting the ER. He now wears safety glasses if he is near the area. I do agree though it is great sharing an activity we enjoy with our children or their children.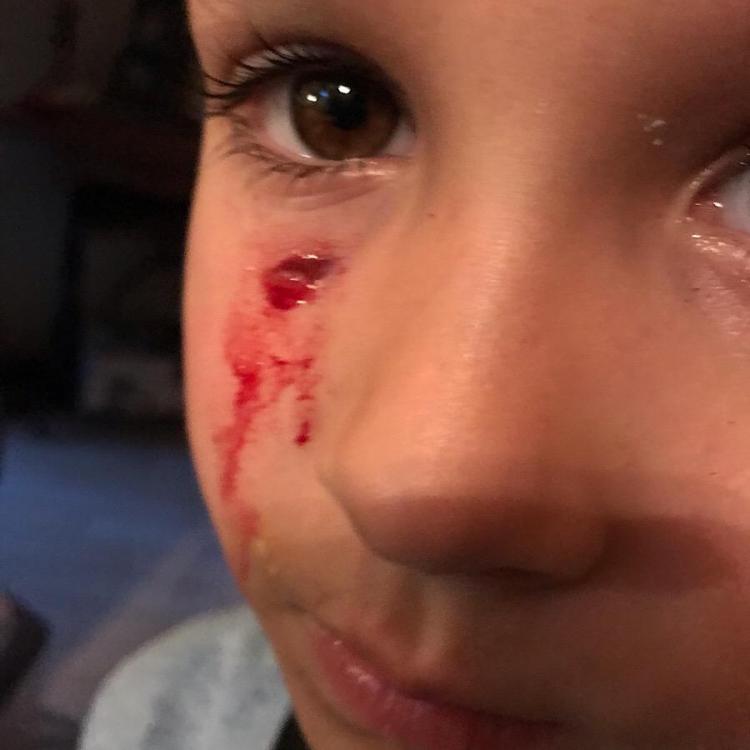
-
That third one Glenn posted looks like it would be the easiest to make. The one that appears to be the most versatile would be the second. Although the 1st one, which looks like it is the same style GS Tongs makes, would be almost as versatile. I have never used one of these, but have watched a few reviews. One problem with those like the third style, those like the one on the Etsy site, and others in the Smithing Magician style is lack of visibility and inability to use the tool from the side. When the day comes that I make my own, I expect it will be a copy of the second one. My only concern is how do you remove a die if you deform the top die? I plan to drill holes and thread them so I can remove the front plate.
-
What about clinker? That slit looks like it would plug up easily.
-
I think your best bet is to just put it back together and use it till it fails. In the meantime look for a blower with a good gearbox and a busted fan housing. When you find one, just attach your good housing to the donor gear box. After that.....just heat and beat yours until you either break it loose or you just break it period. And since there seem to be no videos showing removal of that gear, you may want to make one. If you succeed, others will see how you did it. If you fail, others will see how to NOT do it. Either would be informative.