Donal Harris
-
Posts
970 -
Joined
-
Last visited
Content Type
Profiles
Forums
Articles
Gallery
Downloads
Events
Everything posted by Donal Harris
-
I agree with Lou. Would like to see a walkthrough on the guard construction. Edited to add: Why leave the gap there?

-
 Shaping the end of the handle to make it crooked seems like a lot of work for anything other than a hammer. I think I will just make a round drift and reshape the hole. Then no one will ever know I had screwed it up initially. (I just realized I misspoke in my OP. I intended to say I would cool down the thin side and not the fat side. Cooling the fat side would just make the thin side thinner.) Swedefiddle, I assume using a center punch instead of a drill would work? Any sort of setup would be better than just “winging” it as is my usual practice. The reason I decided to put a handle on it was the punch was too short. I was trying to punch holes in a hook for a coat rack and the steel being punched flipped up and branded my pinkie finger.
 -
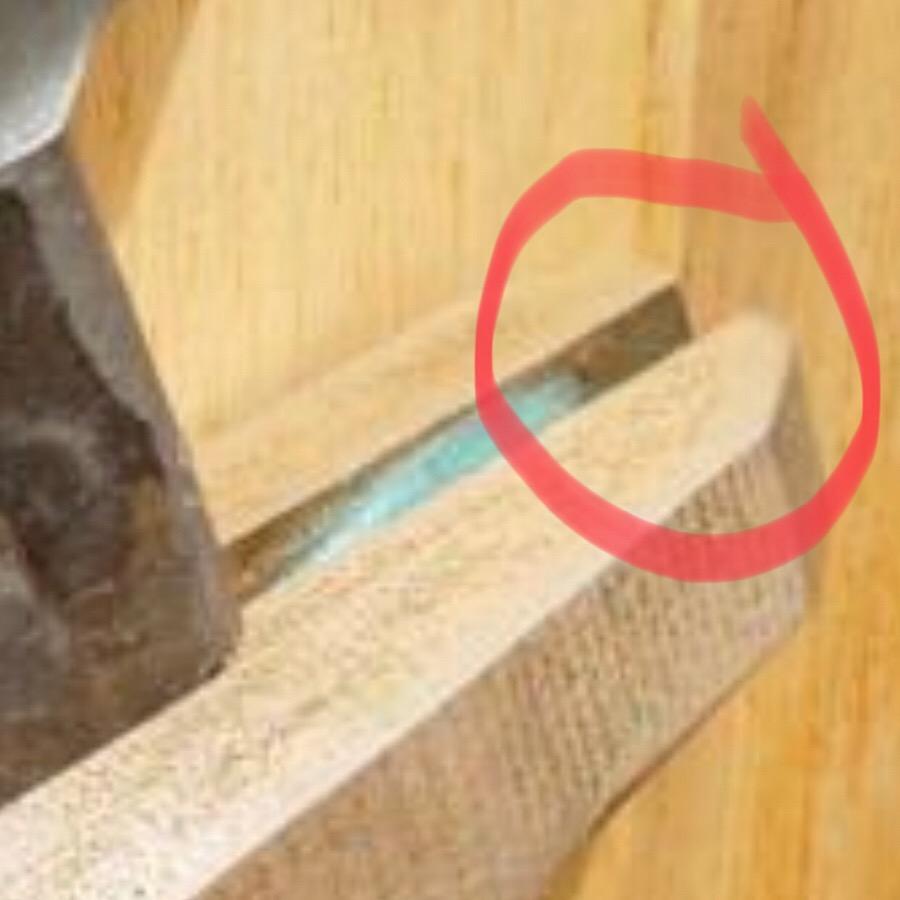
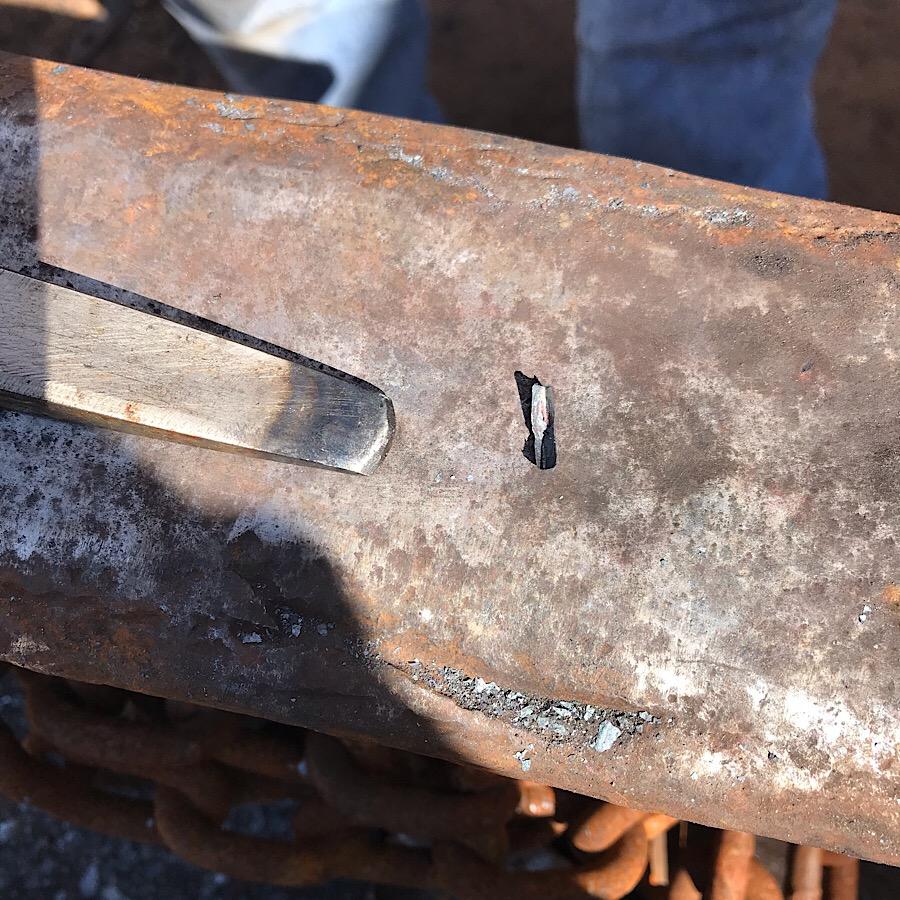
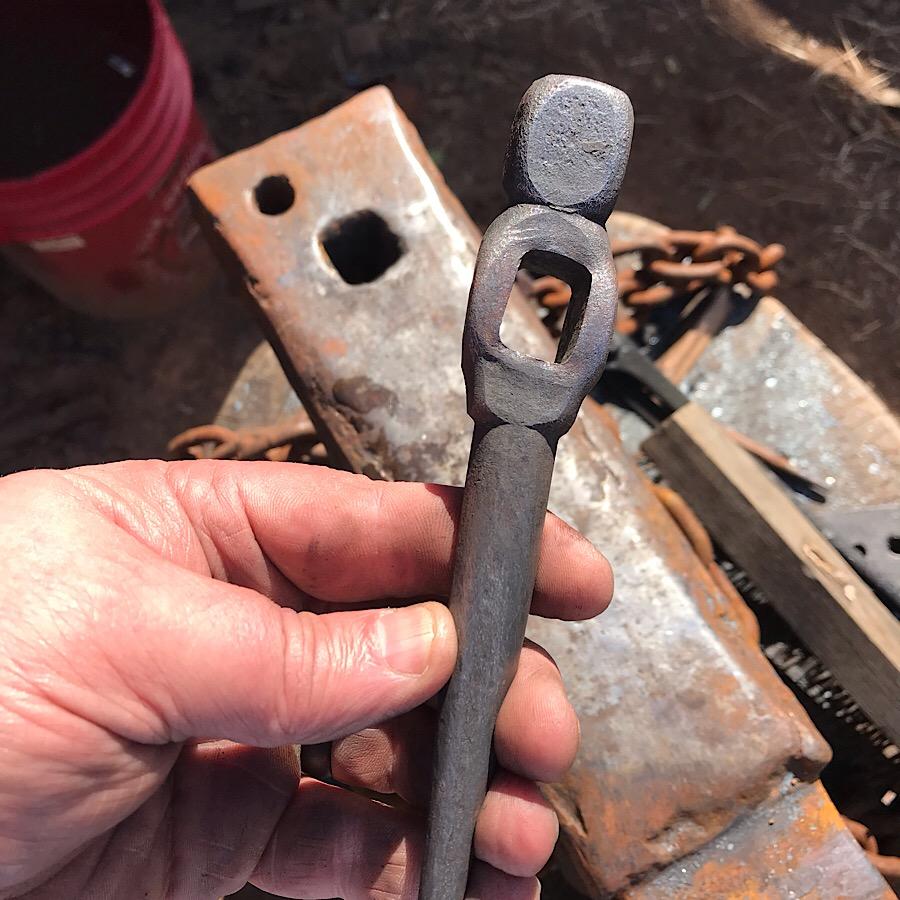
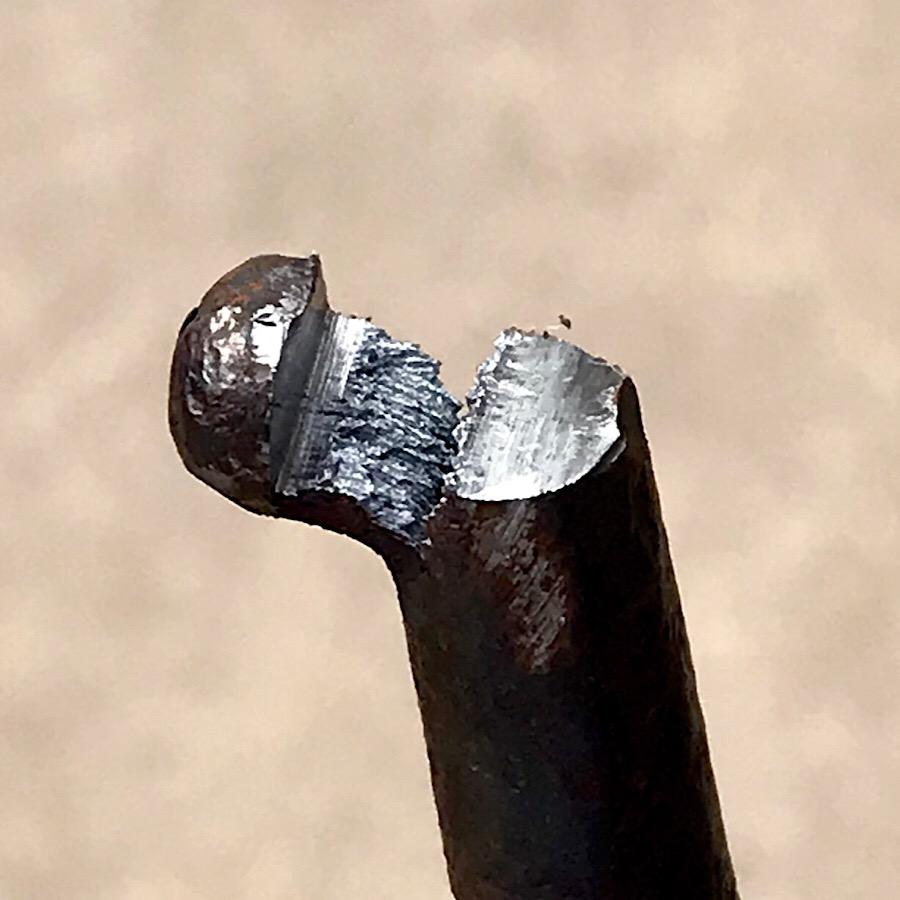
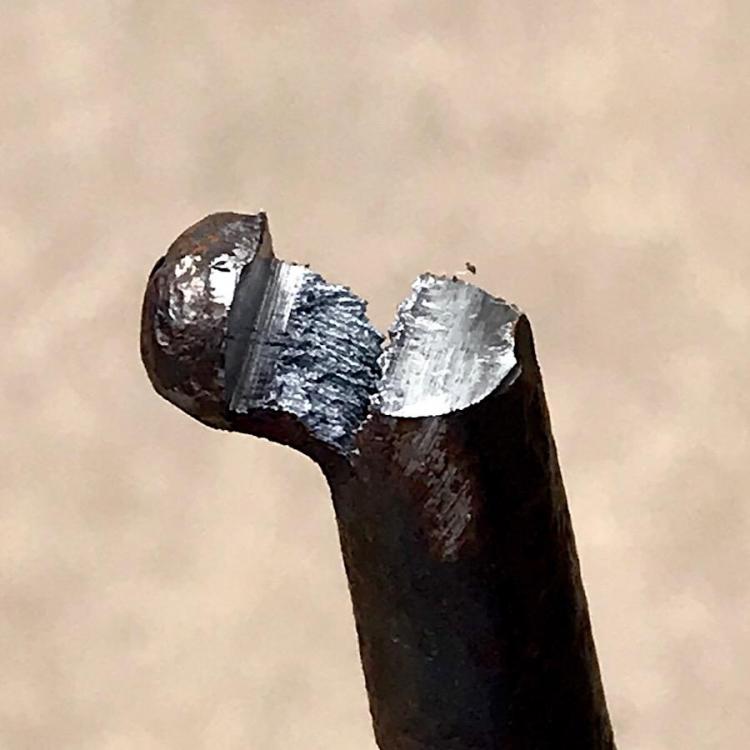
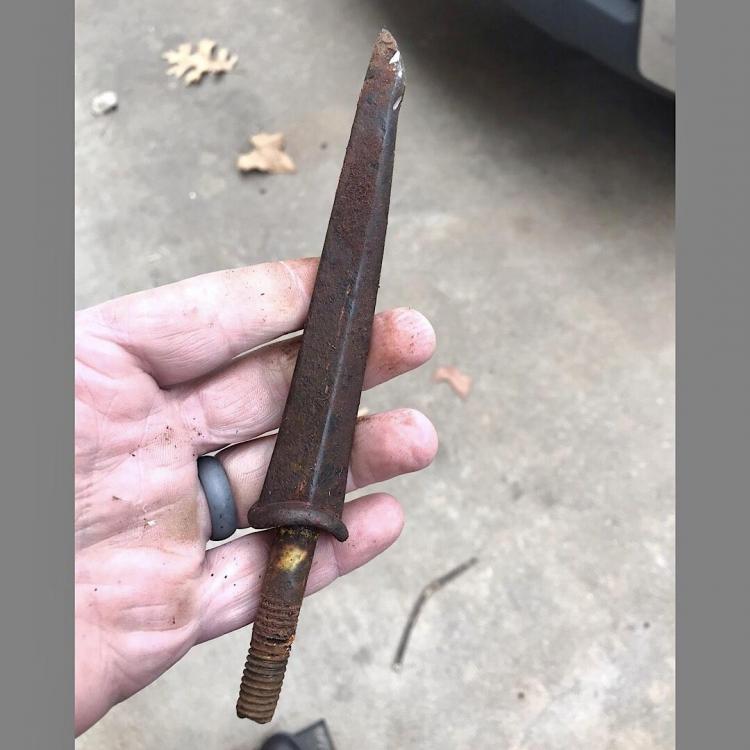
I assume the answer is “you don’t”. i could tell after the first couple of whacks that the slit was not going to end up parallel. I thought I might could just flip the steel 180 degrees each time I cooled the punch. Didn’t help, as you can see in the first picture below. Had it just been a problem of one side moving more than the other when drifting, I would have cooled the fat side. I am thinking now I should have just turned it over and tried again at starting the slit. I was very surprised at how little steel was removed. That can be seen in the second photo along with the tip of the punch/drift used. I used sucker rod to make the punch. The punch being slit was made from a tie rod end of unknown type. The third photo shows the punch after the hole was drifted to the size I wanted. You can’t see the tip but it is just out of the frame. It will be a round punch. Were this a hammer I would be concerned about the hole being cocked, but since it will just have a round handle. Why not drift the hole round? I didn’t have a round drift. That still has to be made. Could I have fixed the slit before drifting? Would just making a round drift and drifting it round now be best?


-
Tie Rod Ends and Threads in Scrap in General
Donal Harris replied to Donal Harris's topic in Slitters, Punches, Drifts, etc
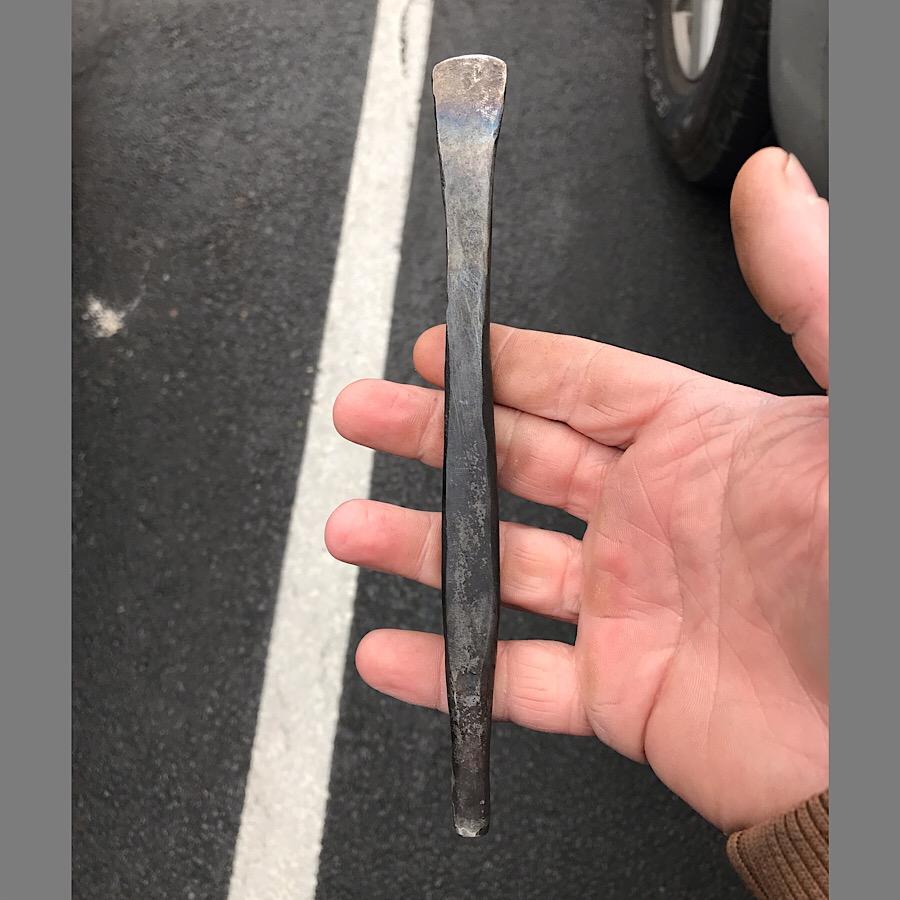
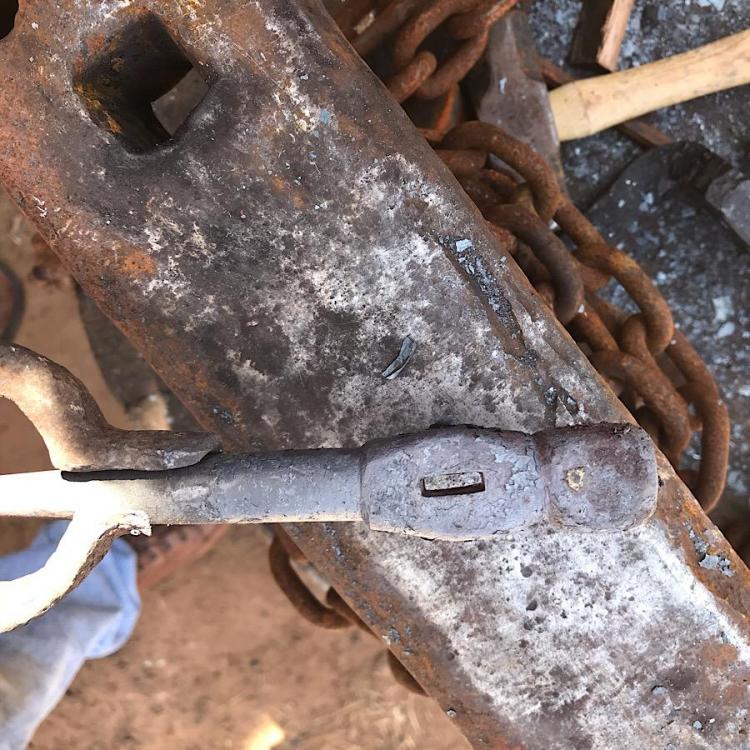
The second tie rod end above I made into a hot cut. It can be seen in the attached photo below on top of a cable spool. (The hot cut was not the subject of the photo so it is in the extreme top left of the photo.). It doesn’t look like that today. It now has a thick washer about midway up to keep the hot cut from being driven too far into the hole. The reason I put the washer on was I grew tired of having to tap the shank of the tool to get it out of the anvil. I couldn’t grind all the thread away. The shank would have been too thin if I did. Besides I expect Daswulf is correct. As long as I am not using it hard it should be fine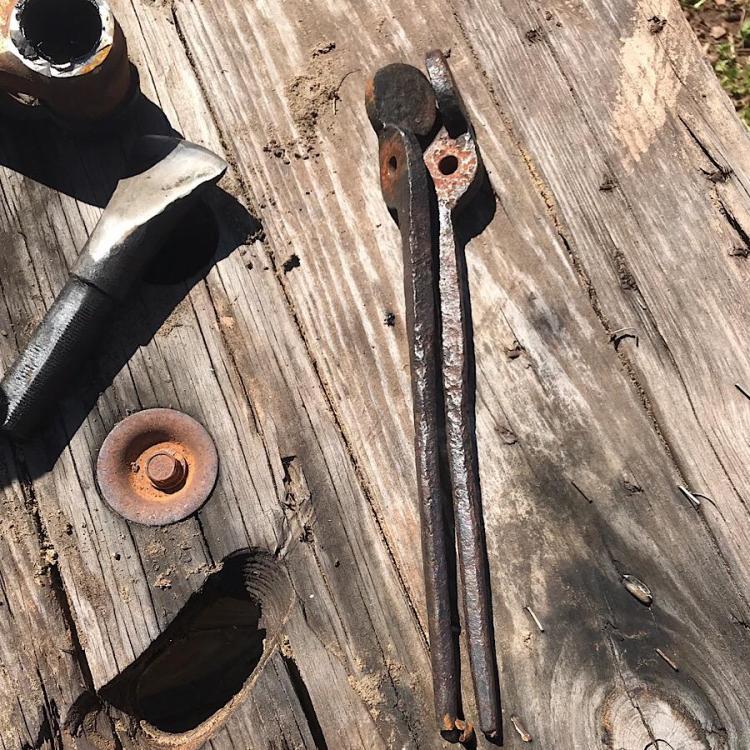
-
Old thread, but on quite a number of the old anvils I have seen the pritchel holes have been broken. Why would anyone want to risk such a thing?
-
Isn’t the only commercial source of WI just salvaged old stuff? Why would someone want to use something special to make tongs today when just normal steel scrap will do?
-
I picked up most of my tongs from someone who wanted to see his father-in-law’s tools and equipment go to someone who would use them and was not just wanting to get stuff cheap and then sell it for a profit. The surface of the tongs has always seemed different than what you normally see on rusty tools, so I took the end of the reins on one of the sets that needs the rivet replaced to see how it sparked. It sparked a lot like my post vise, horn of my anvil, and old wagon tyres that I know to be wrought iron, so I cut the tip half way through and bent it. It split and didn’t break. I assume it is wrought iron? If so, almost all the tongs I bought are wrought iron. When would tongs have no longer been made from wrought iron?
-
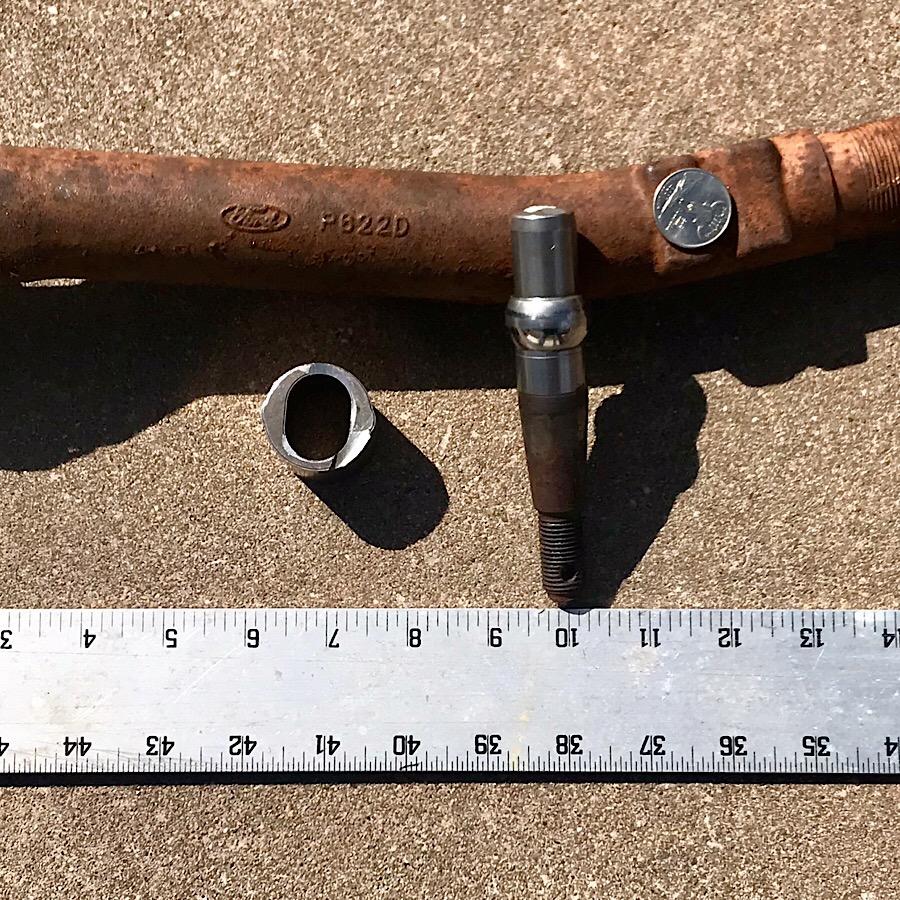
I make chisels, punches, drifts, and fullers from tie rod ends, but this one is much larger than any others I have used. It is marked “ford p622d”. i don’t need a drift as thick as this. My Hardy hole is small. 7/8” I think. To use such a thick drift I would need to fabricate a portable Hardy hole. I suppose I could make a few handled punches? I don’t know the proper name for it, so will just say the ball that goes in the socket. That I think I will forge into a handled center punch. What about the socket? It sparks pretty well. I am thinking I might cut it and unroll it to use as the bit in a hatchet. I have wrought iron wagon tyres to use as the head. I thought I might forge weld the bit into the head. The axe, should I use mild steel at first rather than experiment with my limited supply of wrought iron?

-
What can I make from harrow tines?
Donal Harris replied to Donal Harris's topic in Blacksmithing, General Discussion
My first attempt at turning one of these things into something was pretty much a miss. I was going for a veining tool. The tip hardened well in oil and I tempered it to a light straw color. The reason I say it was a miss is it is very difficult to “walk” it down to form a straight line to form the veins in a leaf (mild steel). It bounces. With a veining tool I had forged from sucker rod it doesn’t. You can’t see it from the flat on view in the attached photo, but the tip is not inline with the striking end. I believe that is why it bounces. I also don’t like the striking end being so small and easily rounded over. I believe I should have just chopped the threaded end off instead of leaving it on to make the tool longer. Had I heat treated it and tempered to a blue color, it might have been better. Instead I did not heat treat the striking end at all. Tempering to blue should have made it less deformable, yet still softer than my hammer face. The tool I made from sucker rod has a tip that is just as asymmetrical when viewed flat on as this harrow tine tool, but it is rounded more and is much better aligned with the striking end I will try again.
-
Let’s see how far I can get without cheating. Frosty: Alaska I believe. Expert on Naturally Aspirated Ribbon Burners TP: New Mexico, but he seems to have lived pretty much everywhere at one time or another. Has a method for finding anvils named after him. JLP: Massachusetts? Definitely some place in the NE. Produces excellent videos. Sometimes I wish she would explain what she is thinking more, but the written narrative does a good job of explaining what she is doing. Evidently she also gives ninja lessons. IDF&C: Arkansas. I believe your wife is involved in what you do? If true, you are truly blessed. Charles Stevens: Bradley, Oklahoma. At first I thought he was older than I am, but he is actually younger. Very knowledgeable about forge design and the history of same. Expert and perhaps the original designer of the JABOD forges. He tried over a series of PMs to help me fix a problem with my forge. LazyAssForge: Sterling, Oklahoma Sells a very good project “sketchbook”. I am not sure if the drawings are done by him or if the artist is actually his wife. I believe it is his wife. He raises mules. I am not sure if he races them, hunts with them, or just likes to look at them Steve Sells: likely wrong here, but I am going with Ohio. Definitely north of me. Has a son. Makes custom knives, but also does traditional blacksmithing. Not a real fan of stock removal. Believes forged blades are the best blades. I gotta say I agree with him. He did write the book after all. Glenn: I’m going with Michigan or Ohio. Definitely a northern state I think. I should know because I have certainly PM’d him with enough questions. Drawing a blank after that.
-
Texas is stupid thick with blacksmiths and bladesmiths. I forget who said it, but you can’t swing a stick without hitting a bladesmith in Texas. There is a section down near the bottom of the Forum which should help you find a blacksmithing group within driving distance of you. I am not sure how many generations it would be, but my dad’s side settled in Pooleville, Oklahoma when the Civil War ended. It was called Elk at the time and was in the old Indian Territory. There isn’t much there but grass now. It could have been worse though, one of the brothers settled in Bonham, TX after the war. I really lucked out there. i grew up beside a red dirt road about 5 miles south of Rush Springs, OK. Definitely not a city boy, but unlike pretty much everyone else in my family, I did not work in the oilfield after leaving home. Instead I became a Clinical Laboratory Scientist and have spent my whole life since then working inside hospital labs where the temperature is a steady 22 degrees Celsius year round. (We were once Medical Technologists. Why and when it became CLS instead of MT is a boring story. Clinical Laboratory Scientist sounds pretentious and silly.) Pretty much the same here. But that is what I like about it. It is cool learning something new almost every time I am at the forge or anvil. I may not be able to produce anything beyond a misshapened lump, but it is a mishapened lump that “I” made myself using tools that made myself. (Not the hammers. Those were all rusty old heads I bought at yard sales, cleaned them up and profiled them with an angle grinder, and then installed new handles from wood I took from an Osage Orange tree.) Another thing I like about blacksmithing is it is very easy to learn but almost impossible to master.
-
How could you have spent any time at all in Texas and not known what sucker rod is? The stuff is everywhere. :-) It is pretty much the steel equivalent of duct tape. Farmers and ranchers use it for everything from making hay feeders to fences. It is also good for making punches, chisels, and other tools. You should be able to find it for $7-$10 per 25 foot section. It probably comes in other thicknesses, but most seems to be 3/4”, 7/8”, or 1 1/4”.
-
What can I make from harrow tines?
Donal Harris replied to Donal Harris's topic in Blacksmithing, General Discussion
I see what you did there as well! Until I was an adult I thought it was pronounced ‘harrah’ because that is the way both my dad and granddad pronounced it. -
Newspaper and kindling. Although I do cheat a bit on that in a way. I have an old electric crock pot that I use to melt paraffin from old candles I buy cheap at garage sales. I split scrap lumber into thin 5” long strips. I soak the strips in the melted paraffin until they no longer float. Dryer lint works as well, but I like the wood better. I take a page from the newspaper and place a small bit of crushed bituminous coal and two or three pieces of the thinner wood strips inside the newspaper. I wad the newspaper and other stuff into a loose ball. Over that I place about 5 or 6 of the paraffin-wood strips in a camp fire arrangement. Around the edge of that I place coal. I light the ball with a match or grill lighter and turn on my blower at a low setting. In just a few minutes my forge is burning well. No compressed O2, diesel, or gasoline needed.
-
What can I make from harrow tines?
Donal Harris replied to Donal Harris's topic in Blacksmithing, General Discussion
I heat treated one in motor oil. It hardened, but not as much as other mystery metals I have. I’m going to try water. I don’t have a welder, so scrap art isn’t an option. If they don’t make decent punches, I will make a letter opener or something. (I may be using the wrong term. Perhaps fuller is a better term? I don’t plan to punch holes with them, just move metal like I would with my fingers in clay. -
God bless the SCABA and Byron Donner who stores our pile at his place in Norman. Exspecially at the rate I burn thru the coal. It is pretty good stuff too. Years ago, before my time, they got it from Texas. Brown coal. Not so good I have been told.
-
Well yeah. Driving an hour costs money, but fill two drums full while at the clubs pile and then hang out, eat, talk to the smiths who have been doing this a long time. Learn a thing or two. Well worth the gas.
-
Are there no blacksmithing associations near Dry Ridge, Ky? I believe SCABA coal is $.07/lb. I know nothing of the other ABANA affiliates, but assume most would have similar setups for member coal.
-
What can I make from harrow tines?
Donal Harris replied to Donal Harris's topic in Blacksmithing, General Discussion
The tips aren’t diamond shaped. About halfway down one side is rounded. When I was a kid they were “dragon teeth” and the bent ones were “dinasour claws”. My Poppy’s resource center was good for hours and hours of adventure. -
So the deer bone has a purpose? I thought perhaps it had just fallen in the bloomery.
-
What can I make from harrow tines?
Donal Harris replied to Donal Harris's topic in Blacksmithing, General Discussion
Das, I suppose that depends upon the definition of “loaded up”. It had 80 tines, but two of them were actually just RR spikes welded to a bolt. 78 may not be loaded up with tines, but at the very least I can burn and break them until I learn to make something out of them. I think that’s the ticket, Glenn. Resource Center and not scrap pile. To my wife it is that “ugly pile of junk out back”. It was in hopes of making some racks to organize the resource center that I came home with the harrow. I thought I could take the tines out and have posts with predrilled holes to attach shelves to for a couple of resource racks. -
Deer bone?
-
What can I make from harrow tines?
Donal Harris replied to Donal Harris's topic in Blacksmithing, General Discussion
Medium carbon. I say that only because sucker rods are largely medium carbon and the spark pattern and color looks just like that. I assume high carbon steel would not likely be used for harrow tines. They wouldn’t necessarily need to be hard, but would need to be resistant to wear and breakage. I believe curved tines are spring steel. As for fines of the type I have I couldn’t find much, although I was able to find several online stores selling them. Edited to add: You can’t see it in the picture, but the tines have a diamond shape profile. -
It sparks like an MC steel so it should be hardenable. Other than small punches, fullers, and drifts, what other tools could I make from them. Or even non-tools? I plan to make a rack for steel from the round tubing they were attached to. Assuming I can do so without an arc welder.
-
Beautiful! Why not reforge the fasteners to have square heads? Would forged fasteners not meet code? The modern fasteners look out of place.