
Frank Turley
-
Posts
2,607 -
Joined
-
Last visited
Content Type
Profiles
Forums
Articles
Gallery
Downloads
Events
Everything posted by Frank Turley
-
Old chisel, what kind of steel?
Frank Turley replied to 30cal_Fun's topic in Blacksmithing, General Discussion
Test an unknown to some knowns. You may be pressing too hard against the wheel. Use a very light touch, and you'll be able to see the shower and lines better. -
OOOOOLD Stake Anvil
Frank Turley replied to eric sprado's topic in Blacksmithing, General Discussion
I think the catalog of the ABANA conference, Carbondale, IL, 1976, had a photo of an anvil very much like yours. They identified it as a shipsmith's anvil, apparently something of a size that could be carried and used on board a ship in the early days. -
Boy Howdy! We could write a book on this subject. I've been forge welding for 47 years. In an everyday coal forge situation with mild steel, you have two welding heats. One is a sweating heat with no sparks being emitted. The other is when you may notice a few incipient sparks, which may be OK. What you don't want is a HUGE shower of sparks, because then you're oxidizing and burning the metal. It is best to weld at the sweating heat, so named because the surface slag or cinder looks runny. At a sweating heat, you may lose time in terms of a few hammer licks, but there is less chance of burning the metal. The steel is at the incipient burning range when the sparks appear. I've taken a half dozen sweating heats over the same area without adversely affecting the steel. The sparks, by the way, are the bright ones that burst about a foot or so from the metal. They are actually particles of metal separating from the parent bar, so there is a weight loss, though minimal. We see the same kind of sparks when oxy welding. We may need a chemist to deal with the next question. Present day materials scientists call forge welding or fire welding, "solid phase welding," "solid state welding," or "bonding." I don't think that the surface of the scarfs or fagots are molten steel. I don't think that you are going to blow out any molten iron or steel. The metal is in a solid state. It is what the old timers called "pasty" for lack of a better term. When fire welding, you DO want to get rid of the surface molten slag. This molten material is a compound of the flux and scale, now melted together. Most smiths will either shake the pieces of metal in midair or rap them against the anvil before laying them on the anvil to weld. You can see the surface slop falling, which is good. On small pieces, they are occasionally wire brushed before welding, but most often they are shaken or rapped. The reason for using RELATIVELY light blows when starting a weld is to prevent "shear." You're trying to keep the material from sliding apart which would occur with a hard blow. The few light licks to start the weld allow for cohesion instead of shear. THEN you can hit harder, once the cohesion takes place. Regarding seams, which we call "shuts," you can sometimes get rid of them with another welding heat and by using light, rapid blows. http://www.turleyforge.com Granddaddy of Blacksmith Schools
-
I came to smithing through horseshoeing more than 35 years ago. We used coal forges for shoeing and smithing. I have had beaucoups blacksmith students over the years at Turley Forge School. I don't think I've ever seen a horseshoer wear gloves except maybe thin deerskin in the wintertime. In shoeing, you're handling clinch cutter, pulloff pincers, clinching tongs, hoof knife, rasp, nails, driving hammer, and that's all BEFORE you go to the forge for your tongs, rounding hammer, forepunches, pritchels, etc. You'd go nuts trying to handle all those tools with gloves on. When I began to do ironwork after I let the horses go, I continued NOT to wear gloves. I do not miss them. I have students who INSIST on wearing them and they get used to picking up hot iron with them on. Then, when they don't have them on, they pick up hot iron...force of habit. It doesn't take them very long to inspect that hot iron, if you get my drift. Sometimes, the iron is so hot that the glove gets hot, and you've never seen a person move so fast as trying to shake and pull that hot glove off! I laugh. Then, there is the handling of different tools. You may want to pick up a scriber and use it. Gloves are in the way. Sometimes, a guy may remove his gloves to handle a small tool. Guess what? He forgets where he put the dang Gloves. Oh yes. It happens. Then you waste time going on a glove search. Some people get blisters easier than others. If that happens, I usually put a gauze and adhesive tape on, the tape wrapped around the entire hand. That way, they are still sensitive to the tools and the work. There are exceptions. If I'm doing heavy work at the power hammer, I wear face shield, gloves, and apron. I look like a guy heading for outer space. But for smaller work at the anvil, no gloves. As for comparing blacksmithing to fusion welding, there are two similarities: the metal is ferrous and the metal is hot. Everything else is totally different. http://www.turleyforge.com Granddaddy of Blacksmith Schools
-
Beautiful photoessay of Romanian Blacksmiths
Frank Turley replied to JimDawdy's topic in Blacksmithing, General Discussion
I covet the big anvil. -
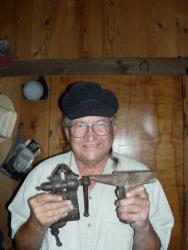
I agree with Brian that #1 is a hoof nipper. They are kind of "cheesy" and formerly were pictured in farm catalogs; not as good as the more expensive ones where there were TWO sharpened jaws coming together. The #3 tongs we always called "clip tongs," and in the early days they were often used when forging flat stock lathe tools. If the "clips" or "ears" are full length on the jaw, we called them "box tongs," used in pretty much the same way. My first thought on #2 was a crucible holder, which has already been mentioned. #4 is anybody's guess. I have some plow share tongs that have two sets of jaws going to one pair of reins. One set of jaws attaches to the top of the share length while the other set attaches to the bar behind. They are a real "whimsey" as lots of folks wonder what they are. http://www.turleyforge.com Granddaddy of Blacksmith Schools
-
Out of three lengths of 3/8" round or square, forge a turned eye at the end of each. Run the pointed end of one rod through the eyes of the other two, so that all three eyes are adjacent. Spread into a tripod. If the eyes are large enough, you can hang an S-hook or trammel from one of them.
-
damascus steel gun barrels
Frank Turley replied to KINGFISH's topic in Gunsmithing, Muskets, Flintlocks etc
I think that Bruce Lepage may still be around. He used to pattern weld barrels. He's either in Minnesota or Wisconsin. Bruce is an expert engraver and engraves the froes that are given to Alex Bealer Award recipients. -
I suffered from heat exhaustion when I was shoeing a horse in the hot summer sun. I felt weak and nauseous, so I sat under the shade of a tree. The lady customer came out and was concerned. She said, "I know just what you need, iced tea!" When she returned from the house with the tea, I took a drink and immediately vomited. From that experience, I would suggest not drinking much if anything, until you're somewhat recovered. http://www.turleyforge.com Granddaddy of Blacksmith Schools
-
I'm one of the ole fossils who has demonstrated in California for CBA on four occasions: Petaluma, Cazadero, Santa Ana, and Vista. The Santa Ana workshop was hosted by the Orange County Guild, a division of CBA. There is lots of activity in California. Check out the Samuel Yellin Cemetary Gates in Redlands. It's worth the trip. http://www.turleyforge.com Granddaddy of Blacksmith Schools
-
I'm a computer fossil and a rookie, so I can only tell you about two full page color photos of two spit jacks in "Antique Tools and Instruments from the Nessi Collection" plates 93 and 94. ISBN 88-7439-124-2. Plate 93 shows one from Northern Italy, circa 1600. The other is from France, circa 1810. http://www.turleyforge.com Granddaddy of Blacksmith Schools
-
There were only 1,000 copies printed for the 1st edition. Mine is signed but also has a hand written number and date of the signature on page vi. That makes the book special, but just how special in terms of dollars, I can't say. http://www.turleyforge.com Granddaddy of Blacksmith Schools
-
Yes, no, and maybe. If you're careful and skilled with a torch, you might get a clean looking braze where only a thin line of brass would show. If you're forge brazing, it is more difficult to control the flow of the brass. In either case, I would use the proprietary brazing rod, because it's alloyed to melt at about 1600ºF. Some old-timey brazing and horseshoe calk brazing was done using pure copper as the solder, but although resulting in a strong braze, copper melts at 1981ºF, so it may be more difficult to work with compared to brass. The iron must be in close contact with no gaps or daylight, so that the brass can run between the surfaces by capillary action. The iron will be at a good cherry red heat when the braze takes place. No matter what you do, if you don't charge enough, this job will eat your lunch. You must also ask yourself, am I skilled enough to take this on this class of work? Can I forge new nails if necessary? Can I install without wrecking the table?
-
Eric Sprado, In the olden days, I shod horses in Salem for about one year. On my site, http://www.turleyforge.com under Links and scrolling down, there are sequential photos of me welding up a strap hinge barrel. I normally send out hard copy school brochures, so a postal address left via my website would be the route to go. Best, Frank Turley
-
I see that keeping the original hardware could be considered a big deal. I also see that if you're a good smith, if you have some wrought iron, if you understand some of the subtleties of the forged hinge construction, then your piece will be just as authentic as the early piece. There is the possibility that yours may even be better in quality and strength. By subtleties, I mean for example the knuckle length. The central knuckle of a three knuckle Colonial hinge is often just slightly longer than the two end knuckles. Say the barrel length is 3", then if each end knuckle is 15/16" long, the central one is 1 1/8". Nowadays, however, we tend to think that there should be as much "meat" on one leaf as the other...meaning the end knuckles are 3/4" and the central is 1 1/2". Another sublety may be the peening of the hinge pin. I think that very little was left protruding either end of the barrel for the cold upsets. Each upset became somewhat flattened and could even be burnished a little with light finishing blows. Something that Peter Ross did that surprised me at first; he cold punched the nail holes. The finished holes were spaced properly, but they were a little crude in appearance. There was some burr cleanup. Peter explained that this was an expedient method for a Colonial smith, and that the nail head would cover the slight irregularity of the holes. http://www.turleyforge.com Granddaddy of Blacksmith Schools
-
I confess ignorance about the survival rate of hinges on drop leaf tables. I think that Peter Ross prefers to call the butterfly hinges "dovetail hinges" but no matter. We're on the same page. In the photo, I don't think the hinge is coming apart. The forge welded barrel has the "teardrop vanishing point" because of the way it is forge welded over the radius of the anvil edge. It is not a defect. To redo a weld that may be opening, we get into the area of restoration. If clinch nails are used, it's going to be a booger to get them unclinched. I have done this on old chests and cabinets, and great care must be taken not to damage the wood unduly. Sometimes, a nail will break. Assuming the hinge is removed, you now have the problem of attempting to forge weld a leaf without damaging or welding the barrel with its knuckles. I saw Peter make this style of hinge, and the weld was made on the fully doubled leaf with the pin still in place! When the weld was completed, the quenched leaf was clamped in the vise, and the pin was driven out cold with a pin punch. Only then did the hacksawing and filing of the knuckles begin. When the old, removed hinge has either end of the pin peened over, you're not going to be able to do the weld without the other leaf and knuckles getting in the way, especially in terms of taking heats. Also, when you hammer on the leaf, you'll displace metal, including the holes. My conclusion would be that to make a new hinge with matching nail holes would be easier than trying to reforge the old hinge. When we think about strength, let us not forget that a standard Stanley 5-knuckle butt hinge is made of 16 gage metal with none of the barrel welded; it is just rolled and tucked. Yet nobody is returning to the building supply to complain about it's weakness. The old New Mexico cowboys say, "I don't care how weak it is, as long as it's strong enough." http://www.turleyforge.com Granddaddy of Blacksmith Schools
-
Iron City Tool Works, Pittsburgh, PA, 1854-1958. Blacksmith tools; hammers; hoes; picks; railroad tools; & vises. The company was acquired by Warren Tool Corp., Warren, Ohio, in 1958. reference: Directory of American Toolmakers, Early American Industries Association, 1999. http://www.turleyforge.com Granddaddy of blacksmith schools
-
Just a guess that the vise might be an old Iron City brand made in Pittsburgh. Look on the movable leg opposite what is shown in the picture and look for a stamp, a six pointed star with IRON CITY inside. http://www.turleyforge.com Granddaddy of Blacksmith Schools
-
Too many years ago, pre internet, I read in an English book about a stake shank being inlet into the end grain of a timber. If memory serves, the worker sat on the edge of another (movable) timber with his feet on the ground. This latter apparently acted as a stool. From this position, he did his raising or whatever. The term "stiddy" was used to describe the stake and timber (I thought). I search-engined stiddy and found that it was used to describe a small stake-anvil used mainly by cutlers. In any event, it sounded like a good way to work for prolonged periods, although I haven't tried it. http://www.turleyforge.com Granddaddy of Blacksmith Schools I thought of this by reading another thread about stake plates.
-
One other consideration. Tom Joyce told me that he had used one of the "knots" of a roofing tar brush. A knot is one of the three or four circular clumps of fibre, usually tampico, found on the wooden brush head. Each knot looks like an oversized shaving brush and is banded at the top with sheet steel, at least on the one that I own, branded "4K Mohawk": 18 ga x 3/4" bent to a 1 1/2" diameter. A knot is removable by pin punching the small wire nails which hold it to the wooden head. Then you must figure out a way to fab a sheet steel attachment for both the brush and the handle shank. I think that oxy-acetylene welding with a sanding cleanup and painting is the route to go. If you made a ferrule to snug-fit the existing ferrule, you could use slender, annealed, cross-rivets transverse of the shank length. The holes would go through the sheet, but also through the hidden, wooden form inside. I guess if the broom user wants to burn the brush on hot coals, that is their problem. At least, tampico is better than a curled up, melted nylon brush. http://www.turleyforge.com Granddaddy of Blacksmith Schools
-
Economic coal shake up
Frank Turley replied to thecelticforge's topic in Blacksmithing, General Discussion
This is what I've read and have been told. Coal is most often sold in 100,000 ton lots and trainload lots, and maybe half of our coal goes overseas for steel making plants, especially Japan. That is why us little guys are having a hard time when we want one 100# bag to one ton. I used to get coal loose in my pickup at the King Mine near Durango, CO, but about 3 years ago, they quit selling to the public. They will sell to a retail distributor, if that retailer can buy a large dump truck amount, about 25 tons or more. The last time I was there, I saw one large truck load after another being filled and hitting the road. I'm pretty sure they had a contract with the Four Corners Power Plant which is not too far from the mine. http://www.turleyforge.com Granddaddy of -
I enjoyed seeing your work. I've done repro work in the Spanish Colonial period of the southwestern U.S. About unthinking our "design prejudices," a drawknife could be a push knife with the handles placed differently. The Japanese sen comes to mind where the handles are side extensions. http://www.turleyforge.com
-
question on repairing the screwbox on a post vise.
Frank Turley replied to Countryboy39067's topic in Vises
From someone who has not done this. Back in the day, one could buy something called spelter. It was a brass powder or finely granulated brass, and it could be mixed with borax. Further, if the mixture were moistened, it could be brushed on the area to be brazed. You want a tight fit on the parts to be brazed, no daylight. The molten copper runs between the surfaces by capillary action. The iron must be at least at a cherry red. I was thinking of possibly getting a more uniform heat in a muffle, perhaps by using and heating a pipe. Proprietary brazing rod is alloyed to melt at about 1600ºF, which makes it a known quantity and fairly easy to use. Other brass alloys may melt at higher temperatures. Reference, James F.Hobart,"Soft Soldering, Hard Soldering and Brazing," Van Nostrand, 1912, 1919. http://www.turleyforge.com Granddaddy of Blacksmith Schools -
Blacksmithing classesin Nerbraska
Frank Turley replied to don't tread on me's topic in Blacksmithing, General Discussion
I knew that the Stuhr Museum in Grand Island had a working smithy, because Ward Brinegar worked there for quite a while before settling in the Santa Fe area. I see that the museum offered a couple of weekend classes in April. http://www.stuhrmuseum.org/blacksmithclass.htm http://www.turleyforge.com Granddaddy of Blacksmith Schools -
350 Layer Pattern Welded Belt Buckle
Frank Turley replied to Jose Gomez's topic in Blacksmithing, General Discussion
Pep, Very neat work. Looking forward to seeing you at the June Campout. Frank Turley