
Frank Turley
-
Posts
2,607 -
Joined
-
Last visited
Content Type
Profiles
Forums
Articles
Gallery
Downloads
Events
Everything posted by Frank Turley
-
Grafvitnir sent in the sequential photo article by Nietfeld. I had not seen that before, but that was pretty much what I was attempting to explain verbally in my earlier post about bolt tongs. Yes, flat stock; that is the route to go. Starting with round stock will keep you busier than a three legged cat in a sand box. http://www.turleyforge.com Granddaddy of Blacksmith Schools
-
Most old bolt tongs were made of flat stock shouldered on edge over the anvil radiused edges, some distance back from the end. The shoulders are on opposite edges, near and far of the anvil edges to define a rivet-hole boss. The near made shoulder demarcates the square-sectioned neck leading to the jaw, a short length on the end being left untouched. The far shoulder demarcates and defines the rein material which is drawn and lap welded to a rod. The neck is bent AWAY from the first shoulder making the shoulder disappear. This begins the somewhat 1/2 round curve it will have. The jaw is shouldered to make it offset so it stands proud, to be carefully hot split and opened to a Vee. A 90º jaw is more versitile than a half-round jaw. When the two pair are riveted, the jaws and reins can be aligned and fit to a specific piece in the vise or on the anvil. Bolt tongs do not need the small diagonal shoulder one sees on flat jawed tongs. That little shoulder provides clearance for the boss, and it is made at the base of the flat jaw. On bolt tongs, there is no jaw clearance needed, because the boss is a distance away from the jaw. "Keep the work of the Masters always before you." Samuel Yellin http://www.turleyforge.com Granddaddy of Blacksmith Schools
-

New smith, looking for book recommendations
Frank Turley replied to gonefishin's topic in Book Reviews
The book that helped me get started was "Plain and Ornamental Forging" by Ernst Schwarzkopf. It was reprinted in 2000 AD. There is an out-of print book that I think is the best to come on the market in fairly recent years: "Werk und Werkzeug des Kunstschmieds" (Work and Tools of the Artsmith); ISBN 3-8030-5040-5, 1981 AD. Lest the German title deter you, each printed page is in German, French, and English, so there is no need to attempt translating. The author, Otto Schmirler, was brought up in his family's smithy in Vienna, Austria. He became the chief designer for the firm, and his how-to drawings and photos are throughout the book. I have found http://www.dealoz.com to be one of the premier book finders. http://www.turleyforge.com Granddaddy of Blacksmith Schools -
Reflections on wrought iron
Frank Turley replied to Timothy Miller's topic in Blacksmithing, General Discussion
The pig iron was produced from iron furnaces. For example, let your search engine look for Cornwall Furnace or Meramec Furnace. They were in constant blow 24-7, and there were boo coo of them in the East and Midwest. The process was termed indirect. First, they had to make the high carbon pigs. Then they were refined and the carbon driven out as gases, in finery hearths. http://www.turleyforge.com Granddaddy of Blacksmith Schools -
Reflections on wrought iron
Frank Turley replied to Timothy Miller's topic in Blacksmithing, General Discussion
When my smithery school was relatively new in the 1970's, one of my students had ordered a few hundred pounds of the Swedish charcoal iron. Apparently, it was no longer being made, but there was a stockpile of it on the docks to be sold. He sold me some, and I still have a little. It is wonderful stuff to forge, more forgiving than say, the "cheesy" wagontire iron that you sometimes encounter. You can work it from lemon into a bright cherry. In general, wrought iron has very low tensile strength. When cutting on the hardie for instance, when it gets cardboard thin, the shearing blow will break it. I got some of the Wisconsin iron recently, and flattened it to sheet metal to make a lock escutcheon, and it behaved very well, no splits or separations. Pretty good stuff. Ref the spark test, my experience with quality WI is that there will be no bursting. However, you will get a few bursts from dead soft steel wire, including binding wire. In touching the WI lightly to the wheel, you'll get a shower of fairly straight carrier lines with "sprigs." Sprigs are short branches coming off of the carrier lines. At the end of the shower, you'll see an occasional space and a "dash." The WI incandescence is a little darker that that of MS. Regarding spark testing, compare the unknown to the known. http://www.turleyforge.com Granddaddy of Blacksmith Schools -
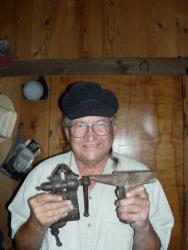
Judging by the overall shape, the "withered" ears, and the looks of the screw box, it is either a Columbian or an Indian Chief. The Indian Chiefs were prominently marked on the mount. If not so marked, I would say it's a Columbian. As a guess, the Chiefs look so much like the Columbians, that I think they were made by the Columbian firm.
-
Blacksmith Tooling History: Rating our era.
Frank Turley replied to kraythe's topic in Blacksmithing, General Discussion
Maybe we can pare this down a little. Alan Watts was a philosopher within my living memory, and as I recall, he once attended a coctail party where he encountered a woman of his acquaintance. During the course of their conversation, she told him that in her Buddhist studies, she was having trouble "living in the present." He replied somewhat in dismay, "But surely at this very moment in time, you ARE in the present." The woman had a zen-like epiphany and seemed to have conquered the elusive concept. So Kraythe, where you are in history is RIGHT NOW. "History," as an academic discipline, is a mere human construction. http://www.turleyforge.com Granddaddy of Blacksmith Schools -
Railroad Bridge Anvil
Frank Turley replied to tinybigsmoke's topic in Anvils, Swage Blocks, and Mandrels
I can't help you ID the anvil's maker, but I offer a footnote. These anvils were sometimes used in the oil patch, when they still used cable tools. The large tool was heated and dressed in the field by men wielding sledge hammers. http://www.turleyforge.com Granddaddy of Blacksmith Schools -
Definitive Test for a Forge Weld?
Frank Turley replied to kraythe's topic in Blacksmithing, General Discussion
The weld isn't all that good. The leftover seams, we call shuts. In a good forge weld the shuts either don't show at all, or they might show only on the scarf points. The safest welding heat is a bright yellowish white color with no sparks being emitted. You may have a few incipient sparks but NOT a big shower, or you'll begin to oxidize, burn, and ruin the metal. On a loop weld like yours, it is good to put a simple one sided taper on the free end to act as a "simple scarf." The taper is 1 1/2 to 2 times the stock thickness in length. This scarf allows the metal to "flow" together. If there is no scarf the metal end bites into the parent bar instead of fading into it easily. You can take a half dozen welding/sweating heats (no sparks) in the same area without damaging the metal. You wire brush and flux before each welding heat. On a weld area like yours, you can hit first on the scarf side, and then quickly on all four sides pepeatedly. The problem with taking many heats, is that you will lose stock in perhaps three ways. One is scale. Two is sparks. Three is hammer reduction. Therefore, the finished weld may be OK, but the stock has lost thickness and width. One test of a forge weld is to twist it hot. If it opens and goes haywire, then you'll have your answer. http://www.turleyforge.com Granddaddy of Blacksmith Schools -
You've got some good answers. As one responder suggested, the placement of the slot(s) must be just right. The slot must extend a little into the fixed leg, or you won't have anything to wedge against. I learned a while back that the key that precedes the wedge may be called a "jib key." http://www.turleyforge.com Granddaddy of Blacksmith Schools
-
The mix may be applied with more heat, say, above the heat rainbow colors, ie., above 630ºF, but below a black heat (approximately 800ºF). I heat in the forge. You get a semi-gloss black finish. I use old fashioned Johnson's floor paste wax applied with a cotton rag. To further protect the piece, you can give it a cold wax finish at any time followed by a light buff. You'll get some vapor which is not good to breathe, so I work outdoors or with the door and/or windows open. If you get a great deal of vapor and nothing happens, you're too hot. If you get moderate vapor and a black finish, you're OK. If you get a greasy coating and hardly any vapor, you're too cold. http://www.turleyforge.com Granddaddy of Blacksmith Schools
-
Hay-Budden anvil catalogue from 1914/15
Frank Turley replied to Timothy Miller's topic in Anvil Reviews by brand
Nice catalog! Thank you. I got my first anvil, a Hay-Budden, from a San Pedro, CA, ship salvage yard in 1963. I was traveling with a farrier, and it turned out to be a farriers' pattern with the clip horn. It weighed 158 pounds. It had two pritchel holes but no swell to the horn. Another HB farriers' pattern came to me many years later. It weighed 213 pounds and had a good 5"D swell to the horn. It is very sleek looking, one yard long and one foot tall. It has a narrow face, a clip horn, and two pritchel holes. Again, many years later, a 140 pound HB farriers' anvil came to me. It had the clip horn, no swell and only one pritchel hole. I often wonder whether the differences were because the company was transitioning from blacksmiths' to farriers' anvils, and it was making changes little by little. For instance, my little anvil had one pritchel hole because perhaps someone on the staff had not yet thought of two pritchel holes. I had the clip horn but no swell, because perhaps the swell had not been thought of yet. Now I see in the catalog that HB took custom orders. It could be that my anvils were simply custom forged with some features left in and some left out. Food for thought. http://www.turleyforge.com Granddaddy of Blacksmith Schools -
The hold down needs to have just the right curve so that it "chokes" into a top edge of the pritchel hole and the opposing edge at the bottom. It is a matter of experimentation. While on the subject of "third hands" however, Francis Whitaker showed a third hand that fit into the pritchel hole, and he used it to support a stock length when lap welding. I've made one. You forge an anvil-thickness length of stock, making it round at the end of a bar, reduced from a preferably square cross section, to be placed for a snug fit in the pritchel hole. You'll have probably 12" to 20" sticking vertically above the anvil face. A hot, 90º bend will take place at the anvil face. Insert the hot bar, pull it down and hammer a right angle. The horizontal, straightened portion can now pivot on the far side of the anvil to support a piece for a lap weld. http://www.turleyforge.com Granddaddy of Blacksmith Schools
-
Traditional smith's cap
Frank Turley replied to Bill in Oregon's topic in Blacksmithing, General Discussion
-
What causes pitting on the old wrought iron?
Frank Turley replied to woodforge's topic in Metallurgy
I've made a few pipe tomahawks. Some are OK, and a few were not so OK. I did study ones that were in museums. I have Peterson's "American Indian Tomahawks;" it is good and bears study. Milford Chandler wrote the appendix on pipe tomahawk construction. When he was a young man, he would go into the smithies and watch tomahawks being made. We are not talking here about quickly thrown together "throwing hawks" which are nothing more than funky hatchets. We are talking about exquisitiely forged pipe tomahawks which have an excellently filed false pedestal supporting the bowl and other interesting filing and finishing forms. At one time, I was a conservator at the Museum of New Mexico History Division. I confess that I didn't know a great deal about conservation, but I was able to study lots of tomahawks, swords, pistols, and rifles. I took apart and cleaned many rifles. Since that time, I have met a few professional conservators who have had college training in their field. I'm told that European conservators all receive extensive training. Currently, a local Santa Fe conservator is working with Tom Joyce to help preserve his African ironwork collection. Modern day professional conservators are steeped in chemistry. They must know about various forms of oxidation as it affects metals. They must know how to remove superficial rust and still leave a matte gray tone and some original texture. I can guarantee you that they don't use sanding belts. I used to clean superficial rust with a caustic soda solution and zinc crystals. When throughly rinsed and dried, I would protect the pieces with microcrystalline wax. Having had a little experience with tomahawks, I would say that one would look at the thickness, and shape of the blade, and of course, the surface texture and color. There is quite a difference between the wide long blades often traded to Omaha, Ponca, Osage, and Pawnee tribesmen, and the smaller versions most often traded in the Midwest and East. One important thing is whether the hollow smoking stem is still attached, and can it be dated (carbon 14?). What is the decoration on the stem? If a guy took a hot file and pressed it on the wood to make a charred design, one begins to get suspicious. What is the shape of the eye? I would suggest that an authenticator might get the same type of training as a conservator or at least work with a conservator to gain some of their sort of knowledge. Now a little story. Harold McCracken, now deceased, was a renowned authenticator of Frederick Remington Western paintings, drawings, and sculpture, mainly paintings. A dealer friend named Bill Center asked McCracken point blank, "How in the world do you do it? How can you be sure, or are you sure?" McCracken said words to this effect, "Well Bill, I have seen probably thousands of Remington, Russell, and other artists' paintings. At the present time, when I see a painting, and I get an awful gut level feeling, I take a closer look, and I'm looking for mistakes. The kinds of mistakes are perhaps the shape of a horse's head, the wrong color for sage brush, the Indian tipis are cone shaped instead of being a little straighter in back and more sloping in front. If I don't get that sinking feeling, I still inspect the painting closely, but I feel better about it possibly being authentic." http://www.turleyforge.com Granddaddy of Blacksmith Schools -
You're probably working too cold. In the British book, "The Blacksmith's Craft", all three shoulders of a flat jawed tong are done at a light welding heat. http://www.turleyforge.com Granddaddy of Blacksmith Schools
-
Getting two separate, scarfed pieces to lap weld can be more difficult than a fagot weld or welding a ring, for instance. For a number of years, I have been putting proprietary E-Z Weld compound on top of the borax, and it seems to help. I first put on the borax. When it glazes on the surface, it gets tacky. When the E-Z is applied, it tends to stick to the borax. http://www.turleyforge.com Granddaddy of Blacksmith Schools
-
I think the easy way would be to arc weld a square plate (1/2" ?) onto a vertical shank, and arc weld a haft onto it. It could even be mild steel. The working face is not dead flat. Around the bottom, you can fall it off about 3 or 4 degrees, maybe 3/8" in, so when you use it, you don't get edge marks. The largest U.S manufactured faces appear to be 3" square, at least the ones I've seen. I have a 3 1/2" square one marked AT&SF. They were made as small as 1 1/2" square. Using blacksmith techniques, I am currently not set up to make a large one. A smith could start with 3" square stock and fuller four sides, drawing it up to a head. Then punch for an eye. For one that size, it would certainly be advantageous to have a large power hammer and maybe one good striker to help fine tune it. I presently have some 2" round 18-wheeler axle steel, probably 1045. I could upset the heck out of one end, probably obtaining a circular working face. Nothing wrong with that. http://www.turleyforge.com Granddaddy of Blacksmith Schools
-
My most used hammer currently is a Channellock 2½ pound cross peen. I used a Channellock 3 pound for years, but then I got a little age (sense) on me. Channellock quit making smiths' hammers maybe 20 years ago, a shame. I just finished forging two hammers made of old 18-wheeler truck axles whose cross-section I squared up on the trip hammer. I patterned them after the Channellocks. They made the 2½ pounder of square stock, 1½" on a side. The 3 pounder is 1 5/8" on a side. These hammers are not too unlike the currently made German cross peens, but in America, the head was often corner chamfered in order to make a round face. In Germany and on the Continent, the square face is preferred with the corners having a very slight chamfer. I began heating and beating in the 1960's as a farrier, so I started with a Heller Brothers rounding hammer. These had circular faces, one of them a ball face, so I never did transition to a square face after I "let the horses go." No matter what hammer you buy or make, you will alter it to suit your needs. I liken the hammer face to a pocket watch crystal and the edges are radiused all around. There is no chamfer leaving a "ridge" around the face. I formerly made my cross peen portion almost a full half-round, but I changed after attending a Peter Ross workshop. His peens were crowned side-to-side and somewhat flattened. There were small radii going into the peen flats. They work very well and as Peter told us, "Less cleanup!" "An old dog learns a new trick." If you look at old hand forged hammers and top tools in the U.S., the eye is usually capsule shaped, like the capsules you take with water. It has straight sides and half round ends. The length of the eye is frequently twice its width, but that is not a hard and fast rule. It is easier to forge a tapered hammer-eye punch with that cross-section than it is an oval section. Same way with a drift. You forge a tapered rectangular cross-section and radius the two "edges." If it's oval, it takes more cold work to get the final result. This is not a contest. An oval eye is OK, and so is a capsule shaped one. Japanese forging hammers have a rectangular eye. I prefer a smallish eye to a large eye. A quite large eye removes too much metal from the cheeks either side of the eye. The thin cheeks take away metal needed for heft. I like a 15" to 15½" slender, oval haft, American style, with a quite thin neck. The thin neck will take shock. It even "whips" a little in midair on the backswing. One little addendum. I have learned to fuller with the edge of my round hammer face. When fullering top and botton, I go to the far radiused edge of my anvil and lift the workpiece at a 45º angle. For fullering, I use a regular hammer swing and then pull it towards me to match the anvil edge. I find that easier than if I were to use a square faced hammer. As time goes on, you will acquire an arsenal of hammers. At my anvil, I have a home made 4½ pound cross peen, Channellock style. I have a rounding hammer, a cat head hammer, a home made similar to a cat head, a Japanese forging hammer, and a rawhide mallet. In the school shop, I have a French cross peen, Heller's cross peen, and a number of smaller sheet metal hammers. http://www.turleyforge.com Granddaddy of Blacksmith Schools
-
I've responded once to this thread, but someone mentioned the British Worshipful Company of Blacksmiths' gold medal. I had no clue about the gold medal, and it is not explained well on the Company's site. That brings up the name of Edward Martin. Many blacksmiths have not heard of Mr. Martin. He has recently passed on, but he used to frequently come from his home in Closeburn, Scotland, to the U.S. to demonstrate for the American Farriers Association and other farriers' groups. His specialty was making Clydesdale horseshoes, and he willingly shared his knowledge and expertise. It was little known that he was also a skilled ornamental smith. A friend and I visited him in Scotland about 6 years ago. He was kind enough to drive us around to show us his excellent ironwork which was installed in three churches within a 30 kilometer radius of Closeburn. As we were relaxing and visiting in his living room, Mr. Martin said that he had something to show us. He brought from a back room a gold medal about 3.5 inches in diameter. He told us that it was awarded to him by the Worshipful Company of Blacksmiths in the year 2000, in London, England. It read in part, "Awarded to Edward Martin - Supreme Master Blacksmith." Mr. Martin shared with us, "It's the third such award presented in the last 100 years." From the above, I assume that a smith of the Worshipful Company does not simply become good and receive such a medal. It is a special award for a lifetime of excellence in the field. http://www.turleyforge.com Granddaddy of Blacksmith Schools
-
Traditional smith's cap
Frank Turley replied to Bill in Oregon's topic in Blacksmithing, General Discussion
I was curious and got online...found out that some caps are available in the Women's Wear accessory areas of department stores. Really! Today, I went to Target, J.C. Penny, and Ross. Target has a black cap with elastic in back and a short bill: "Newsboy Hat Black/95291 @$9.99. It has a mix of materials, not pure cotton or wool. Ross had a 100% cotton black cap, short bill, similar to those quilted welder's caps (see Francis Whitaker): D&Y Brand @$5.99. J.C. Penny did not have a very good selection in my city, but they do show a few on line. These caps are sometimes called "newsboy" and sometimes called "mod caps." Some of the mail order sites say "Fits Most," but I wouldn't buy a pig in a poke. I'd want to try it on in person. http://www.turleyforge.com Granddaddy of Blacksmith Schools -
Blacksmith's anonymous
Frank Turley replied to divermike's topic in Blacksmithing, General Discussion
I can't say whether Samuel Yellin (1885-1940) was or wasn't a smitaaholic, but I'm taking it upon myself to post a quotation from him...just in case. "I love iron; it is the stuff of which the frame of the earth is made. And you can make it anything you will. It eloquently responds to the hand, at the bidding of the imagination. When I go to rest at night, I can hardly sleep because my mind is aswarm with visions of all the gates and grilles and locks and keys I want to do. I verily believe I shall take my hammer with me when I go, and at the gate of Heaven, if I am denied admission, I shall fashion my own key." * As for me personally, I have a slack water dog that I trained to be my striker, but that wouldn't qualify me as a 'holic, would it? * "Sketches in Iron: Samuel Yellin" by Myra Tolmach Davis, The Dimock Gallery, The George Washington University, Washington, D.C. http://www.turleyforge.com Granddaddy of Blacksmith Schools -
In the early literature, this hot split method is shown, in Schwarzkopf for example. It requires precision and cleanup of the internal rags. Each strand must be equal in section, or else the thinner ones will move faster than the thicker ones, creating a messy basket. I get a kick out of Schwarzkopf. He depicts and describes this same procedure in "Plain and Ornamental Forging," and finally says words to this effect. "...or you can weld it, which is easier." http://www.turleyforge.com Granddaddy of Blacksmith Schools
-
hot cutter or cold chisel?
Frank Turley replied to bourne101's topic in Hot Cuts, Anvil devils, metal cutting on the anvil.
Cold chisels to be used on mild steel have a 60º included angle. Hot chisels have a 20º to 40º included angle. http://www.turleyforge.com Granddaddy of Blacksmith Schools -
The "saw doctors" call that style a dog head hammer. The currently used Japanese cutler's hammers are not nearly so head heavy and poll light, although they are head heavy. However, some of the Japanese sledge hammers have quite long heads with the haft quite close to the poll, probably because the anvils are buried in the ground and are set not so high as ours. http://www.turleyforge.com Granddaddy of Blacksmith Schools