
Frank Turley
-
Posts
2,607 -
Joined
-
Last visited
Content Type
Profiles
Forums
Articles
Gallery
Downloads
Events
Everything posted by Frank Turley
-
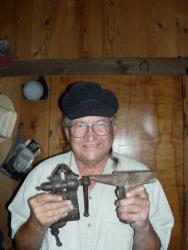
Correct me if I'm wrong, but I think the grooved portion of the vise is a "toe calk welding die" for "sharp shoeing." I have a couple of old such hardie/dies, and each groove has a vee shape. My understanding is that the room temperature toe calk is driven into the hot horseshoe via a "nib." The nib is a small sharp "spur" forged at one end of the calk; it holds the calk temporarily in place until a forge-weld is taken. The ground surface of the calk is semi-blunt until a welding heat is taken and then the calk is placed in one of the dies for welding in order to give it a sharp, wedge shape. The foot surface of the shoe is struck. The heels were also bent to 90º and made sharp, the medial wedge-length in the line of stride and the lateral calk 90º to the line of stride. The sharpened calks were primarily for winter ice and snow. Presently, we use tungsten carbide bits specially welded onto the the ground surface of the shoe [marketed as horseshoe Borium]. In the United States, the toe calks were formerly manufactured with the projecting nib. They came in different sizes. Toe calks are not used much nowadays, neither blunt nor sharp. They were popular in the early, agrarian days for shoeing draft horses which were drawing farm plows and equipment. Posted by a retired farrier, now a teacher of smithery. http://www.turleyforge.com Granddaddy of Blacksmith Schools
-
Grant, Your video reminded me. Where does steel wool come from? A hydraulic ram! http://www.turleyforge.com Granddaddy of Blacksmith Schools
-
 This is the Uri Hofi style of striking. The "master" is the young guy; he's calling the shots. He stands by the side of the anvil heel. The striker stands to one side of the horn, so that he can touch the horn with his sledge when needed in order to start and preserve the rhythm. The rhythm is metronomic, not iambic. Tsur Sadan told me that it took him quite a while to catch on to this striking method. To fully understand the signaling, you would probably need to take a workshop that would explain everything. I don't use that method in my school, but there are many striking/signaling methods. http://www.turleyforge.com Granddaddy of Blacksmith Schools
 -
Since flatters are not made for edge holding, a medium carbon steel such as an old axle half-shaft would work. The ones about 15 years old and older are often 1045. You can harden the business end in water. To temper, bury the striking head in a coke fire and look for a purple or blue temper color to appear on the scale-free working face. My hammer eye punches with haft are the kind that remove a burr. I don't slit/drift, although some smiths do. I punch/druft. The eye is "capsule shaped," with straight sides and half-round ends. I suppose you could upset to get the flange. It will take several heats. You should expect some mushrooming on the striking head, because it is always softer than the hammer head for reasons of safety. It will be normalized or annealed. http://www.turleyforge.com Granddaddy of Blacksmith Schools
-
I'm 75 and have been forging for 47 years. My right shoulder has bothered me a little and I don't have quite the extension and range of motion on the right that I do with the left shoulder. My elbows have been OK. I have been doing Cheng Man Ching's Yang short form of Tai Chi for about 25 years. I think this has helped me to relax at the anvil and breathe deeply. I recently had some Feldenkrais lessons in the use of my right shoulder. These are small movements that one doesn't usually do with a joint or a related group of joints. It has a rejuvenating effect. http://www.turleyforge.com Granddaddy of Blacksmith Schools
-
Opinions of new anvils
Frank Turley replied to Rutterbush's topic in Anvils, Swage Blocks, and Mandrels
Sp. Roger Lorance, Canton, Illinois. Firepots. http://www.turleyforge.com Granddaddy of Blacksmith Schools -
Opinions of new anvils
Frank Turley replied to Rutterbush's topic in Anvils, Swage Blocks, and Mandrels
I'm presently using a Fontanini 250# anvil. I like that they are cast in the U.S. and hand finished by Steve in Wyoming. They are a Continental pattern except the horn has an "American belly" to it. The upsetting block is on the far side of the anvil, when the horn is on your left. The hardie hole is 1 1/8" so I forge my own tools to fit. Steve and I like to mount the anvil sitting in a sand box which gives good rebound and is not excessively loud. I first learned about the sand idea in Schmirler's book, "Werk und Werkzeug des Kunstschmieds." www.fontaninianvilandtool.com http://www.turleyforge.com Granddaddy of Blacksmith Schools -
An arc weld should be OK on a small hand-held pair of tongs, especially if the weld is normalized or stress relieved. I have forge welded reins on many pairs of hand-held tongs. The face of the scarf is normally on the 2nd shoulder side of a three shouldered jaw. The reason; the forge weld is stronger in tension that way than if the weld was "on top." The scarf is normally on the drawn stub of the rein about 3½" behind the last shoulder. Some smiths completely draw the reins without welding. Francis Whitaker told the that he always did so. To my knowledge, large industrial tongs are never welded, neither forge, arc, nor gas. They are totally forged from a respectable alloy steel. Some of the old ones were of high carbon steel. Most often the reins are a long flat taper in width, the thickness staying the same. Sometimes, the reins are quarter round or half round on the edges. A welded rein in large, industrial use would be an accident waiting to happen. The above mentioned triangle tool used to keep one rivet head in a fixed position is often helpful in keeping tongs from freezing in one position. We don't know the history of old tongs. For all we know, they might have been run over by a jeep. A pair may occasionally freeze, lock up. Then we usually bang them against the anvil until they loosen. Later on, they freeze again. I think that sometimes a rivet will get bent and in its random rotation, it hits an area the locks the tongs in position. When I have a pair of tongs like that, I take them apart and replace with a new rivet, one where the head on one side can't move. http://www.turleyforge.com Granddaddy of Blacksmith Schools
-
Creatures of habit. I started out in the olden days as a right-handed farrier, and we kept the anvil horn to the left. We were using the horn a lot for turning and bending shoes. The tong hand was on the left as was the horn, so it seemed more comfortable that way. As a blacksmith, I still work that way most of the time. I have visited a number of old time shops where the horn was on the right. One old right-handed smith told me he liked the horn on the right, so he could leave the hardie in its hole without worrying about removing it (considering loss of digits).
-
Getting slightly off topic, I wanted to comment on the Japanese hand hammer, not that I'm lauding it. I have the dimensions of four hand hammers. Two belonged to Yataiki, the premier saw maker. The proportion ratio in inches on one is 2.5" : 1.5", the larger figure being head to center of haft; the smaller being poll to center of haft. His personal hammer was 2.75 : 1.25. In my shop, I have a small hammer purchased in California 2.25 : 1.5. A recently hand forged Japanese forging hammer weighs approximately 3.5 pounds. It's proportion is 3.5 : 1.25, so compared to the others, it is proportionately "head heavier." Many of the Japanese sledge hammers have a quite long head compared to poll ratio. This is probably because the anvils are low and buried into the ground. The hand hammer eyes are rectangular, the hafts about 12"+, going into an oval for the grip. The poll is not used for forging as a peen would be. When you pick up a Japanese hammer to go to work, there is no mistaking how to hold it.
-
There is lots of verbiage here. You can go to youtube.com and type in uri hofi. Watch him work.
-
Worth its weight in gold
Frank Turley replied to K. Bryan Morgan's topic in Blacksmithing, General Discussion
When purchasing a leg vise, one should at least know the jaw width, what the screw threads look like, and whether any parts are missing. The pictured vises are probably Columbians or Indian Chiefs judging by the shape of the protruding portion of the screw boxes. Columbians were the brand most commonly sold in the western U.S., not necessarily because they were so great. I think that their screw boxes were cast iron, maybe ductile iron, whereas the Peter Wright vises had a solid forged screw box. The English Peter Wrights had beautiful lines, nicely chamfered legs, and a neatly turned screw box, the latter almost appearing to be an old fashioned mortar. A good American made vise was the Iron City, made in Pittsburgh; they were stamped IRON CITY inside of a six pointed star on the movable leg. There were other good old leg vises on the market, but the manufacturer was not always known. As to jaw width, there were many 4" and 5" vises sold. If one is serious about smithery, I would suggest looking for a 6" jaw or wider. An 8" jaw vise is hard to find, but they were made. For neophytes, I think a 4" vise would be OK, but I would still be looking for a bigger one. My favorite is the Peter Wright. On top of the screw box in small letters, you can sometimes make out, "P. WRIGHT PATENT SOLID BOX." Another feature of the Peter Wright are the "ears" which extend over the washer, apparently intended to keep swarf out of the works. http://www.turleyforge.com Granddaddy of Blacksmith Schools -
Attaching an iron bar to a wooden door
Frank Turley replied to urnesBeast's topic in Blacksmithing, General Discussion
When double doors are involved, one is usually passive and has a vertical head and foot bolt, sometimes called cane bolts. That door will also have an astragal to act as a stop for the other door, the "active door." When the spring-tensioned head and foot bolts are thrown into the header and threshold, the passive door is locked. The active door can have handles on both sides. When pulled shut from the outside, I envision a Mexican style of crossbar, which I will attempt to describe. The bar, maybe 3/8" x 2" x 2½', has a half round end as viewed flat, and a hole through the flat, maybe 1/2"D.The bar hangs from a forged cotter pin, maybe 7/16"D. The two ends through the door are flattened and clinched inside. The "ring", circular portion of the cotterpin outside retains its 7/16"D stock size. The ID of the ring is 1/2" to 9/16". There can be some slop. When not in use the crossbar hangs vertically. The other end of the crossbar is shouldered on edge and a round tail drawn out, bent in a circle and welded. This circle will match ANOTHER cotterpin with is driven through the active door and clinched. The rings of both cotterpins are horizontal when installed. The welded circle is horizontal, so the padlock shackle can be dropped through. The crossbar is lifted and dropped into a flat-stock L-hook, so the crossbar is now horizontal. The L-hook is fastened to the active door a little ways back from the padlock rings, when the bar is horizontal. I'm sure this sounds involved. When you look at the doors from outside in the unlocked position, you'll see the crossbar hanging vertically from the passive door. On the active door, you'll see an L-hook, a cotterpin, and a handle. In the locked position, the crossbar sits horizontally in its L-hook with the padlock in place. http://www.turleyforge.com Granddaddy of Blacksmith Schools -
Philip, http://www2.horseshoes.com I think there is a rigmarole to sign on, but it's worth it. Best, Frank Turley http://www.turleyforge.com Granddaddy of Blacksmith Schools
-
When all else fails, try http://www.dealoz.com.
-
Forging flat to round
Frank Turley replied to ofafeather's topic in Blacksmithing, General Discussion
ofafeather, I suppose you could figure a way to arc weld or gas weld the pin in a coundersunk hole by filling the countersink with filler rod while fusing. If you study old pieces, you can see how they are forge welded. In the colonial days, guys would make strap hinges and pintles day after day, and get paid piece-work. They would get skilled and speedy. I believe that an arc welded setup for a pintle would be slower than skilled forge welding. Furthermore, in the colonial period, the pintle was termed a "hinge hook." Technically, "pintle" is a seafaring term. Buena Suerte, Frank Turley http://www.turleyforge.com Granddaddy of Blacksmith Schools -
Forging flat to round
Frank Turley replied to ofafeather's topic in Blacksmithing, General Discussion
It's good to be innovative, but you don't want to shoot yourself in the foot. You might try thinking about the old timer's way. The forge welded pintle was probably the most used way because it gave you a bearing surface for the hinge barrel. It takes practice to get it right. Let's assume the hinge is of 3/16" thick material. I do it in two steps, first welding a loop on 5/16" x 3/4", not unlike a hinge barrel weld. I normally drift for a 7/16" or 1/2" pin, although 3/8" would work for a lighter door. For the pin, I put a tiny upset on one end to keep the pin from falling through the hole. The pin is inserted leaving about 1/8" of the upset end protruding. I like to weld first over the radius of the anvil using various angled backing-up blows into the far side of the anvil. Then I'll drop the pin through the pritchel hole or an appropriate bolster and work the upset portion into the boss. It usually takes more than one welding heat. This second weld is what Schwarzkopf terms a "pin weld." I've seen a few old pintles that looked to be made of square stock, bent and unwelded. I've tried this a few times. Using 1/2" square stock, I forged the pintle to a round section, finished between swages. I bent to 90º at the sectional transition. You do get a radius bend which is a bit difficult to square up with an upset corner. A few friction blows will help it a little. On a couple of old ones that I've seen, the corner of a set hammer was used at one side of the bend. This pulled enough stock into the outside corner that it could be trued up and squared up with a few hammer licks. It that way, it would be easier to install with the hammer, as you're now hitting a square corner rather than a radiused corner. Now, you only have a bearing surface on the square bar, which latter by the way, had been forged into a spike. I have one pintle like that in my collection that has a 1/8" deep wear pattern. Apparently these bent pintles worked, even though they didn't provide a full bearing surface. I had a friend who wanted to try forging the bearing surface/boss and spike and then punching a hole rather than welding up a loop. He gave it up when he saw how much time that it entailed. http://www.turleyforge.com Granddaddy of Blacksmith Schools -
Do you smith with a prosthetic?
Frank Turley replied to DennisG's topic in Blacksmithing, General Discussion
I have had boo coo students go through Turley Forge school. One man had lost one leg just prior to coming to my school years ago. He became a successful smith working for years at Sturbridge Village, MA. I have had a handful of students who were illiterate. A couple of them tried to hide it. Being illiterate is not deserving of a prothetic, but interestingly, some states consider it for vocational rehab. Money can sometimes be furnished to illiterates for schooling. I have a day laborer in the shop at present who, at one time, lost half of his thumb to a solid sledge hammer blow. It doesn't seem to bother him in the workplace. My old horseshoeing friend, Skip, got a staphylococcus infection in the middle finger of his right hammer hand. It was serious and weakened him so much that I had to visit him in the hospital. When he recovered enough to start working, his finger remained semi stiff and had a crook on the end. He simply learnd to work with a three finger grip and with that middle finger (of all things) protruding. I had a student who had such a serious cancer that his genitalia and part of his lower bowel were removed. He carried a plastic belt bag under his shirt to retain his bm's. This man was amazing. He knew that he had a limited time to live out his life. Yet blacksmithing was a long-time dream of his, and by golly, he was going to realize this dream. For what he had gone through, he was amazingly upbeat and added some joy to the class. http://www.turleyforge.com Granddaddy of Blacksmith Schools -
The hot farrier's progression of rasp use may be something like this. The new rasp levels the horses hoof, plantar surface. Then, the same rasp becomes a finishing tool for dressing off (touching up) the clinches and "polishing" the hoof below the clinches with the file side of the rasp. When it becomes too dull for finishing, it becomes a hot rasp.
-
it may be what the British term a siding-down tool for setting or finishing shoulders as with a set hammer. The curve may have been for specialized, repeated work. We don't know what the final product was. The curved haft got your hand away from the heat.
-
Using the Hot Cut Hardy
Frank Turley replied to ofafeather's topic in Blacksmithing, General Discussion
An inverted dimple is a pooch. Francis Whitaker's "straight side hardie" had a vertical straight side and the other side was beveled at the cutting edge, about 25º. An apprentice will learn to take the hammer haft out to the side parallel to the blade length when giving the final shearing blow(s). The reason is to prevent cutting the wooden haft on the hardie near the hammer head which happens if you're working behind the hardie width. Many smiths, some experienced, have numerous cut marks just under the hammer head. Are you guilty? http://www.turleyforge.com Granddaddy of Blacksmith Schools -
Figure-eight agitation in liquid quenchant?
Frank Turley replied to Frank Turley's topic in Heat Treating, general discussion
Grant & All, I'm a professional, but if you earn a nickel from your work, you're a professional. Furthermore, nobody knows 10% of anything. With that said, years ago I purchased from a Texaco distributor a 55 gallon drum of quenching oil. If memory serves, they had two grades available, Quenchtex A and Quenchtex B. I was told that the "A" was a little slower that "B". "A" was the one I chose. It's appearance is not unlike motor oil, although I have seen another quenching oil that was a dark color. As I understand it, the quenching oil is treated to abstract heat at the proper rate and to have a higher flash point than motor oil. If the oil is warmed with say, a hot bar of iron, the viscosity changes and you can get a slightly quicker quench than at ambient temperature. For my small work, I normally quench in a five gallon bucket. It has a multiple holed, steel basket in the bottom (with bail), so that if I drop something by mistake, I can retrieve it. I keep a lid on it always when not in use to keep shop dust and fly ash out. Dirty oil and crankcase oil slow the quench too much for my liking. As far as "under the shedding sprussnut tree," I'm in Santa Fe, and our yard trees are pretty small. So the big drum sits in the sun and rain and snow. I have sold a lot of the oil, so there is probably only 15 gallons remaining. I'm fairly certain that the HT pros will determine how to quench based on the shape of the object, whether it has holes in it or sharp corners, whether it's delicate or chunky, etc. Therefore, the figure-eight idea is not engraved in stone. I think those ole Bethlehem heat treaters were kind of hoorawin'* us steel mill visitors, and at the same time, they were testing us. *Cowboy palaver for "teasing." http://www.turleyforge.com Granddaddy of Blacksmith Schools -
In Santa Fe, New Mexico, I get large lump coal from a feed store for $100 per front-end load. I can't weigh it, but I assume each load is approximately 700#. I normally get two scoops in the pickup.* Some of the large lumps can be broken with a tamper, but I can surround the fire with the large pieces, and they fractionize when hot. They form usable coke as they fractionize. *A "ute" if you're in Australia.
-
Some observations about twist method for making tongs
Frank Turley replied to evfreek's topic in Tools, general discussion
I've made a few hundred pairs of hand-forging tongs for flat work and farriery, and I use the three shoulder method as shown in "The Blacksmith's Craft" and "Plain and Ornamental Forging." I think the twist method is cheesy looking and requires nearly as much work as the three shoulder method. I normally lap (forge weld) the reins, simply because it is good practice. The scarf face is on the 2nd shoulder side of the blanked jaw about 3" back from the 3rd shoulder. I don't think the twist would affect the strength all that much on mild steel, but there is something called "grain flow" which is affected adversely in a twist. It is difficult to find a layman's definition of grain flow. The crystaline structure and other constituents in the metal do align themselves in the direction of hot working. The flow is not as gross as the fibrous structure of wrought iron, but is analagous. As an example of food for thought, if you take a newspaper sheet and tear it following the line of print, it tears easily in a fairly straight line. If you tear it at right angles to that alignment, it tears crookedly. Twisting steel also twists the grain flow pattern. http://www.turleyforge.com Granddaddy of Blacksmith Schools -
In non metallurgical terminoloby, tempering is the softening of a hardened steel in order to give it toughness and to remove brittleness. I tell my students it's kind of like Goldilocks and the three bears. Papa Bear's bed was too hard; Mama Bear's bed was too soft (annealed); but Baby Bear's bed was just right (tempered). Or how about this? We live in the temperate zone of the world. It is neither too hot nor too cold. It is in between. It is TEMPERATE! We harden the steel first to give us a known value. It is dead hard and file hard. A new file won't cut it. You now have a given from which to work backwards, so to speak. For a punch, you only need to harden the tapered end and maybe a little above. The striking head remains annealed or normalized (air cooled from red) to make it softer than your hammer head. After hardening by agitating in an oil bath, clean off the residual oil with a rag and abrade a scratchy bare metal finish on the hardened portion and a bit above it. For tempering, heat above the tapered portion and watch for surface oxide colors to appear. You will be way below an incandescent heat. You will be "chasing color" toward the business end. The colors run in bands. Each color represents a specific temperature. You're waiting for a purple or blue to hit the very end. Then quench. At this point, water may be used. You are simply trying to stop the colors (temperature) from continuing to change. The heat rainbow will first present a straw (light yellow) color. Following that will be dark straw, copper, purple, full blue, and pale blue. Straw is 440ºF. Purple is 527ºF. Full blue is 563ºF. The more color changes means that more heat is being applied. The more heat you apply, the more hardness you will sacrifice. Different tools have different hardnesses. As a vague generality, a pushing or paring tool will have a harder temper than a tool of direct or indirect percussion. As an example, a wood chisel for paring the end grain of hard maple may have a straw (hard) temper, whereas a cold chisel taken to a blue would have a softer temper. Though I'm using the word "softer," the cold chisel will still be hard enough to do the job. http://www.turleyforge.com Granddaddy of Blacksmith Schools