

Woody
-
Posts
1,015 -
Joined
-
Last visited
Content Type
Profiles
Forums
Articles
Gallery
Downloads
Events
Everything posted by Woody
-
Very nice work
-
heat treating cold rolled 1018 mild steel
Woody replied to keithh999's topic in Heat Treating, general discussion
super quench mild steel will get you about a Rockwell C 42. As I understand it, super quench was invented to get a bit more hardness out of mild steel at least that is the rumor I heard. -
Triton you did NOT anneal that piece of spring, you hardened it. To anneal, heat the piece to non-magnetic, then let it soak for a couple minutes at that temperature to be sure it is heated completely thru. Then put it in a bucket full of ashes, vermiculite or lime. Make sure it is completely buried in the stuff in the bucket. Let it cool in the bucket over night. Remember Quenching steel hardens it. Slow cooling over a long period of time, annealing, softens steel.
-
I have heard of wood and seen the stuff but I try to avoid it as much as possible. If you cut an piece of steel a quarter inch too short, you can stretch it, that don't seem to work with a 2 X 4 however. :)
-
This is a knife I just made for Jackie, steel is 52100, hardware is stainless steel, handle is Desert Ironwood with Corian and plastic spacers.
-
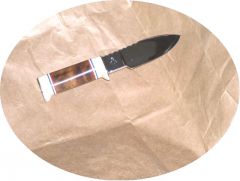 52100 Drop Point Hunter with Desert Ironwood Handle, stainless steel hardware, and Corian and plastic spacers
 -
I have tried the copper/brass/nickel or German Silver combo, it worked but the problem I encountered was the brass has a melting temp considerably lower than the nickel silver or the copper and it tends to melt and run out if you are not careful. Next time I will skip the brass and just use the nickel silver and copper.
-
Richardson's Practical Blacksmithing all 4 volumes, you don't have to read it all, but browse thru it very good reference for general blacksmithing
-
Jr. I am so sorry to hear that, God Bless and Keep both of you. Woody & Jackie
-
Jr. Glad to hear she is home, that is the best place to be. Give her my best. Our prayers are with both of you Woody & Jackie
-
Down an dirty test, heat a piece to non magnetic, quench in oil. When quenched, see if a file will cut it. If the file just skates, the steel is quite high in carbon content but determining the actual carbon content is impossible. You can determine what the scrap was in it's original life, spring, axle etc, then consult the junkyard steel list to see what material the part was made from. Once that has been determined, you can look up that steel and see the actual carbon content along with other alloy materials that were added to the steel. Keep in mind that an item such as a spring can be made from several different materials, i.e. 1095 or 5160, which have different carbon contents. There is a method of spark testing that will tell you also and a blueprint on this site of what various steels look like when spark tested, but it can be difficult for a beginner to use.
-
If the above don't work try this Hanson Custom Knives - A Bravenet.com Hosted Site Hanson Custom Knives - A Bravenet.com Hosted Site
-
Yes it is entirely possible, the instructions are here S0001 Making Magical Swords
-
Look at the scrap, try to determine what it was orignally if you can, I have a junkyard steel list that shows the steel type of various material. I can send the list if you message me on this site with your email address. The information I have contains quite a bit of information on various knife steels and the composition of the more popular blade steels.
-
Gorgeous Work Rich, I love the way you mix and match your handle material and spacers.
-
Resist the urger to choke the living daylights out of the incredibly stupid people in this world that desperately need choking. :)
-
help metal burning blue flame
Woody replied to howardz71's topic in Blacksmithing, General Discussion
http://www.iforgeiron.com/forum/f7/zinc-cadmium-hydrogen-fluoride-other-toxic-compounds-8515/ Please read it, the life you save may be your own. -
can I turn mild steel into high carbon steel
Woody replied to chrispychris's topic in Blacksmithing, General Discussion
Yes, pack the mild steel into an air tight container, fill the void spaces with high carbon material, heat to a bright red heat, hold at that heat for at least a week. Or just go to the junk yard and get some car springs and make your knives from them. -
for knife hardware I have taken copper wire and braised it together with brass rod, then flattened it. It makes an interesting pattern
-
I think there is a blueprint about etching using salt water and a battery, if there isn't I have the instructions some place. email me and I will dig them up and send them to you.
-
or you could just buy a $5 used hair dryer, that should supply all the air you need.
-
A while back I posted a prayer request for my old High School friend Vikki, she is in an ongoing battle with cancer. She recently had some expiremental cryogenic treatments to the tumor which reduced it greatly in size but now she is starting a new bout of chemotherapy next week. Vikki is the granddaughter of a blacksmith who ran a blacksmith shop in Devon, Montana for many years. I got an email from her today and she specifically requested that I "tell those blacksmiths to keep their prayers coming." Thank you all Woody
-
My prayers are with her and her family Woody
-
Very Nice indeed!
-
I copied this from the Anvilfire Guru Page several years ago EZ-Burner: Ricardo, That is an old Ron Reil plan hosted on his page. It has been built by thousands. That burner is what is called an "Atmospheric Burner" because is runs on atmospheric pressure - there is no blower. They are used on many commercial forges. They are very tricky to get everything balanced to run correctly. Any one burner will only work with one volume of forge. On commercial forges they add burners as the forge gets bigger. Make the forge twice as big and you need twice the number of burners. A single EZ-Burner will work on roughly a 1/3 of a cubic foot or about 10,000 cm3. I quote from the Ron Reil site. 1. You will need at least 450 BTUs per cubic inch of forge chamber volume if your forge is going to be able to forge-weld. Some would argue for a figure as high as 540 BTUs per cubic inch. 2. The "Reil Burner" will deliver about 135,000 BTUs at medium to higher gas pressures, and can be cranked up to almost 200,000 BTUs by raising the pressure to 20 psi or more. In the lower pressure range of from 1-6 psi, where I do most of my work, it will produce about 60,000 BTUs, or even a little less. Use the middle figure in any design calculations. 3. Shoot for a burner to volume ratio of 1:300 or less. Some smiths who are very knowledgeable would say a more conservative ratio of 1:250 would be safer and insure that your forge will be able to weld. To calculate how many 3/4" burners you will need just divide the total chamber volume of your forge, in cubic inches, by 250 or 300, and then round up. If you come out to a burner requirement of 2-1/3 burners, then you will need 3 burners for your planned forge volume. Always plan conservatively or you may end up with a forge that is too cold to forge-weld. The above information is assuming that you will build a well insulated forge, having at least 2" of Kaowool lining coated with ITC-100, not Satinite, on the interior surface of the chamber. A 3" lining of Kaowool would be even better, and would probably pay for itself in fuel savings over the long run. If you elect to use a rammable or pourable refractory, or bricks, you will have to address the lower insulation values associated with these materials. One option is a composite design, a pourable refractory shell for durability, inside a Kaowool shell for insulation value. These are more difficult to build but are long lasting and can work very well. EZ-Burner Numbers (more): Ricardo, I missed on the numbers for the Ron Reil burner (see how easy it is to screw up). At his BTU value's (based on how much gas is used NOT how efficently it is burnt) the forge volume should: • 60,000 BTU - 120 cuin (2000 cm3) • 100,000BTU - 200 cuin (3300 cm3) • 150,000BTU - 300 cuin (5000 cm3) • 200,000BTU - 400 cuin (6500 cm3) I have found that it is difficult to get one of these burners to run at that wide a range so the balance is more critical than it seems. There is also a huge difference in the shape of pipe reduction bells. Some are a gently curving funnel (the right shape) and others are hemi-spherical and not a good shape for a venturi induction system. Recently they have discovered that better designs of the same type burner with smooth induction bells, a good gas nozzle and a symetrical air damper (tubular) can operate at a much wider range. Often the solution is simple. Close some of the forge off using a couple fire bricks, make the door opening smaller. In all cases gas atmospheric forges take up to 45 minutes to get up to a good working heat and a couple hours for heavy refractory to abosorb enough heat that welding temperatures can be reached. I hear these same problems from people over and over including folks with commercial gas forges. But there is almost never a failure using a blower type burner. If you have electricity to run one they are simplier to build and have a wider range of operation. The slightly higher presurization in the forge chambre assures a good high temperature for welding heats. AND THAT brings up another point. If you are at high altitude your forge may not reach welding heat without a blower or preheating the