
kevin (the professor)
-
Posts
222 -
Joined
-
Last visited
Content Type
Profiles
Forums
Articles
Gallery
Downloads
Events
Everything posted by kevin (the professor)
-
Really nice, I love the fairly low layer counts with high contrast. Really nice. Kevin
-
Nice differential hardening and etch, if I am seeing things right. Good work. I like it. I have a ton of ironwood growing on a farm in Texas, if anyone wants to buy a farm! thanks for sharing the knife. it is high quality.
-
Hello again, Same knife. I just made handle fit with top of spine. It was suggested to me, and I liked the idea. thanks for looking, Kevin
-
Hello Everyone, I decided to have some fun and make something simple but enjoyable. I made a little pukko-like thing. The blade is a little rounder and the grind is relatively high. The handle bends and swells, and fits my hand like a glove. 1095 full quench tempered x 2 x 1 hour ea. @ 385F 4.5" long blade 1.125" wide 9" oal handle mild steel, leather, aluminum, and walnut (yeah, I said it - ALUMINUM. If you can make a Ferrari engine out of it, it is good enough to help me grip my knife. Strong, light, easy to work, doesn't corrode easily. Better than a plastic spacer or a lump of petrochemicals ) OK - I was exaggerating the rant. Still, I like aluminum for small spacers. It has the qualities I am looking for, and I like better than plastic (but not better than horn). As always, your comments, suggestions, bits of wisdom, etc. are welcomed. Thanks, Kevin
-
1075 "Modified Kard" with Hamon and Bubinga
kevin (the professor) replied to Graham Fredeen's topic in Knife Making
Got the video of it doing some cutting posted to YouTube. Its got a couple of shots of cutting a free falling piece of paper in mid air, and some other standard paper cutting. Didn't get any shots of shaving hair, don't really have any left after testing the edge on this thing, lol. YouTube - Cutting with the 1075 Blade with Hamon Kevin, the guard is done out of some wrought iron anchor chain. I drilled a series of holes in it and used a file to open the slot for the tang. Once I got it fitted snugly against the shoulders of the blade I took it to the grinder and did all of the rough shaping on the outside, then took a round file and filed in the groove. Then sanded everything up evenly by hand. For the finish, it was achieved through a combination of multiple cycles of heavy etching in Ferric Chloride, with flash rusting in a hydrogen peroxide and salt mix, with sanding in between each cycle, and it was finished off with torch bluing it to a deep gray. There is a series of 3 thin nickel spacers inbetween the guard and bubinga, that were just sanded and buffed to mirror finish, they don't show up too well in the pics. Excellent work on the fit and finish, too. I need to work on a couple of the techniques you displayed so well in this one. I need to file a round groove in the bolster of my p-welded seax that I posted here (Dr. JPH suggested it, and I thought of this blade of yours as a prime example of the technique!). I am impressed with the salt bluing, etc. too. You have taken the time to really learn about your chosen medium. Thanks Kevin -
Jose, those are really attractive. I am not big on religious icons, but the cross looks really well done. The wire is a good touch, too. I am going to keep your words here, and give twisting a try soon. I will post here if I get something worth looking at. thanks, Kevin
-
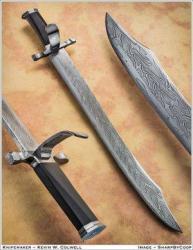
Finn and Mike, Thanks for the compliments. I like this class of blade a lot. If I am correct, it would actually be historically accurate for the inhabitants of Northern England and Scandanavia as well as much of North-Western Europe. The shape may change ever so slightly, but the same basic approach (the continental versions were more likely to be spear pointed, according to a couple of sources I have read). these are fun, now I just need to learn how to twist a billet once it is welded. Oh yeah, and I need to practice welding more, with bars that meet better when I begin. One thing I forgot to mention, when I started the weld of billet to edge, I had the edge still attached to a long bar to use as a handle. I put the layered billet on top. As I worked my way down the seam, welding them together, they would bend due to the impacts. The bending of the lower bar (handle/edge piece) would rip the weld seam back open. This is one of reasons for weld flaw that happened. In the future, handles go in middle of stack, not on the bottom! Now, if I can only learn to twist these things... Kevin
-
1075 "Modified Kard" with Hamon and Bubinga
kevin (the professor) replied to Graham Fredeen's topic in Knife Making
pictures two and three really show the blade off. I liked it, but it has a lot of subtle complelxity that I did not notice at first. As I said somewhere else, I also really love the fittings. I would like to know how you shaped and polished them. Kevin -
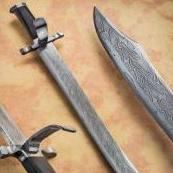
Hello Everyone, I have been working on this one for a couple of weeks. It is my first attempt at a pattern-welded seax. It is also the first time I have ever tried to weld together two long bars. The results were pretty good. I have a lot of room for improvement, but this was a big challenge given my level of ability. So, I have learned that: 1) I need to have the bars meet better before I try to weld them. 2). I should learn to estimate how much stock I need to account for loss of material (I couldn't grind all of the weld flaws out because I had less material at the end than I planned. 3). I may try a larger hammer to see if that helps. 4). I need to learn more about etching and presenting to bring out best of this type of material. Still, I am really pleased overall, it is cool. My ancestors would be proud (Northern European Germanic by way of Northern England / Southern Scottland). Blade is 10.5" x 1.5" x .125" 1095 and 15n20 spine (about 25 layers) 1095 edge edge-quenced in heated canola (I may not do this with simillar blades in future, it sort of obscures pattern - too much at once). tempered 400F, two one-hour trials Brass bolster and cap no idea what wood, just looked better than most of what I have. long, flat oval cross-section to handle Through tang, peened, large and sturdy. As usual, I appreciate comments, encouragement, advice, etc. I really pushed my skill set with this one, and many of you may see obvious areas for improvement in my future work. Thanks for looking. Kevin
-
I like it, too. It is good and looks functional and traditional. The story elevates it to another level, entirely. thanks for sharing. Kevin
-
Greetings Everyone, This is a bowie of 1095 with walnut handle and clay ht. 6.5" blade, 1/8" thick at ricasso, with slight taper I am happy about this one, it is the first time I did the differential temper thing with clay. It came out better than I expected. The clay I used came from a little "home cooking." (I made the mixture myself) The clay came from unscented, bargain basement kitty litter. 1 part kitty litter 1 part crushed brick 1 part wood as and sugar (yep - sugar, mostly carbon, sticky when wet or melted, actually grows when burned) Seeing the diff heat treat reminded me of how magical steel really is. I have one major question: Will someone more experienced with this sort of thing give me some advice about how to polish to accentuate the ht line? (many of the housecats owned by you guys have more experience with this than me). Thanks for looking. Advice, comments, ect. are encouraged! Take care, Kevin
-
Shear Steel and Mammoth Ivory
kevin (the professor) replied to Christopher P.'s topic in Knife Making
Thanks for the info and links. This craft is great because you can mix science, history, philosophy, and plain ole hard work. So many levels. Finnr - I can't censor any longer - What the heck is on your head in your avatar? Not that I mind it, I just can't decide what the thing(s) is (are). Really nice knife. subtle pattern. One last question - in terms of final product, how much difference (what are the differences) between an etch done with strong salt like ferric chloride and an etch done with a mild acid like vinegar (not time, just any other diff's). Thanks for showing this knife. It is great as a knife, and a wonderful conversation piece, also. Kevin -
Yeah, Bad form - I spent a year reading and watching vids (and ruined several old files and rasps off of ebay over a piece of rr track) before I ever asked anyone. You may need to drop or take an incomplete and take a run at the project once you are ready. If something is really going to be a skill that you develop for life, then learning it well is a lot more important than the grade you make in a class. Failing and retaking but acutally learning is a lot better than passing the first time and not really knowing (not to mention not giving proper reverence to the tradition and art of smithing!) Oh yeah, and I forgot, paying respect to the process of education. You don't have to go to a university to learn, but whatever path you take, you should go about it with integrity and dedication. Kevin PhD, Forensic Clinical Psychology Assistant Professor of Psychology
-
Hello Everyone, I am glad to be able to get back to making knives. Tendon in rt hand healing well, and I got the go ahead to hammer and file again :excl: So, I decided to try and make a Seax. Maybe my ancestors will be proud. I have never made one before, but I entered in a "knife in the hat" run by another forum. The knife of choice was seax (the one I wanted to try, anyway). 1095 8.5 inches long 1.3" at widest point .125" thick rosewood handle stainless and leather bolster 15n20 buttcap I REALLY LIKE THIS KIND OF KNIFE! Advice and information is welcomed (thanks Petr!). I hope to get a lot better with these, they are fun and historically interesting. Also, I have to decide if this one is good enough to send as my contribution to the KITH. Thanks for looking, Kevin
-
It is a nice first pattern-weld. I think this is an enthralling process, and you will probably fall in love with it. Keep up the good work. Kevin
-
Strong Seax-ual content..the faint hearted turn away!!
kevin (the professor) replied to JPH's topic in Knife Making
It's a beaut! I am about to finish my first seax, and yours gives me hope. Sorry to say, but your fuller is bigger than mine. What's a guy to do? Seriously, glad you are back. Please keep posting when you can/want. You helped a lot of us move from thinking about forging to actually trying it. take care, kevin -
Hey, thanks for the videos. I like them a lot. I also appreciate the experiment in functionality. I like kukri, but don't think that we should be limited to only the traditional form. Good work, and thanks for sharing. Kevin
-
A question from knife making unplugged
kevin (the professor) replied to Stroyeror's topic in Knife Making
Steve, OK - I am new. But, I have always wondered the same thing. Always have to straighten as you go anyway, even if you tried to pre-bend. Easier for me, at least, to take a little time with each heat (or two) to realign by either working the other side or putting spine on anvil and tapping straight. kevin -
Charlotte, Yes - there is another forum that showed a couple of different designs to make interchangeable scrapers for fullering in this way. They looked like good tools, with guides to track the work, etc. I was trying to achieve the same outcome with less ability and raw materials. I have a combination ruler/scribe that I am thinking of modifying to hold carbide bits. If the thing wasn't an antique, I would have done it already. Good insights, at some point when I have the stuff and ability, I will make on of "those" Here is a youtube link for one of the nicer ones. thanks, Kevin
-
Frosty, Nope - its a true scraper. The flat side of the "bit" is smooth and at a slight angle off of perpendicular. I see what you mean though, and in fact, the round side with the teeth may be useful for cleaning out later, but I think I probably ground them too much for that. I am holding it with flat side of bit bitting into metal at about 60 degrees, and the flat side of bit is smooth and sharp. But, you are right that it may have worked with a filing action if i had left teeth on. Now that I have thought about it (thanks to you), next one I will try to leave teeth on the back side, to use for cleaning the groove out and finishing. (I will have to make one for every shape of channel that I want to cut). Thanks for looking, Kevin
-
Greetings everyone, I am sort of on light duty, surgery a week ago. today I was able to make a simple fuller scraping tool, and it works really well. It is simple, it is ugly, it is sturdy, it is something that someone who has a minor grasp of forging grinding and heat treating can make, and most of all... it WORKS. So:1. take a half-round file, heat it bend it so you can put pressure on it with hand clearance, and rock it to get the optimal cutting angle. 2. grind a bit (whatever shape you want your fullers to be) on the end, with flat side doing the cutting. 3. Heat treat - leave really HARD 4. Clamp something for a guide to follow until you have a good channel started 5. Fuller away. Sure, there are better ones, but this will give you the ability to make fullers while you learn. As long as the fuller you want follows a straight line, you can set up some sort of guide to get you started. Enjoy the scraping, Kevin
-
low layer count w/ ironwood handle
kevin (the professor) replied to kevin (the professor)'s topic in Knife Making
Thanks for the kind words. I am happy with this knife. It is the first time I have been able to keep the nice, sharp ridge from my grind lines. In the past, I accidentally rounded the ridge over when hand shaping and polishing. I am afraid that my father-in-law will just put the knife in a drawer and never use it, that's why I am going to tell him to use it as a letter opener. I would look at it and use it all the time. It would be a sad fate for something I put so much energy into, if it was just put away and not seen or used. thanks for comments, Kevin -
Greetings Everyone, Here is a simple pattern-welded knife I made for my father-in-law. It has a low layer count, and is a straight laminate. I am going to tell him to use it as a letter opener, so he will see it. Otherwise, he would put it in a drawer and never use or look at it. It could be a really good working knife, too. 5.5
-
Sam, That is a really nice sword. I think it is my favorite of yours, that I have seen. Only because I like the graceful curved shape. Many people make the cut and thrust type of swords, but not as many (here) make this type. Really cool, and it looks like it would mow 'em down if you could time that thing while on horseback. And yes, you are turning them out at a good clip. Kevin
-
Hello everyone, I hope this is the right place to post. If not, please move. Is there anyone who has some high carbon steel cable, that can be used for pattern welding, who would like to trade some of this for a post vise? The post vise is in great condition. It is short, it needs about 12 inches more "post" welded or bolted on (or it needs to be set on a stump for most standing uses). The mechanism is in great working shape, the previous owner decided to cut the last few inches of the post off, well below all of the mechanism. I will send pics to anyone interested. I have a hand injury, and I am not able to continue with all of the drawing and folding by hand. Cable offers a way to keep pattern welding without hurting myself. I also have a rr track anvil, if anyone is interested. Thanks, Kevin