
kevin (the professor)
-
Posts
222 -
Joined
-
Last visited
Content Type
Profiles
Forums
Articles
Gallery
Downloads
Events
Everything posted by kevin (the professor)
-
knife for Scoutmaster friend
kevin (the professor) replied to kevin (the professor)'s topic in Knife Making
Ecart, thanks for the reply. This one is tulipwood. I really liked this wood - its dense but pretty easy to work. It also has a really visible figure/grain. I actually have a custom order, for a knife almost like this one (shorter clip and maple handle with palm swell). So, this knife was a lot of fun to make, and I hope my friend likes it. Also - people seeing it has led to ORDER # 3! YEAH! kc -
Greetings, This little knife is one I like a lot. It has 6" blade with 4.2" handle. I hope it is just the right size for a friend of mine to carry and use. With luck, he will be able to tell the kids over and over how someone actually made the knife (without machines, without shipping it across the ocean...). This is the first time I have gone with blued fittings, and I like them a lot. I torched them, but had to follow with birchwood casey for touchup. knife is etched, with visible dif ht line. The first pic is the blade w/out hanlde but after test etch. This wood is workable but pretty dense. I like it a lot. Thanks for looking, Kevin
-
That type of scraper works for me, but it works best with really narrow grooves with steep, v-like or u-like bottoms. I left the bit almost fully hardened. There is a youtube video with Alan Longmire showing how to make a Sam Bell type Dirk. In the first of the series, he has a simillar scraper but he put the guide finger on the scraper tool rather than clamping a piece on you work for a guide like I do. scraping is not the easiest, but I broke my flexible shaft machine. Kevin
-
Damascus steel:is this too small for a knife?
kevin (the professor) replied to SRT02's topic in Knife Making
I agree with everyone else. I would form plan (per JPH) and then have part of that plan to be a stub tang just behind ricasso and solder, braze, maybe even forge weld a mild steel tang so that you have a complete "stick tang" that is almost all some other material. That way, you can forge that to shape and grind it clean and have a substantial blade for something like a "bird and trout" or small hunter. or hideaway type dagger, or small paring knife, or edc friction folder, or a sgian dubh, or...or... or.... or... you get it - have fun! Kevin -
Mike, thanks for the advice - my problem comes with trying to get the bevels forged. I do all of the other things (or try to) that you mentioned. I also have a modified child's baseball bat for straightening. All wood. Now, I am tipping the blade up slightly on anvil and striking with different angle. Then, I switch sides and forge from the area that is beveled back into the area that is not bevled. I do a short section of each side with each heat, and try to work up from the edge in successive courses. so, one heat I will forge from the tip back about 3 inches at the edge on each side. Next heat from the 3 inch spot to the ricasso on each side. Then, back to tip, but a little farther away from edge... I don't know if the general approach is flawed of if I am just not maintaining the same angle on the anvil and with the hammer all of the time. (maybe I need to forge from the unbeveled section into the beveled section instead of other way around - I have heard that suggested, too). Wayne Goddard mentioned the same problem in one of his books, but I can't find where he described his solution anymore. Thanks for the input - I will pay close attention to angle of hammer to give your suggestion a chance. Basically, I am going to try to eliminate all variables and manipulate one at a time until I find the cause - sort of like my day job. kc
-
Bear, that is a good suggestion. I did not have the proper stuff to do the really thin layer all over followed by thick one on spine. I just used none on edge and thick on middle with clean area on spine. wally hayes has a video about grinding a katana-like sword where he shows how to do this the proper way. I was just making good with what I had. thanks for good idea, kc
-
Frosty - I love it! thanks for the info and laugh. Yes - I am learning a little at a time about hamon, and I am getting the ability to fix or adjust more and more of the little things that often go wrong. This may seem like a really stupid recurring problem to have, but here it is: every, EVERY blade I make that is longer than 4 inches, I get a twist in the xxxx thing as I am forging in the bevels. any advice is welcomed on this issue. my ideas are that maybe I should start forging from the unforged section into the forged section? not sure, but it always happens.''
-
Hello Everyone, It has been a little longer than normal since my last knife. There are three good reasons for this. First - the work that is shown here is soooo far and away out of my league that it is a little daunting. But, I need the advice and encouragement, so here goes. I just have to keep telling myself that with 10-15 years of work... Second, related to first, I am becoming more obsessive, and my definition of "finished" is receding into the distance. Third - I accidentally let this knife hear that I was planning a trip to Austin without it. The thing jumped from vise and put a 7-stitch cut across the palm and heel of my left hand before I could subdue it. Jealous freak! So, here it is. 7" blade 1.25" wide 1095 with clay ht according to friend's test files (error inherent) - RC 57-59 edge, RC 52-54 middle of blade, and 54-56 spine one more thing - I learned that when one uses a thick layer of clay, the differential hardening line (insert Japanese term here for ignorant Texan)is a couple of mm away from where the clay actually stops.. I decided to go with this because I read that the weapons that broke in a certain era of Japanese history were those that had more than 1/3 of the blade either hardened or in transition. That won't be a problem here . So, thanks for looking. Comments always welcomed. Kevin
-
Mutt - yeah, I normally forge mine into an octagon or a square, and then forge them into a flat rectangle (pretty much like bar stock, just over 1/4" thick and 1" to 1.5" wide). It just makes sure that any voids or delams deep inside the material are stuck together. If they happen to come out rectangular to begin with, then I hammer them so that the dimensions swap, the slightly longer side of the rectangle becomes the slightly shorter side and vice versa. kc
-
Hey - I am from Texas and I lived in Austin for 2 years when I was 20-22. I am staying on 6th street! Just wondering about knife stuff while I am there. kc
-
Do what John N said. Just to be certain, as I mentioned before in a ramble, I deliberately hammer it enough to significantly change the cross section at a welding heat. So, the way I hammer, the cable is essentially an octagon when I have done two or three welding courses. Once I think it is probably a bar, and I have reached the point where the coating of decarb and old flux on the outside plus the outer welded material protect the inside from further oxidation and decarb. So, I have an octagonal bar of steel with a buch of crap on the outside. I do one more course at welding heat, and I think it is really important - forge to significantly change the cross-section of the bar while at welding heat. This major change in shape solidifies the existing welds and locates any voids or delaminations. I am used to starting with 1 to 1.5 inch wide, .25" thick bar stock. So, I hammer the cable billet into a flat and long rectangle. Then, grind ALL of the junk off of the outside. It is ok to cut little channels into the billet where the natural indentions from the cable twist require more and deeper grinding. This way, you don't have to sacrifice as much metal off of the surface as you would if you flat ground to remove the same stuff. Also, when done, hammer the bar flat again to remove the channels from the grind. This can not only make the welds better, it can make the pattern more interesting also. That's my process. I haven't done it a lot, but it has worked well the few times. Look at the two I have posted now from cable recently. It appears to wok
-
Stanley, Damn shame I have moved away. I am from Huntsville. I bought a truck in Waller once. I will be in Austin on 17-19, is there anything in the custom knife world you would suggest I see if I get some free time while I am there? I am testifying in a trial, but maybe will be free on Friday. I am learning, and Austin is my favorite city. Let me know if anything in the knife world is a must see while I am there. take care. Loved the cable and bone knife on website. kevin
-
I agree with everyone else - you are now burning the cable. Get a new piece, burn the lubricant out in forge. When stops smoking and burning, flux. to be safe, test forge with plain flat bar of carbon steel and make sure you are hot enough to weld that bar but not so hot that you burn it. Just stick two bars together with flux and tap lightly on anvil. If they stick, move on to cable. flux, put in forge to soak, make sure whole thing is welding heat but none of it is sparking and burning. If you see sparklers, it is too late, get it out of the heat immediately. You will have to grind off outer layer if that happens. When you reach the yellow-white heat (seen through protective glasses to not burn your eyes), put immediately on anvil and hit rapidly and firmly (not real hard) with hammer. Fee it stick, keep hitting fast as you can with firm blows until the heat drops (about 10-15 secs). Hit one side 6 r 8 times, rotate 90deg and hit 6 or 8 times. Flux, back in forge, heat, back to anvil, this time rotate 45deg, hit 6 or 8 times, then rotate 90 deg and hit six or 8 times. Work in overlapping sections down the bar (with two heats dedicated to each section as described above). After TWO courses of this, I then do another course at welding heat where I forge the cable billet into a rectangular cross section. If it is already rectangular, then I forge it to invert the short and long sides of the rectangle. This last forging complete with significant change in cross section makes sure that the whole thing has actually welded. sorry for long response - but this has worked well for me. Also, get good tongs so you can hold the darn stuff. Kevin
-
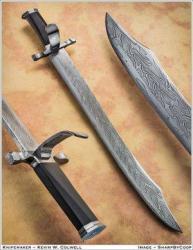
cable san mai single edge boot dagger
kevin (the professor) replied to kevin (the professor)'s topic in Knife Making
thanks for your input. Remember, this is a long and slim knife, so when you hold the handle it does not seem big at all. In the photo, the front portion of the handle, the swell near the bolster/guard, does look a little disproportionate. It really only comes about a centimeter below the ricasso. It feels really good in my hand, but I have a big hand. If I was going to make this type of knife in volume, I would learn to make full-tang and just rivet really thin handle slabs to it. Still, I like this one, too. Taste is personal, I guess. take care, Kevin -
Greetings Everyone, This one is a little different for me. I have a Mexican-American buddy who wired my shop in return for a knife. He wanted to play a joke along the ethnic theme, so he asked me to make him a concealable knife. He also liked cable and birdeye maple. Here is the result, a single-edged cable and 1095 san mai dagger with a single edge. It has a spear point, and the first half inch of false edge is sharpened to give point really good penetrating ability without losing integrity. 6" blade .75" wide 10.5" oal lightly etched in vinegar. handle sealed with linseed oil. This was my first time using san mai construction in conjunction with cable. I like the look, and hope to try it on a much larger seax soon. Or, at least a cable back and a 1095 edge. Thanks for looking. As always, comments are encouraged. As you all know by now, I am trying to learn without a local teacher, and I benefit greatly from the comments I receive from peers and experts here. take care, Kevin
-
cable hunter for trade
kevin (the professor) replied to kevin (the professor)'s topic in Knife Making
Hey, thanks guys. heat treat - I took a small bit first and verified that it would harden in oil. just cool oil. It depends on the diameter of the original cable - Wayne Goddard has a discussion of the relationship between decarb and overall cable diameter in one of his books. If you have a fairly large cable to start (around 1" dia), and you flux and control forge atmosphere and grind away decarb... then oil should work. Any less diameter, and you will likely need warm water or even brine. I just ground last of decarb off, normalized 3x, and heated just past critical and quenced in light canola oil. Then, 3x temper at 390 F. I left it a little lower temper than monosteel since there would be bands of iron around bands of steel due to decar and since it is only a 5" blade. thanks for asking. I am no expert, but it came out well for me. This is the 4th knife from the same big bit of cable, so I had time to practice on this specific steel. Kevin -
cable hunter for trade
kevin (the professor) replied to kevin (the professor)'s topic in Knife Making
I am terrible at sheaths, and I don't really like to make them. He could probably make a better one himself. Of course, he could probably make a better knife himself, too, but... Its about reciprocity. Knife karma... kc -
Hello Everyone, I am posting a photo of a knife I made as part of a trade for materials. I am sending this back to the person who gave me a few lengths of cable as a show of grattitude. It has 5" blade 4.5" handle. walnut handle, brass bolster and butt cap, leather spacers. I hope he likes it. Advice, comments, etc. are welcomed. thanks for looking, Kevin
-
I like it for a first, too. Its good for any really. You should round the handles over and then take sandpaper (I use 2, 4, and 600). first polish to within an inch of its life vertically with each one, and then repeat same cruel sanding using the "shoe shine" method. Take a 2 inch wide strip of sand paper as long as you can get (about 11 inches if you have sheets). Fold strip in half for strength, and now shoe shine away by pulling the length of the strip back and forth horizontally across the kinfe handle (with knife sticking straight up and down and paper wrapped around half of handle in a U shape). When one side of paper loads, flip the strip. So, 200 up and down, 200 round and round... 400, " ", 600 " ". Then, rub well with finest steel wool you can get. Finally, rub with linseed oil, let sit about 5 with excess oil and then rub in vigorously. Then, slather lot of linseed oil on and let sit over an hour, rub vigorously, repeat several times, only increasing the time interval of the soak before rubbing each time. The heat from friction and rubbing with soft cloth is supposed to help linseed oil polymerize inside wood and form protective barrier. If you rasp, file, or belt sand the edges off of the handle and then give the finish treatment I described, you get a "traditional" finish. Also, it is MAGIC, one of the most enjoyable moments in knifemaking is the first time you put linseed oil on a freshly sanded handle. You won't know the true beauty of the wood until this moment, and then it jumps out. Kevin
-
Really nice work. The parts all "fit" to make a nice concept and tool. I like it a lot. I agree with the leather comments, too. I am having enough of a time learning to work iron and steel. These additions of leather, wood, copper, brass ... not to mention photography. I have always been impressed by the skills you guys have, but the more I try it myself, the more I recognize your artistry. very well done. kevin
-
kukri (getting busy in new shop!)
kevin (the professor) replied to kevin (the professor)'s topic in Knife Making
Thanks mark and HWoolridge, this thing would be a fierce chopper and even with the slightly rounded spear point, it would stab pretty well. There is a good taper from elbow to tip, and with the wide and slightly convex bevel... It chops better than a small machete that I made that is 3 inches longer. Easier to carry, too. Wouldn't want to fence with it, but it would work in a trench. Or, um, in my back yard on rouge maple saplings... kc -
Hello Everyone, I have managed to complete a working kukri to use in trimming some of the small stuff in my new back yard (partially forested). Besides, I wanted one of these to take camping. If you can believe it, I sold the other kukri I made. It is not as "finished" as it could be, but I like it a lot for a real workhorse. It chops and slices like a fiend. Also, you can't tell it, but the whole darn thing is one big weld. I only had 1.25" x 1" 1095 on stock, and I wanted a wider blade. So, I had to weld two bars together to get enough mass. The weld is visible on the spine, but it is invisible everywhere else! For me, getting two pieces of 11" long stock to weld perfectly was a big accomplishment. blade: 12" (around curve and all), 10.5" from point to guard. 3/16" @ elbow 1/16" @ point 1.7" wide at widest 1095 from Admiral Steel Rosewood, brass, and leather. this was fun to make, I forged closer to final product on this than on the last kuk, I have learned to use the edges of the anvil to work bevels down more (or I should say, I am beginning to learn this skill and I played with it on this knife). comments welcome. Thanks for looking. Kevin
-
Thanks, Yeah, they will collect a deep layer of grit, sawdust, oil, and a little blood over the coming years. I apologize that I need to learn to take better photos. I am really lousy with cameras. Esp. digital ones. I understand the old fashioned kind better. thanks for looking, kc
-
Hello Everyone, this is a set of pics from my new shop and of the first knife I have made since moving into it. I have been busy building things for the shop since we bought our first home, and now I have to catch up with making knives.You will also see my new Grizzly grinder in the pics. It is an amazing step up from the Delta 1/4hp I was using. quiet and smooth, too. But, I still use the Delta for handles, smaller belt width and slower speed. Knife: welded cable about 11.5" blade 16" oal bird's eye maple, leather spacer, and nickel silver fittings I am going to weld more cable soon. It is great to see patter up close. thanks for looking, Kevin
-
that is great for an early knife. I like it on its own merrit, especially given it is one of your first. Great. Kevin