kevin (the professor)
Members
-
Joined
-
Last visited
Everything posted by kevin (the professor)
-
I put the new link in the first post, too. https://picasaweb.google.com/115247891742386906523/DaoForJim#
-
Hello Everyone, this is what I have really been working on for the last 2-3 weeks, with periodic breaks to make the full-tangs. This is a GIFT to a friend who is retiring. It will be named "Brainslicer" since he is a bio-psychologist. He is also a Viet Nam vet and has practiced Japanese and Chinese martial arts since the late 60's. He will really be thrilled with this. This is far from "perfect" and nothing like what many of you can make. Still, this one came out better than I expected it could. W2 steel (thanks Aldo) 22.5" working length 1.37" wide at shoulders, 1.26" wide just before tip .30" thick at ridge at shoulders, .24" just befor tip. this blade is light - it weighs 1.48lb. 10" tang, for now. Last 3.5", the secondary bevel is "scraping sharp." There is a pic of the clay layout in there, too. This formed a hamon closer to the edge than I expected, but with a lot of utsuri from partial hardening. I used semichrome when polishing, and this made the utsuri a lot harder to see. I may just stick to sandpaper in the future. the first link should take you to picasa. You will see larger pics if you click on the link. https://picasaweb.google.com/115247891742386906523/DaoForJim# thanks for looking. Comments encouraged. I learn from y'all. Kevin
-
oh yeah - Riverside Machine - 2x72 bader clone with modifications, variable speed, 1.5 hp, DELIVERED for less than 2K. This is a serious grinder. Totally Enclosed, Fan Cooled motor, NEMA whatever enclosed electronics.... You could hit this thing with a high pressure washer and not hurt the electrical components, and no dust can get to any of the workings. This is the same quality as a burr king or bader, and the only real difference between this and a kmg is that the supports for the tooling arm are cut from large billets of aluminum (3/4" thick aluminum, so don't even suggest that they might bend or work themselves apart over time). Its not like the grinder in a box kits, where everything is put together from square steel tubing. This thing is built very, very solidly. I can't directly compare to kmg's because I haven't used one. However, I am aware that they are quite good. This grinder is better than the Bader BIII and the Burr King knifemaker's grinders. And a LOT less expensive. as you can guess, I highly recommend Al's grinder (and his hydraulic press). kc
-
Yeah, there was probably a difference in the hardness across the blade. also, dilute the ferric to about 1 part to 4, ferric to water. Then, just etch for about 30 seconds and look at it. You may find that a short etch is better. A more dilute solution will help bring out the differences. Make sure the whole thing is well and truly polished first, then degrease (windex will do this just fine), then etch. sorry if you already know the stuff I am saying. I am just trying to help. kc
-
I could never get full-tang knives to work, either. Until, I got the new variable speed grinder from Riverside Machine. One of the facebook links shows it. The grinder is essentially a Bader clone, but with a lot of unique features that Al (who owns the shop) came up with. It is a wonderful machine, and getting it opened up a number of doors in terms of fit and finish (and pleasure). There are things I can do with it that I could only do by hand before. Yeah - I beat the heck out of the blade with a little ball peen hammer to drive the scale in, and to also give a small secondary bevel so that I could be assured that I would not accidentally grind all of the scale away when grinding the main bevel. kc
-
Gene, thanks for letting me know. I have the Picasa links fixed. I had to add one to each knife. take care, kc
-
43ab0591af4a1ddb2a2b593bcf72e4ba
-
honestly, I was thinking of making something that looked like a smaller version of a Chinese broadsword. A couple of others have noticed the lineage, too. thanks for the comments. I wanted to make something fun out of monosteel while I was waiting for my hydraulic press to arrive. I will be on a damascus binge after this. kc
-
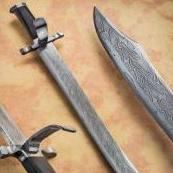
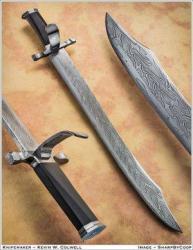
Hello Everyone, I don't think I posted this one here. It is a take-off on a cutlass. It has a plate guard instead of a knuckle bow due to a joke on another forum about ninja pirates and a piece made along that line by Jake Cleland of Skye Knives. So, here is my take on that theme. It has a 12" blade, and there is a very active hamon under there. I have polished it better, but my camera is on the fritz. So, this is the best I have. The hamon is so active that one learned friend is pressing me to re-fit this as a wak. I accidentally stumbled upon the right heat range to get a really active area of transition. I hope I can do it again when I try deliberately! This one was made just for fun. It does have a wicked chopping/slicing ability, though. Hope you enjoy this in the jocular spirit that I made it. Kevin
-
Rich - I can't say a lot about my level of knowledge, but that is a very well-made and beautiful knife. kc
-
good start. My first blade was ugly. Yours is not. Good sign. The main thing is to share pics and pay attention to what you like in other knives ( and what you don't like). Most of all, listen to the guys on these forums. I only have 18 months of experience. many of these guys have more years than I have months in this craft/art. Luckily, they like to teach and share. If I were you, I would focus on hand-sanding. Take sand paper and wrap it or attach it to something hard and flat. I use a bar of brass or a bar of steel. Then, use this sanding implement like a draw-file. Spend about 5 times the amount of time you think you need with 80 or 100 grit and then move up through the grits. With the first grit, you are actually taking dips and waives out of the steel, as well as any scratches from filing and grinding. After the first grit (there are no maching scratches and there are no dips or waves in the blade), then you are just polishing. You only need to use each successive grit long enough to remove the scratches from the previous ones. For the final two grits you use, make sure that you always start each pass as far up the blade toward the handle as possible and run the entire length of the blade. This will take all swirls and stuff out. Everywhere you change direction while sanding with the paper touching the blade, there will be a little swirl scratched into the blade. You need to get rid of these with the last two passes. Come to think of it, your last several passes at each grit should be full-length, too. There is no way that scratches and dips will come out of a blade on their own. Sadly, as you get better, you will become better at finding these imperfections, which means you will spend more time doing this part. Don't try to sand without a hard backing, it is terrible for your fingers, and the paper just follows the dips and such in the blade. good work. keep showing your progress. Kevin
-
Hello Everyone, I am posting pics of a seax-like thing and a matching maple sheath. This was made to replace the seax that was stolen in the mail. I have found a UPS store where I can trust the people to actually send my packages. I felt bad for the guy who paid me and got ripped-off, so I made this for him. Yes, I have been on a seax trend. 2 reasons - 1, they are from my favorite historical period, and 2, they are the only thing people keep offering me money to make for them. My press should be shipped this week, and I need some cash to catch up. That being said, this is actually the best I have ever done with fit and finish, though it lacks some. I bought some maple and walnut (this is the maple) from a luthier's supply. This let me make the handle and scabbard by chiseling and routing and then gluing the halves together. For me, this was a lot better. It was more precise than drilling through a block. (thanks to Walter Sorrells and Jesus Hernandez for posting the info on their websites that led me to do things this way). This knife is very, very beefy. 11" blade, 1.5" wide. Spine is 15n20 and 1080, rest of blade is two more bars of mono 1080. copper spacers to match the copper on sheath (I found a use for my old heating pipes!). One big mistake, I cut the handle so that the stripes of the chatoyance run the length of the handle rather than across it. So, it does not look as vibrant as the sheath. Big OOPS there. Hopefully, the next one will be a high layer count type of p-weld (cause of my press). Thanks for looking. Comments are welcomed. Kevin
-
OK - I can't take it. I had to change the angle of the handle a little. The pics let me see something that needed to change. So, here is the knife now.
-
Thanks for the positive feedback. I have sort of gotten into this style lately. I will probably go for longer stuff and higher layers and/or more bars when the press gets here. I orderd a press from Uncle Al's Riverside Machine. It seemed pretty good for the price, and he has a dedicated shop of support staff. I spoke with Ron Claiborne, and was probably going to buy one from him, but he is booked until around February. It was a close call in my eyes between them, but the time factor made the decision. I am a college prof, and my best time for bladesmithing is in the summer. I still want to make viking period stuff, but I want to branch out some, too. kc
-
Hello Everyone, I have made a working sized seax with the blade shape roughly based on some museum pics. It has a 6" blade, a 4.25" handle. The spine is wrought iron (with a lot of character), the working edge is 9 layers of 1080 and 15n20,with a twist for looks. I am hoping to move into longer stuff and more bars or more layers soon, when my hydraulic press gets shipped. I think this is a pretty good little knife, in that it approaches a historicall shape. I am at a point where I can see my mistakes much better than I can fix them, so I am at times frustrated. But, I love this stuff, and hope to keep learning. comments are welcomed. After all, I learn from you guys more than anyone else. thanks for looking, Kevin
-
uh - wow. I don't remember the exact process and composition, but I do remember some bits and pieces. If you have a link to a thread describing how the steel was made or what it is in terms of hada and continuity of lines in the geometry. But, as I always say, I am not an expert on Japanese blades. I hope this sword is both used and displayed by someone who appreciates what they have. thanks a lot for sharing. Kevin
-
You may be able to order through McMaster Carr. I don't know if the delivery will kill you. http://www.mcmaster.com/#steel/=7c7fmt you can get all of the steels that Steve mentioned and many of the ones I mentioned through them. Try to find something with nickel if you want a bright steel color in the mix. If you go to sorrell's site, he has some subtle hada on swords from mixes sort of like you are planning. best of luck, kc
-
try to find a steel with nickel and carbon above 40 points. Even better, nickel and carbon above 60 points. That way, it will fully harden. Nickel does not etch much and stays more shiny or siver-gray. Higher carbon steels become darker gray (so two basic tool steels will contrast slightly in that more carbon becomes darker). Manganese makes carbon steel get DARK. people in US use 1080 and 15n20 or 8670 or 8620. 1080 is a high-carbon tool steel with more manganese than any of the others, 15n20 is just 1070 plus nickel. 8670 is a good alloy with nickel (kind of like L6) and 60 points of carbon. 8620 is the same, but with only 20 points of carbon. People here used to use a203E, which is a pressure vessel steel that has not enough carbon but a lot of nickel. If you have to mix in a steel with little carbon in order to get nickel, then make sure the average proportion of carbon in the blade is greater than 60 points. Do this by balancing the mix ratios of the nickel bearing and the high carbon steels. Or, you can mix barely different steels like 01 and w2, or 1080 and w2, to get a very subtle pattern. It really looks like a hada from a japanese sword. Go to Walter Sorrell's website and look closely at the description and surface of his blades. Also, go to www.atar.com This is Dr. Jim Hrisoulas's website, and read what he says, look at his pics and process description. Buy his books, buy his vidoe, shake his hand, etc. he has great info for starting out through seasoned pro. Kevin
-
go with Matt - he knows what he is writing. either forge or just get a bar of steel and grind away the parts that don't look like a knife. or, cast bronze and hammer the edges to make them hard. that would be a heck of a project, and really beautiful. kc
-
so - let me get this right, you did not make that by using a can or a press? That is really neat! I am biased against the poweder/can type of damascus. Don't really know why, I just am. But - what you made is really cool. I mistakenly thought that you pretty much had to use a can to do that. Live and learn. Very good work. Please show us the final blade, too. Kevin
-
I am impressed by your work. Especially the fact that you do not use powders. I do not know why exactly, but I do not have the same level of respect for powedered mosaic as I do for the "old" ways. Beautiful work, thank you for sharing. Kevin
-
Mark - I am truly impressed at the craft and skill. nice work. kc
-
thanks guys. I have actually already sold this knife, but the person buying it wants me to take the money he sent a buy a stamp, then stamp the blade, then send it to him. He is hoping that my firsted stamped blade could be a good one to own. Not quitting the day job, but i do have summers where I don't have to teach, and I can make knives. I soaked the leather in oil for a day, and then sealed it with a couple of coats of superglue. I am hoping that does it. I have been working hard to try and get things more smooth and flowing. handle is finishe with linseed oil with just a little beeswax melted into it. Kevin
-
Vinegar actually works, but it takes all night. I etched a lot in vinegar. I now use ferric chloride, diluted 3 or 4 to 1, but I buy it from a chemical supply. So, 3 to 1 would be better if you have the RS etchant. You really, really should get Dr. Jim Hrisoulas's books. You can order them from libraries, they are online, etc. I even have the old vhs videos that a friend traded me for a bowie knife I forged. I just watched a lecture by Don Fogg, and he said that he stopped using all of the powerful acids due to safety and environmental reasons and because the ferric works so much better and is not dangerous. I would rec' following these guys' lead. One thing to remember is to get ALL of the oil and dirt and fingerprints off. It is harder to do than you think (or it is for me because I forget and keep getting more xxxx on the knife when I try to clean it). good luck kc
-
congratulations. that seems to be a beautiful blade. I like the shallow fuller. Can't wait to see it etched. kc